The Rapid Elearning Blog

Archive for January, 2018


3D models in PowerPoint

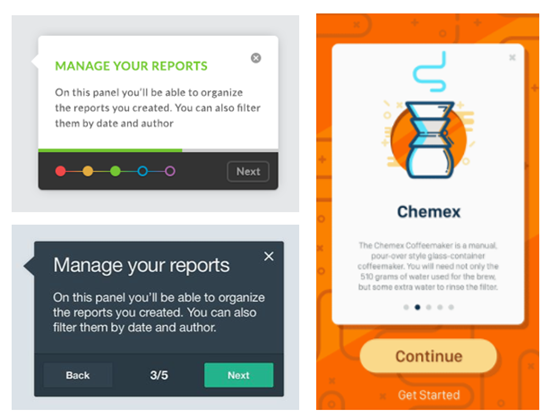
I shared a cool 3D interaction in a recent workshop demo and have had lots of people ask how I built it. You can check out the interaction in this Rise demo.

Creating the interaction is a two-step process:

  • The first step is creating a video of the 3D model as it rotates in and out.
  • The second step is to insert the video and add interactive elements in Storyline.
  • In the case of the Mars Rover module, there’s a third step because inserted the interactive Storyline module into Rise. This is pretty cool because it allows for really simple and fast authoring in Rise, and then when I need custom interactions, I just build them in Storyline. It’s a win-win.

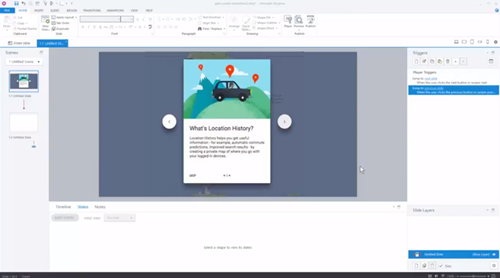
Here’s a previous post where I detailed more of the construction of the Rise demo. For today’s post, I’ll show you how to create the 3D video you’ll use for a Storyline interaction. The tutorial below shows how to create the video using 3D models in PowerPoint.

Click here to view the tutorial on YouTube.

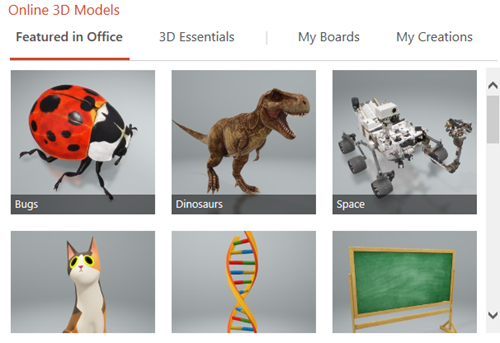
Insert 3D Models in PowerPoint

PowerPoint comes with a number of 3D models. It also supports inserting models shared by the community. You can also build your own 3D models and insert them using standard 3D formats

3D models in PowerPoint

Most likely you’ll want to insert your own 3D object. So it’s nice that PowerPoint supports the common 3D file formats. Here are the supported 3D formats for PowerPoint:

  • .FBX
  • .OBJ
  • .3MF
  • .PLY
  • .STL
  • .GLB

How to insert the 3D model in PowerPoint:

  • Create a slide and then select a 3D object.
  • Insert it just like you would a shape or picture.
  • Position the object on the screen.
  • Duplicate the slide (we’ll need this for the video).

Create the 3D Animation in PowerPoint

The first slide is the starting point from which the 3D object rotates. The second slide is the rotation point. You’ll need to rotate the object so that the position changes from slide 1 to slide 2. You can also move and scale it.

3D models in PowerPoint


  • Reposition the object by either scaling, rotating, or moving it on the slide.
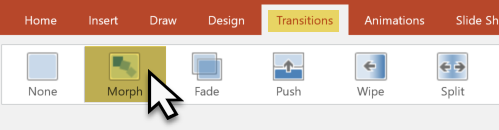
  • Go to slide transitions and select a morph transition for slide 2.
  • Preview the slideshow.

3D models PowerPoint

On preview, you’ll see how the 3D object uses the morph transition to change positions. Pretty slick, huh?

Fine-tune Slide Transitions for 3D models in PowerPoint

That’s the essence of the 3D animation. Now it’s a matter of fine-tuning the animation by playing with the slide timings.

When all is done, the PowerPoint slides will be saved as a video file. That means the animations and transitions need to be automated.

3D models in PowerPoint 3D PowerPoint morph transition timing

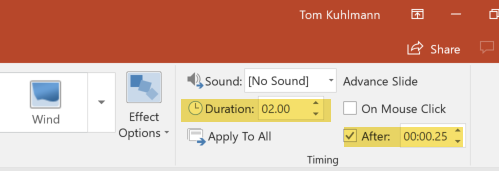
  • In the Transitions tab, go to Advance Slide and select to advance after X time. That means the slide will automatically advance at a certain time and doesn’t require you to do anything to trigger the slide movement.
  • Slide 1 is just the starting point so it needs to advance as quickly as possible. I usually set it to advance after .25 seconds.
  • Slide 2 will trigger the morph animation. On slide 2 you can change the speed of the 3D animation by changing the slide duration.
  • Slide 3 (optional) is great if you want to create the sense that the object rotated in and out like the Mars Rover demo.

Save the PowerPoint file as a Video

When all is done, save the PowerPoint file as a video. You have two options: .MP4 and .WMV.

The MP4 format works well but I did find that when I use it with Storyline, the last part of the .MP4 always seems jumpy. It probably has to do with how the .MP4 is encoded by PowerPoint. So if I am using the video to build an interactive file, I save it as a .WMV. Then I let Storyline do the conversion. That resolves any issues you may experience.

That’s basically it for the 3D model video in PowerPoint. You create the two or three slides and save as video. Once you have the video, you can insert it into Storyline or anywhere else you use video. To make it an interactive video like I did with the 3D rover, you’ll need to tune in next week where I show how to create an interactive video in Storyline.

Events

Free E-Learning Resources

Want to learn more? Check out these articles and free resources in the community.

Here’s a great job board for e-learning, instructional design, and training jobs

Participate in the weekly e-learning challenges to sharpen your skills

Get your free PowerPoint templates and free graphics & stock images.

Lots of cool e-learning examples to check out and find inspiration.

Getting Started? This e-learning 101 series and the free e-books will help.


insert emoji e-learning

In a previous post, we looked at when to use emojis in e-learning courses. There some good tips and comments in the post. Emojis add clever visual cues, but it is important to use them in a way that enhances the learning experience and doesn’t confuse it. So that’s always something to keep in mind.

The next question is how does one actually find and insert emojis. Today, I’ll show you three simple ways to add emojis to your e-learning courses.

Insert Emojis Using Keyboard Shortcuts

insert emoji keyboard e-learning

In Windows, you can add emojis using the keyboard shortcut [Windows Key + .]. And with a Mac, it’s [CTRL + CMD + Space]. I’m not sure what it is for Linux, but odds are you’re just sitting in a basement not communicating with people, so it’s probably not as critical.

I find that it can be a bit of a challenge when adding emojis via the Windows keyboard because I have to first activate the emoji screen and then start typing. But if nothing comes up while I type, I have to search; and it’s easy to accidentally add text and an emoji to what you’re typing on the screen.

Insert Emojis Using the Onscreen Windows Keyboard

insert emoji onscreen keyboard e-learning

I believe the Windows shortcut above was added in a recent version of Windows 10. If it doesn’t work for you, try accessing the touch keyboard. That’s been part of Windows for a while now.You can add it to the taskbar and then just click the icon to open the onscreen keyboard.

insert emoji with keyboard

Insert Emojis Using a Browser Extension

Each browser is going to work different (and have different options) so you’ll need to learn how to do this in a browser other than Chrome which is what I use. I added the “Emoji for Google Chrome” extension to my browser. Whenever I want to insert an emoji, I just have to click on the icon and search. I then select the emoji which gets added to the holding cell and from there I just copy and paste it.

insert emoji with Chrome browser extension e-learning

One thing to keep in mind is that the emojis will look different on different devices. For example, what you see in your browser may be different than what you see on a mobile device, which will look different than what you see in your document. They’ll still be emojis, but may not be as dynamic as the ones you inserted.

insert emojis look different

Do you have a different way of inserting emojis?

Events

Free E-Learning Resources

Want to learn more? Check out these articles and free resources in the community.

Here’s a great job board for e-learning, instructional design, and training jobs

Participate in the weekly e-learning challenges to sharpen your skills

Get your free PowerPoint templates and free graphics & stock images.

Lots of cool e-learning examples to check out and find inspiration.

Getting Started? This e-learning 101 series and the free e-books will help.


emoji for e-learning header

Emojis are the today’s hieroglyphics. I can imagine thousands of years from now as archaeologists try to reconstruct our culture. They’ll spend years collecting emoji messages and then additional years to decipher them. And after all of that time, they’ll come to learn that we worshiped the goddesses known as Kardashians.

It’s a frightening thought indeed, but one we can counteract in how we use emojis in our training programs.

What Are Emojis? 😕

The first emojis started in Japan. It literally stands for picture character. They’re often used to add emotional context to messages. Although, often they’re combined to communicate more than quick emotional cues. There’s even an emoji version of Moby Dick.

emoji moby dick for e-learning

You can learn more about emojis here:

Emojis for E-Learning Require Context to Communicate 💬

The emoji is a tiny graphic that can be used to reinforce a point, add some emotional context, or a visual bookmark. Be careful when using them to communicate ideas because you may not communicate what you really intend.

Emojis are ambiguous and open to all sorts of misunderstanding and the emojis will appear different based on the device.

If you follow any of the heated discussions around emojis you’ll notice that they comfortably sit in a nest of political correctness. This is something to keep in mind when you deal with gender, skin tones, and cultural differences. You don’t want the emoji to distract from your message.

Emoji for E-Learning Examples 💻

Here are a couple of examples of how I used emojis in a recent Rise training session. In the image below, I used the emoji as a visual cue to add some context to the title. It also makes scanning the screen easier because the emojis do add contrast. It’s a simple use where the emojis adds something to the screen but doesn’t conflict with the content and is less open to misinterpretation.

One challenge, though, is that there may not be an emoji that works for the topic at hand. Then you have to get creative. Which goes back to the warning about miscommunication and ensuring that your creative use of the emoji still communicates what you intend.

In the “Health Supplies” title, I couldn’t find a first aid kit emoji so I used the hospital. It’s not perfect but does work.

emoji e-learning

In the next example below, I used the emojis as bullet points. I like this as it adds a bit more visual interest and shows each point as distinct. But again, the same issue exists when it comes to finding the emojis that work with your content.

There was no emoji for soap or toothbrush. So I went with shower and smiley face with nice teeth (and I assume healthy gums). And there’s not a lot of options for baby wipes thus I selected the baby.

emoji e-learning

As you can see, given the right content and some thought, emojis can play a role in your e-learning course. I’m curious if you’ve used emojis in any of your courses. If so, how? And also, how was it received? Feel free to share in the comments.

Events

Free E-Learning Resources

Want to learn more? Check out these articles and free resources in the community.

Here’s a great job board for e-learning, instructional design, and training jobs

Participate in the weekly e-learning challenges to sharpen your skills

Get your free PowerPoint templates and free graphics & stock images.

Lots of cool e-learning examples to check out and find inspiration.

Getting Started? This e-learning 101 series and the free e-books will help.


e-learning instruction screen interactive start screen

It’s common that when getting to a new web service or starting a new application you see some sort of instructions or start screen. Basically, the screen freezes your interaction with the site until you’re oriented and then lets you continue. Some force the interaction and others allow you to opt-out.

Those are not much different than the gate screens I’ve written about in the past (with free downloads). The gate screen sort of does the same thing. It stops your progress, provides instructions, and lets you continue.

Examples of Start Screens

Here are some examples of different instruction screens I’ve seen online. I’m sure you’ve seen something similar.

instruction screen

examples of interactive start screen

How to Create an Interactive Start Screen

Today I’ll walk through the process of creating an interactive start screen. Below I highlight the main considerations and you can watch the video tutorial to get the details.

  • Is the screen mandatory or can the user click away at any time? I prefer the freedom to leave, however, there may be times where it’s important the person is exposed to all of the instructions. Sometimes people tend to skip out and they may benefit from not doing so, especially when it comes to matters of compliance training.
  • Does the instruction only move forward or does it go backward, as well? Probably more a matter of preference, but if they can go back make sure you build the navigation to work properly. You’ll also notice that one of the images above offers a single “continue” button thus limiting it to forward movement only.
  • Do you need the progress dots? Many of those instruction screens have dots. They’re good for progress indicators. You’ll notice that some of the screens display numbers or timelines. If you do use dots, are they clickable? Do they need to be?
  • How are the instructions displayed? Are they on cards, which seems to be the most common. Or are they displayed fullscreen? Fullscreen gives you more real estate. Cards are usually laid over the main screen with some sort of lightbox design.
  • Is the content animated? There are some nice effects you can create with entrance and exit animations. But sometimes when building these types of screens, the time it takes to make them look right, may not be worth the value you get.
  • How do the instructions end? Some disable the navigation buttons and others offer a “get started button.” The main consideration is what is the next step? If they need to continue, make that clear. Or if all they need is to close the screen, then make that clear, as well.

How-to Tutorial

Here’s a tutorial where I build a quick prototype and discuss some of the considerations and approaches you can take building an interactive start screen.

instruction screen e-learning interactive start screen tutorial

Click here to view the tutorial.

There are a lot more considerations, but those are a good start. And when you actually start to build the screens for your course, you’ll find there are many different ways to do so.

Events

Free E-Learning Resources

Want to learn more? Check out these articles and free resources in the community.

Here’s a great job board for e-learning, instructional design, and training jobs

Participate in the weekly e-learning challenges to sharpen your skills

Get your free PowerPoint templates and free graphics & stock images.

Lots of cool e-learning examples to check out and find inspiration.

Getting Started? This e-learning 101 series and the free e-books will help.