The Rapid Elearning Blog

accessories audio narration

In a previous post, we explored some inexpensive microphones for recording audio narration. However, sometimes having a microphone is not enough. There are other accessories that help put the microphone in the correct position and offer other assistance for recording the best quality audio.

In this post we’ll look at a few accessories to help get better audio quality when recording narration.

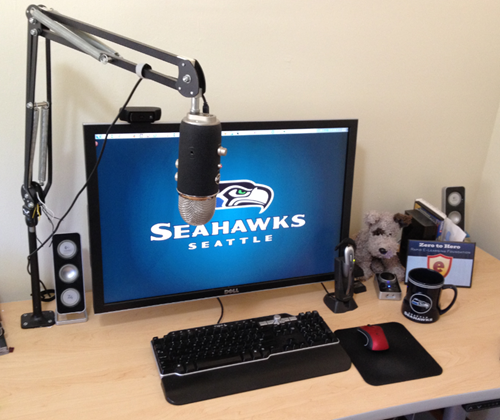
Use a Microphone Stand when Recording Audio Narration

It’s a good idea to invest in a microphone stand. It helps control placement of the audio. There are a few inexpensive options for microphone stands.

desktop microphone stand for audio narration

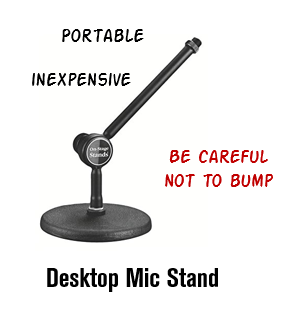
  • Some people use simple desktop stands. They’re OK but I find they often get in the way and chances are greater of accidentally bumping the stand and messing up your audio narration. This is especially important because most people just record audio and aren’t monitoring it at the same time. Thus you don’t realize that the audio has the bumping sound until you preview it.

microphone stand for audio narration

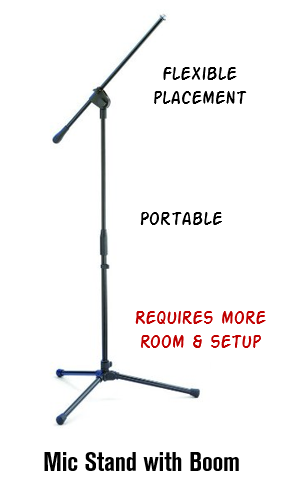
  • Depending on your room set up, a viable option is a stand up mic stand. This allows you to record standing or sitting down with lots of flexibility with how and where you position the microphone. I prefer the ones with the boom arm so that I can move it in position. With a desktop stand like above, people tend to lean down into the mic which may mean they move around more or don’t breathe properly while talking. People tend to talk better standing up and this stand lets you do so.

swing microphone stand for audio narration

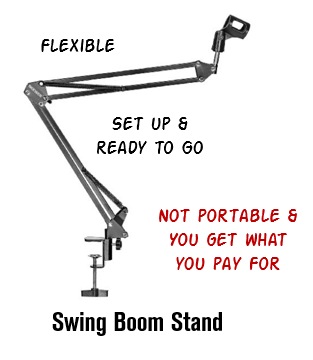
One thing to keep in mind, you get what you pay for. The less expensive products are great if you’re not moving them around too much. But moving a lot, means they’re more apt to get banged up and break.

Use Audio Dampening to Get Better Quality Audio Narration

Sound waves tend to bounce around a lot. I work from a home office and the hardwood floors in the hallway act as a funnel, moving all the sound to my office. I dampen the sounds by putting a piece of carpet in front of the door and I hang a thick blanket over a rolling clothes rack I purchased from Ikea. It doesn’t look great, but it works well.

sound dampening for audio narration

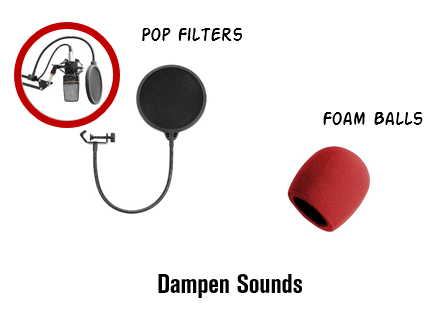
You can look more polished with just a few accessories using different types of filters that sit between your microphone and the incoming audio wave. Sometimes all you need is a simple foam ball that sits on top of the microphone. Or a pop filter which helps catch your breath sounds.

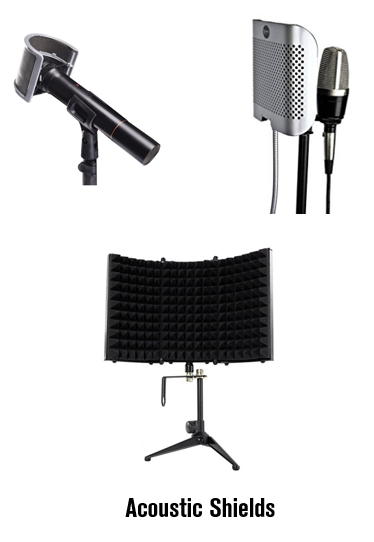
Then there are all sorts of acoustic shields that clip onto the microphone or attach to the mic stand. I like this one that expands to create a larger barrier but folds into a nice portable package.

acoustic shield for audio narration

Some people I know use the portable sound boxes that are filled with foam. You can buy them at a decent price or make your own using some acoustic foam and a cardboard box. If you work in a cubicle, it already has some sound dampening. You could also put together a makeshift studio by assembling a few cubicle walls. A lot of companies have extras laying around or you can buy some at an old office supply store. The panels are top quality and do a great job.

preamp for audio narration

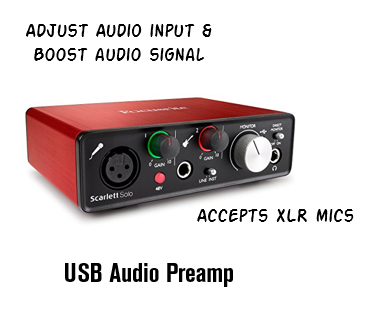
If you really want to get fancy you can buy a preamp to better control the audio going into your computer. I don’t use one, but David does and his audio quality is always nice and rich. It may seem extravagant to get a preamp, but consider this: your microphone takes in sound waves and outputs a signal. When you use a less expensive microphone you tend to get a lower signal (or low sensitivity). A preamp will boost the signal for better audio. This is important because you’ll never get better quality than what you record.

What I find amazing is how inexpensive and available these accessories are compared to a few years ago. All of the items are less than $100 and most are in the $20 range.

Which accessories do use? What tips do you have using them? Feel free to share in the comments section.

Events

Free E-Learning Resources

Want to learn more? Check out these articles and free resources in the community.

Here’s a great job board for e-learning, instructional design, and training jobs

Participate in the weekly e-learning challenges to sharpen your skills

Get your free PowerPoint templates and free graphics & stock images.

Lots of cool e-learning examples to check out and find inspiration.

Getting Started? This e-learning 101 series and the free e-books will help.


11 responses to “Accessories for Recording Audio Narration”

December 13th, 2016

Great article! Another accessory that I use is a shock mount, used to hold a condensor microphone by elastic bands instead of rigidly on the mic stand. It helps minimize extra noise, especially if the mic stand gets bumped.

Also, I was initially planning on buying a pre-amp, but a colleague convinced me to buy a mixer instead (which includes a pre-amp) and I love it and am so glad I did, because it makes getting the sound levels right really easy, and allows for a lot of flexibility for different recording situations (I record other people rather than record myself). Yamaha makes a series of mixers (that start with MG) that have USB input/output that are great.
Another accessory are good headphones for monitoring the recording. I use Sony MDR-7506 headphones.

December 13th, 2016

Good review of some handy accessories. Instead of a pre-amp, though, you could consider a digital audio interface. These usually include mic pre-amps and connect directly to your computer. Mic pres, stand-alone or in an interface, are particularly useful when you’re using a dynamic microphone. These are unpowered mics that typically have a lower output signal than condenser mics which are powered (either internally with a battery or externally by an interface, pre-amp, or recorder).

One thing that will help reduce sibilance and p-popping is talking across the mic (slightly off-axis) instead directly at it (directly on-axis). Experiment with the best position for your mic. You want to balance reducing unwanted sounds with the clarity of your voice as moving off-axis too much will make you sound farther away.

December 13th, 2016

I should add that if you do get a Yamaha MG mixer, make sure that you use one with a USB interface so that you can take the sound directly out of the mixer and in to your computer. I initially thought they all did, but I see now that it varies depending on the model.

December 13th, 2016

I use a Blue Yeti microphone that I removed from its stand and attached to a swing boom arm clamped to my desk. I also have a pop filter attached. I found that having the mic in a desk stand did get in the way. Also, I have found that the swing boom allows me to position the mic slightly above and to the right of my mouth which makes it easier to see the computer screen from where I am reading my script, and reduces breath sounds.

December 13th, 2016

@Will: good tip on the mixer and headphones. I see Amazon has the six channel mixer a bit cheaper.

December 13th, 2016

@Dan: thanks for the tips. Do you have a preference for digital audio interfaces?

December 13th, 2016

@Ed: that’s how I do it, too. I have the mic offset which lets me see the screen and keeps me from breathing into the mic when I talk.

December 14th, 2016

I have been fortunate to narrate dozens of eLearnings. I recently added the Kaotica EyeBall to my Microphone set-up. It device completely isolates the mic from the room (not soundproof)and is giving much richer audio. In addition the Eyeball has a built in 2 layer pop filter. Very happy with it.

December 15th, 2016

@Michael: that’s pretty cool. I’ve seen something similar on Amazon where people buy the 8″ foam balls and do the same. foam ball microphone filter

I have a question: We often use a laptop to narrate. The recording area changes and we need an on-the-go solution that can be brought to different narrators in different locations. The DIY sound booth I saw here and in other places (that can be moved to different recording areas) are not large enough to hold a laptop as well as a mic. Any solution you know of, or have, that can match these needs?
Thanks!

December 23rd, 2016

@Shevi: in those circumstances you’ll want a way to control the sound coming into the mic. A unidirectional mic that only allows sound to come in at one point is a good start. And then some sort of buffer. I like the foam ball idea in the comments or one of those foam shields. Some people get really nervous when being recorded, so seeing a bunch of stuff may intimidate them. Depending one what you’re recording, a headset mic is probably fine.