


I took a stab at creating a self portrait last night. Here it is http://i.imgur.com/v9Tv6Kr.png.
How to Create Your Own Illustrated Characters in PowerPoint
July 1st, 2014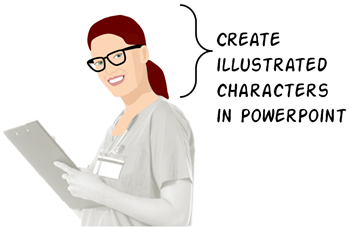
PowerPoint is a versatile application. You can use it for all sorts of things from presentations to online training programs. In previous posts I’ve shown you how to customize clip art and create your own graphics.
Today’s tip comes courtesy of blog reader, Daniel Albarrán. He sent me an email stating that once he understood the versatility of PowerPoint it opened his eyes to all sorts of possibilities—one of them being the ability to create illustrated characters.
How to Create Illustrated Characters in PowerPoint
Here are some of the graphics he created in PowerPoint.


As you can see, PowerPoint’s a capable application. Pretty cool, huh?
Tips When Creating Illustrated Characters in PowerPoint
Want to create your own illustrated characters? I created a couple of more tutorials with a few extra tips to add to what Daniel started. You can view the tutorials below.
Part 1: Working with PowerPoint’s curve shape.
Click here to watch the PowerPoint tutorial.
Part 2: Working with the custom shapes.
Click here to watch the PowerPoint tutorial.
Here’s a roundup of the PowerPoint tips:
- Practice using the Curve tool so that you can control the curve and not create too many points. The fewer the points, the easier it is to edit.
- Edit the shape. Right click on the shape to access the Edit Points feature. From there you can move the points and make adjustments and small tweaks.
- Show & hide shapes using the Selection Pane.
- Name the shapes in the Selection Pane for easier management of the image.
- Use the Shape Union feature to merge the shapes. You can also group them if you want editing control in the future.
- Right click to save the image. Select .png format to retain the transparency.
- Don’t worry about being perfect. Also, the less detail the easier it is.
- Practice, practice, practice. Once you get the hang of it, you’ll never want for the right image. Play around with the gradients and layered objects to create more texture and richness.

Here’s the character I created for the tutorials and the one Daniel shared with me. Feel free to look at how they were created.
Now it’s up to you. Do a practice character and see how it goes.
Events
- Everyday. Check out the weekly training webinars to learn more about Rise, Storyline, and instructional design.
Free E-Learning Resources
 |
 |
 |
|
Want to learn more? Check out these articles and free resources in the community. |
Here’s a great job board for e-learning, instructional design, and training jobs |
Participate in the weekly e-learning challenges to sharpen your skills |
 |
 |
 |
|
Get your free PowerPoint templates and free graphics & stock images. |
Lots of cool e-learning examples to check out and find inspiration. |
Getting Started? This e-learning 101 series and the free e-books will help. |
You might also like:
21 responses to “How to Create Your Own Illustrated Characters in PowerPoint”
Not bad, Tom!
This is a brilliant idea! I spend too much time looking for the right stock photo but I think I could use this trick to create my own. Thank you Tom!
It was nice to see how the Curve tool can be used to create illustrated characters. I think PowerPoint’s Artistic Effects options are also great for making photos look like illustrations, especially the Cutout, Paintbrush, and Pencil Grayscale options. If nothing else, one could apply an Artistic Effect to get a better idea of what shapes to draw for an even more “illustrated” look.
Here’s an animation done in Powerpoint, with text to voice dialog. https://www.youtube.com/watch?v=gYVX57YO3UU
Thanks for the tutorials. I took a stab at it just using a random photo I found. Here’s what I came up with.
Thanks Tom for the tutorial…I decided to try my hands on one picture I had on my system and create an Illustrated Character from it. It was challenging and I hope to use it more for my work…
View at
https://www.dropbox.com/s/1zqeiijy1c6si1q/boy%20illustrated%20character.png
Time…I spent almost 3 hours doing this.
@Tom: I’d say about an hour give or take. I anticipate it would get faster as I became more comfortable using all the tools, and choosing colours and gradients etc. I’m still a bit of a beginner when it comes to those things.
It’s easy and good – but can someone shed some light on copyright issues? For example, if I grab a picture at random from the internet and transform it using this technique, can I use it, or am I infringing a copyright?
Hey Tom… great tutorials and help. I’m just discovering what great tool PowerPoint can be and Illustrated Character, I’m doing a lot with it now! Now I shouldn’t have issues with getting & creating images for my blog.
The first Illustrated Character I designed yesterday was
https://www.dropbox.com/s/1zqeiijy1c6si1q/boy%20illustrated%20character.png
I have since done a few others and I think it is getting better and faster.
Thanks and great work!
Hi Tom, your self portrait is very good! And your tutorials (with those nice singing birds in the background) are great. An additional tip is using Ctrl, Alt and Shift keys when drawing and manipulating the dots, I´ve noticed that they give a softer control.
What’s the next step? Animation?
For example, might one be able to do a stop motion type video using only the mouth to synch with audio. Yes, it might have a Monty Python feel to it but that could be an attention getter in itself. Do all of this on a green or blue background and use chroma key to bring your character onto a stage such as in front of a PowerPoint presentation.
Thank you for these great tutorials, Daniel and Tom! I had fun with this and created my Articulate Community profile using PowerPoint after watching your videos. 🙂
http://community.articulate.com/members/AmyIannucci/default.aspx
It took a couple hours and could still use some work, but it was good practice with the Curve tool, which I’m not used to using.
Thanks for the tips!
Cool and powerful
Thanks for creating this, Tom. You have a gift for coming up with and explaining useful tips. Dig the self-portrait, btw.
Leggi qui la traduzione in italiano autorizzata:


0
comments