Articulate 101: 7 Secrets of the Slide Properties Manager
This is the 6th post in the Articulate 101 series. It was written by Articulate VP of Community Tom Kuhlmann.
I read once that we only use 10% of our brain’s power. My wife’s been on record to affirm that it’s definitely true for me. The same can be said for the software we use.
I get to see hundreds of courses built with Articulate software and I can tell you that many people are just touching the tip of the iceberg when it comes to using the tools’ features and functionality.
Today, I am going to show you seven ways to use the properties manager so that you can leverage the software you use to build your rapid elearning courses. At the end of the post, I’ll put you on a scavenger hunt to identify how I used some of these tips to build a sample elearning course.
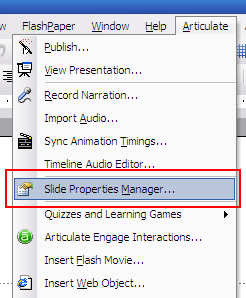
Before we get started, I’ll point out that you can access the Slide Properties Manager from the Articulate drop-down menu in PowerPoint.
Inside you can manage the properties of your slides, such as the following:
- Change the slide titles
- Create slide sub-groups
- Alternate between slide views
- Change presenters
- Assign background audio
- Control how the slide advances
- Hide slides from view
Let’s take a quick tour of these features and discuss some ways you can leverage them to make your elearning courses more effective.
1: Change the Slide Title in Your Player Menu
By default, Presenter will pull in the PowerPoint slide title and use that for the title in the player menu. However, there are times where this doesn’t work for you. For example, what if you have a really long slide title and don’t want that title to appear on the menu? Or, what if you have a blank slide that has no title?
That’s easy enough to fix in the Slide Properties Manager. In the “Display in Navigation As” column, you can type in your own slide title.

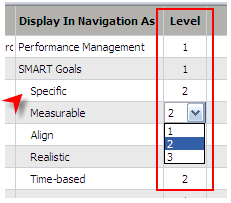
2: Create a Slide Hierarchy by Changing the Slide Level
The Slide Properties Manager lets you create slide hierarchies. This is a good way to break your course into sections. To do so, go into the Slide Properties Manager, select your slide and change the level.
If you look at the image below, you’ll notice that the slides at a lower level are indented so that it’s easy to tell where the sections start and stop.
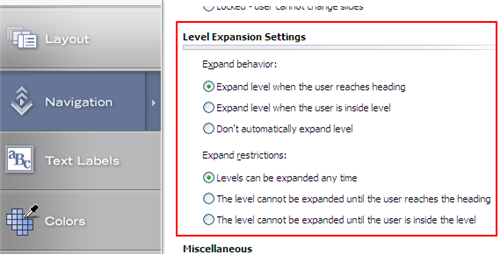
Once you have slides set at different levels, you can control how they appear in the player by modifying the navigation options in the Player Template Builder.
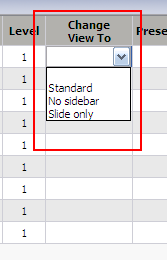
3: Claim More Screen Real Estate by Changing Slide Views

The Presenter player gives you three view options. You have the standard view with a menu on the side. There’s a view with no menu. And the final choice is a slide only view.
Why would you change views during your course?
I like to go with no menu when I want more control of how the content is displayed. For example, in this presentation I did for a school project, having a menu wasn’t critical. Besides, the learner could always get to the menu by clicking the display button in the lower right corner.
The “slide only” view is a good option when I have the need for more screen space. This works well when I insert additional media files like Flash, Quizmaker quizzes, or Engage interactions and want to show them as large as possible.
If you want the slide to change views during the course, go to the Slide Properties Manager, select your slide, and then choose the desired view from the drop-down menu.
By default, the following slide will stay in the changed view unless you go in and change it back to the original view:
4: Use Multiple Presenters in Your E-Learning Course by Changing the Presenter at the Slide Level
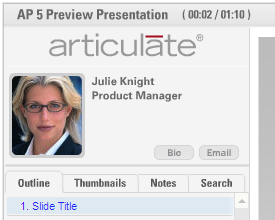
It is common for elearning courses to feature a presenter in the player’s presenter panel.
To have the presenter show during your course, you need to enable it in the layout view of the publish panel.
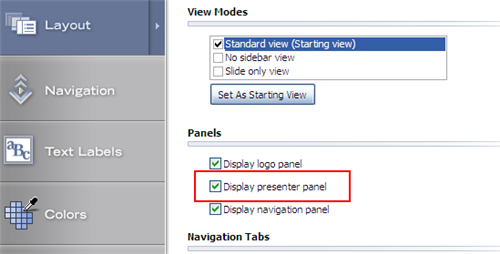
Once you have the presenter panel enabled, you can select from the presenters you have loaded in your player. From the publish menu, click on the presenter drop-down arrow and then select your presenter.
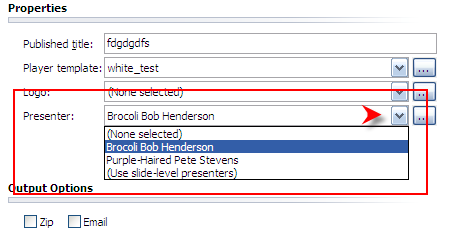
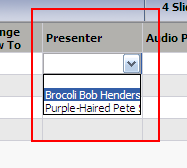
What happens when you have more than one presenter? You can change your presenter for each slide if you’d like. Just go to the Slide Properties Manager, select your slide, and then choose your presenter.
If you have the presenter panel enabled, you’ll see the presenter information change as you get to that slide with a new presenter.
5: Add Background Audio to Your E-Learning Course
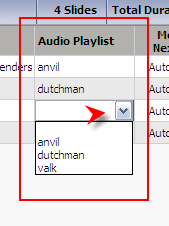
Do you want to add a nice subtle background audio track to your slides? It’s easy to do. The first thing you need to do is add an audio playlist by going to the Articulate drop-down menu, selecting “Library & Options” and then “Playlists.”
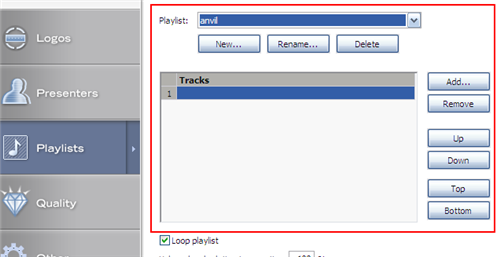
Once you have a playlist added, go to the Slide Properties Manager to assign a playlist at the slide level. Select your slide, click the playlist drop-down menu, and select the playlist you want for that slide.
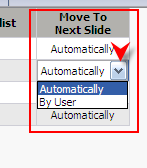
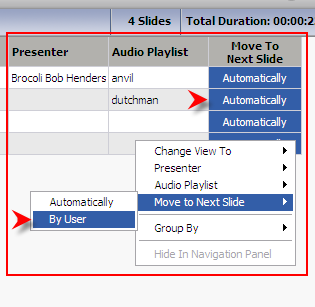
6: Control the Slide Navigation By Setting Them to Advance by User or Automatically
As a best practice, I usually set the slides to stop and wait for the user to click to advance. The reason I do this is so the user has control over the flow of the information. Sometimes the user will focus on the screen or lose track of the content and isn’t ready to advance to the next slide.
However, there are times when I will set the slides to auto advance. For example, I’ll do a progressive build of animations. To the user, it just looks like one slide. However, it might actually be a series of slides that are just auto-advancing.
To change how the slide advances, just go to the Slide Properties Manager and select whether you want it to advance automatically or by user.
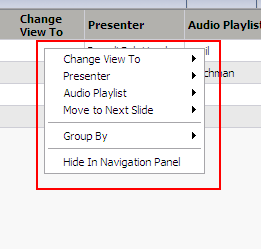
7: Right Clicking Reveals some Extras Tricks
Most software applications allow you to right-click and access shortcut menus. Articulate Presenter is no different. Go inside the Slide Properties Manager and right click. You’ll notice that all of the options available to you in the table are also in the right-click menu.
If you get used to the right-click, it can shave seconds off of your production time. This gives you more time to complain about your boss, surf the web, or set up your next office prank. If you do none of these activities and don’t need those precious seconds, there’s still an advantage to the right-click feature.
Change all of the settings at once by doing a mass edit. For example, the default setting is to advance the slides automatically. What if you have 100 slides and want them all set to advance by user? Instead of changing each one individually, select all of the slides, and then right-click and change to advance by user.
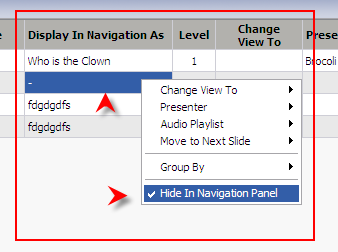
Hide the slide title from the player menu. Suppose you have a presentation where you create an animation that builds over five slides. The user only sees it as one slide because it auto-advances. Because you’re using five slides but only want it to look like one, you can hide some of the slide titles from the user. This way they only see one slide in the menu.
Keep in mind that the user can still see the slides and they are active in the presentation. However, the slide titles can’t be seen in the menu.
I use this feature a lot. For example, I build branched scenarios where the user is jumping all over the presentation. They just don’t know it because they can’t see the slide titles.
To hide the slide, right-click and then select “Hide in Navigation Panel.” You can easily tell a slide is hidden in the panel because the title is replaced with a dash. To unhide, just do the opposite and disable the hide option.
The Slide Properties Manager gives you a lot of control of your course at the slide level. By leveraging these controls you can add more power to your courses.
I built the Skyscan demo to show some of these features. Take a look at it and see if you can spot some of the tips I offered in this post:
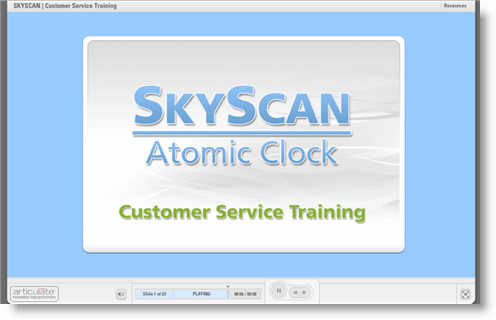
- What happens to slides 1 and 2 in the menu?
- Notice how slide 2 transitions to slide 3?
- Slide 1 starts in one view. When does it change to another and why doesn’t it go back?
- How many main pages are there?
- Why are there no numbers in the slide titles?
Subscribe to the blog via email or RSS feed to make sure you don’t miss out on tomorrow’s tip.

24 responses to “Articulate 101: 7 Secrets of the Slide Properties Manager”
I really like your tips and the SkyScan demo!
I thought that I should mention that I found a couple of spelling errors in the demo, in case you are actually creating it for a client…
Both are in the quiz section. The first one is in Question 2’s correct answer, and the second one is in Question 3.
Keep up the great work, Tom! I love reading your posts.
I can’t believe there’s a typo! I’ll fix that. I copied and pasted the text and got a little sloppy. It’s just a demo and not a real client project but still needs to be fixed. Thanks.
Hi Tom,
In your example, how did you get the numbers to disappear in the navigation panel?
Thanks!
I changed the slide title and didn’t use numbers. Look at the first point in the post and all you need to do is retype the title without the numbers. Hope that helps.
Hi Tom,
I’m new to Articulate and I’m also trying to remove the numbers from the navigation panel. None of my titles have numbers, yet each entry in the navigation panel is preceded with a number. The first entry is preceded by “1”, the second entry by “2”, and so forth. How do I prevent these numbers from being added to the TOC.
Seth, good follow up question. I forgot to add one step in the last comment. To get rid of the numbers that show in the menu, go to the player template settings. Under layout, scroll down to the bottom under slide titles, and deselect “display slide numbers…”
Hi Tom,
I use the Slide Properties Manager quite a bit, but I have one frustration. Whenever I add a new slide, “Move to Next Slide” is always “Automatic”. As a result, I often forget to change this for a new slide and don’t notice the problem until after I’ve published the course.
Is there a way to change this so that whenever I add a new slide it is set to “By User”? I’ve tried messing with my template to see if that makes a difference, but so far no luck.
Hello Kari,
Right now, there’s not a default setting. I run into the same issue. What I do is create my first slide and then go into slide properties manager and set it to “by user.”
Then I go back into the slide panel and hit ctrl+D to create a bunch of duplicates of the slides. Now all my slides are set to “by user.”
I encourage you to submit that as a feature request.
Hi,
nice presentation.
i was wondering on which image format you were using to make this presentation. It looks to me that the images still look pretty crisp after resizing the window.
This is something i’m having trouble with. I think it’s because i’m putting my content in flash and then adding it to presenter. did you use flash?(i mean the first navigation slides with the three green buttons)
anyway, nice presentation!
greetz
Hello Kristof,
The images are just .png created in Photoshop and then added to PowerPoint. Other than the PS images, the entire course is created with PowerPoint or Engage.
[…] 7 Secrets of the Slide Properties Manager […]
Hi,
I really like your tips and the SkyScan demo.
I have 1 dought, in Skycan demo you have added quiz template, which looks to good. It’s the default template or made in flash/powerpoint. Can you pls help?
–Pratik
Hello Pratik, the quiz was created in the older version of Quizmaker.
Hi,
If this template exit in new version Articulate 09 or not?
If this template exits in new version, can you explain or give me more information/detail’s. If it exit in older version, Pls let me know which version it exit.
The quiz template from that course is the default template for Quizmaker 2. We are currently at Quizmaker ’09, which has a different template.
Can i use the template of Quizmaker2, in Quizmaker ’09. If yes can you pls explain the steps, how to do it? Can we have the animated tempalte in Quizmaker ’09.
When I publish my presentation it starts at slide 100, however, I only have 72 slides. How can I fix this?
Are you using Flash player 10? If so, check out this link.
http://www.articulate.com/support/kb/002567.php
If that isn’t the case, jump into the forums so that you can get a more detailed resolution.
Hi there,
I am trying to make a main navigation page as a platform for people to explore my training-similar to the main menu page on this demo. I have no clue how to do this. Could anyone offer advice? Does this require branching? Thanks everyone. I am new to this.
@Lauryn: this post explains more about how to do it. There’s another demo and a tutorial on branching.
http://www.articulate.com/blog/heres-how-you-can-get-past-click-read-e-learning/
hi,
i’ve seen courses in developed in articulate where details about 2 presenters (images, titles, etc) are displayed on the top left. How is this possible? Can i show all the presenters involved in the introduction slide and then in subsequent slides show the main presenter alone?
Hi,
When i update some engage or quiz file, and publish the course. The audio’s are completly lost and the course is publish without the audio. Is their any solution or steps missing before publishing.
Hi Pratik,
Try the steps outlined here:
http://www.articulate.com/support/presenter09/kb/?p=643
If you continue to have difficulty, submit a case here:
http://www.articulate.com/support/contact/
I am using Studio 09 and am having difficulty getting 1 slide to auto transition after 10 minutes. I set the timer on the Powerpoint slide transition to be auto after 10 minutes; howvever, after I publish and run the course, that slide transitions as soon as the audio ends. Any ideas what I am doing wrong?
Comments are closed on this post. Need more help? Post your question in the E-Learning Heroes Discussions.