Build Interactive Scenarios in Presenter ’09
This guest blog entry was written by Articulate VP of Community Tom Kuhlmann.
I love the versatility of rapid elearning. On one hand you have people who are just getting started and using Articulate’s Rapid E-Learning Studio to create their courses. The tools work great because they can immediately apply what they’re learning about instructional design without learning to program the courses in Flash.
Then you have experienced Flash developers who are using a hybrid approach where they do some custom work in Flash and combine it with the Articulate software to create highly engaging and interactive courses. It saves them time and still lets them build the custom pieces that they need.
And then, there’s a bunch of people in the middle who are learning to leverage the tools they have. They’re not beginners and they’re not Flash programmers. But they do desire to create more interactive courses. They want to get past basic click-and-read courses and make something more interactive. But they don’t want to learn ActionScript or some other complex process.
In today’s post, I explain how to use some of the features in Presenter ’09 to create interactive branches in your courses. Once you learn to do so, a whole new world of opportunity exists. Since each slide in PowerPoint is blank, what you do with it is up to you. And by using Presenter’s new features you can create all sorts of scenarios and interactivity for your elearning courses.
The Basics of Building Interactivity in Presenter ’09
Building an interactive series of slides requires that you leverage some features in PowerPoint as well as in Presenter ’09.
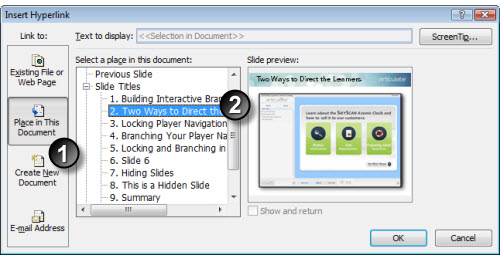
PowerPoint hyperlinking. To get from one slide to the next without using the Presenter controls you’ll need to build hyperlinks inside PowerPoint. Select your text (or object) and then hyperlink to another place in the file. In the image below, you’ll notice that you select “place in this document” and then the slide:

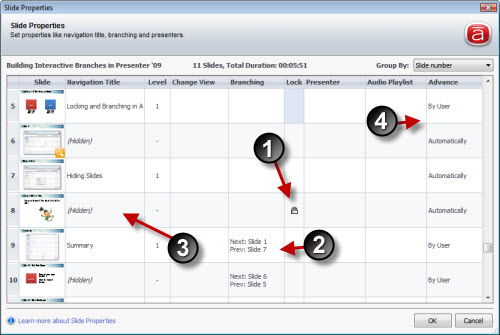
Presenter ’09 Slide Properties Manager: It’s in the slide properties where you set the branching features for your course. There are four main features that I cover below: slide locking, slide branching, hidden slides, and slide advance:

- Slide locking: Lock slides to disable the player controls. This forces the user to click on the hyperlinks in the slide.
- Branching: The branching feature lets you assign where you want the back and forward buttons to go. For example, if you use a hyperlink to go from slide 2 to slide 7, you want the slide 7 back button to go back to slide 2. You do so with the branching feature.
- Hidden slides: When you create interactive slides, you might end up with a lot of extra slides that you don’t want to show in the side menu panel. You can hide them. Then, set your branching to skip over them if you don’t want the user to accidentally click into those slides.
- Slide advance: You can set slides to advance on click or automatically. Sometimes I’ll build a series of slides that progressively build information. To the user it looks like one slide, but it might actually be ten. I have those slides set on auto-advance. This is where the branching really comes in handy. If I auto-advance from slide 3 to 10 and the user can’t tell, I will set the back button of each of those slides to go to slide 3 instead. Keep in mind that if you set forward branching on slides that auto-advance, the branching still works.
That’s a quick overview. In future posts, I’ll show different ways to create interactive slides that depend on understanding these features. For now, I’ll leave you with the following tutorial. It explains how to build interactive slides using the features in Presenter ’09. If you want to learn more about building interactive scenarios in Presenter ’09, check out the product tutorials.
One last point: Take advantage of the Articulate user community. There are a lot of really creative people in the forums who can offer some time-saving tips and best practices.
While the Articulate software is easy to learn, getting the most out of it depends on your creativity. With these new features in Presenter ’09, there’s no reason that you can’t build interactive elearning courses that will wow your learners.
In case you missed them, here are some previous posts on using Presenter ’09:
- Publish to LMS with Studio ’09
- Quickly Turn Your Podcast into an Elearning Course
- How to Get Perfect Screenshots in Presenter ’09
- Create Podcasts with Presenter ’09
- Be More Productive When Recording Narration in Presenter ’09
- Use Annotations to Save Time (& Look Like a Star)
- Don’t Worry, Mr. President. We’ve Got Your Back


3 responses to “Build Interactive Scenarios in Presenter ’09”
[…] this post, I built a quick demo using the Presenter ‘09 features that I discussed previously. The demo starts with a branched menu that discusses three ways to set up your […]
[…] about branching, I just did a couple of tutorials on the Word of Mouth blog. One explains how to use the slide properties manager in Presenter ‘09 and the other discusses how to get past click and read elearning […]
[…] artigo é uma tradução de Build Interactive Scenarios in Presenter ’09 de Tom Kuhlman, publicado em […]
Comments are closed on this post. Need more help? Post your question in the E-Learning Heroes Discussions.