How to Customize the ’Slide Only’ View of Articulate Presenter
This guest blog post was written by Articulate MVP Dave Moxon. Dave is an elearning designer and English language teacher who lives in France. He’s active in the Articulate Community Forums.
The Articulate SDK is a great way to customise your Articulate Presenter presentations, with custom Flash buttons, menus and tabs. However, not everyone has the SDK, so here are a couple of tips that can actually be gleaned from the SDK Player Preview Documentation, which is publicly available to everyone, on how to add some exciting extra features to your presentations, tips which can help you make your presentation do just what you want it to do.
No Controls, Please
Every so often, we make a presentation where we just don’t want any navigation controls on the screen, whether it be those at the bottom centre of the screen in ‘Standard View’ or those controls at the bottom right of the screen in ‘Slide Only’ view, perhaps because they may cause the student to make the publication go somewhere we don’t want it to. Some people resort to coloring the presentation in such a way as to try and make the controls invisible.
However, we are going to see that in the ‘Slide Only’ view, we have in fact a choice of three ‘modes’ or views, one of which allows us to totally remove controls in the ‘Slide only’ view, and another giving us an alternative to the standard controls that we normally use.
Most of the guidance needed to accomplish this is actually in the Preview Documentation for the Player SDK. Incidentally, there may be other ways of achieving what I am about to do.
A Choice of 3 Views
So let’s have a quick look at the three ‘slide only’ modes.
Standard
The first is the standard ‘slide only’ screen mode which you can see below and which uses controls like these in the bottom right-hand corner of the screen:
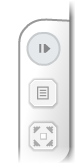
This mode is great but sometimes we don’t want our students to click on these controls or pause the presentation. The solution is generally to go into the ‘no sidebar’ view, remove navigation buttons so that the student cannot ‘interfere’ with the publication but we lose the ‘full screen’ view.
View example of ‘Standard Slide Only’ view
Floating
Another choice we have in ‘slide only’ view is to changes the controls in the bottom right-hand corner of the screen to be able to go forwards and backwards. The SDK calls these ‘floating controls’ so let’s call this the ‘Floating mode.’ You can see an example below. This is a great extra feature to our suite of settings and controls in Articulate Presenter. Those with the SDK have access to the FLA files and can edit these in Flash if they wish.
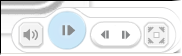
View example of ‘Floating Slide Only’ view
No Controls
The third possibility removes the controls altogether so that you are left with absolutely no controls whatsoever except those that you have designed in your Powerpoint slide via hyperlinks etc. I call this the ‘No Controls’ mode. You can see an example below and is an alternative to the ‘no sidebar,’ ‘no navigation’ view.
View example of ‘No Controls Slide Only’ view
So we have three ‘slide only’ modes: The standard, the floating, and the ‘no controls.’
So how do we get the two extra modes?
Well, to get the floating and ‘no control’ modes, the procedure is quite similar. There are two ways. Either you edit playerproperties.xml file for each publication, which you will find in the <published folder>dataplayerproperties.xml or if you don’t want to do this every time you publish (because let’s face it, it takes time and adds complexity to what should be a straightforward operation), then the best thing is to create a custom template or several, which you can choose when you want to use these ‘slide only’ modes. In this case, you don’t change the playerproperties.xml file, you change the template, which in turn will change the playerproperties.xml file automatically for you. I am going to show you how to change the template.
Floating Mode
- First create a new custom template and call it ‘Floating template.’ To do this, go into the Player Template Builder and click on File.

- Select ‘New from existing’ and choose a template that you use a lot.
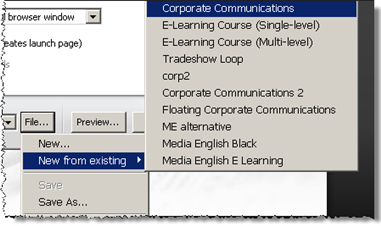
- Give the new template a name beginning with ‘Floating’ so that you can identify it easily later on.
- Click OK and then click Close to leave the Player Template Builder.
- Now, leave Presenter and go into Windows, and locate the Articulate folder in Program Files. Open it and then open the Presenter folder.
- Double-click on the templates folder, which is in the Presenter folder, and locate the newly created template that should begin with ‘Floating.’
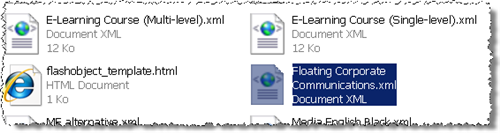
- Open this file using a simple editor like Wordpad (the following is now true if you are editing the playerproperties.xml file in the published folder, which I mentioned above).
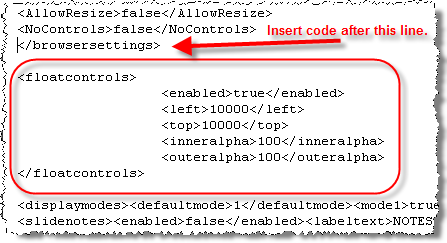
- Do a search for </browsersettings> in the text.
- After </browsersettings>, insert the following code.
		<floatcontrols>
			<enabled>true</enabled>
			<left>10000</left>
			<top>10000</top>
			<inneralpha>100</inneralpha>
			<outeralpha>100</outeralpha>
		</floatcontrols>
This code is available in the Preview SDK publication at the bottom of page 3.
- Save the template file (or the playerproperties.xml file) and close.
You have just created a custom template for creating the Floating mode ‘no slide’ view. Now, all you have to do is to create your publication, and all your ‘no slide’ views will have the new controls, if you publish using this template. This mode is a great way of letting learners go backwards and forwards in the ‘no slide’ view. Try it and see for yourself.
Note: The saved template will only keep its form if it is not changed in any way. If you change some feature of the template — e.g., making the presentation start in Standard rather than No Slide, then the Floating controls code might get lost.
No Controls Mode
But what if we don’t need controls at all? Then to get this third mode of the ‘slide only’ view, the No Controls mode, we do exactly the same as for the Floating mode but we delete a file just after publication, and post onto our LMS, upload onto the server, publish to CD etc. (Note that if you are using Articulate Online, you will need to do a manual upload.)
- Publish using our Floating template. (Or manually insert the ‘floating code’ in the playerproperties.xml file.)
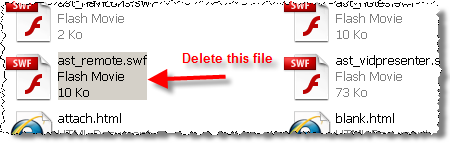
- Identify and locate the published folder.
- Open the player folder and delete ast_remote.swf
Now, when you view your publication, your controls will have completely disappeared.
A New Player
So there we go — two new ways to display your presentations. Just be careful with the Full Screen mode that your student is not locked into this view. And don’t forget that in the full SDK there are many more ways you can customise the player to make your presentation different from the rest.

24 responses to “How to Customize the ’Slide Only’ View of Articulate Presenter”
Great work on this Dave! This is an excellent post.
Nice write-up. It would be great to see this as a simple option within the Player Template Builder to avoid all the workaround gyrations. Perhaps in version 6?
[…] hacks: Dave loves to get under the hood with our products and hack it up (he authored How to Customize the ‘Slide Only’ View of Articulate Presenter back in August); be on the lookout for more tips ‘n tricks from […]
I have created custom templates through the Player Template Builder but I cannot see any corresponding xml files in the Program FilesArticulatePresentertemplates folder. In fact I searched my entire hard disk and couldn’t locate any corresponding xml files. I’m using AP 5.20 / PP 2003/ Windows XP.
Hi Naveen- I’ve submitted a case for you so that we can help you out.
This is great! Now that I have the controls gone…how could I insert a swf with a button that takes me to the next slide?
Andrew – you will need the sdk to do that.
What I would like to know is if it is possible to change the navigation controls with the SDK when in the standard view?
Any idea why the earlier recommendation to remove ast_remote.swf, has been removed from this article?
http://72.14.235.132/search?q=cache:tbfCkB_2kIEJ:www.articulate.com/blog/how-to-customize-the-slide-only-view-of-articulate-presenter/+remove+ast_remote&hl=en&ct=clnk&cd=1&gl=sg
Hi Kelvin- It was not intentionally removed. Thanks for pointing that out. I’ve corrected that and some other issues that were in this entry.
[…] How to Customize the ’Slide Only’ View of Articulate Presenter 5 […]
I have the trial version of Presenter 09 right now. I can’t see any of my custom templates in my templates folder. I’m wondering if this could be because I’m still on the trial version? My office is planning on purchasing Studio 09 but until then I’d really like to try some of these custom slide views.
Hi Kristin- please take a look at this article to find out the location of your player templates in Presenter ’09.
The trial version is fully functional.
Gabe,
I have gone to the locations listed in the article you gave me and I still do not see any of my custom templates or color schemes. I only see the standard templates/schemes that originally came with Presenter 09. Also, the “objects” folder that holds logos, playlists, etc. is completely missing. I do not see it anywhere in my “Presenter” folder (and I have added logos to my presentation, so they should be listed). Since you say that the trial version is fully functional, do you have any idea why this would be happening?
Does anyone know if this feature is part of the 09 release. I could not find anything about it in the Player Templete menus
Hi Kristin,
Open a window in Windows Explorer and type %appdata%. This will open your Application Data Folder. Open the Articulate folder and you should find these things in the Presenter folder.
However, we don’t recommend manually modifying this folder. The easiest way to share a custom template with another author is to send them the Articulate Presenter package that is using the custom template:
http://www.articulate.com/support/presenter09/?p=457
Hi Verl,
These instructions are the same for ’09.
Justin,
I searched as you suggested and still did not see my custom templates. From the %appdata% search, I opened the Articulate folder, then the Presenter folder. The Presenter folder was empty accept for another folder named “Project” which contains a project.txt file. I have also run a search of my computer for this custom template and have not been able to find it anywhere. I know that you do not recommend modifying these template files, but I would like at least try out some of the tricks listed in this tutorial.
Does anyone have any idea why I am still unable to see my custom created templates?
I’m assuming you can select a custom template that you have created and published with it, right? If you are using a 64 bit vista machine check here:
C:Program Files (x86)ArticulatePresentertemplates
or do a search for the file which would be [name of template].xml on your hard drive and you should be able to locate it.
I am still unable to locate custom templates. I have searched my hard drive and looked in all the folders listed in comments above. I also exported a Presenter Package and the other user was unable to see any of the custom templates used.
I am able to select these templates on my computer and I have “published for the web” successfully but I am still unable to share these templates in any way on other computers.
This is going to become an issue as more of us begin using Articulate and my computer is the only one with these templates. Are there any other suggestions on how I can resolve this?
To share a custom template, publish a presentation with the custom template (to make sure it has been applied to the presentation). Then create an Articulate Presenter Package of the presentation, and send the resulting zip file to another person. When the other person receives the zip file, they need to extract (unzip) the zip file and launch the PowerPoint presentation. Then they need to go to Articulate -> Publish. The Player Template drop-down list will show the name of the custom player template followed by the text (In Project), which denotes that the custom player template is only available in this project. They need to click the ellipsis (…) button beside the Player Template drop-down list, which will open the details of the custom player template. Then click the “File…” button, and select “Save As…” They can save the template with the same name or another name of their choice. It will now be available on their computer for all other presentations.
To locate the .xml player template files on your computer, I would create a new template in Presenter and call it something simple, like Test123. Then make sure hidden files/folders are visible on your computer. Then perform a Windows search of your C: drive for Test123 (or Test123.xml).
Hi there:
Does the above methodology work for No Sidebar view in Articulate ’09? I would like to design a presentation that allows the upper bar (for Attachments, glossary, etc) but eliminates all other player controls.
In addition, what happens if you want the volume control only?
Thanks!
Brant
Hi,
I use a floating mode. This is a very cool solution. I congratulate the idea. I’m doing the training to which I join with the Captivate file 5 as a web object. Following the publication of my navigation is under the web object. Is there a way to move the navigation to the first layer?
Within a presentation I am using slide only view and no sidebar. I do not want to have any controls for the slide only view but controls (forward/back) for the other view. Can the above be accomplished and let me use both of these views in the same presentation?
Has Articulate not come up with a permanent solution yet instead of this work-around?
Thank you.
Comments are closed on this post. Need more help? Post your question in the E-Learning Heroes Discussions.