How to Get Perfect Screenshots in Presenter ’09
This guest blog entry was written by Articulate QA Project Lead Dave Mozealous.
You just upgraded to Studio ’09 and are impressed by the new features and the crisp quality output of Presenter ’09. You want to go the extra mile and make your screenshots look pixel-perfect. Well, here is the definitive article on how to make your screenshots look great in Presenter ’09.
First, some background information about images
A scaled screenshot looks worse than its original size version
Any time you resize or “scale” a raster image like a screenshot, the scaled image will look worse than the original. It doesn’t matter which program you use to scale the screenshot, it will always look worse. For example, the first image below is its original size. Then I used Photoshop to scale the second one down to 95% of the original. The third I scaled up to 105% size of the original. Notice how the second and third images are slightly blurry and lack the clarity and crispness of the original? Scaling screenshots is bad and you should try to avoid doing it.

Original (320 pixels x 222 pixels)
95% (304 pixels x 210 pixels)

105% (336 pixels x 233 pixels)
PNG is the best format for screenshots
PNG is a great format for screenshots because it uses lossless compression so your file will look the same as the original image. Always use PNG for screenshots. As soon as you take your screen capture, save it as .PNG. Formats like JPEG use lossy compression, so some of the original data is lost. They won’t look as good as PNGs. JPEG works better for photographs. (Note that converting a JPEG to a PNG won’t have any benefit. It always needs to be a PNG from start to finish.)
How to prevent scaling your PNG files
Now we know that we want to make sure that we are using PNG images for our screenshots, and they should not be scaled. So how do we prevent scaling our screenshots? There are actually three places where scaling can happen:
1. Prevent scaling at playback
The first thing we will want to do is to lock your Presenter ’09 Player Template at the optimal size. This will prevent the Flash Player from scaling your content.
- Click the Articulate menu in PowerPoint
- Select Player Templates
- Click the Other tab
- Select Lock presentation at optimal size from the Presentation size drop-down
This will now lock your presentation at the optimal size, which will lock the slide size at 720 pixels wide by 540 pixels high (click here to view at full size; shown below smaller so that it fits in this blog post):

2. Make sure your original screenshots are not scaled
We got the player locked now, and we know the slide size (720×540), so now it is time to go get some screenshots. We know that the maximum slide size is 720×540, so we will want to take screenshots that are no bigger than 720 pixels wide and 540 pixels high. Almost any screenshot tool will let you crop your images.
Two important things to remember when saving your screenshots:
- Save your image as .PNG
- Crop your image to be 720×540 or smaller
Now we have our screenshots, so let’s move on to the next step.
3. Insert your screenshots in PowerPoint and size them
Let’s add some screenshots to PowerPoint, and then set them up so they are sized for perfect-looking output.
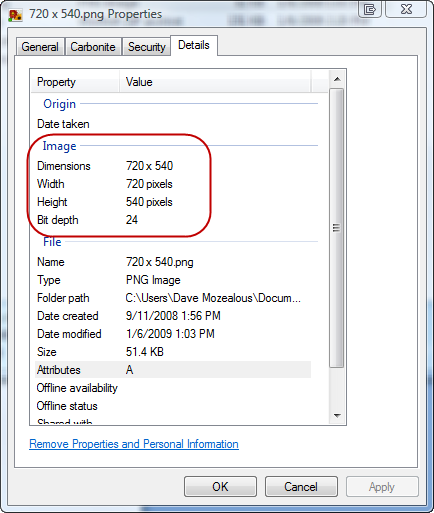
First, find out the dimensions of the image you want to insert. We will need this later so that we can properly size it in PowerPoint.
To get the dimensions of an image:
- Right-click on the image in Windows and select Properties
- Select the Details tab
You’ll find the image dimensions here. Make a note of them.
Now let’s insert the image in PowerPoint:
- Select Insert -> Picture
- Browse to and select your screenshot
The funny thing (or annoying thing) about PowerPoint is that when you insert an image, PowerPoint scales it. That’s exactly what we don’t want to happen. So now we have to fix it.
In PowerPoint, objects are sized based on inches, and we only have the dimensions of our image in pixels, so we need to convert the pixel size (image size) of our image to inches (PowerPoint size).
Use this form to convert the pixel size to inches:
Your browser does not support iframes.
Can’t see this form? Click here.
Resize the image to its original size in PowerPoint
Next, it is time to resize the image in PowerPoint so that it won’t be scaled:
- Right-click on the image in PowerPoint and select Size and Position.
- On the Size tab notice the Height and Width cells, here we will want to set the size of our image in inches.
- Enter the values and hit Close.
Using these steps, I’ve created a demo here that has two screenshots on it. Click here to view it. The first screenshot fills up the entire slide; its dimensions are 720×540. The second one is smaller at 500×300. You can download these images if you want to test it out with some sample images before you use your own.
As you’ll see, if you use these steps, your images will always look identical to the images. The secret is just to avoid scaling!

55 responses to “How to Get Perfect Screenshots in Presenter ’09”
If you’ve ever tried (and failed) to size a window pixel perfect by dragging the window frame before doing a screen grab here’s a tip.
I do my screen-grabs with SnagIt to just grab a particular window but I size that window with Sizer (http://www.brianapps.net/sizer.html) – a superb tool that I wish I had known about many moons ago. Because you can tell Sizer what size to set a window your screen grab will be exactly that size: 720×540 – easy.
[…] http://www.articulate.com/blog/how-to-get-perfect-screenshots-in-presenter-09/ […]
Thanks for the info!
I’ve found that if I capture and save the png to 960×720, PPT scales it to exactly 720×540 when I insert it, so it fills the slide like I want. I haven’t noticed a quality problem, but maybe it’s my eyes. I’ll try your method and see if I see an improvement.
Also, do you know why Articulate doesn’t allow you to add your logo as a png? I have to save it as a jpg.
Thank you Dave for this post. I have always wondered what the secret is behind PPT, Articulate and images. Now I know and it will make a huge difference to the quality of my published presentations.
Hi Heather,
There is no specific reason we can’t support a PNG logo, but my guess is that when we originally built the logo feature in Presenter it was before PNG was really en vogue as an image format, and then over the years we just haven’t added support for it.
I’ll see if we can get this added at some point in the future.
-Dave
@Heather
One more suggestion, I would try using a BMP instead of a JPG…it will likely result in better quality.
@JP
NP, glad you dig the post.
Thanks for the post. I had been anxiously awaiting this information and it’s great, but I have a few more questions that I hope you could address.
First, the “optimal” slide size is 720×540. What is driving that? Is there any way to change that? Most applications were written to run at 800×600, or in my case 1024×768. When I resize my screens to be 720×540, I can only get about 3/4th of the screen and I need to be able to show the whole screen.
Indeed, this can be seen in your example. If you look at the screenshot of Excel, there is quite a bit cropped off the right side of the Excel window and some cropping on the bottom.
Another issue I was hoping you could address is the size of the output. I looked as your fullscreenshot and it took up less than half of my monitor and it was too small to see and there was no way to resize it.
Could you give some examples or suggestions on how to make full size screenshots (800×600 or 1024 x 768) look sharper in Articulate?
Thanks.
@Curtis,
Well, the optimal size of the slide area is 720×540, the reason we make it this size is that the rest of the player makes the entire presentation 980×640, and since the majority of users are using a monitor that is 1024×768, making the slide any bigger would make the player bigger, and then a user wouldn’t be able to see all of the presentation on a 1024×768 monitor without scrolling.
If you have to capture bigger than 720×540 you have a couple of options though:
1. What you could do is set your monitor to 800×600, then capture your screen shots, and then crop out parts that aren’t necessary like the task bar in windows, which is about 40 pixels.
2. Resize whatever app you are capturing to 720×540 and then you can capture the entire app.
3. Capture at 800×600 and insert at 800×600, then set the slides that contain those captures to Slide Only mode in the player template. In slide only mode the slide is 113% of the standard size, so you will have some more room to play with. So what you would do, is insert your screen capture at 800×600, then resize the image in PowerPoint to 9.83 inches by 7.37 inches.
This is what I have done here:
http://www.articulatetest.com/optimal/player.html
The key is knowing that whenever you scale the images, they aren’t going to look optimal, so whatever you can do to prevent that will help.
Thanks Dave.
I’ll have to look at the 3 different areas that do the scaling and see if removing any of them make a big difference. Sounds like I am going to have to scale at least once to get the whole screenshot in. However, not all of our screens are full screen, so we can make some screens much sharper.
Thanks again for researching and posting this. It is very helpful to understand how it all fits together.
Dave,
This is very useful info. Thanks for the post. One thing I’m still curious about: is there a “global” setting within Powerpoint that would help us avoid having to reset every screen shot we insert? I have yet to find one if it exists. My courses contain many screen shots and resizing each one becomes time consuming.
Thanks again,
GG
@GG,
I sure wish there was, but unfortunately there isn’t. Sorry 🙁
Thanks Dave! This is an issue I have been trying to find better info about for months. One question – I work with lots of large screen captures and one of the issues I face is the problem of fitting large captures into a 720 x 540 window. One idea that occurs to me is to Snag screens using a smaller display – like on a laptop – rather than on a big desktop monitor. Would that help me capture large screens with less pixels?
Hi Brent,
Yeah, exactly. The other thing you can do is resize your standard desktop too. If you right click on the desktop and select “Personalize” or “Properties” (depending on the OS) you can configure your desktop to use a smaller resolution.
Glad you found the topic useful.
-Dave
Actually, I have tried reducing the screen resolution on my desktop PC, but unfortunately this doesn’t change the size of the screen, it just lowers the resolution, and I wind up with captures that are just as big and more fuzzy. Am I missing something?
Hey Brent,
The reason the screen captures look bad after you take them at 800×600 is you are viewing them at 800×600. So take your screen captures on a desktop resolution of 800×600, then set your desktop resolution back to whatever your default is, and they will look good.
Actually, when I have tried this it was because I wanted to scale down a screenshot – and that’s why it ended up fuzzy. I suppose my question was really “is there a way to rescale a screen before you snag it?” Snagging screens at lower resolution doesn’t seem to effect scale – it basically crops the visible area. I’ll follow your advise & avoid scaling. Thanks.
I have downloaded your 720×540 png files and when I place them into Powerpoint, I have to increase the size of the image to 133% to fit it to the page as per your published example. I looked at the resolution have you have it set at 96dpi. However screen resolution is 72dpi which explains why I had to increase it to 133% to fit. It is fine to keep the image to 720×540 pixels but what resolution (dpi)?
I have pdf’s of application forms (text and tick boxes), what is the best way to export the png in illustrator? I can send a sample of the images and files i’m using via email. Thanks.
@Paul,
Don’t worry about DPI, DPI is a printed thing, not a digital thing. DPI is used to set the scale of a digital image. It doesn’t affect the actual size of an image. A 720×540 image is the exact same image whether its 72dpi or 1000dpi.
>I have pdf’s of application forms (text and tick boxes), what is the best way to export the png in illustrator?
Sorry, I am not really an expert on Illustrator, so I don’t have a whole lot of advice for you here.
Thank you for your reply. I wanted to clarify your response to my question about dpi. An image that is 720×540 at 72dpi has a document size of 25.4cm by 19.05cm (which is the document size of the powerpoint canvas). However an image that is 720×540 at 300dpi has a document size of 6.1cm by 4.57cm which would appear much smaller in powerpoint. To make things more confusing, the sample images you supplied are at 96dpi and need to be at 133% of its original size to full the powerpoint screen.
So the dpi does matter because even though articulate uses pixels as measurement, powerpoint uses cm and therefore effected by the dpi of the image.
If I have a set of forms created in Indesign and exported as PDFs. I can export the PDF to a PNG file in any resolution and size. What would be the best dpi and document size to get the best result.
Thanks again.
Hey Paul,
Just as an FYI, the DPI does matter for what size PowerPoint sizes them to by default, but it doesn’t affect the quality of the output at all if you follow the instructions in this post.
Check out these images:
http://www.articulatetest.com/DPI.zip
Insert them in PowerPoint and set the size to full slide. They are both 720×540 but have a different DPI (300 vs 72). Then publish. You will notice no quality difference between the two.
See this example:
http://mozealous.knowledgeflash.com/3671578564
Hi Dave,
your hint to use a resolution of 800×600 leads me to another question:
In which resolution does Presenter store the output SWFs?
Is it 720×540? (and then scaled up in Slide only View?)
Or 800×600? (and then scaled down in Standard View?)
Or according to the Slide Property Settings? (which would be the best, I guess)
Hi Ralph,
In slide only mode the slide is actually 813.6×610.2 which is 113% of the normal slide view of 720×540.
The output SWF size is 720×540, and then scaled up to 813.6×610.2 in slide only mode. However, the output SWF size doesn’t matter for image quality, it is what size it is displayed at, and what size the inserted image is.
An image of size 720×540 will look best when the SWF is displayed at 720×540. An image of size 813.6×610.2 will look best when displayed at 813.6×610.2, and it will look better than an image that is 720×540 and displayed at 813.6×610.2.
The key is that you want your image to be displayed at it’s original size.
I highly recommend the Jing Project, also from TechSmith. Free. Mac and Windows compatible. Lots of configuration.
Good post, Dave.
Hi Dave, and thanks for this very useful info.
In my company, we place our images as a filling effect of a rounded rectangular, so that the corners come out rounded.
Is there a way to make such screenshots look good when published in Articulate?
Thanks!
@SHIR,
Good question, and unfortunatel I don’t have a good answer for this. When you apply a picture effect to a picture, it effects the quality of the image that we can extract from PowerPoint. For example, if you do the following:
1. Insert a screenshot inside PowerPoint, Right Click and save the file as PNG. Then open up the PNG, the image quality should be the same as your original.
2. Do the same thing, but apply a picture effect before saving as PNG. Then open it up and notice the quality. See how there is a bit of a drop off?
One suggestion you might want to try is adding the effect to the image before inserting it PowerPoint, like through Photoshop or something.
Hi,
This post helped me improve my project. Thanks!
What are the recommended dimensions for a Flash that is supposed to be presented in Articulate in full screen, with out the sidebar and the bottom bar?
TIA!
Hi Shir,
If you are using slide only mode the slide size is going to be 813.6×610.2, so you shouldn’t use images that are bigger than that size.
Hope this helps.
Dave
I have spent two days trying to understand the strange way in which PowerPoint inserts graphics, and finally found your excellent blog which helps a lot. Your article has much wider relevance than the title “How to get perfect screen shots…”. I found a certain lack of clarity in the MS PPT online documentation…
You suggest targeting a slide size of 720 x 540 pixels, described as “optimum”, and I understand how you get to this figure, which is effectively working at 72 pixels per (PPT) inch.
There is a simpler way to adjust picture sizes to match this figure (at least in PPT 2007). After inserting a graphic, open the “Size and position” window from the Format tab. Tick “Best scale for slideshow”, and set the resolution to 720 x 512. This will then automatically resize the graphic at the 72 ppi figure. (Don’t worry about the strange “512” figure – it seems to work OK!) Unfortunately there does not seem to be a way to set this as a default in PPT.
I understand your logic in targeting the 720 x 540 screen size, but it does mean that the eventual product does not make anything like full use of available screens. I was looking for a way to target a higher resolution, for two reasons:
(1) Using a larger screen canvas allows better definition of small items, particularly text, as there is an inevitable loss of definition through the PPT-Articulate-Flash chain, and
(2) Technology is continuing to advance. Already the 720 x 540 target looks small on a 1024 x 768 screen, and larger screens are becoming more common. SXGA+ at 1400 x 1050 cannot be far off, as well as the WSXGA+ at 1680 x 1050.
Any further comments will be greatly appreciated.
Peter
My main recommendation would be to not capture the entire desktop when you are doing your screenshots. Entire desktops display a lot of info that probably doesn’t need to be captured, i.e. taskbars, menus, etc. This should help you capture smaller images.
The problem is Flash does a poor job of scaling images, that is why we give the recommendations we do, to minimize scaling.
Also, one thing to think about, only our slide content is 720×540, once you include the player it is bigger than that, like 980×640 or something close to that, which will fit pretty well on a 1024×768 monitor. If we made the entire player bigger, you wouldn’t be able to see the entire player without scrolling on a monitor that is 1024×768.
I hope this helps.
Dave
Thanks for the response.
A small point: I am not concerned with screenshots – We use very few of these.
I want to find a way to create courses with the graphics content at the highest practical resolution, and maximise the player on the user’s screen. I want to get away from having to design for the lowest common denominator in a world which is rapidly changing. I suppose any decision will have to be a compromise!
Dave,
This has been a very helpful thread. I’m creating a Flash app to import into Articulate in slide-only view. I understand then, that I should create the Flash app at 814×610 (813.6×610.2)? Or, since it’s Flash, should I create it even larger than that?
Thanks very much,
Michael
The size of the Flash app you build doesn’t really matter, unless you use screenshots in the Flash app. Flash does a poor job of scaling down screenshots. If in your flash app you just have native flash drawn shapes and other vector based art it should scale very well.
Can you offer any similar tips for how to achieve similar results in Adobe Premiere?
I use captivate to capture screenshots at 800×600 and scale to 720×540 in PPT. Still abit fuzzy. Can you offer a better option?
Yo, all this talk about that ppt slides is 720×540 is a bit confusing for me, if I zoom the slide to 100% I think it’s in scale 1:1 right? then my canvas (ppt area) is 960×720 så my 720×540 images is to small, whant cover the hole slide. Is there a seeting to resize the ppt slides? I’m using PP2007?
When I snag the screen, both with snagscreen and print screen, I am not provided with an option to file on .PNG, only BMP, GIF and JPG.
Hey Jose,
You might want to try another tool that allows you to save as PNG, like SnagIt.
-Dave
Hi Dave:
I have tried Snagit and SnagScreen but as soon as I remove the cursor from the highlight in order to click on any of the snag choices the highlight disappears so it does not come out on the end product. The only way I can catch the screen with its highlighted parts is using Print Screen and the end product is of very low quality when published.
Example: Click on Start, click on programs, click on Office (all three are highlighted). If I move the cursor to click on snagit, the highlights disappear.
Jose
Hi Jose,
If you have SnagIt installed it will allow you to capture in SnagIt using the Print Screen button, so you can capture the same way as you did just normally pressing the Print Screen button, but will save the file in SnagIt, which then can be saved in PNG format.
Although, I am not really an expert in SnagIt, so if you are having problems capturing in SnagIt what you need to capture you might want to check with Techsmith and see what they can recommend.
-Dave
Jose, whenever I encounter similar situations, I use the SnagIt timer function which allows you to set SnagIt to capture your selection on a delay, and frees up your hands, so to speak, in order to hold your screen items in place (like drop-downs & mouse-over stuff).
Your suggestion seems to be right on target. I will try it.
If the whole process suggested in the blog has to be repeated with each and every capture it would be a very long and cumbersome process. Can the process be set by default and, if so, how?
Jose
Jose, the problem is how PowerPoint inserts the images. It doesn’t seem to insert them in any logical manner in terms of sizing, so there isn’t way to make this process (at least at this point) easier.
Would be sweet if someone built a PowerPoint macro or something that automatically handled this…
If you scale your Powerpoint presentation down to 7.5 x 5.625 while you’re working on it, your 720×540 screenshots will fill the page perfectly and look crisp. Scale it back up to the “Onscreen presentation” (which is 960×720) size right before you publish.
DAVE:
Would Renne’s suggestion of March 22 work to reduce the size of the whole screen to 720×540 to fit the course content space in Articulate without the image becoming fuzzy?
@Jose,
From an initial test I did it seems to work, but you could run into problems depending on the DPI of your photos. Most screen capture software I have used takes screenshots with 72 DPI (Dots Per Inch), and if you insert images as Renee suggests that are 72 DPI her method will work. If they are higher DPI (like 300) then the image will get inserted at a much smaller size. PowerPoint does some sort of calculation when determining what size to insert the image as, and DPI plays a factor on this. But I don’t want to get too far into that discussion because it will likely just be confusing.
-Dave
I would use Print Screen, Snagit or Snag Screen and the shots are of Office Screens as the courses are of how to use these applications for some specific chores. I undestand you use Snagit so I think there should be no problem.
This blows away a workflow I’ve had in PPT for years! Like Heather, I was working at 960 x 720 in Photoshop (at 96 dpi which equates to 10 x 7.5 inches if printed) and images dropped into PPT filling the screen (and PPT considered them 100%, which I liked). But I just tested the method here–working at 720×540 (at 72 dpi which also equates to 10 x 7.5 inches if printed) and then sizing up to what PPT calls 133%–and the new method makes much cleaner results. Crazy! I’ve never understood while PPT uses physical dimensions (inches) when it’s a screen presentation product. Whatever! This is awesome. Thanks.
Hi Dave, thanks for this helpful information. Do you also know how many pixels (width and height) Engage has (for making screendumps)? Or what is the ratio? I am thinking about using a screendump in the Labeled Graphic option.
Hi Elka,
Off the top of my head I do not know the size of Engage Interactions as the max size for each interaction is likely to change.
You don’t have to worry about the ratio though in Engage, you only have to be concerned with any scaling (scaling will make the screenshot quality appear worse).
So to get the best looking screenshot this is what I would do:
1. Open the interaction you want to put the screenshot in
2. Insert a large image (1024×768 for example)
3. Publish
4. Use a tool like SnagIt to determine the size of the resulting image area
5. Make sure your images are no bigger than that image area
Hope this helps.
Dave
I would use this guide for maximum sizes in video and images in Engage: http://www.articulate.com/blog/articulate-101-3-things-you-need-to-know-about-engage/
Those who use Snagit (I use version 10) can set a fixed region capture area before making the capture. I set the fixed area at 720 x 540 and then when I start the capture the fixed region is displayed and you can move it to capture the area you want. The resulting capture will always be the correct size. There are too many steps to put them all in this thread but it’s fairly simple to do. In Snagit click on Help and then search for “fixed region.” The first item on the resulting list of choices will be for “Capture a Fixed Region.”
Well I just wasted the better part of a Saturday following the advice on these screenshots. I have to say that they look worse than they did before, so either I’m missing something OR?? I was so happy that I had a solution. NOT.
Hey Anna Marie. Contact our support department at http://www.articulate.com/support for help. They can figure out what is up.
-Dave
For future readers of this thread:
The answer is to:
Go to Presenter’s Presentation Options > Quality and set the Compression to Custom. Set Image compression to Lossless.
Set the player template to show the presentation at the optimal settings.
Go to Articulate > Player Templates > Other.
Using the Browser Size drop-down list, select “Resize browser to optimal size”.
Using the Presentation Size drop-down list, select “Lock presentation at optimal size”.
Click the Close button, and save your changes when prompted.
Publish the presentation and be sure to choose the player template that you just modified.
My total folder size is now 23 Megs, not 3 as it was before but the screenshots look great.
http://www.sharinghousing.com/overview
Thanks support folks.
Comments are closed on this post. Need more help? Post your question in the E-Learning Heroes Discussions.