The Rapid Elearning Blog

Archive for December, 2008


The Rapid E-Learning Blog 2009

What happened to 2008?  It just flew by.  When I was a child each year took an eternity. Now it seems like everything is kind of blurred together.  And here we are, about 50 posts later reflecting on a year gone by.

Some Quick Thoughts About 2008

Thank you for all of the kind comments that I get each week after I post.  I also appreciate the great feedback and suggestions.  If you don’t regularly review the comments with the blog posts, I recommend you do.  Here’s a good example from a recent post on using virtual worlds to create characters for your courses.  The comments section is loaded with some great feedback and additional resources.

I love going to conferences and meeting you.  In fact, some of my best material and blog topics come from interacting with blog readers and trying to solve problems.  If you’re ever at any of the same conferences, please come by the Articulate booth and say, “Hello.”  The schedule for next year isn’t completely fleshed out, but I’ll be in Atlanta at Training ’09, in Orlando at Articulate Live ’09 and the eLearning Guild’s 2009 Annual Gathering

The Rapid E-Learning Blog: Tom with blog reader Ammar Al-Attiyat

Speaking of conferences, it seems that each trip to the conferences this year brought some surprises.  Here are a few travel tips for your next trip to an elearning conference:

  • Don’t lose your wallet in the airport.  It’s hard to go through security without being treated like a potential terrorist. 
  • Bring something to read.  If the cargo door on your plane is hit by one of those vehicles that moves your luggage around, it takes a few hours to repair.  You’ll want something to read while the repair is made.
  • Make sure to sit next to a doctor.  On my flight to Educause, someone on the plane fainted and fell down in the aisle.  Fortunately, there was a doctor seated nearby to treat him.  I provided some comfort by assuring him that this was better than losing his wallet in the airport.  I think my words encouraged him and helped him feel better.

Ripped off!!!  While 2008, has been a great year, I was a bit saddened to learn that I didn’t make Urlesque’s Twenty Bloggers We Want to See in a Bikini list.  Maybe I’ll be in the running next year when I’m in better shape.

Answers to Common Questions

While we’re doing an end of year post, I’ll take the opportunity to answer three of the most common questions I get throughout the year.

  • How do I get copies of your previous posts?  You can do a search for posts from the blog right above the book image.  Or you can scan the titles in the archives.  The archive link is always at the bottom of the page.
  • What books do you recommend to get started?  There are a lot of really good books out there.  In the post, 5 Simple Ways to Get Started with E-Learning Development, I offered a few solid recommendations.  If you have any you’d like to recommend, let me know.  I’ll be doing a post on this later. 
  • Does it cost money to subscribe to your blog?  No.  The blog is free.  You can subscribe one of two ways: email or RSS feed.  For email, click on the subscribe link on the right side of the blog and enter your email address.  For RSS, use the orange RSS button.  If you’re not familiar with RSS feeds, check out the Common Craft’s RSS in Plain English

…And Now for the Top 10 posts for 2008

  1. 5 Secret Tips from an E-Learning Pioneer
  2. Here’s Why Unlocking Your Course Navigation Will Create Better Learning
  3. When It Makes Sense to Pay for Professional Narration
  4. Create E-Learning Scenarios By Bringing the Virtual World into the Real World
  5. Create Custom Characters for Your E-Learning Scenarios
  6. What You Need to Know When Working with Grouped Clip Art
  7. What Everybody Ought to Know About Instructional Design
  8. How to Add Scenarios to Your Rapid E-Learning Courses…Rapidly!
  9. Is Google Making Our E-Learning Stupid?
  10. Change Your Presentation Template to an E-Learning Template

Looking Forward to 2009

I have some cool things planned for the blog and eager to write some of the posts and tutorials.  II think it’s easier to learn when we can deconstruct the examples so I want to share more of my assets and files.  Right now I’m working on a way to easily manage that.  Stay tuned for some exciting news.

I’m really looking forward to Articulate Live ’09.  Like this blog, it’s going to be structured so that you get practical tips and tricks that you’ll be able to take back and apply to your work immediately.  If you use the Articulate software, I highly recommend it.  It’ll be a great time.

I’m also looking forward to seeing many of you at other conferences and events.  Also, if you’re in the Seattle area, drop me a line.  I try to get out and meet people in the area as time permits.

Again, thanks for making the blog a success.  I hope you have a great new year!

Events

Free E-Learning Resources

Want to learn more? Check out these articles and free resources in the community.

Here’s a great job board for e-learning, instructional design, and training jobs

Participate in the weekly e-learning challenges to sharpen your skills

Get your free PowerPoint templates and free graphics & stock images.

Lots of cool e-learning examples to check out and find inspiration.

Getting Started? This e-learning 101 series and the free e-books will help.


Going to a stock image site and looking for just the right pictures can be very time-consuming and a drain on your limited resources.  Why not create your own stock images?  If rapid elearning software makes everyone an instructional designer, then surely a digital camera makes us all photographers. 🙂

Obviously, this approach doesn’t work for everyone and taking good photos is an art in itself.  However, it is a cost effective approach and with some practice very viable.

Here are a few basic tips to get started.

1. Flood the area with light.

A lot of images appear grainy because there’s not enough light.  A good rule of thumb is to flood the area with light.  You’ll want to use as much light as possible without actually vaporizing your subjects.  The more light you have, the better clarity you’ll get on the images.  You can control the stark shadows by diffusing the light which you can do by bouncing it off of the walls or ceiling.  Or just move the light source back a little.

The Rapid E-Learning Blog: subjects are vaporized by too much light

 2. Keep the image in focus.

The problem with a lot of digital cameras is that after you take the shot, it looks great on that tiny LCD screen.  However, when you get into the office to edit the photo you see that the image is a little out of focus.  Your best bet is to use a tripod (or at least rest the camera on a solid surface).

The Rapid E-Learning Blog: keep images crisp by using a tripod

3. Use the best quality settings you can to get the best image quality.

I had a friend who would always use the lowest settings on his digital camera because he wanted to have room for as many photos as possible.  That made no sense.  He had room for something like 5000 photos.  If he had used the highest quality settings, he would have still been able to put a few hundred photos on the camera.

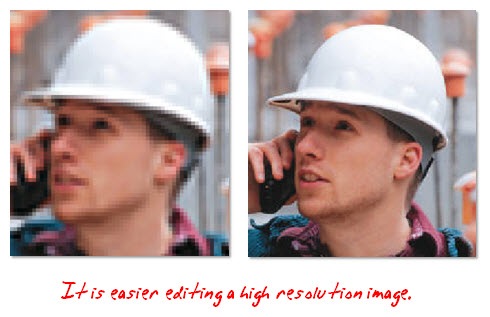
Here’s the deal.  You can’t make a bad image good (even if you send it to Sunday school).  So, you want the best quality possible from the get go.  You can always frame and resize the pictures later.  However, you won’t be able to make a low quality image better.

The Rapid E-Learning Blog: get the best resolution possible

4. Remember the “rule of thirds.” 

Divide your image in thirds.  The best pictures will have the subject intersect two perpendicular lines.  You can find a quick explanation of the rule of thirds here.  My digital camera even has a grid feature to make this easier.  Yours might, too.

The good thing with editing software is that you can always crop your photos to better frame your subjects and make the pictures more interesting.  This is also why you want the best quality and highest resolution as a starting point.

The Rapid E-Learning Blog: follow the rules of thirds


5. Don’t take just one shot.

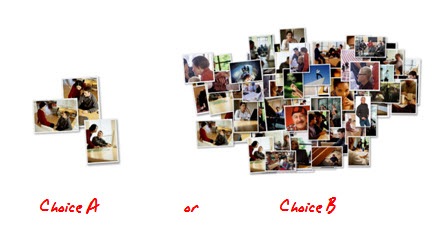
It used to annoy me when I’d send someone out to get a photo of a machine operator on the shop floor and he’d come back with just one picture.  It’s a digital camera, for crying out loud!  Take as many pictures as you possibly can.  It’s not film.  There are no development costs.  The more choices you have, the better off you’ll be.

The Rapid E-Learning Blog: take as many images as you need

6. Create visual interest.

Make the images interesting by shooting from multiple angles and distances.  Take one wide angle shot.  Get another that’s closer and tighter.  And, then do a close up, or even extreme close up.  Get down low.  Get up high.  Tilt the camera a little.  You don’t want all of your photos to look the same or be from the same angle.

Also, try to keep the people from looking at the camera.  You want things to look natural.

The Rapid E-Learning Blog: create visual interest

7. Use real employees to make the images authentic.

People like to see co-workers and themselves in the elearning courses.  Take advantage of this.  It’s also a way to build some interest in the course prior to roll out since the break room will be abuzz, eagerly anticipating the final product.

The Rapid E-Learning Blog: Jim the hero

8. Don’t use real employees because they could be losers.

There’s nothing worse than having John Doe (or your state’s governor) in your ethics course and then find out two weeks later that he was fired for lying about his sales quotas or worse.

The Rapid E-Learning Blog: Jim the loser

Depending on your project, it might even be worth your while to hire a few people for a day and take as many photos as you can.  For example, get a bunch of people in a business casual setting and then shoot images of all sorts of conversations.  You can use the extras for future projects.

To keep costs down, I’ve done projects where I’ve had friends come in and we shot some quick photos.  This works as long as they’re not fugitives or have warrants for their arrest.   

9. Get signed releases.

You want to get signed releases to make sure all of your bases are covered.  Here’s a link to learn more about releases.  You probably want one for adults and one for minors.

The Rapid E-Learning Blog: get a signed release

10. Share your photos.

Everywhere I’ve worked, having the right type of images has been an issue.  Sometimes all you need is a guy in a hard hat, or someone who’s not in a suit.  These aren’t always easy to find.  And, it’s not always cost effective to buy one, either.

Why not share your photos?

I have a friend that has shared his photos on stock.xchng.  You can also join a user group on a site like Flickr and share your pictures using a Creative Commons license.

If you’re not inclined to shoot your own images, you can always find inexpensive stock photo subscriptions.

Shooting your own photos can save you a lot of time and money.  With a little practice, there’s no reason why you can’t learn to do a good job.  What are some other tips to help get the best image quality possible?  Feel free to share them with us by clicking on the comments section.

Events

Free E-Learning Resources

Want to learn more? Check out these articles and free resources in the community.

Here’s a great job board for e-learning, instructional design, and training jobs

Participate in the weekly e-learning challenges to sharpen your skills

Get your free PowerPoint templates and free graphics & stock images.

Lots of cool e-learning examples to check out and find inspiration.

Getting Started? This e-learning 101 series and the free e-books will help.


This is kind of a bittersweet post.  Originally, I was going to write about using Google Lively’s virtual world to build scenes and characters for your elearning courses.  The application was free and had some potential as a learning tool.  Apparently, I was the only one who was using it, so Google decided to pull the plug.  Oh well.  If it’ll help the stock price, I’m all for it.  The 8 shares I own aren’t doing too well right now.

Even with the demise of Lively, the essence of the post still stands.  So I’m moving forward with it.  You’ll just need to find a different virtual world tool.  Any of them should work.  Make sure to read the terms of agreement.  If you’re not quite sure where to start, there’s always Second Life.  TechCrunch recently did a blog post that mentions a few of them for even more choices.

What makes this approach so compelling for rapid elearning is the cost, ease of use, and ability to create virtually any type of scenario for your courses.

Build Characters

The Rapid E-Learning Blog: create avatars

Almost all of the virtual world applications let you build your own avatars.  You typically get a broad range of choices.  In the demo above, I created a couple of characters and then made them look like normal people.  I wanted something that looked more like the real world for my scenes.

Unless you’re doing training for groundhogs in Wyoming then the avatar above probably isn’t the best choice. However, that doesn’t mean you couldn’t use a creature like that as a guide or character in your scenes.  It could lighten up the tone or add a little humor.

Set Your Scene


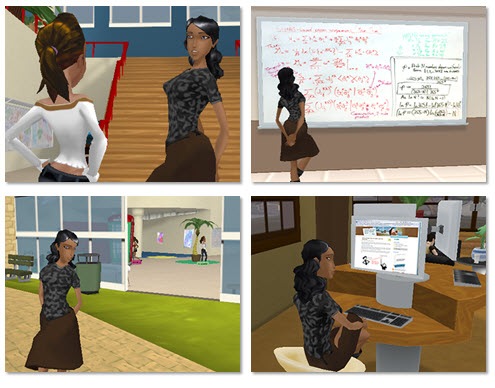
The Rapid E-Learning Blog: create diverse scenes

Most virtual worlds come with all sorts of rooms and settings.  I created the images above in just a few minutes.  I didn’t have to build anything.  I just entered the room and made the image.

As you can see, there are many options.  The character can go from discussing the movie My Cousin Vinny to being a discriminating blog reader.  You get a ton of freedom and creativity in where your characters can interact.

Build Your Scenario

Virtual worlds give you an assortment of characters and settings.  But the real power comes from the camera movement and views.  Because you’re in a 3D environment, you can move the camera around to quickly change the look and feel of your scenario.

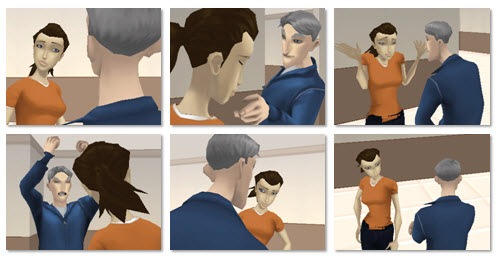
The Rapid E-Learning Blog: switch camera angles

Here are a few images.  The characters are in the same location.  I changed the camera angle and then added an action to add a little drama.  The advantage to this approach is that the custom camera angles lets you set your scenario from multiple perspectives.  This is really helpful when you have dialogue between two people.  I think you’d agree that it seems more engaging.

So, how did I do it?

It really is pretty easy.  We’ll assume that you already have a script and know what types of images you want.

  • Log into the virtual world of your choice.
  • Add you characters.
  • Choose your setting.
  • Move your camera (view) into position.
  • Do a screen capture.  Depending on what you can do in the virtual world, you might even be able to make quick videos and add your own audio, like I did in the demo.

That’s it.  Pretty simple and a great way to get the types of images you want.  Of course, this approach doesn’t work for everybody and every organization.  However, it is a very easy and inexpensive way to make your elearning scenarios look a bit more engaging.

I’d love to hear what you think.  Or if you’ve done something similar, feel free to share examples or give us some tips.

Events

Free E-Learning Resources

Want to learn more? Check out these articles and free resources in the community.

Here’s a great job board for e-learning, instructional design, and training jobs

Participate in the weekly e-learning challenges to sharpen your skills

Get your free PowerPoint templates and free graphics & stock images.

Lots of cool e-learning examples to check out and find inspiration.

Getting Started? This e-learning 101 series and the free e-books will help.


create e-learning learning objectives

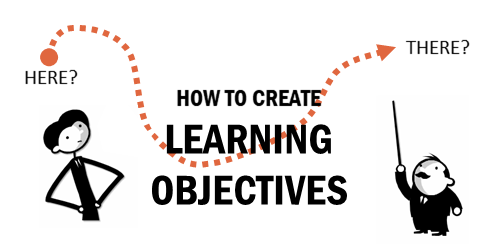
All courses begin with an overarching goal.  Assuming that the goal is clear, you build learning objectives to meet the goal.  In today’s post we’ll explore a simple way to create objectives for your course.

Learning Objectives Start with Clear Goals

Make sure that when you work with your clients you have very clear goals.  What do they hope the course will accomplish?  From that conversation, you’ll be able to discern what the learning needs are.  This helps you build your objectives.

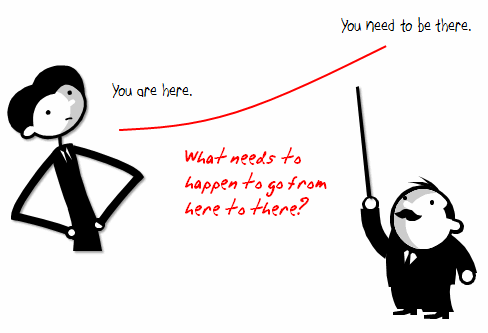
The main area of focus is to understand where you currently are and where you need to be.  Then map out the activities and learning experience to get from one point to the next.

learning objectives start here

What is the Core Learning Objective?

Start by creating your main objective and then use that to drill down to the additional content you need to meet it.  Basically, your objectives are built on three critical questions.

  • What needs to be learned?
  • Who needs to learn it?
  • What do they need to know before they can start?

What needs to be learned?  What you teach should be linked to real performance.  Essentially it’s all about what the learner is going to be able to DO with what they learn from the course.  Avoid using words like “understand.”  That’s not clear.  Find the basis for understanding and then build your objective around that.

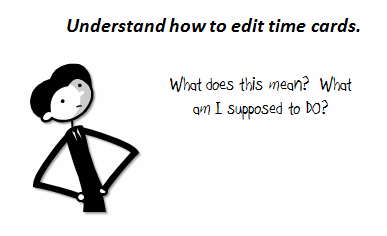
Here’s a common type of objective: Understand how to edit time cards. 

This is vague because it is not aligned to a real measure.  What does “understand” mean?  A better objective is to state what the learner will be able to DO with the new information.  If they understand something, how would you know it?  Build a measurement around that.

explaining learning objectives

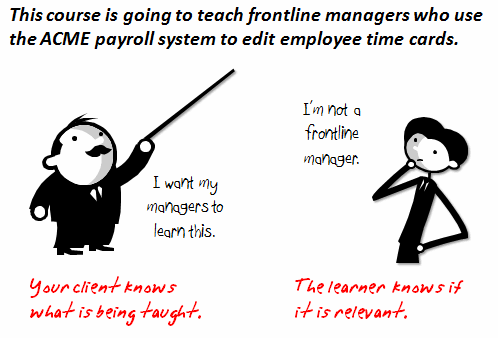
Who needs to learn it?    Who are your learners?  Who is going to take the course?  By including this in your objective you are able to qualify potential learners and tell your client who is being taught.  Are they new employees?  Managers?  At this point you don’t need to do a full analysis of the learner.  You only want to identify the audience for the course and what they’ll be able to do after completing it.

The Rapid E-Learning Blog: clear learning objectives help your client and learner know what's going on

What do they need to know before they can start to learn?  All elearning courses require some prerequisite understanding or experience. By identifying what that is, you avoid some assumptions about the learner. You can either require it prior to starting the course or you need to create the additional content to get the learner to the prerequisite level.

Think of it this way.  I give you a map and tell you to go to Seattle.  First you locate Seattle (your goal) and then you figure out where you’re at (prerequisite) so that you can chart your course.  You can’t reach your goal, if you don’t know the starting point. In the same sense, it’s difficult to teach your learners without knowing where they’re at.

The Rapid E-Learning Blog: learning objectives help tell you here does the learner start?


Once you have your main objective, you can start to drill down.  What assumptions does your objective require you to make?  Those assumptions become the foundation for your sub-objectives.  Let’s look at the example below.

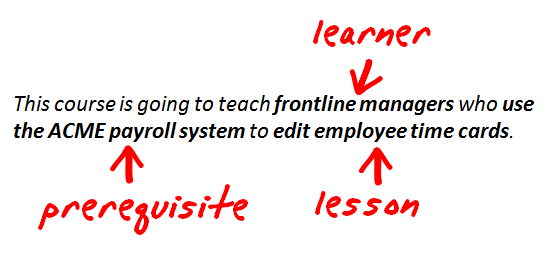
The Rapid E-Learning Blog: learning objectives defined; who's the learner, what's being taught, and what do I need to know before I start?

You know who is going to learn (front line managers), what they’ll learn (edit time cards), and what they need to know to learn it (ACME payroll system).

Editing time cards assumes that the learner knows how to use the ACME payroll system. Thus, if you want your learners to be successful at editing time cards, they need to know how to use the payroll system.  So you can create another objective that includes learning to use the ACME payroll system.  From there, the prerequisite might be that the person knows how to collect the time card data.  Or perhaps they need to understand the company’s time card policies.

The key is to continue to drill down and ask what the learner needs to know prior to learning this new information.  At that point, you determine if you make it a requirement to take the course or if you’ll teach the additional content in your course.  Once you have your objectives, you can begin to collect and sort your content to meet them.

You have a lot of latitude in how you write your objectives.  You’re not stuck in any particular model.  What’s critical is that the objective is performance-based and that who the learner is and what she needs to know prior to starting is clear.

By following the approach above, you’ll align your course objectives with the overarching goals.  You’ll also communicate to your client what the course accomplishes.  And your learners understand what’s in it for them.  Once you have your learning objectives, you can begin to build the course.

When you build you courses, what do you do to determine your learning objectives?

Events

Free E-Learning Resources

Want to learn more? Check out these articles and free resources in the community.

Here’s a great job board for e-learning, instructional design, and training jobs

Participate in the weekly e-learning challenges to sharpen your skills

Get your free PowerPoint templates and free graphics & stock images.

Lots of cool e-learning examples to check out and find inspiration.

Getting Started? This e-learning 101 series and the free e-books will help.