I see the promise of AI generated assets for e-learning. I’m not an illustrator. I have limited Photoshop skills. Because of this, my options for custom illustrations are slim. However, with AI I can find a balance of creating viable illustrated characters with minimal skills.
Today, I’ll show some of the basic steps I use to create the illustrated characters I’ve shared in LinkedIn recently. In these three tutorials, I’ll give an overview on how to create simple, viable illustrated characters using AI. I am working with a few objectives: quick, simple, and minimal editing. I am willing to live with some imperfections.
Getting Started with AI Tip
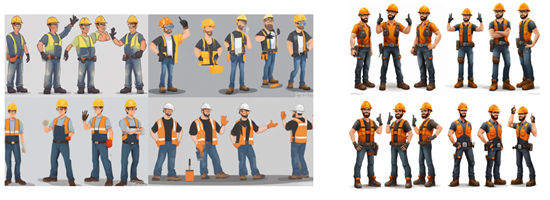
I am using Midjourney to create my AI illustrations. You can use whatever you want. The process is very similar regardless of application. I will add that not all tools offer the same quality. For example, here are two images using the same text prompt. The good example on the right comes from Midjourney. The other from one of the many of the tools that are out there trying to make money quickly from the AI gold rush. Buyer beware!
Step 1: How to Create a Character
I only cover the basics in the tutorials below and show some differences when you change the settings, but the secret with AI prompting is knowing how to adjust parameters such as style, seeding, and quality. The more you use those parameters the better control you have over your results. I will add that I find using fewer words is better.
There are a lot of videos on YouTube and elsewhere on getting consistent characters. I’m not going to get into the weeds on this. Here is a useful source for Midjourney users: John Walter: he has a good series on creating a consistent character.
Set up your prompt. I use character, action, style, and white background (so I can clean the image up after I download it).
Make parameter selections for style, etc.
Once you have a character style you like, change the character descriptions. This is where you can mitigate the bias that is built-into the AI model.
The video below walks through some of these tips, and we look at options in terms of unique styles and characters.
A prompt with multiple poses will give you the same character but slightly different. You can play around with the number of poses, but three poses are a sweet spot. At a minimum you get three similar characters. Assuming the iterative characters are similar enough, you end up with fifteen similar characters.
Generate a character and include the number of poses.
Select a character panel to upscale.
Do another version (minimal variance) which will provide four more similar characters.
This approach isn’t a perfect way to create characters. It’s a quick way to create good enough characters. My goal is to create viable characters quickly. So, I am willing to live with some imperfections.
The hands and faces are problematic. That’s OK. With multiple characters you’ll get enough parts you can mix and match to get some good characters.
You don’t need to use every character you get.
Once you edit the characters, you will fix some of the issues that AI instigates. I’ll cover that in the next post.
Thanks for this series! I have used similar steps/tips to create characters.
I use a MidJourney plugin from a company called InSwap to have consistent faces across characters with similar body types but variances in the face.
1. Start with the best character picture you generate in MidJourney and upscale that picture.
2. Export the picture to your computer. This will be your source “face” picture.
3. Generate additional pictures with your seed picture.
4. If you like a picture but see noticable differences in the face, use the faceswap plugin from InSwap to create a new version with the face from your source picture.
This works with animated characters and pictures as well!
A pro tip for anyone using the methods in Tom’s articles – you can convert the images you create in MidJourney to SVG or EPS files using a free (for now) tool called Vectorizer.AI.
Just export your character file as a picture (I use PNG), go to Vectorizer.AI, then upload the character file.
Vectorizer.AI will convert the image to a vector graphic, allow you to refine the image, then export as a few different graphics formats. This is a HUGE time saver as doing this in Illustrator was time consuming for my level of knowledge.
As I said earlier, Vectorizer.AI is free for now since it is in BETA but definitely something to consider for your toolbox.
Thank you for sharing these. I’ve been using text AI for a while and love it. I’ve admired your icon sets and was so happy to see your process for building these illustrations. Love how you walk through and share what you’ve learned!
Agreed on Vectorizer. I currently use VectorMagic but their vectorizer tool is much better with the .svg conversion. You don’t get the gaps between the vectors. Curious to see how much it’ll cost when they’re out of beta.
I do the same with the face swapping. I find it works really well for photos. One could create all sorts of scenario type photos and then do a face swap to get consistent characters. I haven’t had as much success with illustrations.
Are there any restrictions or copyrights on the images created by AI? I have searched and found conflicting results as to whether or not you can use AI generated images for business purposes.
@Jeniffer: good question. The AI images are not copyrighted so you should be able to use them. There’s a lot of conversation about AI and how the models are trained and with that a lot of dialogue around the ethics of AI. And with that a lot of misinformation, knee jerk reactions, or deficient understanding. The philosophical debate will continue. 🙂


0
comments