The Rapid Elearning Blog

Archive for May, 2016


share e-learning courses

[UPDATE March 1, 2022: The essence of the post is still accurate, but you can find an updated tutorial and instructions here.]

Today I am going to show you how to set up an Amazon S3 account to share e-learning courses and portfolios. You can also share your courses using Google Cloud which I cover in a different post.

However, this post provides more detail and it’s super important to those who use Google Drive to share their e-learning courses because Google is discontinuing that option on August 31, 2016. Now’s the time to come up with a better solution before all of your links no longer work.

Here’s what you’ll need to do:

  • Create an Amazon S3 account.
  • Download Cloudberry Explorer (free).
  • Create an account in Cloudberry to upload your courses.
  • Set the appropriate viewing permission.

I created a video that walks through the process. Below are the basic steps and the video provides a bit more detail.

Click here to view the YouTube Video.

How to Create an Amazon S3 Account to Share E-Learning Courses

Creating an Amazon S3 account is really easy. You’ll need to add your personal info and credit card for payment. Initially you get 5 GB free for the first year and then pay a fee after. For a personal account I wouldn’t expect to pay much, maybe just a couple dollars a year. It’s a very affordable option.

Once you have an account, you’ll need to locate the security settings and find your access keys.

  • Go to User Name
  • Security Credentials
  • Access Keys

This will expose your access key and secret access key. You’ll need them so that Cloudberry Explorer can access your S3 account.

Download Cloudberry Explorer to Share E-Learning Courses

Cloudberry Explorer is the application you use to access your S3 account. Once you have access, you can upload files and get the URL to share.

Create an Account in Cloudberry to Share E-Learning Courses

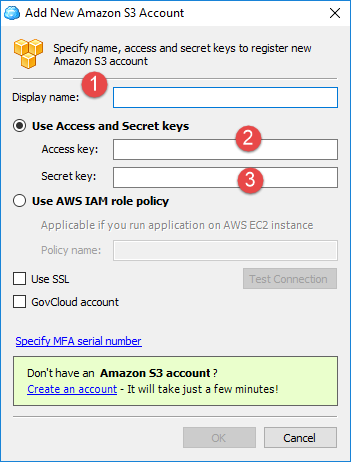
Once Cloudberry is installed you’ll need to create an account that’s connected to your Amazon S3 account.

  • Go to File>New Amazon S3 Account.
  • Create an Account Name
  • Go to Amazon S3, copy and paste the Access Key and Secret Access Key into the form.
cloudberry-explorer share e-learning courses

You should now be able to access the account using Cloudberry Explorer.

Create a Bucket and Set Permissions to Share E-Learning Courses

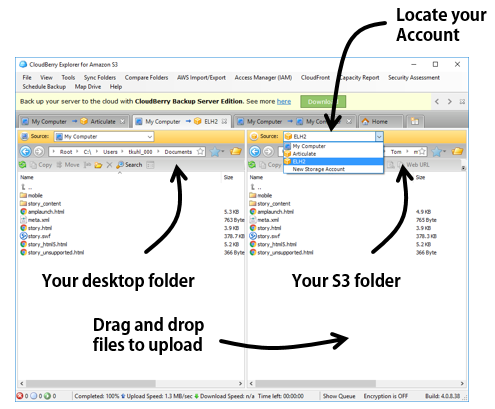
On the left side you can display your desktop folders. And on the right, you display the S3 account and folders.
cloudberry-explorer-1 share e-learning courses

Initially there will be nothing in the S3 account. The first thing you need to do is create a bucket. That’s where you’ll host your folders and save files. You can create more than one bucket. For example, you may have one bucket for your portfolio and another for personal files. And you can limit who has access to the files in your bucket.

  • Create a new bucket. It should have a unique name. All of your folders and files will go into the bucket.

bucket share e-learning courses

  • It’s a good idea…You can set the permissions for the bucket so that anything you add to it can be viewed when you share the link. Otherwise, you have to set permissions every time you upload a course.
  • Click on the Bucket Policy icon and add your policy. This site explains it in more detail.
  • Once you’ve established the policy, you can start to add folders and files.
  • To share a file, click on the Web URL icon.

That’s about it. Of course, you should read more on what you get with both Amazon S3 and Cloudberry Explorer. But for the most part, what you see here and in the video is all you need to do.

Now’s a good time to set up an Amazon S3 account. The cost is nominal and the service works well for sharing your e-learning courses.

Events

Free E-Learning Resources

Want to learn more? Check out these articles and free resources in the community.

Here’s a great job board for e-learning, instructional design, and training jobs

Participate in the weekly e-learning challenges to sharpen your skills

Get your free PowerPoint templates and free graphics & stock images.

Lots of cool e-learning examples to check out and find inspiration.

Getting Started? This e-learning 101 series and the free e-books will help.


free PowerPoint template

When I review vector images, I like to review the other images from the same artist. This way when I need to build a module or template, I can find assets drawn in the same style. This lets me deconstruct the vector illustration and use the parts to create illustrations that meet my own need. And remember, if you don’t have an illustration app, as long as you can get .EPS vector files, you can edit them in PowerPoint.

example of vector illustration

The other day I ran across this series of vector images that would work in an elearning course. Here are some things that work for an elearning template:

  • Avatar: the circled avatar is a common design treatment.
  • Progress meter: using variables allows you to combine various levels of feedback or progress. The meters could also be some sort of slider interaction.
  • Circled content: these are nice buckets that could easily be used as a start screen or menu structure. They also could be replacements for bullet point content.
  • Header bar: again, another common design treatment.

Most of the elements are pretty simple to create. The challenge is creating the circle avatar effect using your own images. Fortunately, it’s easy to do.

PowerPoint Tutorials

I’ve included a couple of tutorials to show how to create the circle avatar effect and how to work with connectors. This will work in Storyline or PowerPoint.

And to make things easier, here’s a free template. All you need to do is add your own content and characters.

Free PowerPoint & E-Learning Templates

free e-learning and PowerPoint template

Click here to see an example.

I created a few simple layouts to help you get started. You’ll need to create the circle avatar effect using one the tutorials above. The template is also connected to the design color themes and font themes for easy editing.

The layouts are just a starting point. If you want to add interactive elements like I did in the Storyline demo above, you’ll need to make your own tweaks. I’ll include the demo file in the same download for you to see what I did.

Free Downloads

Hope you enjoy the free templates and tutorials.

Events

Free E-Learning Resources

Want to learn more? Check out these articles and free resources in the community.

Here’s a great job board for e-learning, instructional design, and training jobs

Participate in the weekly e-learning challenges to sharpen your skills

Get your free PowerPoint templates and free graphics & stock images.

Lots of cool e-learning examples to check out and find inspiration.

Getting Started? This e-learning 101 series and the free e-books will help.


e-learning pain points

The other day someone asked what I thought the three top pain points were for online training or elearning. I hear lots of complaints and I’m sure that there are many pain points, however if we keep them in perspective, they’re really not as painful as being stabbed or thrown down a flight of stairs. Here are some of the issues I find most challenging with elearning.

E-Learning Pain Point #1: Courses are Boring

I review a lot of courses during the year. Many of them are very basic–consisting of mostly slides, simple graphics, and bullet points. I’ll assume that the people who do take the courses probably don’t find then all that exciting. A slide with bullet point content isn’t necessarily a bad thing. However, slide after slide of this type of content isn’t the most effective way to engage and teach people.

The bigger issue isn’t usually the content as much as it is that the content isn’t relevant to the person’s needs. Here are a few tips to help.

E-Learning Pain Point #2: Developers Have Limited Skills & Resources

Many of the people I meet are the only elearning person on staff. And the majority of them didn’t start in elearning. They started as trainers who moved to elearning as the organization needed to put courses online. They end up having to do everything from instructional design, graphic design, and course authoring.

In addition to having limited experience building elearning courses, they usually lack a breadth of technical knowledge and programming skills. On top of that, they don’t get adequate support for other things such as media assets and IT help.

Many of them do a great job given their limited resources, but to build courses that are engaging, interactive, and meet learning objectives requires more than a basic understanding of PowerPoint and learning to find free clip art. This means that the developers need time to learn the skills to build more than basic courses and they need more support from their organizations.

Without organizations making a bigger commitment to their elearning teams, most courses will probably be stuck in pain point #1.

Here are some solutions for those who want to learn more and do more:

  • Check out all of the free getting started resources we have in the community. There’s a lot of good generic content, free ebooks, and of course tutorials to learn the software.
  • Participate in the weekly challenges to practice new things. Even if you don’t participate, make it a point to see what others do as a source of inspiration.
  • Take classes where you can. You can go for a formal degree or certificate at most of the universities. There are informal options like the video tutorials, lots of free webinars, and a number of opensource learning opportunities. And of course, participate in your local ATD, ISPI, and STC chapters.
  • Read a book and apply what you learn to your courses (or the weekly challenges). Here’s a good starting list. Or better yet, create a mini module on what you learned in the book and share it with others. It’s a great way to practice building courses–solidifying the content in your own brain and sharing what you learn with others.

E-Learning Pain Point #3: [Insert pain point here]

I can add an assortment of additional pain points such as courses are too long, high dropout rates, etc. But I’d like to open it up to you. What is the single biggest pain point for you when it comes to elearning and online training? Add your thoughts in the comments section.

Events

Free E-Learning Resources

Want to learn more? Check out these articles and free resources in the community.

Here’s a great job board for e-learning, instructional design, and training jobs

Participate in the weekly e-learning challenges to sharpen your skills

Get your free PowerPoint templates and free graphics & stock images.

Lots of cool e-learning examples to check out and find inspiration.

Getting Started? This e-learning 101 series and the free e-books will help.


free clip art for PowerPoint

Having free clip art is a big deal for those of us on fixed budgets and with limited access to stock images and clip art to use in our elearning courses, presentations, and training programs. So last week’s news that Microsoft is bringing back free clip art was a breath of fresh, kind of.

About two years ago, Microsoft got rid of clip art. Because of this many of you have been using the free stock images sites, the free images in the community, and downloading the free vector images which you can edit in PowerPoint. This works fine, but it sure is handy having quicker access to the right images while you’re building the slide.

Free Clip Art via Pickit

The good news is Microsoft has formed a partnership with Pickit which offers a pretty big library of images. However, while Pickit offers some free images that you can access via PowerPoint, it doesn’t really work the same way it used to with the old clip art gallery.

pickit free clip art powerpoint

Below, I’ll show how to install it and then a few tips on using it for your courses. To get started, I recommend creating an account with Pickit.

How to Install Pickit for Free Clip Art

This part was a little tricky because the instructions aren’t quite that clear.

Here are the instructions that Microsoft provides:

  • Make sure you’re signed in to Office. Open any Office application and, in the top right corner, click Sign in. Type the email address and password you use with Office.
  • If you’re using Word, Excel or PowerPoint, press Insert > My Add-ins. In the Add-ins for Office box, find your add-in.
  • If you don’t see it, verify that you’re signed into Office. Press Refresh to update the list.
  • If the add-in still doesn’t show up in the add-ins for Office list, it might have been hidden. You can use the My Add-ins for Office and SharePoint page to retrieve it.
  • Double-click the add-in to start it.

Those instructions didn’t work for me. First off, my version of PowerPoint 2013 doesn’t have an Insert>My Add-ins option. Instead it’s Insert>My Apps. However, I don’t see the Pickit app in the list.

Here’s how to install the Pickit app if you have the same issue as I do.

  • Make sure you’re signed into your Office account because the app is part of your account.
  • Go to Insert>My Apps and click on the See All link. That will show all of your apps.
  • Select the Pickit app and click on Insert. This will install the app.

Here’s a video that shows how to install Pickit in PowerPoint.

How to Use Pickit for Free Clip Art & Stock Images

I’m using PowerPoint 2013 so I’m not sure if the app works different for newer versions. Here are a few key features and considerations when using Pickit:

free clip art PowerPoint search

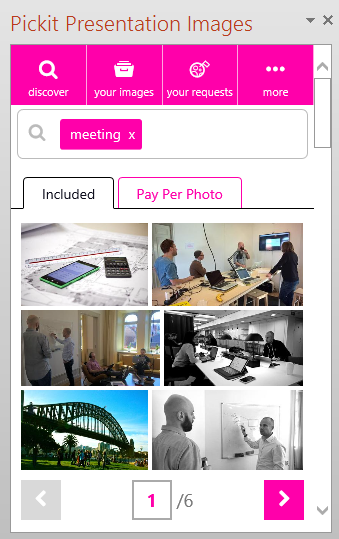
  • The app opens a side panel where you can search for images. In the image above, I searched for “meeting.” The search produced three options: 1) free images, 2) pay per photo, and 3) request an image. Pay images are provided by Shutterstock at about $5/image. I’m not sure how it works if you already have a Shutterstock account, though.
  • You can upload images and manage them (and purchased images) via the “your images” tab.
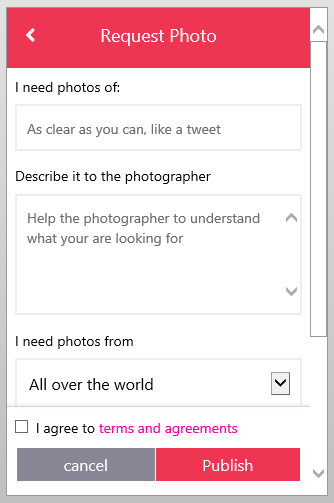
  • The “request a photo” feature is pretty cool and allows you to ask someone to create or share an image you require.

PowerPoint free clip art request image

  • Based on their tutorial video, Pickit is supposed to add an icon to your toolbar. This didn’t happen for me. You’re also supposed to be able to select a word on the slide, right click, and search for an image. However, that wasn’t working for me, either. I’m not sure why, but I was too lazy to research it. If someone figures it out, add a note in the comments.

My impressions:

  • It’s free and the available images are viable (although, it’s not really like the clip art Microsoft offered before).
  • It does help people not bootleg images from Google that may cause copyright issues something that Bing kind of made a bit fuzzy when they dropped the free clip art.
  • You can’t sort illustrated from photographic images. Also, the illustrations come in as .JPG which means they can’t be ungrouped like the earlier clip art. To edit them in PowerPoint you are limited but can use the tips offered in this tutorial post.
  • It would be nice if the image details were tied to specific keywords for better searching.
  • I love the idea of people uploading and sharing their free images.
  • I’m not a fan of the pink branding. I’d prefer more contrast and a less bright color. But it’s free, so I’ll live with it.
  • You can always find inexpensive stock photo subscriptions. In fact Graphic Stock (which has a good selection) regularly runs a $99/year subscription with unlimited downloads.

Are you using Pickit for free clip art? Share your thoughts in the comments section.

Events

Free E-Learning Resources

Want to learn more? Check out these articles and free resources in the community.

Here’s a great job board for e-learning, instructional design, and training jobs

Participate in the weekly e-learning challenges to sharpen your skills

Get your free PowerPoint templates and free graphics & stock images.

Lots of cool e-learning examples to check out and find inspiration.

Getting Started? This e-learning 101 series and the free e-books will help.


a dozen free stock video sites

A while back we had a great challenge on how to use video as the slide background in your elearning courses. It’s a great way to add texture and novelty to screens that are usually plastered with static images and bullet points.

Video backgrounds also force us to think how we’ll lay out the content to accentuate the video. That helps us think about layouts in different ways.

There are over 50 excellent examples in the challenge recap link above. Be sure to take a peak for inspiration. Here are a handful of the ones that stood out to me.

Examples of Free Stock Video Courses

free stock video examples

There are a ton more great examples for this challenge. Be sure to check them out. Which ones do you like best?

Find Free Stock Videos

One of the first questions that comes up is where to get free stock videos. Most of us have our own media production studios in the form of our smart phones and tablets. It’s easy enough to shoot high quality footage to use in your own courses. This adds real context and a connection to your subject matter and organization. If you’re not comfortable shooting your own stock video, try out some of these free stock videos sites. And don’t forget about all of the free stock photo sites we covered earlier.

free stock video site

  • Coverr: seven new videos every week.
  • Pexels: lots of good stuff and link to free stock photos, too.
  • Distill: not to be out done, ten new videos every ten days.
  • Fancy Footage Club: site is closed but they provide a Dropbox link to download all of the free stock videos. Get it while you can.
  • Videvo: free but want a social media share when you use the video. That’s fair for free content.
  • Vimeo: miscellaneous free stock videos.
  • Cute Stock Footage: some cool green screen videos.
  • Videezy: decent selection, but they lead with Shutterstock examples, which requires an account.
  • Mazwai: lots of videos, but the site seems to freeze when they all load.
  • Vidsplay: totally free stock videos.
  • Clip Canvas: free but not a big selection.
  • Pond5: free stock videos found by Geraldo in Al Capone’s vault.

There’s more than enough free stock videos to keep you busy for a while. Now it’s your turn. Take a stab at the background video challenge and submit an example here.

You can always find inexpensive stock photo subscriptions. In fact Graphic Stock (which has a good selection) regularly runs a $99/year subscription with unlimited downloads. They also have a video  and audio service that is reasonably priced.

Events

Free E-Learning Resources

Want to learn more? Check out these articles and free resources in the community.

Here’s a great job board for e-learning, instructional design, and training jobs

Participate in the weekly e-learning challenges to sharpen your skills

Get your free PowerPoint templates and free graphics & stock images.

Lots of cool e-learning examples to check out and find inspiration.

Getting Started? This e-learning 101 series and the free e-books will help.