
I get a lot of questions about buying elearning software. And with that I get to see some of the ridiculous checklists that some IT groups create to compare software. Usually they place more value on number of features (regardless of their real value) than on how those features are used to create the online courses.
When it comes to selecting software, it can be hard to know what to look for and what questions to ask. Here are some tips to help you find the right tools as you wade through reams of the vendor’s marketing information.
Select E-Learning Software by Understanding the Type of Tools
The first thing to know is what types of authoring tools exist and how they work. Generally speaking there are three types of authoring tools for online learning: form-based, freeform, and video.
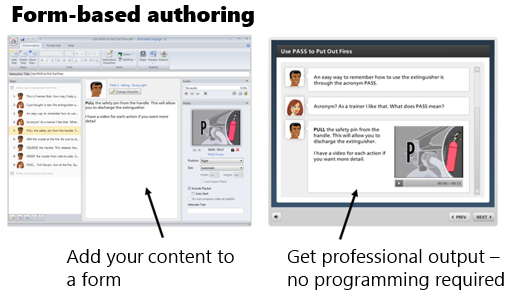
Form-based authoring
Form-based applications don’t require any programming because they use pre-built forms where you add your content. The software is designed to give you a very specific output. All you have to do is add your content. The software does the rest.
This is great because you don’t have to be a programmer or designer to use the tools. All you do is collect your content, choose your form, and hit publish. The programming and design is all done by the software.
Most quizzing applications are form-based. There are places where you add questions, choices, and answers. But you don’t have to make any design decisions. Another good example of a form-based tool is Articulate Engage. You select an interaction type, add you content, and hit publish. Simple as that.
Form-based authoring is great because it’s easy and fast. The downside is that the form is a form and works as designed with limited customization. You’re kind of stuck with what you get. You usually have options in the number of forms, and some choices of colors and such, but for the most part the design is static.
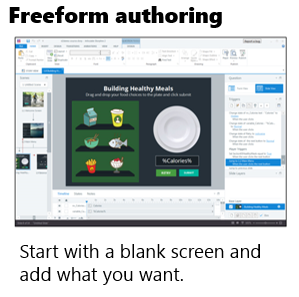
Freeform authoring
Freeform applications give you a lot more flexibility. Generally they start with a blank screen. You determine the layout, content placement, interactions, and visual design. While it’s not overly complicated to do this, it does require more expertise than just adding content to a form. You need to understand how to get something to look and work a certain way.
Of course, the more you want to do with your course, the better you need to know the application. That means a greater time commitment and learning curve than just dropping content into a form and hitting publish.
A hybrid freeform solution is PowerPoint-based authoring. Essentially you use your PowerPoint skills to build your content and whatever you create in PowerPoint is converted to an elearning course. This is an easy entry point for the first time author, but because you’re starting with PowerPoint eventually you’ll hit a ceiling.
Personally, I love PowerPoint-based authoring, but if I had a choice, I’d just go with something like Storyline because it’s easy to learn and over the long haul it provides a lot more value. For example, you may not use variables when you first start creating courses, but it won’t be long before you’ll find the need. If you work with a PowerPoint-based solution, you can’t use variables. However, you can with Storyline.
Some authoring tools require additional programming skills like ActionScript, JavaScript, or HTML. Or they amend their offerings with widgets and add-ons. I have mixed feelings about this approach. It’s good for those who have the programming chops to extend what they can do with the software.
However, what I don’t like is that the widgets and extra programming required go outside of how the rest of the course is authored in the software and often you’re not able to effectively edit the widgets and add-ons. This creates a lot of extra work and can be frustrating. This is just something to keep in mind when you’re looking at tools.
In fact, this is one of the things I like best about Storyline. All of Storyline’s authoring centers around triggers which require no special programming. And they don’t require special add-ons for interactions. You can build what you need; and if you build an interaction, it’s going to be built like everything else in the software. And whatever you build can be saved as a template and shared (with all of the interactivity intact) which removes the need to have a bunch of add-on interactions in the first place.
When you’re reviewing tools, determine what type of tool it is and how the authoring process works. Form is easy and saves time. Freeform provides more flexibility but requires a little more to learn it. Don’t get enamored with features that look good on the surface, but frustrate the authoring process.
Video-based authoring
Video is the other type of authoring solution and it’s pretty straightforward. The videos can be simple lectures, but often are software tutorials or those new “explainer” style videos. Their production is relatively straightforward. You capture the video and process it.
When looking at video tools, you’ll want to understand what editing capabilities exist within the capturing tool. Probably the most important feature is splicing and being able to cut items out.
Select E-Learning Software by Avoiding the Feature Trap
Many organizations make the mistake of crafting feature lists and then comparing the different software based on the features. The ones with more features tend to get rated higher. This is a faulty approach because features aren’t equal and the lists are usually derived from marketing material anyway.
Here’s how I see it.
It’s less important to look at a list of features and more important to look at production workflow because it puts the features in perspective and in context. Each tool can probably build the course you want to build. It may just use different features to do so (which is why a list of features is less relevant). However, the difference in workflow may be substantial. And that’s what you want to discover.
To avoid the feature trap, I recommend that you test each application by building the same demo module. You’ll learn if the tool is easy to use and how long it takes to build what you need. The last thing you want to discover is that your feature-rich product has an inefficient workflow that actually costs you a lot more time.
Tabs interactions are a good test module. They’re usually quick to build and you get to test the general workflow of the software. You learn about layout, how to create the interactive tabs, and expose content.
Here’s a good starting checklist:
- Create five tabs that when clicked exposed new content.
- Make tabs interactive with hover and down states.
- Add a visited state to indicate that the tab was clicked.
- Make the tabs interdependent where one is on (selected) and the others are off (deselected).
- Create conditional navigation where the screen can’t advance until all tabs are visited.
- Change the type of interaction on the tabs from click to hover to see how easy it is to edit.
This simple tabs module lets you dig through the different software a bit and understand the general workflow. This is a better comparison than features that may or may not be important to your course authoring.
Select E-Learning Software by Testing What Happens After You Make the Purchase?
Buying software is easy. And sales people tend to be very accommodating. However, that all changes after the sale.
Keep in mind, once you install the software you’re probably mostly on your own, thus after-sales support is super important and may be worth more than the price of the software. You want to get a good feel for the software vendor and how they treat their customers because you’ll be leaning on them for help down the road.
During the trial phase connect with the vendors. Tell them what you want to build and ask how to go about it. You’ll learn how responsive the vendor is to your needs and what resources are available to help you succeed.
Here are the three things I recommend you research prior to choosing your course authoring software:
- Support: what type of technical support exists? Does the vendor provide free resources to help you learn? What happens when you have an issue? How long does it take to get help?
- Community: many online communities provide customer support and technical assistance. You typically find answers to questions, resources, and an assortment of tutorials. What does the vendor do to support your ongoing development? Many course authors are relatively new to online learning. Thus having an active and engaged community is important, especially one full of resources.
- Connections: community resources are great. However, being connected to other users is key. Vendors build software with features. But users develop best practices and the types of tips and tricks you’ll need to be successful. Experienced community members also share a lot of what they do which is a source of inspiration for those just getting started.
The market is full of options for your online course authoring. So when you’re looking at them be sure to learn what types of tools they offer, what workflow is required, and how they’ll support your development after you’ve purchased the software. If you do those things, you’ll find the tools that provide the best solution to meet your needs.
And if you want to save time, just choose Articulate. We are committed to your success and will do everything we can do to help you build great elearning.
Events
Free E-Learning Resources


3
comments