The Rapid Elearning Blog

Archive for June, 2018


technical support & troubleshooting tips

I’m really proud of the e-learning heroes community. It’s active and filled with so many helpful people. I’m always amazed at how willing they are to answer questions and how quick they are to respond. It’s a testament to the outstanding people in our industry who are eager to share and help (which is probably why they’re in our industry in the first place).

Many e-learning developers are small teams of one or two people, so I see the community as an extension of the team. It’s like having a helpmate in the cubicle next door.

Today, I’d like to offer some time-saving tips that will help you troubleshoot your projects when asking for help. This way you get the right help and get it in a timely manner.

Become Fluent with the Software

It all starts with what you know. The more you know about the software and how to use the features, the better you’re able to find solutions or troubleshoot your courses. At a minimum, watch the tutorials. They do a good job going through the basic features and many of them have downloads with practice activities. In fact, many of the questions I see asked in the community are answered in the basic tutorials.

Articulate 360 subscribers have access to Articulate 360 Training. Every month we do a getting started series for Storyline and Rise. Those are great to learn the basics.

Use a Descriptive Question Title

troubleshooting tips e-learning

Most people scan the titles to figure out where they can best help. If your title is “Help with course, please,” it requires the person to click on the link. However, if the title is more descriptive, it is easier to discern what help is required.

“Variables don’t change when I click the button,” provides enough information for the person who’s looking to help.

Name Your Timeline Objects and Layers

It really slows things down when every slide is filled with the generic default titles. When I help with the files, I start by titling the objects and layers so that I can follow what’s happening. My guess is most people who want to help don’t have the time to do that.

troubleshooting tip title objects

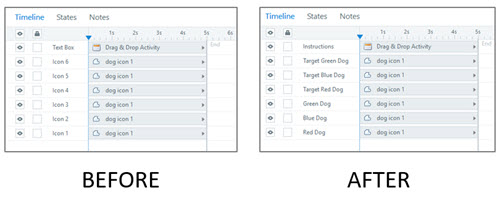
You’ll get faster help if your file makes sense and is easy to parse.

It takes a little extra effort to name objects and layers; but it pays off in the long run when it comes to troubleshooting your course. This is especially true for the person in the community who’s trying to make heads or tails out of your slides.

Share What Version You Use

I am part of a swimming pool forum. They ask that all members have a signature file that includes pool size, type of pool, equipment used, etc. This ends up in every post and eliminates a lot of back-and-forth questions between people looking for and giving help.

It’s a good idea to do something similar when asking for help in the community especially since there are different versions of software which have various updates and different features. Share what version you have, type of PC or Mac, etc.

Keep it Simple

Ever have someone send you a video to watch and it’s 15 minutes long? Do you watch it? Or there’s that one friend on Facebook who’s never learned to create a paragraph break so you just see this massive block of text. I have the same friend and I just skip over what he writes. Who has time to read a book?

Two quick tips here:

  • Be liberal with paragraph spacing so it’s easier to scan and read. And use bullet or number lists.
  • Keep your question to a point or two. If you ask for too much, chances are that people will skip over what you ask. It’s not that they don’t want to help, it’s just that it’s either too hard to parse or too much to work on at one time.

Show What’s Happening

I find it’s easier to do a quick screencast and share it than it is to type a lot of text. This allows a person to see what you’re doing and what’s happening. If you’re using Articulate 360, take advantage of Peek. You can record a screencast which is automatically uploaded to Articulate 360 and generates a URL for you to share.

peek for screencasting

If you don’t use Articulate 360 yet, there are all sorts of other screencasting options that are free or low-cost. In fact, the newer versions of PowerPoint have a built-in screen recorder. Once the video is on the slide, just right-click and save the media as .mp4.

In either case, you can eliminate a lot of going back and forth in the chat by showing what you have and what’s happening. With that in mind, keep it simple and get to the point quickly.

Share a File or Demo

Without seeing the file, it’s often tough to diagnose the issue. Usually the first response to a question is whether you can share a file (or published version of the course) so that we can see what’s happening. So why not share a source file to start?

Here are a few tips that help when sharing files:

  • There’s no need to share the entire course, especially if it’s a 400 MB download. Try to isolate the issue and get rid of slides that aren’t required.
  • Tell people where they should look, especially if there’s more than one slide.
  • Save the file you share as a copy. If the content is proprietary, you can still share the source file. Make a duplicate and either remove the content or replace it with gibberish.

Keep in mind, community members are all over the world and in different time zones. The more you share upfront, the easier it is to get help and a quick answer.

Focus on What You Want and Not Trying to Fix What You Have

It’s easy to get pulled into fixing an issue that is better resolved with an alternative approach. If the desired outcome isn’t clear we end up on a rabbit trail fixing something that had an easier solution. That’s why I usually ask people what they’re trying to do before I start helping to solve the issue they have.

When you ask for help, clarify what you’re trying to do. Sometimes you end up with some good production tips.

It’s Volunteer Time

Keep in mind that e-learning heroes is a community of your peers. Many of them share source files, record tutorials, and show demos. What they offer is offered for free and on their own time.

Be respectful of their time. In fact some of these tips will make it easier for them to help you.

Share the Solution

If you get help and it works, let us know in the forum thread. That helps the next person.

Bonus Tip

Make a goal to pay it forward. I try to answer five questions a day. I find it fulfilling to know I’m helping someone. I also find there’s a lot I don’t know so I end up learning things either by testing ideas or seeing the responses from some really smart people in the community. A side benefit is that it builds your reputation and credentials in our industry.

Events

Free E-Learning Resources

Want to learn more? Check out these articles and free resources in the community.

Here’s a great job board for e-learning, instructional design, and training jobs

Participate in the weekly e-learning challenges to sharpen your skills

Get your free PowerPoint templates and free graphics & stock images.

Lots of cool e-learning examples to check out and find inspiration.

Getting Started? This e-learning 101 series and the free e-books will help.


e-learning templates made simple

E-learning templates are a great way to save time. This is especially true for those of us who work with repetitive content and courses. And it’s even more true for those of us who aren’t graphic designers since the e-learning templates provide nice looking visual design.

However, working with templates can be a challenge. Sometimes they present too many choices (which can debilitate). Another challenge is that to modify templates often requires a more involved understanding of the authoring tools. This isn’t easy for the person just getting started.

Here are a few ideas to help simplify working with templates.

E-Learning Templates Are the Second Step

Figure out what you need before you build first. A big time waster is not knowing what you want in the course but building it, anyway. Then realizing it’s not what you want, you tear down and rebuild. Or worse, you move forward with a bad idea and let it dictate the rest of what you’re doing because of the time already invested.

I like the weekly e-learning challenges to play around with ideas and to see what others do. The challenges help develop fluency with the software and build awareness around ideas that can be implemented before you work on a project.

ACTION ITEM

Let the Content Determine the Right Template

Templates are great, but don’t let the template dictate your content. This is one of the biggest issues with templates. We like a template because it has sixty cool layouts and then we force our content to the template. Or we think we have to use all sixty layouts so we have similar types of content but it all looks different throughout the course because we mix and match the layouts.

ACTION ITEM

  • Review your templates and the various layout options. Then determine when you use them and why. Even if you have a lot of great layouts, it’s a good idea to reduce the layouts you actually use. This provides visual consistency; and repetition is key to good visual communication.

Keep E-Learning Templates Simple

Templates don’t always need to be big all inclusive files with dozens of layouts. It helps to have single purpose templates like just one tabs interaction. The more single purpose the template is, the better you can use it. It’s also easier to customize one slide to match your course than it is to customize an entire template.

e-learning templates

One of the most under used features in Storyline is saving the files as templates. This makes the slides available for the next course. You can insert a single slide(s) or the entire file. The new teams feature in Storyline 360 makes it even better because the slides can be shared with the team and easily inserted in other courses.

In Rise, you can build lessons and save them as templates. Once inserted, they can be modified to meet the course objectives. And they don’t need to be big lessons, you may just want to customize some blocks for easy re-use.  This is especially helpful if you want to use a multiple colors or change the text sizes.

rise e-learning templates

ACTION ITEM

  • Create single slide templates in Storyline and save them as templates. If you’re on a team account, share them with your team.
  • Learn to create and save templates in Rise. I like to create branded blocks where I add different colors and text sizes.

Learn to Edit the E-Learning Templates

Inevitably you’ll need to modify the template. There are some things you should learn about the software so that when you need to change the template it doesn’t take forever (otherwise you lose the time-saving benefit of the template).

ACTION ITEM

Templates are a real time-saver. But to really save time with them, plan ahead so you’re content is prepped; and then learn to use the authoring software used to build e-elearning courses.

Events

Free E-Learning Resources

Want to learn more? Check out these articles and free resources in the community.

Here’s a great job board for e-learning, instructional design, and training jobs

Participate in the weekly e-learning challenges to sharpen your skills

Get your free PowerPoint templates and free graphics & stock images.

Lots of cool e-learning examples to check out and find inspiration.

Getting Started? This e-learning 101 series and the free e-books will help.


Years ago I developed a hierarchy for course design. I used it to help manage my team and allocate our limited resources.

Rapid E-Learning Ruled

Back then, most e-learning was custom-built in Flash. Those courses took more time, required special skills, and cost a lot more to produce. However, with Articulate Presenter and PowerPoint we could build about 80% of what we needed. It was fast and easy. So our default was Articulate Presenter unless we could justify why it didn’t meet our needs.


PowerPoint Meets Flash

PowerPoint had its limits. But when we needed custom interactivity, we‘d build just those pieces in Flash and insert them into our PowerPoint-based courses. That meant we got fast development and custom interactivity: a win-win.

Save Resources for Expensive Development

There were courses where PowerPoint or a hybrid approach just didn’t work. As a final option we custom built our courses in Flash. Because this was the most expensive and time-consuming option, we tried to limit this and do most of our custom development using the hybrid approach.

It made no sense, to custom build Flash when we could do the same thing faster and less expensive with PowerPoint. So we always started with rapid e-learning and only moved to more expensive development when we could justify doing so.

Today, we have a similar challenge. Let‘s revisit the hierarchy of course design for a new generation of rapid e-learning designers.

The Updated E-Learning Course Design Hierarchy

Both Rise and Storyline are part of Articulate 360. Often, I‘ll get questions about when to use Rise and when to use Storyline. To answer the question, I lean on the same strategic approach I used years ago.

Operate at the Speed of Business

A large part of e-learning content exists because of regulatory and compliance requirements. Those courses are more explainer content and less interactive. Thus, it makes sense to use the easiest tool and quickest production process possible.

And this tool is Rise. It‘s super easy to use and getting courses (especially simple ones) out the door is a breeze. On top of that, whatever you build can be saved as a template, saving even more time. And as far as interactive content, there are a number of interactive choices that come with Rise (and those get updated frequently). Rise is also fully responsive which is perfect for today’s mobile workforce.


Hybrid Development is a Win-Win

The reality is that not all content is explainer content and often there needs to be more custom interactivity than what you get out of the box in Rise. That’s OK.

When Rise doesn’t provide the content type you need, use Storyline. Build single slide interactions and then insert them into your Rise courses with the Storyline block.

With this approach, you get easy authoring for the majority of the content in Rise and custom interactivity when you need it in Storyline. It‘s a good balance between speed of production and providing the appropriate level of interactivity. That’s a win-win.

Manage Resources for Custom Interactivity

There are times when working directly in Storyline makes more sense than working in Rise. For example, if you need to build complex interactions, adaptive learning paths, variable-based navigation, or complex interactive scenarios then it makes sense to build them in Storyline. Although, Rise also offers an interactive scenario block, so that is still a better starting option. Storyline gives you a lot more flexibility because you start with a blank screen and build from there.

This doesn’t mean working with Storyline is complicated. It‘s still easy to learn. It means that for simple content, Rise is usually a better solution.

Want a tabs interaction? In Rise you select the tabs interaction block and add your content. You‘re done. Building the same thing in Storyline requires time to think about what it will look like and how it will function. Then the construction begins by adding the objects, layers, and triggers. It‘s easy enough to do, but just a bit more time-consuming to do it. And time is money.

So when people ask which tool to use, I suggest using the hierarchy. All things should start with Rise. If you can’t build it with Rise, explain why. If you need custom interactions, build the core content in Rise (you have a lot of options with the various blocks) and add Storyline interactions when necessary. And if your course requirements are more complex and they can’t be met with Rise, then by all means, use Storyline.

The main thing is you‘re managing your limited resources.  If you spend a week on something in Storyline when you could have built it in one day with Rise, you‘re not being a good steward of your resources. And when you need more time for custom work, you won’t have it because you spent it on simple content.

That’s where the content creation hierarchy comes in handy. It‘s all about managing resources and delivering a viable product on time and within budget.

Events

Free E-Learning Resources

Want to learn more? Check out these articles and free resources in the community.

Here’s a great job board for e-learning, instructional design, and training jobs

Participate in the weekly e-learning challenges to sharpen your skills

Get your free PowerPoint templates and free graphics & stock images.

Lots of cool e-learning examples to check out and find inspiration.

Getting Started? This e-learning 101 series and the free e-books will help.


variables to save time

Here’s a time saving tip when working with variables in your e-learning courses. This is helpful when testing your course as you work on it.

Create Reference Variables

During your production process when working with variables it’s always a good idea to create a reference to those variables. This is a text box that shows the current value of the variable. Thus when testing your course and making adjustments that change the value of the variable, you can see it displayed.

add a reference variable to the slide

If you don’t use a reference of the variable how else will you know the variable value changed? You have to assume that the course is working correctly, which may not be the case. Being able to see the variable helps in troubleshooting issues you may have when using them. For example, if the variable changes then you know something else is the issue.

Where to Put Reference Variables

The reference variables are only visible during the construction and testing of the course. Once it’s ready to go live, they need to be removed from the slide.

Everyone has their own production method. Here are a few options:

  • Delete them when you’re ready to publish the course. This gets rid of them, but if you need to go back and edit the slide, you need to recreate the references.
  • Move them off the slide. This works, but then you have to move them back on when you do edits. Seems like a lot of extra work.
  • Keep them on the slide, but hide them on the timeline. This means they’re always there, and just require a simple click to make them visible.
  • Put them on the master slide. I like this approach. I can turn them off on the master slide and they’re off on all the slides. And then if I need them available, I only need to turn them back on once rather than doing it slide by slide.

Additional Variable Resources

Here are a few quick tutorials and previous articles on working with variables:

Tutorials

Articles

What tips do you have when working with variables in your e-learning courses?

Events

Free E-Learning Resources

Want to learn more? Check out these articles and free resources in the community.

Here’s a great job board for e-learning, instructional design, and training jobs

Participate in the weekly e-learning challenges to sharpen your skills

Get your free PowerPoint templates and free graphics & stock images.

Lots of cool e-learning examples to check out and find inspiration.

Getting Started? This e-learning 101 series and the free e-books will help.