The Rapid Elearning Blog

Archive for August, 2018


The training industry likes acronyms so today we’ll revisit one I shared a few years ago to help new course designers remain focused on producing real value.

It starts with the cookie story.

Two people are selling cookies in the neighborhood. One person bakes a bunch of chocolate chip cookies and sells them door-to-door. Unfortunately that person lives in a hipster neighborhood of Keto enthusiasts and those hostile to gluten. Not many want chocolate chip cookies. They prefer cookies that fit better with their diet.

The other person doesn’t start by baking cookies. Instead that person decides to canvas the neighborhood and asks what the neighbors prefer and takes orders specific to their tastes. From there, the person buys the ingredients required for each order, bakes cookies, and delivers them to satisfied customers.

The first person committed valuable resources to a product that many didn’t need or want. The second was able to manage resources by committing them to a product that customers did want.

Build E-learning Courses People Need

There are some lessons in here for us because often the courses we design are made to fit a general need, but not specific enough to provide value to everyone. The main culprits for this are lack of time (so we just crank out a course to get it delivered) and content-centric courses (rather than ones focuses on the user or performance goals).

Training needs to be designed with the end-user in mind. Often we start with content and figure out how to package it into a”course” that we can deliver online. The mistake is that while the content may be valuable, we tend to focus on delivery of the content as the end-goal. Then we become like the first cookie seller where we peddle a generic product that doesn’t meet real needs.

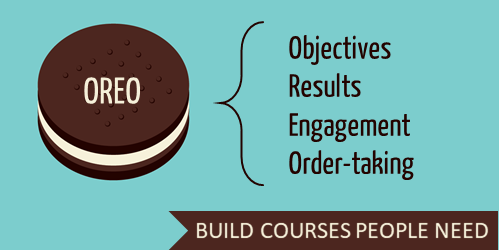
Here’s a simple cookie-themed acronym to help with working through the course design: OREO

While this isn’t revolutionary advice, it is still a good reminder to have clear objectives and manage the resources appropriately. What tips would you share for beginner course designers?

Events

Free E-Learning Resources

Want to learn more? Check out these articles and free resources in the community.

Here’s a great job board for e-learning, instructional design, and training jobs

Participate in the weekly e-learning challenges to sharpen your skills

Get your free PowerPoint templates and free graphics & stock images.

Lots of cool e-learning examples to check out and find inspiration.

Getting Started? This e-learning 101 series and the free e-books will help.


variables dashboard to save time e-learning

Variables add all sorts of capability to the learning experiences you create. They allow to move past linear, click-and-read content to more complex interactions with branched scenarios and personalized, adaptive learning.

Today I’d like to share a tip that really comes in handy when working with variables. It’ll save time and really help when you use a bunch of variables that are interdependent.

The 1-2-3 of Variables

Working with variables is a three-step process:

  • Create the variable: which is a like a bucket waiting to have a value
  • Adjust the variable: some action or trigger changes the value of the variable
  • Use the value: once the variable has a value or new value, that information can be used to trigger a different action

I explain that in more detail in this post on how to simplify working with variables in e-learning.

Add a Reference to the Variable for Troubleshooting

When working with variables, there is some trial and error and continuous testing. I always recommend adding a variable reference to the screen so that when troubleshooting or testing you can see the current value of the variable. This really comes in handy. If triggers depends on the value of the variable, you want to see that the variable is actually changing. If not, then you know where to start looking.

I explain that in more detail in this post on how to work with reference variables in e-learning.

Testing Variables in Your E-Learning Course

Here’s where it gets tricky. Some courses can have a ton of variables. For example, you may have a slide at the end of the course that requires dozens of interactions throughout the course. These interactions allow you to display personalized feedback. And each interaction is connected to interdependent variables.

Testing that everything works requires going through the course to activate triggers that adjust the values of the variables. This is really time-consuming. Unless you create a variables dashboard.

How to Create a Variables Dashboard

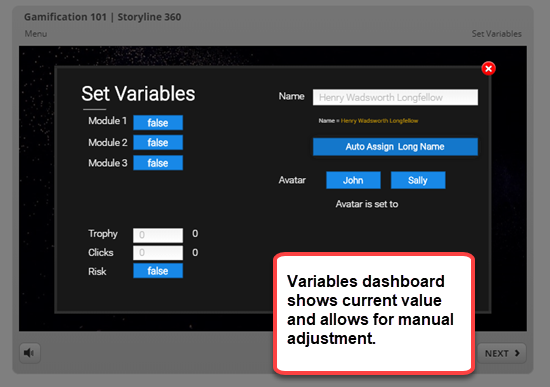
A variables dashboard allows you to be anywhere in the course and test how something would work depending on the value of certain variables.

For example, in a previous post we discussed how to lock navigation based on completing specific actions. To test it, requires completing all of the actions.

However, with a variables dashboard you can manually adjust the variables and then go to that single slide to test it. That saves a ton of time and frustration.

variables dashboard

Here are the basic steps to create a variables dashboard:

  • Create a slide that shows the current value of the variables and also allows you to manually adjust them. In the image below you can see I have buttons that let me change from true to false. There are text input boxes to add text-based values, and ways to adjust the numbers for variables that count specific activities.
  • Add this slide as a lightbox slide. I add it to the player so that it’s persistent and available throughout the course.
  • Prior to final publishing, get rid of the lightbox slide so that it’s not available to those who actually take the course.

variables dashboard

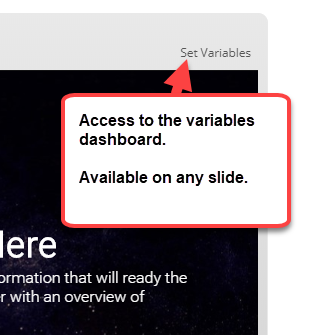
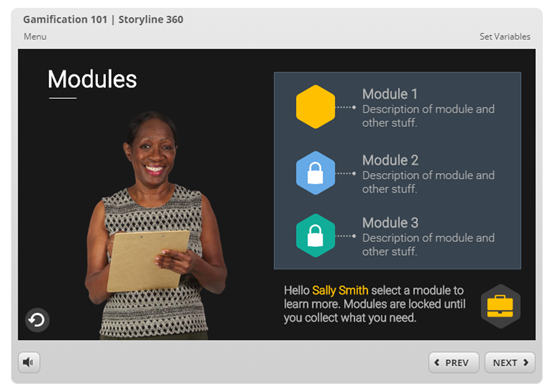
Below is an example of a test module I used for a recent gamification webinar. You’ll notice the “Set Variables” link on the top right corner. Go ahead and test it.

variables dashboard example

Click here to test the variables dashboard.

If you want to learn more, here’s a tutorial where I explain how and why it’s set the way it is.

Hopefully, you’ll find using a variables dashboard helpful and productive when build your own courses.

Learn More About Variables

If you haven’t used variables before, it’s time to learn how and then start to create all sorts of cool courses.

Here are some posts that will help you learn more:

Events

Free E-Learning Resources

Want to learn more? Check out these articles and free resources in the community.

Here’s a great job board for e-learning, instructional design, and training jobs

Participate in the weekly e-learning challenges to sharpen your skills

Get your free PowerPoint templates and free graphics & stock images.

Lots of cool e-learning examples to check out and find inspiration.

Getting Started? This e-learning 101 series and the free e-books will help.


locked navigation

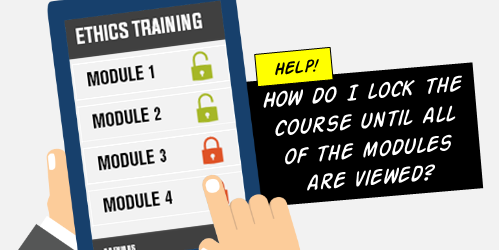
The question I see asked almost every day revolves around locking navigation until a user has completed a task. In the most common case, the first slide is a course menu. The user clicks a button, goes to a module, completes it, and comes back.

At that point, the module is marked complete and the user goes to another module and repeats the process until all of the modules are complete. Once that is satisfied, the user can continue.

There are a number of ways to approach this, but I’ll show the way that probably makes the most sense and is easiest to troubleshoot. In the process, I’ll offer a few bonus tips. Watch the tutorials for the details.

It Starts with Variables

Learn to use variables. The getting started tutorials show how and they offer some practice activities. In fact, the true false variable tutorials actually answer the top question asked.

For the novice, variables may seem intimidating, but once you understand them, they’re easy to use and give you a lot more control over the design of your course.

In Storyline, working with variables is a three-step process:

  • Create a variable
  • Use a trigger to adjust the value
  • Use that value to do something

A variable is a piece of information. In this case, we use a variable to track if the person’s done something. We’ll use a true/false variable and start with an initial value of false (1. create variable). When the user completes a module, we create a trigger to change the value from false to true (2. adjust value). When all of the module variables are true, we can use a trigger to unlock the navigation (3. do something).

Tracking Navigation with Variables

Now let’s get started. I’ll write out the basic steps, but I recommend watching the video tutorial to get the detail.

Download the source file here.

Menu Slide

  • Create a trigger to disable the next button when the timeline starts. This prevents the user from clicking forward.
  • On the module buttons, add a custom “complete” state rather than using the “visited” state. You’ll use this to indicate the module is completed.
  • Add a trigger on the buttons to jump to the specific modules.
  • Add a trigger to change the state of the module button to complete when slide starts on the condition that the variable for that module is equal to true.
  • Add a trigger to change the state of the next button to normal when the slide timeline starts on the condition that all variables are true.

Module Slides

  • Create a true/false variable for each module that you’re tracking.
  • Set the initial value to false.
  • Name the variable so when it’s read it makes sense: such as Module1Complete = False
  • On each module, add a trigger that adjusts the variable from false to true. It doesn’t matter what you use to trigger the event. Some people use a button and some use the last slide’s timeline. It really doesn’t matter. The main point is to have a trigger that adjusts the variable from false to true.
  • Create a button that returns to the menu slide.

A few tips and common issues:

  • Trigger order matters. Often the button has two triggers. One jumps to a slide and the other adjusts the variable. If the user jumps to the slide first, it leaves before the variable can be adjusted. Change the trigger order so that the variable changes and then leave the slide.
  • “When timeline starts” is key when you visit the slide. Many people use a trigger to do something when the variable changes. However, when returning to the slide, the variable has already been changed. Thus nothing happens. You need to load the slide and then evaluate the value of the variables.
  • Create custom states and don’t use the built-in visited state. I like to create custom states so that there’s no conflict with pre-built states. The built-in visited state doesn’t require triggers. If a user clicks on the object, it is visited. I’ve seen dozens of examples where users create conflicts between their triggers and the built-in states. It’s good to create your own states for specific control.
  • Variables are best when leaving slides. A lot of people use states to trigger objects, such as change next button when the state of all buttons are visited. However, states are slide-specific and variables are available throughout the course. Variables also give you complete control. It just makes it easier to troubleshoot when using variables because you can see what’s going on.
  • Use text references for variables. They let you see that the values are set and what they need to be. It’s challenging to troubleshoot if you can’t be sure that the variables are changing.

While today’s tutorial is relatively simple and limited to locking navigation, once you understand the core concepts, you can use similar techniques to create branched scenarios and adaptive learning paths.

That’s a quick run down of the most commonly asked question. Be sure to watch the video tutorial to see all of the details and some bonus tips. And if you haven’t watched the getting started tutorials, make the investment to go through them. They do answer many of the the questions I see in the community.

Events

Free E-Learning Resources

Want to learn more? Check out these articles and free resources in the community.

Here’s a great job board for e-learning, instructional design, and training jobs

Participate in the weekly e-learning challenges to sharpen your skills

Get your free PowerPoint templates and free graphics & stock images.

Lots of cool e-learning examples to check out and find inspiration.

Getting Started? This e-learning 101 series and the free e-books will help.


meaningful content

The reality is that many e-learning courses are irrelevant to the needs of the person who has to take them. Lawsuits and regulatory compliance dictates a lot of demand for e-learning courses. It puts instructional design on the back-burner and end-of-year certification becomes the priority.

It’s just a reality of our industry.

Information vs Performance

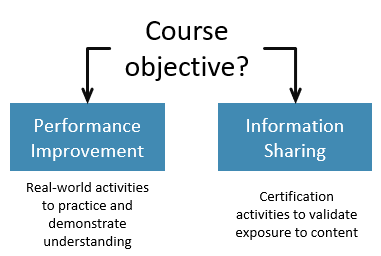
I’ve always split courses into one of two groups: information or performance

  • Information: share information and certify a basic level of awareness/understanding
  • Performance: change behavior to meet a specific metric

By splitting into those groups, I know what resources to commit to the projects. Performance-based training takes more effort to build and I want to have the resources to build those courses. I don’t want to squander my limited resources on courses that just require a few slides and final quiz.

relevant meaningful e-learning

With that said, regardless of the content, courses should still be framed in a manner relevant to the person who has to take the course. It may be compliance-based content, but there’s a relevant context for compliance. And framing the content in that context helps ensure understanding and compliance (which is the objective).

Here are three ways to take generic compliance content and make it more meaningful to the end-user.

Get to the Know the Learners & Their Environment

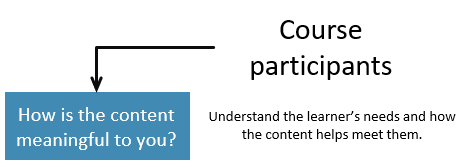
Try to spend time with the learners. Become familiar with their routines and how they do what they do. Often, the procedures they perform in real life aren’t congruent with what the managers or subject matter experts expect. It’s good to know this before building a course that people ignore because it’s not the way they do things.

relevant activities for e-learning

Share with them the objectives of the course and some of the essential content. Ask how that plays out in their real, day-to-day activities. They’ll give you some good fodder for case studies and simple scenarios.

Be a Bridge Between the Content Owner and the Learner

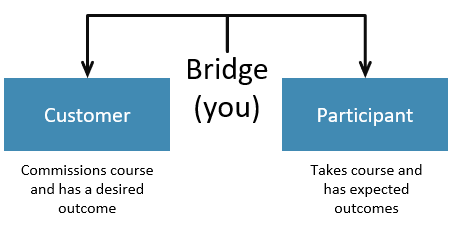
The content owners and those who commission the course often have different objectives than the person who takes the course. This is especially true for compliance training that often seems pointless to the learner.

bridge between customer and learner

Part of your role is to blend the organization’s needs with the learner’s needs. Get the learner’s involved. It helps build awareness of the training that is being developed and they may offer valuable insight.

Content is Relevant in the Right Context

In live training sessions, you can generate meaningful conversation and engaging the attendees is easier. They share and comment. Online learning can be a challenge because a lot of compliance training is equal to a X minute lecture.

You may not engage in active conversations but there are things you can do:

Even if the course is a compliance course and may not be the most relevant, by getting the learners involved, the content can be placed in a relevant context that is engaging and keeps the people from tuning out or discounting what’s trying to be shared.

What are things you do to keep your elearning courses relevant?

Events

Free E-Learning Resources

Want to learn more? Check out these articles and free resources in the community.

Here’s a great job board for e-learning, instructional design, and training jobs

Participate in the weekly e-learning challenges to sharpen your skills

Get your free PowerPoint templates and free graphics & stock images.

Lots of cool e-learning examples to check out and find inspiration.

Getting Started? This e-learning 101 series and the free e-books will help.