As always, enjoyed learning from your insights!
Blur Your Course Into Focus
January 20th, 2009A good elearning course always starts with good content. However, content alone isn’t your only consideration when building elearning courses. How your course LOOKS plays an important role.
One of the beefs people have with rapid elearning courses is that they tend to look like PowerPoint slide shows. Even if the content is good and well presented, odds are that many of your learners will quickly tune out of your course.
There’s no reason that has to be the case because there are simple things you can do to make your courses look different and be more effective in teaching.
To get started, I highly recommend books like Beyond Bullet Points and Presentation Zen. One that I’ve heard a lot about, but haven’t read yet, is Slide:ology. These books help you think about how to present information in a new way. You’ll learn to craft a better message and make screens that are more visually interesting.
If you have the budget, it’s always a good idea to bring on a graphic designer. But the reality is that a budget and rapid elearning usually don’t go hand-in-hand. In that case, you’re kind of left to fend for yourself.
In today’s post I’m going to talk about using blurred images. Normally you don’t want a blurry image…like when you’re out walking and take a picture of a UFO hovering over the neighborhood. However, when building your elearning course you can use blurry images to your advantage.
Direct Where Your Learner Looks
If you shoot a photo or video, you can change the focal depth. This allows you to blur the background and focus on the subject. You do this; so that the eye is naturally drawn to the area that’s in focus. It’s also a good way to take the focus off of background items that might interfere with the subject.
Suppose you’re presenting a scenario in your course. Dave the accountant is on safari. His driver was attacked by a baboon and carried off into the brush. Dave’s stuck in the middle of nowhere by himself. What’s he to do? Compare the two images below.

There’s a lot going on in the screen above. It might confuse your learners. However, if you apply a simple blur to the image, you pull the focus away from less important information and transfer it to Dave where it belongs.

In the past I’ve used this to clean up images where there was a lot of noise in the background. I even recall one project where there was an obvious safety violation in the picture and we couldn’t reshoot it. So all I did was blur the background to hide it (and then prayed no one lost an eye).
Something that a lot of people don’t consider is that everything on your screen should be planned. Whatever you put in front of your learners should contribute to the course. You definitely don’t want irrelevant information competing with what you’re trying to convey.
Add Some Action to Your Image
Motion blurs are a good way to convey a sense of action without explaining a lot or having to spend the time to set a scene. Look at the two images below. If you saw them in a course, what do you think they say?


While the examples above are simple, the main point is that with some creativity, you can use the motion blur filter (or even a radial blur) to help set the tone for content in your elearning course.
You can get some good ideas of how to use a motion blur by looking at examples on some of the stock photo sites. Just type in: motion blur.
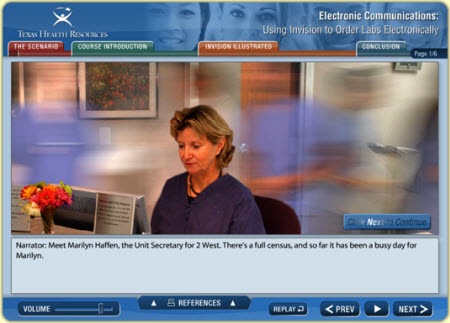
Here’s a screen shot of a course created by Enspire that I saw online a while back. I did the screen grab because I thought it was a great example of how you can take a still image and give it a sense of action. Add some busy office background noise and you can easily convey the sense of a lot going on…without having to explain it.

Layer Images to Create Activity and Focus
Something that I like to do that doesn’t require a lot of work is to layer images that are out of focus. By switch between them, I can direct the learner’s attention. It’s kind of like the technique you might see in a movie.
For example, you focus on a flower, but then the focus shifts from the flower to something in the background. You end up with the background in focus and the flower out of focus. You can do something similar in your courses.
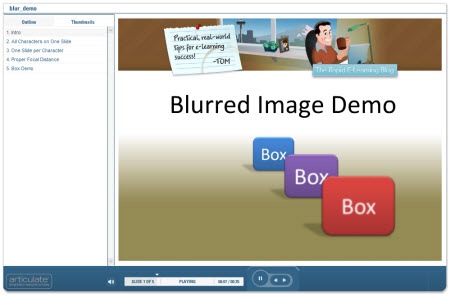
Check out the quick demo to give you some ideas and see it in action.
Here are a few points from the demo:
- A blurred background can add visual interest to your course. It adds some depth and helps pull your other content into focus.
- You can mix and match clip art and photos. Even if you don’t use the blur on your images, don’t be afraid to experiment. The worst that can happen is that it doesn’t work. In the demo, the background is a real photo and the characters are clip art. I think if works on those slides.
- You don’t need to put everything on one slide. The first example is one slide. The others are stretched over multiple slides. I just hid them in the navigation panel.
- As you can see, you can apply the effect to more than just your pictures. It works great on text and shapes.
That’s a quick overview of how you can use blurred images in your elearning courses. You’ll have to learn how to do that with your graphics editor. However, it’s usually a pretty easy process and the blur filter is standard.
Here’s a quick demo that I did to show you how to apply the blur effect with two free tools. One is web-based. The other is a desktop application. Here are some links to free resources if you don’t have a graphics program.
I look forward to your comments and any ideas or tricks that you use. Feel free to share them in the comments section.
Events
- Everyday. Check out the weekly training webinars to learn more about Rise, Storyline, and instructional design.
Free E-Learning Resources
 |
 |
 |
|
Want to learn more? Check out these articles and free resources in the community. |
Here’s a great job board for e-learning, instructional design, and training jobs |
Participate in the weekly e-learning challenges to sharpen your skills |
 |
 |
 |
|
Get your free PowerPoint templates and free graphics & stock images. |
Lots of cool e-learning examples to check out and find inspiration. |
Getting Started? This e-learning 101 series and the free e-books will help. |
26 responses to “Blur Your Course Into Focus”
So, how do I actually DO the blur. I can’t find out the instructions.
thanks.
What are your sources for clip art and pictures?
Another great tip and useful idea.
What tool are you using to create blurred backgrounds and images? I like the affect but do not know how to create it.
Great advices as always. I wonder how do you create this pictures in your demo that look like drawn? I thought its made with Flash “trace Bitmap” function but no:)
I use PowerPoint 2003 and I can’t figure out a method to blur an AutoShape.
Vicky
Ditto. How do you actually DO the blur? I use the latest Microsoft Office. Lorna
Nice post!
Certainly brings focus and attention of what is essential.
The photo editing tools aviary and picnik are both linked to aviary.com thought I let you know!
Yes, I agree with you Tom! In situations where you need to depict screen shots from software applications, and direct the learner to a specific field- you can highlight the field, magnify your selection, and blurr the background. Voila! results are pretty striking. BTW I used SangIt to get this effect but check it out maybe other softwares would support this too.
[…] Blur Your Course Into Focus | The Rapid eLearning Blog | Tom Kuhlmann | 20 January 2009 […]
[…] har jag läst två inspirationskällor. Dels från Rapid E-learning blog om hur man presenterar innehållet bra. Från Stefan på Redaktionen.se dök ett nyhetsbrev ned i min mail. Där skriver han om hur han […]
Hi Tom
I just breifly tested the ungrouping clipart practice on some business pictures and there were so many tiny elements I found it very difficult to pull the main character out of the scene. Any tips?
Hey there-
Our company, Enspire Learning (www.enspire.com), produced the animation that was unattributed in the blog. It looks more impressive in animated format.
Thanks for the great blog entry.
Cheers,
Shon
[…] http://www.articulate.com/rapid-elearning/blur-your-course-into-focus/ < Posted by mperno Filed in design ideas, images Tags: Add new tag, design ideas, images Create a free edublog to get your own comment avatar (and more!) […]
Jerry,
For the character photo in the top two examples, Tom used the Narrator Files stock photography of coaches/narrators. http://www.narratorfiles.com
— Matt
[…] Blur Your Course Into Focus […]
It this the only program to created blur ? Have you try this in the only program I have? Microsoft 2007 .It a very nice idea with articulate but this take time to work with. I think I can with more time. My pc erase that program .I look at it in my pc and the folder is empty .
A great post. Thanks Tom!!
Hello ,I have look over these site and I work in the Picnik .I look over the Aviary and the Gimp. For now I think I stay with the Paint until I manage the other.They all are good tool .But it take time with the Gimp ,Aviary more that Picnik and paint.You see what I have done with paint and Picnik when I sent it to you.
Thank you very good post . I hope I get in to the other so you can see if I past this to
[…] Blur Your Course Into Focus discusses ways to use a blur filter so that you can direct the learner’s focus. […]
[…] This post was mentioned on Twitter by Mel Aclaro, eFront Learning. eFront Learning said: good article => Blur Your Course Into Focus http://cot.ag/9xpMEX […]


0
comments