The Rapid Elearning Blog

Archive for the ‘Branched Scenarios’ Category


Articulate Rapid E-learning Blog - pre-assessment scenario

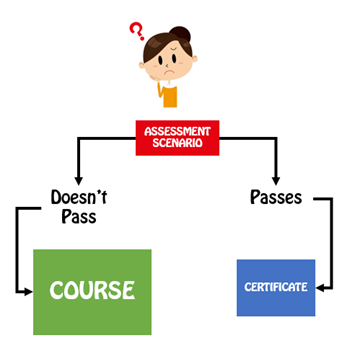
Organizations operate at the speed of business and don’t like to waste time or money. That’s especially true when it comes to pulling people away from their daily tasks. And this is something that happens every time a person is asked to complete an e-learning course. So it’s important to create the most cost-effective process possible and still meet the organization’s goals.

One way to make e-learning courses cost-effective is by sorting your learners and then pushing them to a successful learning path. Some who take the courses are more experienced and don’t need the same course that the new person does. And the new person probably needs a lot more context and content.

Understand Your Learners Before Building a Pre-Assessment Scenario

People come to the courses with varying levels of experience, skills, and understanding. In an ideal world, you can craft an adaptive learning process where everyone gets a unique learning experience, but that’s usually not an option. Most of the time, you have to create one course that meets the needs of everyone.

  • Experienced learners already have a lot of contexts. And often the e-learning courses act more like a certification process than new learning experience. So, in that sense, let them prove what they know and move on to completion.
  • New learners are new and don’t have a record of accomplishment of experience. Often, they don’t know what they don’t know. Some may know more than others. And some may think they already know the content.

Let Learners Test Out Instead of Using a Pre-Assessment Scenario

A common option is to let learners test out by successfully completing a pre-test. Present an assessment upfront. If they pass it, they go to the end and are done. If they don’t pass it, they go to the beginning and take the course. This is a viable model and works great for simple compliance training where an annual course completion certificate is the main objective.

Articulate Rapid E-Learning Blog - pre-assessment scenarios let you test out

However, many of those pre-assessment tests are very basic and what do they really prove? They may prove the person knows the content, but it doesn’t mean that they know how to apply it. Or it may prove that they’re good guessers. In either case, they generally don’t prove understanding, especially in a performance environment.

Create a Pre-Assessment Scenario

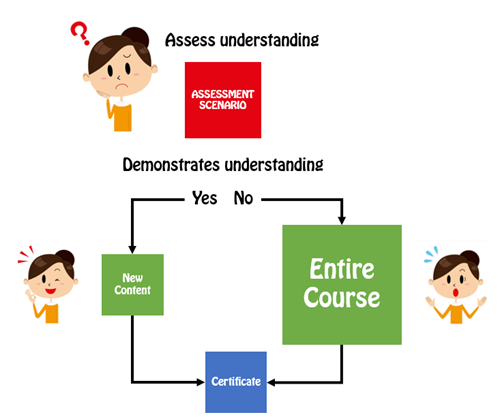
Functionally a pre-assessment scenario is the same as a pre-test. The goal is to sort the learners and move the experienced and novice learners down different paths. However, the core difference is that the assessment scenario attempts to assess deeper understanding of the content and its proper application.

Pre-tests typically ask a series of multiple-choice questions. And again, this is fine for a simple end-of-year certification. However, if the course is more performance-based, then the scenario allows you to stage an event that lets the learner demonstrate that they can meet the performance requirements by successfully navigating the pre-assessment scenario.

Articulate Rapid E-Learning Blog - pre-assessment scenario flow

A couple of additional benefits is that a pre-assessment scenario helps remind the experienced person of what they need to do and for the new person it helps expose deficient understanding and the types of situations they may encounter in the real world. The pre-assessment scenarios also help cement the objectives for the course. When a person isn’t successful, they’re more apt to pay attention to the course content since they’ve already been proven to lack some of the expected understanding.

A few production tips:

  • Keep it short. Instead of big, long scenarios which take more time to produce, create a series of quick hit scenarios.
  • This is a pre-assessment. So don’t feel obligated to do much to set up or support the assessment with resource content. If they can demonstrate their understanding, they can pass the pre-assessment. If they can’t, well, that’s why you created the course.
  • Create templates. You can create interactive scenario templates and reuse them for quicker production.

Pre-tests are a great way to efficiently and effectively move learners through the training process. However, they are limited in what they can assess. Switching to a real-world pre-assessment scenario provides a better way to assess understanding and application of the training content. It also lets those who don’t pass understand why they need to take the course.

Events

Free E-Learning Resources

Want to learn more? Check out these articles and free resources in the community.

Here’s a great job board for e-learning, instructional design, and training jobs

Participate in the weekly e-learning challenges to sharpen your skills

Get your free PowerPoint templates and free graphics & stock images.

Lots of cool e-learning examples to check out and find inspiration.

Getting Started? This e-learning 101 series and the free e-books will help.


branched scenarios

In a previous post, I wrote about a simple way to structure a scenario by using the 3C model.

  • Challenge: This could be something as simple as a question or a very involved case study.  The goal is to get the learner to think through the content and make a decision.
  • Choice: Once the learner is ready to make a decision, you provide choices.  A good scenario is nuanced and not completely black or white.  You want to engage the learner and really get them to think through the scenario.  You don’t want the choices to be too obvious.  If they are, then a scenario might not be what you need for the course.
  • Consequence: Each decision the learner makes produces consequences.  At this point you can provide feedback.  It could be simple text with instructions to continue.  Or you could advance the learner to another decision-making challenge.

The 3C model is an easy way to build the scenario infrastructure.  You can save this as a scenario template.  That’s easy enough to do.  Where a lot of people struggle is how to create the visuals for the scenarios.  That’s because most of us don’t have the technical skills to build out the right graphics.

To make the task easier, I broke the graphics for scenarios into five parts: characters, environment, text, containers, and buttons.  Using that approach makes it easier to think through the visual design.

Here’s a quick overview.  The image below shows a scenario screen with the five elements.  You have characters.  The are in an environment.  The scenario usually has some text.  It’s either going to be on the slide or in some sort of container like a box or callout.  Then you’ll have the choices for the learner to activate.  These can be actual buttons or hotspots.


The Rapid E-Learning Blog - all of these parts added together make a scenario

Those five parts together make up the visual elements of your scene.  Now let’s look at them in a bit more detail.

Interactive Scenario: Characters

Characters are the people or avatars you use for the scenario.  You can have a single character or multiple characters.  I prefer to build a few different templates from which to work.  In the examples below, there’s a single person scene and one that represents two people talking.  As you can see, nothing fancy, just a bunch of placeholders.

The Rapid E-Learning Blog - create various templates with different character placeholders

Interactive Scenario: Environment

The environment is the backdrop for the scenario.  Is the character in an office, public area, warehouse, or a production environment?

The environment sets the tone for your scenario.  If you add some ambient background noise, that will lend to the reality of the scene.  For example, if it’s a business environment you could add some office machine sounds or people murmuring the background.

The Rapid E-Learning Blog - easily swap out your environments

Interactive Scenario: Text

In most cases you have onscreen text.  There are all sorts of ways to add the text so you want to consider the font you use and how it’s positioned onscreen.

Keep in mind, the text not only conveys the written word, it’s also a graphic that conveys its own meaning and helps set the tone for the scenario.  For example, in the thought cloud below, I used Comic Sans because it’s more personal than something like Times New Roman.  It fits a text bubble.  On the chalkboard, I used a handwritten font to look like it was written on the board.

The Rapid E-Learning Blog - the text can be represented in many ways

Interactive Scenario: Containers

Containers are the boxes you use for the text or scenario-specific content.  For example, a text bubble or call out is a container.  You might have other containers on the screen such as an instruction box, or one of those text boxes that contains key points or a call out.  These containers will change based on the layout and look of your course.

In the examples below you can see a number of containers from paper strips to a picture frame.  There’s really no limit to the type of container you can use.

To keep with the visual theme make sure to pick images and fonts that go with the theme.  You want everything to be cohesive and look like it belongs together.

The Rapid E-Learning Blog - containers can be simple text boxes or elaborate images

Interactive Scenario: Buttons

A button is where the learner clicks to activate the choice.  It could be an actual button or it could be a place on the screen where the learner is going to click (like a hotspot).  If it’s a hotspot, you usually have to design a unique graphic or text that indicates that is part of the choice.

In the first example below, the “button” is actually a hotspot over the paper strips.  However, in the second image, I used real buttons.

The Rapid E-Learning Blog - what's the learner going to click on and how will it look?

I use this simple framework to build my scenario templates which contain placeholders for all of the five visual elements.  When I know that I am going to use a scenario template, then I know what elements I have to custom build for that scenario.  Once they’re built, all I have to do is swap the placeholder graphics with the real course assets.  However, it doesn’t mean that the screen is going to look exactly like the placeholder.  Look at the example below and compare the placeholder screen to the final screen.  You’ll notice that while all five elements are represented, the layout isn’t verbatim.

The Rapid E-Learning Blog - template before and after

  1. Character:  The character isn’t full body like the placeholder.
  2. Environment: I added an office environment.  I blurred the image so you can tell it’s in an office, but I didn’t want too many details that might distract.
  3. Text: I pasted in my content.
  4. Container: In this case the container isn’t a text box.  Instead I chose to go with a note theme and used the grid pad for the container and sticky notes for the choices.
  5. Buttons: The buttons are made to look like sticky notes.  The learner clicks on them to make a choice.

Here are some considerations:

  • You want to be able to right click and swap out the placeholder content without a lot of tweaking.  Because of that, make sure your assets are the same size.  Otherwise, when you make the switch, you’ll have to scale and move the inserted assets around.
  • On the other hand, it’s just a template.  The template is just a guide.  You’re not locked into the way it’s initially designed. Don’t worry about having to move stuff around or changing your content.  Feel free to delete items you don’t need.  Or adding additional assets.
  • Keep it simple.  Don’t over complicate the scenario.  Remember, the elearning course is just one facet of the learning process.  I’d rather build a simple scenario and get it out to my learners in a few days, then spend weeks (or months) building out a more complex scenario.
  • Remember good visual design.  It’s easy to add too much to the screen when building a scenario.  Only add what you need and make sure that it’s clear to the learner what you want them to do.

Building elearning courses can be quite the undertaking.  Most people I know are one person shops or work on small teams with few resources and usually no graphic design support.  Hopefully these tips will help you the next time you need to build out a quick scenario.

Events

Free E-Learning Resources

Want to learn more? Check out these articles and free resources in the community.

Here’s a great job board for e-learning, instructional design, and training jobs

Participate in the weekly e-learning challenges to sharpen your skills

Get your free PowerPoint templates and free graphics & stock images.

Lots of cool e-learning examples to check out and find inspiration.

Getting Started? This e-learning 101 series and the free e-books will help.


interactive branched scenario

This post is in response to some conversations I had during the last ASTD conference in Washington, DC.  There were some people who suggested that rapid elearning was only good for basic linear courses and they lamented that they couldn’t build interactive scenarios.

I’ve built hundreds of rapid elearning courses and I can tell you that building branched scenarios with your rapid elearning tools is not only possible, but it’s actually pretty easy to do.

In today’s post, I’ll start by showing you the three-step model I use to build the scenario infrastructure.  Once you know how to do this, you can pre-build all sorts of scenario wire-frames with placeholder content.  Then when you want to use one in your course, it’s just a matter of inserting the pre-built scenario, setting your links, and adding your content.

The Three C’s of Scenario-Building

I like to keep things simple.  So I use what I call, the “3C Model.”  Each scenario consists of a challenge, some choices, and then consequences of those choices.  That’s basically it.

The Rapid E-Learning Blog - 3C model for elearning scenarios

When I build out my scenarios, sometimes I’ll use one branch to let the learners test their understanding.  I don’t score it or anything like that.  I just want to give the learner a way to test what they know.  Other times, I’ll use the branch to sort the learner.  If they get it, they move on.  If not, I can send them down a path to get additional info.  With interactive branching you can also convert a linear elearning course into more of a story-like course that both engages the learner and lets them interact with the content.

I start by creating a generic 3C model where I provide a challenge, choices, and consequences.  Then when I want a scenario, I drop in a 3C.  If I want to continue the scenario, I drop in another 3C.  So I can make my branch as simple or complex as I want it to be.  Once I have the infrastructure built, I swap out the placeholder content with my real course content and I’m done.

The image below represents the structure for a generic three-choice branch.  This is what I pre-build.  I also pre-build two-choice and four-choice branches.  Then when I need them, all I have to do is insert them into the course.

The Rapid E-Learning Blog - generic 3 choice elearning scenario branch

So in the example above, you’re presenting a challenge to the learner.  The learner makes a decision and then selects the appropriate choice.  The choice made produces consequences.  At this point you can provide feedback and have the learner continue through the course.  Or you can add another 3C structure at the end of the consequence.  So you’d end up with something that could look like the image below.

The Rapid E-Learning Blog - adding the 3C model template to branched elearning scenarios

There are a few ways to structure this ongoing branch.  In the first 3C section, the learner gets to the consequence.  At that point, you could provide feedback.  Then move on and present another challenge.

Or you could do what I did in the second section.  Instead of providing feedback, I just jumped right into another challenge.  Thus, the consequence of the choice the learner makes creates another challenge.

To make my scenario-building easier, I have some pre-built scenarios that I can quickly drop into my course.  They represent the generic scenario structure and they’re built with placeholder content which I can easily swap out with the content from my course.

The 3C model is a very simple model to use.  Whenever you want to create a decision-making scenario, just drop in a 3C template.  If you want to continue the scenario, then add another 3C template.  You can add as many as you like and make your scenario as simple or complex as you want.

Just keep in mind that if you want to make a complex scenario (which could provide a very rich learning environment) you really need to understand the subject matter and create something of value.  Don’t just create branched scenarios to be “interactive.”  Make sure that they’re relevant and meaningful.  There’s nothing worse than forcing your learners to click through a meaningless scenario that is both obvious and a waste of their time.

If you can tell the person in one sentence what they’d learn through a ten-click scenario, odds are that you’re better off sticking with the one sentence.  Personally, I’m from the Archie Bunker School of Scenario-building.  I don’t have the patience to click through a bunch of pointless choices.  And my guess is that your learners feel the same way.

The Rapid E-Learning Blog - Archie Bunker quote

One last point, spend some time pre-building all sorts of scenario looks.  Then duplicate them and create versions with different choice options.  For example, each scenario look should have a two-choice, three-choice, and four choice option.  You could add more, but typically, it’s hard to come up with more than four viable choices.  And if you continue the branching, you could end up with a real confusing mess since the options would grow exponentially.

The image below shows three different scenario looks.  There’s the placeholder look that you’d create, and an example of how it might look with real content.

The Rapid E-Learning Blog - before and after examples of scenario templates

As you can see, building a scenario using the 3C model is pretty easy to do.  It always starts with challenging the learner’s understanding or assumptions.  Then you present choices for the learner to make decisions.  Each decision produces a consequence where you can provide feedback or move the learner to a new challenge for more decisions.

Events

Free E-Learning Resources

Want to learn more? Check out these articles and free resources in the community.

Here’s a great job board for e-learning, instructional design, and training jobs

Participate in the weekly e-learning challenges to sharpen your skills

Get your free PowerPoint templates and free graphics & stock images.

Lots of cool e-learning examples to check out and find inspiration.

Getting Started? This e-learning 101 series and the free e-books will help.


This is kind of a bittersweet post.  Originally, I was going to write about using Google Lively’s virtual world to build scenes and characters for your elearning courses.  The application was free and had some potential as a learning tool.  Apparently, I was the only one who was using it, so Google decided to pull the plug.  Oh well.  If it’ll help the stock price, I’m all for it.  The 8 shares I own aren’t doing too well right now.

Even with the demise of Lively, the essence of the post still stands.  So I’m moving forward with it.  You’ll just need to find a different virtual world tool.  Any of them should work.  Make sure to read the terms of agreement.  If you’re not quite sure where to start, there’s always Second Life.  TechCrunch recently did a blog post that mentions a few of them for even more choices.

What makes this approach so compelling for rapid elearning is the cost, ease of use, and ability to create virtually any type of scenario for your courses.

Build Characters

The Rapid E-Learning Blog: create avatars

Almost all of the virtual world applications let you build your own avatars.  You typically get a broad range of choices.  In the demo above, I created a couple of characters and then made them look like normal people.  I wanted something that looked more like the real world for my scenes.

Unless you’re doing training for groundhogs in Wyoming then the avatar above probably isn’t the best choice. However, that doesn’t mean you couldn’t use a creature like that as a guide or character in your scenes.  It could lighten up the tone or add a little humor.

Set Your Scene


The Rapid E-Learning Blog: create diverse scenes

Most virtual worlds come with all sorts of rooms and settings.  I created the images above in just a few minutes.  I didn’t have to build anything.  I just entered the room and made the image.

As you can see, there are many options.  The character can go from discussing the movie My Cousin Vinny to being a discriminating blog reader.  You get a ton of freedom and creativity in where your characters can interact.

Build Your Scenario

Virtual worlds give you an assortment of characters and settings.  But the real power comes from the camera movement and views.  Because you’re in a 3D environment, you can move the camera around to quickly change the look and feel of your scenario.

The Rapid E-Learning Blog: switch camera angles

Here are a few images.  The characters are in the same location.  I changed the camera angle and then added an action to add a little drama.  The advantage to this approach is that the custom camera angles lets you set your scenario from multiple perspectives.  This is really helpful when you have dialogue between two people.  I think you’d agree that it seems more engaging.

So, how did I do it?

It really is pretty easy.  We’ll assume that you already have a script and know what types of images you want.

  • Log into the virtual world of your choice.
  • Add you characters.
  • Choose your setting.
  • Move your camera (view) into position.
  • Do a screen capture.  Depending on what you can do in the virtual world, you might even be able to make quick videos and add your own audio, like I did in the demo.

That’s it.  Pretty simple and a great way to get the types of images you want.  Of course, this approach doesn’t work for everybody and every organization.  However, it is a very easy and inexpensive way to make your elearning scenarios look a bit more engaging.

I’d love to hear what you think.  Or if you’ve done something similar, feel free to share examples or give us some tips.

Events

Free E-Learning Resources

Want to learn more? Check out these articles and free resources in the community.

Here’s a great job board for e-learning, instructional design, and training jobs

Participate in the weekly e-learning challenges to sharpen your skills

Get your free PowerPoint templates and free graphics & stock images.

Lots of cool e-learning examples to check out and find inspiration.

Getting Started? This e-learning 101 series and the free e-books will help.


 The Rapid E-Learning Blog - motivation

There’s a good chance that if you neglect the information in this post you’ll lose your job.  Want to know why?

You can present a lot of good information in your e-learning courses, but you can’t really control whether a person learns from them.  The learners own what they learn and much of it is determined by their level of motivation.

The good news is that while you can’t make a person learn, you can create an environment that is more conducive to learning.  You do this by tapping into the learner’s motivation.  Your job is to figure out what will motivate your learners and then use that angle to lure them into the course.

Typically, people are motivated when their learning has meaning.  For example, if I know that passing a course will equate to an increase in my income, I am motivated to pass the course.  The same can be said for being motivated by personal safety.

When I was in basic training at the beginning of my military service, I was given one opportunity to throw a live grenade.  I was in Finance and normally they didn’t trust us with much more than a pencil.  Before I got to throw the live grenade, I had to go through a series of practice sessions and safety procedures.  Considering the implications of making a mistake while throwing the grenade, you can be sure that I paid real close attention to what I was being taught.

The odds are that most of your e-learning content doesn’t have life or death implications, so you must be a little more creative at tapping into what will motivate those who take your e-learning courses.

5 Ways to Motivate Your Learners

Reward Your Learners.  People are motivated by rewards.  Figure out what type of reward you can give the learners and then build that into the course.  Sometimes the rewards can be timed challenges or reaching a certain level of achievement.  Other rewards could be actual merchandise, like winning an iPod.  It all depends on the course.

Rewards don’t have to be tangible items.  They can be simple things like affirmation and encouragement.  The main point is to connect with the learners and find a way to have them feel good about some sort of achievement in your course.  The reward is something as simple as being able to test out of the course.

Make Sure Your Course Has Real Value.  Before your learners click on that first button, they want to know if the course has any value or benefit.  The truth is that most people who take e-learning courses don’t see the real benefit and because of that they either aren’t engaged with the course, or they don’t complete it.  If it happens to be a mandatory course, then they’re just trying to figure out how to click through it as fast as possible.  That doesn’t have to be the case.

I used to work at an organization where any time we met with a certain executive, he’d ask about our company’s performance metrics or last quarter’s earnings report.  He wanted to make sure we knew why we were working for him.  Because he had this knack for putting you on the spot, you were more motivated to pay attention to the organization’s goals and performance.

In that case, each e-learning course had meaning and implications to my job.  This also had an additional benefit.  Not only did I have a heighten sense of awareness to previously “boring” information, but I also always felt good (see the first point) when he called me out and I knew the answer.

Help Your Learners Perform Better.  This ties into the previous point.  Your course needs to have value and it needs to be relevant to what your learners do.  People will be motivated to take your course and pay attention as they know it will help them perform better.

Your job is to connect the learner to the course content.  If I’m taking a site safety course, I’m less motivated by clicking a button on a simple assessment than if I’m thrown into a real-life scenario where I am challenged to work through some issues like what I’ll face at work.  This type of approach connects me to the content, more so than screen after screen of bullet point information.

Set Clear Expectations for the Course.  I’m amazed to see my children just click around on the computer screen to get what they want.  On the other hand, I’ve watched adults fearful of clicking a next arrow not sure what will happen.

People tend to be leery of things they don’t understand, or if they’re not sure where they’re going.  However, once they get a sense of what’s going on, they’re more apt to be responsive to the course.

If you want your learners motivated, then an effective way to get them there is to let them know what to expect from the course that you want them to take. This all ties into the points above.  You’re asking the learners to spend some of their valuable time going through your course.  They expect clarity on what they’ll do, why, and what type of outcome to expect.

Along with clear expectations is to make sure that the learner knows how to navigate your course.  I’m not saying that you must create an addendum course on how to click the “next” button.  Instead, what I’m saying is that you don’t want to create a frustrating learning experience because the learner doesn’t know what to do with the course or how to get through it.  One of the best ways to de-motivate your learners is to make your course navigation so confusing that they just leave and never come back.

Tell Them They’re Wrong.  Controversy gets our attention and is a good way to motivate.  Challenge what a person believes, or even tell him he’s wrong, and you’ll see a person motivated to prove you wrong.  Of course, this approach needs to be tempered with common sense.

However, there is a lot of value in challenging people and what they know.  It’s just a matter of knowing how to do it in a manner that is appropriate.  When a person is challenged it puts them at risk and they tend to pay more attention.

Create an environment where they can safely fail or make mistakes and you’ll challenge them and keep them engaged.

These are some basic tips and things to consider when building your courses.  What you can do in your e-learning courses to motivate your learners is dependent on the course and your resources.  However, the main point is that you find the angle that works for your learners and the course you build, and then use it to engage your learner’s motivation.  A motivated learner will learn.

Events

Free E-Learning Resources

Want to learn more? Check out these articles and free resources in the community.

Here’s a great job board for e-learning, instructional design, and training jobs

Participate in the weekly e-learning challenges to sharpen your skills

Get your free PowerPoint templates and free graphics & stock images.

Lots of cool e-learning examples to check out and find inspiration.

Getting Started? This e-learning 101 series and the free e-books will help.