The Rapid Elearning Blog

Archive for the ‘Screencasting’ Category


presentation tips

I do a lot of presentations live and online. I also record a ton of tutorials. During those presentations I’m usually showing how to do something and attendees need to see the mouse movement and where it’s at. Here are a few simple tips to highlight your mouse when presenting or recording your tutorial.

Here’s a video tutorial that walks through the tips below if you want more detail.


Click here to view the tutorial on YouTube.

Make the Mouse Pointer Extra Large
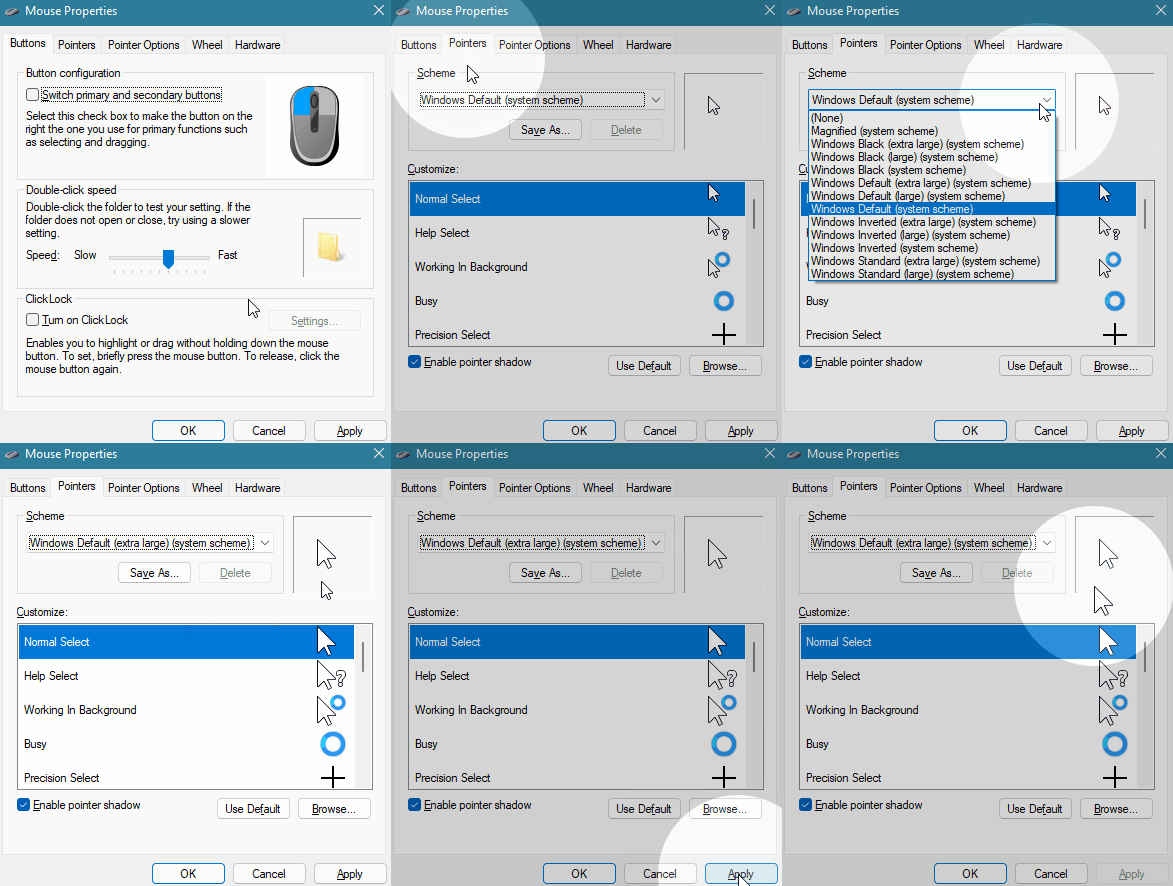
change mouse pointer size

In a presentation or tutorial you are trying to direct the viewer’s eye. This is especially true for software demos where it’s easy to lose track of what’s going on and where the mouse is moving, more so if the viewer isn’t familiar with the user interface.

Go into the mouse properties and change the mouse point to extra large.

Use Keyboard Shortcut to Show Mouse Location

I use this quite a bit. In the Pointer Options of the mouse properties, set the mouse to show location when pressing the control key. Whenever you move the mouse to somewhere else, press the control key and you can direct the viewer to that part of the screen.
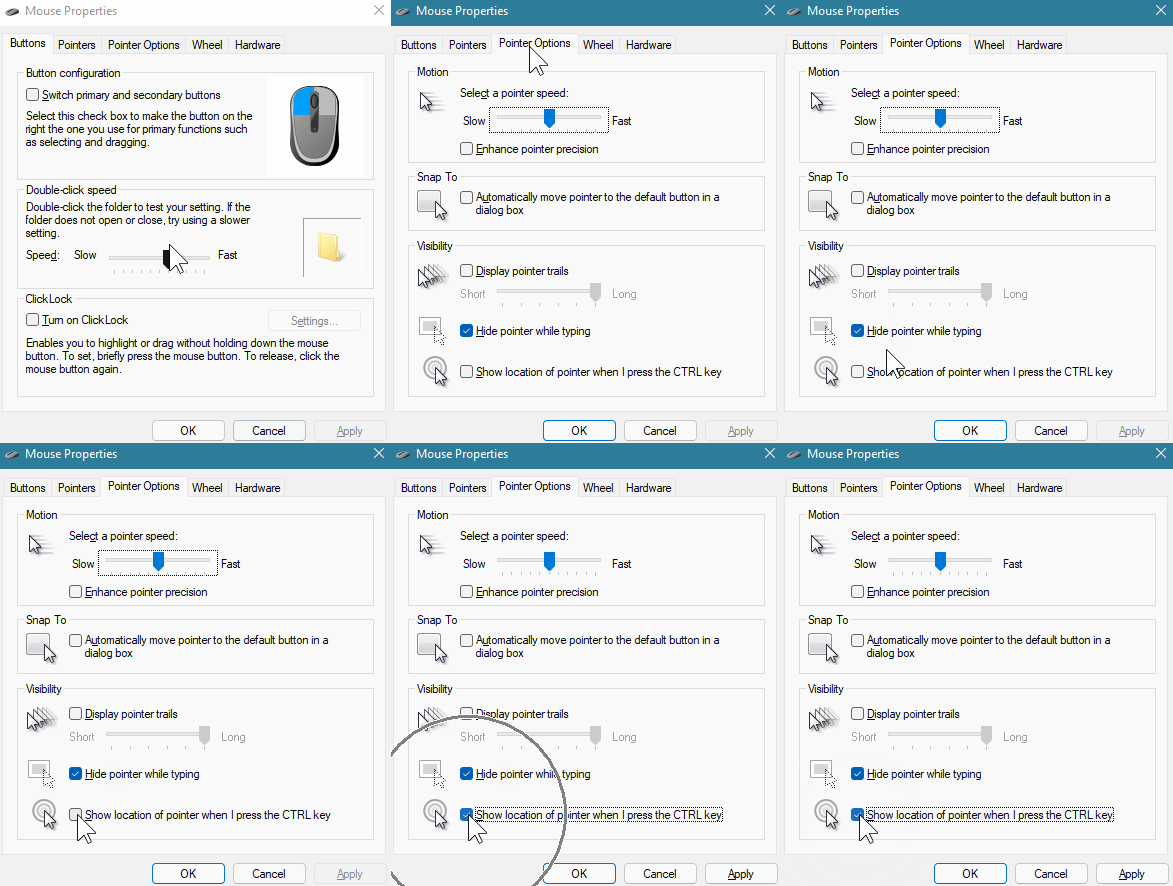
highlight mouse pointer location

Create a Spotlight Effect to Show Mouse Location

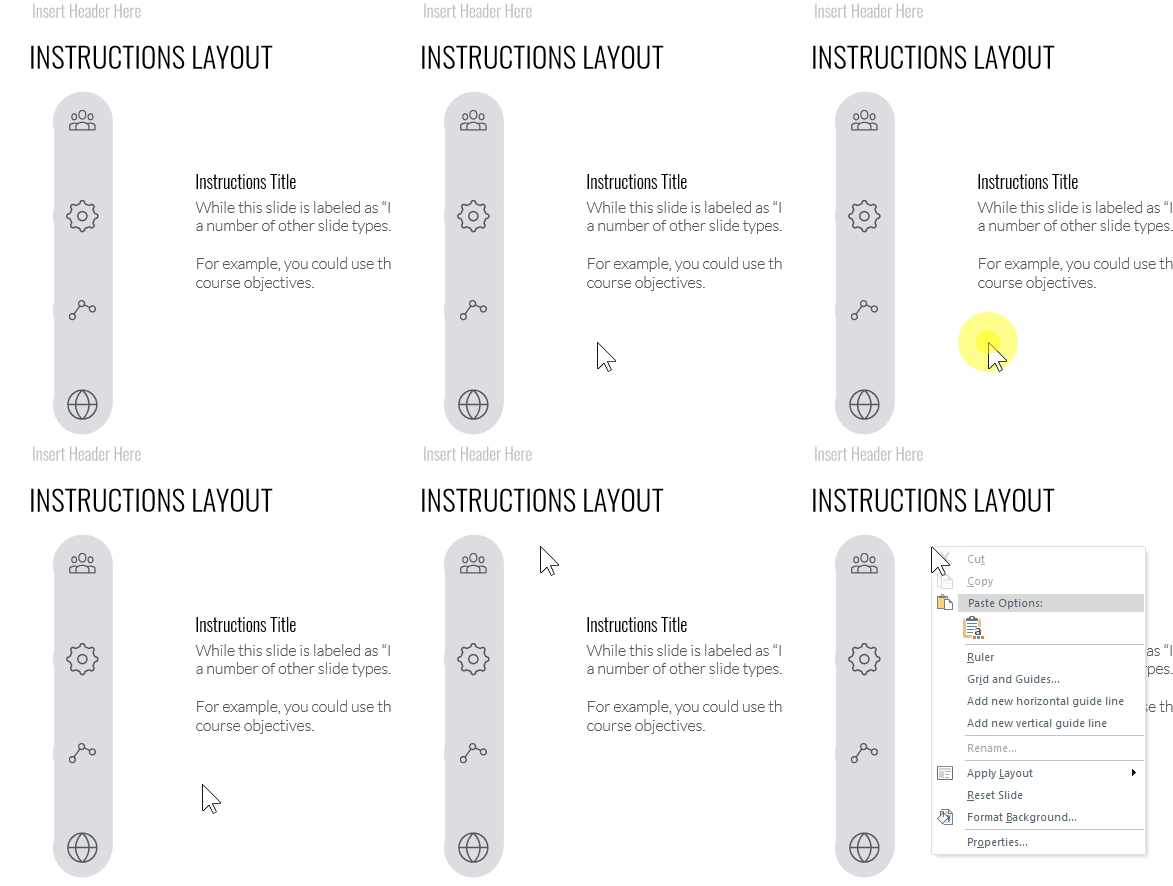
Microsoft PowerToys are little applications that add more functionality to Windows. In a previous post, we looked at how to install a simple color picker. That’s not all that comes with the PowerToys. There are three mouse related features that could come in handy. In fact, I use the spotlight effect instead of the control button feature above.
mouse pointer spotlight

Install PowerToys and then select the mouse features you want to enable. Play around with the settings and see what works best for you.

Highlight Onscreen Left and Right Clicks

If you want to show where the mouse is when you click, set the left and right click to different colors and as you click it’s easy to see where the mouse is and you’re doing. Press Windows+Shift+H and that activates the mouse click highlighter.
mouse click highlighter

Highlight the Mouse Click with Crosshairs

Press Control+Alt+P and that activates the crosshairs. Personally, I don’t find this one as useful, but it is an option. I’m kind curious who would use this type of highlighter and when. Feel free to share in the comments.
mouse crosshairs

The PowerToys are nice. I use the spotlight effect all the time. It looks elegant and easy on the eyes. I always found the mouse options with the control click circles to be a bit old looking and kind of herky jerky.

Hope these tips come in handy when you do your next webinar, presentation, or screencast tutorial.

Events

Free E-Learning Resources

Want to learn more? Check out these articles and free resources in the community.

Here’s a great job board for e-learning, instructional design, and training jobs

Participate in the weekly e-learning challenges to sharpen your skills

Get your free PowerPoint templates and free graphics & stock images.

Lots of cool e-learning examples to check out and find inspiration.

Getting Started? This e-learning 101 series and the free e-books will help.


low recording levels

If you find that you’re microphone audio levels are too low, here are some tips that may help.

I record a lot of demos and webinars. With that comes the quest to find decent quality audio. I have a boom arm on my desk that I can swing into action. On it I have a Blue Yeti microphone. Overall, I really like the quality of the sound and this set up works great for recording tutorials where I work from my main screen. I also like that the microphone has its own gain controls which resolves the issue I have below.

However, the challenge with the Blue Yeti is that I work from a home office and if people outside my office are yacking, then the mic picks up their chatter. I can usually work around it a bit. However, webinars are live and I have less real-time control.

For webinars I prefer to use a headset mic because they seem to do a better job blocking out background noise. I’ve used a Plantronics mic for years. It does a great job recording my voice and blocking out the other home office sound. However, the audio is a bit thin and sounds like I’m Lionel Richie on a phone, checking to see who’s home.

Because of this, I recently purchased a Beyerdynamic headset mic. It’s a bit higher end but it’s a great mic with a nice sound. However, it is an XLR mic which requires a different connection to my computer and a pre-amplifier.

And this is where the Windows 10 audio issue is exposed and fixed.

Where’s the Microphone Boost?

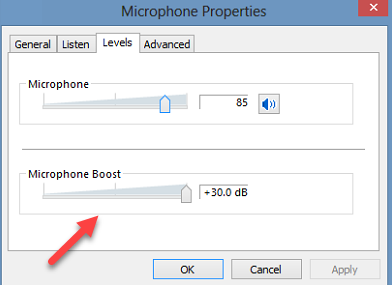
Like many Windows 10 users, the audio recording input signal is too low. Earlier versions of Windows had a way to boost the recording input, as seen in the image below. However, in recent versions, there’s no option.

audio recording input low

If you do not have the option to boost your audio input, one potential fix is to select the Advanced tab from the Microphone Properties window and deselect the option to “Allow application to take executive control of this device.” This works for some people.

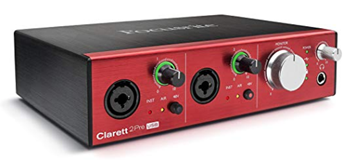
The other option is to use a pre-amp. I have an older Focusrite Scarlett 2i2 which is generally simple to use and should work. However, I ran into an issue. The pre-amp has an input range of 1 to 10, but it only seemed to have an impact from about 8 to 10. I just wasn’t getting enough initial boost and the 8 to 10 range didn’t give me enough wiggle room. Since it’s a USB pre-amp, I figured that perhaps it just didn’t have enough juice for the phantom power and signal boost since it was pulling its power from the computer.

Focusrite Clarett pre-amp

So I tested the Focusrite Clarett. It has its own power source and not pulling it from the computer via USB. However, I ran into the same issues. The range was limited to 8 to 10 with little room for adjustments. Both Focusrite devices are good devices and should work. In fact, on older versions of Windows, the Scarlett worked perfectly. However, with the latest version of Windows 10, I just can’t seem to boost the input levels and there no longer seems to be a way to do it from the drivers or the audio control panel.

So where’s the fix?

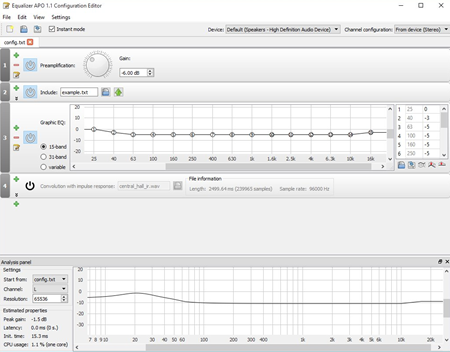
Install APO Equalizer. It’s an open source project on Source Forge that includes a pre-amp which will boost your incoming microphone signal. In addition, there are some other audio options to enhance your audio input and outputs.

APO eaulizer for low audio recording volume

I’m no audio engineer or APO Equalizer pro. However, the installation is easy, and the setup is pretty simple. Don’t let all of the meters and lines make it seem complicated. Once it’s set, you really shouldn’t have to do much with it. Below are some resources to help you get set-up.

The YouTube tutorial above does a great job showing the basics. It’s probably worth learning a little more about some of the filters and how they can improve your audio input. In fact, many of us record in less than ideal circumstances where we may have background noises like air conditioners or computer fans. Some of those filters may help fix the issues.

If you have issues with low recording volumes, hopefully these tips help. If you have additional tips, feel free to share them in the comments section.

Events

Free E-Learning Resources

Want to learn more? Check out these articles and free resources in the community.

Here’s a great job board for e-learning, instructional design, and training jobs

Participate in the weekly e-learning challenges to sharpen your skills

Get your free PowerPoint templates and free graphics & stock images.

Lots of cool e-learning examples to check out and find inspiration.

Getting Started? This e-learning 101 series and the free e-books will help.


e-learning porfolio

I get questions all the time about work portfolios. One of the most frequent questions is “What types of courses need to be in the portfolio?”

Why Have an E-Learning Portfolio?

The portfolio is your proof of skills. It shows that you have more than a resume list of education and experience. It documents some of your projects and also shows your specific skills.

The challenge for many is that the work we do is proprietary and we can’t show what we know. That’s OK. If that’s the case, you want to create a few sample modules that demonstrate your skills and get the attention of the person reviewing your portfolio. And let’s face it, some of the projects that we get stuck on at work aren’t things we want to show anyway.

Here’s What Should be in Your E-Learning Portfolio

Here are the five things you need to showcase in your e-learning portfolio.

  • Assessments. Quizzes are the most common element in e-learning courses. Create a few different types of assessments. The default, blocky-type quizzes are fine, but you want to show more than copy and paste skills. Make the quizzes look different and modify the default settings. The more custom you can make them, the better.
  • Scenarios. Interactive scenarios are always popular. They’re more fun than click-and-read content and they show how to build situational training that closely mirrors real-world interactions.
  • Interactions. No one wants to look at 60 slides of the same content. Instead showcase mini interactions, or pull some of the interactions out of the 60 slide course. There are three main ways to interact with the screen: click, hover, and drag. Build some modules that demonstrate your skills creating different types of interactions. Lean more on dragging than clicking because it’s novel and people like to move things on the screen.
  • Software Training. Most organizations do some sort of software training. Show your skills building software training. Add a short screencast video as well as an interactive software simulation.
  • Make it interesting. Most e-learning isn’t very good and usually very boring. Convert one of those types of courses into something interesting. Make it look good and make it interactive. Show a before and after version of your course/module.

Here’s a bonus tip: people are drawn to the visual design more so than they are to the instructional design. You want your portfolio to look good.

If you’re trying to figure out how to build those demos or what types to do, check out the weekly e-learning challenges. There’s a lot of variety and plenty of ideas. Any one of them would make a good module to include in your portfolio.

Do you have an e-learning portfolio? If so, what type of content do you have in yours?

Events

Free E-Learning Resources

Want to learn more? Check out these articles and free resources in the community.

Here’s a great job board for e-learning, instructional design, and training jobs

Participate in the weekly e-learning challenges to sharpen your skills

Get your free PowerPoint templates and free graphics & stock images.

Lots of cool e-learning examples to check out and find inspiration.

Getting Started? This e-learning 101 series and the free e-books will help.


screencast tips

Screencast tutorials are some of the most common forms of online training. This makes sense since a large part of e-learning is predicated on learning new software. One challenge is creating effective and engaging screencasts. So today, we’ll look at a few simple production tips to help you get started.

Screencast Tip: Establish Context Quickly

It helps to know what you’re learning and why. At the beginning of the screencast, introduce what you’re going to teach and why (or what the outcome should be). Many screencasts aren’t clear about what the value of the screencast is. They either jump into instruction with no context, or they spend too much time on non-essential content.

Screencast Tip: Get to the Point Quickly

The other day I was reviewing a product video for some new gadget. The video was about seven minutes long. I wanted to know how the gadget worked and what features it had but the guy in the video spent the first three minutes talking about a bunch of nonsense that had nothing to do with the video topic. As Archie Bunker used to say, “Get to the point, Edith.”

Screencast Tip: Don’t Focus on Features

Many of the screencasts I view go through a feature list. They spend way too much time on the user interface and the features buried within it. You don’t need to explain everything in the software or everything you can do with it. And not all features are created equal. Some are used all the time and some rarely. Skip the feature-by-feature dissertation. Focus on the key features and the ones most critical to the user’s objectives.

Screencast Tip: Focus on Action

What are people supposed to do with the software? Make a list of required actions or responsibilities. Then build your screencasts around actionable objectives and how to meet them. Give them real-life challenges and how the software meets them. For example, if I were teaching someone how to use a spreadsheet, instead of showing them how to to use specific features, I’d start with a real-world challenge: “You need to create a report using this data.” And then from there, I’d go through the process of instruction and focus on the features relevant to the objective.

Screencast Tip: Don’t Stop at One

People need multiple opportunities to practice. Many screencasts and the associated activities are built on a single action. This is fine. However, use the activities to reinforce a previous lesson as you introduce new skills. Give them opportunities to review and repeat the previous process.

The more practice, the more fluent they’ll be. This is really key with software training where you build on skills from previous training videos.

Screencast Tip: Keep it Short

Shorter videos are better. Stay focused and get to the point, as I noted above. It’s better to have a series of shorter videos than to have a single long one that forces the user to scrub through looking for relevant info. Try to stay focused on a single objective.

Screencast Tip: Provide Post-Screencast Resources

Because the screencast videos will be shorter and tied to specific actions there may be some learning gaps or other things the person wants to know. It’s always a good idea to curate a list of additional resources for the viewer to access after they’ve completed the screencast video.

Screencast Tip: Don’t Make a Screencast

Screencasts take time and some require multiple edits. And if the content changes (like a new interface or features) then they need to be redone. Often it’s easier to show a static screen and use labels to highlight specific areas. These are also easier to update when the subject matter is still in flux. And it helps you avoid long videos when they just need simple information.

I like this interactive screenshot prototype that David built a while ago. It looks good and it’s easy to build. It’s also available as a free download.

Here are some additional resources for those who want to create screencasts:

What tips do you have to share?

Events

Free E-Learning Resources

Want to learn more? Check out these articles and free resources in the community.

Here’s a great job board for e-learning, instructional design, and training jobs

Participate in the weekly e-learning challenges to sharpen your skills

Get your free PowerPoint templates and free graphics & stock images.

Lots of cool e-learning examples to check out and find inspiration.

Getting Started? This e-learning 101 series and the free e-books will help.


e-learning screencast webinar tutorials

If you create software training then odds are you show a lot of keyboard shortcuts. If that’s the case you’ll like today’s tip where I share a simple tool that makes it really easy to display the keyboard shortcuts on-screen.

How to Display Keyboard Shortcuts during Screencast Tutorials

Meet Carnac the Magnificent. It’s a keyboard utility that displays keyboard shortcuts as they are used during your demos. This is perfect for webinars and screencast tutorials. It’s also great for live presentations where people in the back of the room can’t always hear or see what’s going on.

Here’s a quick tutorial where I show how it works and how it would look in your software training.

Click here to view the Youtube video.

  • You can download Carnac here. Read more about it here.
  • Once you download the file, double-click to install it.
  • You’ll see the purple Carnac icon in your system tray.

Once it’s active in your system tray and you use a keyboard shortcut, you’ll see the shortcut displayed on the screen as in the image below.

screencast tutorials example

How to Customize the Keyboard Shortcut Display for Screencast Tutorials

You can modify how the keyboard shortcuts display.

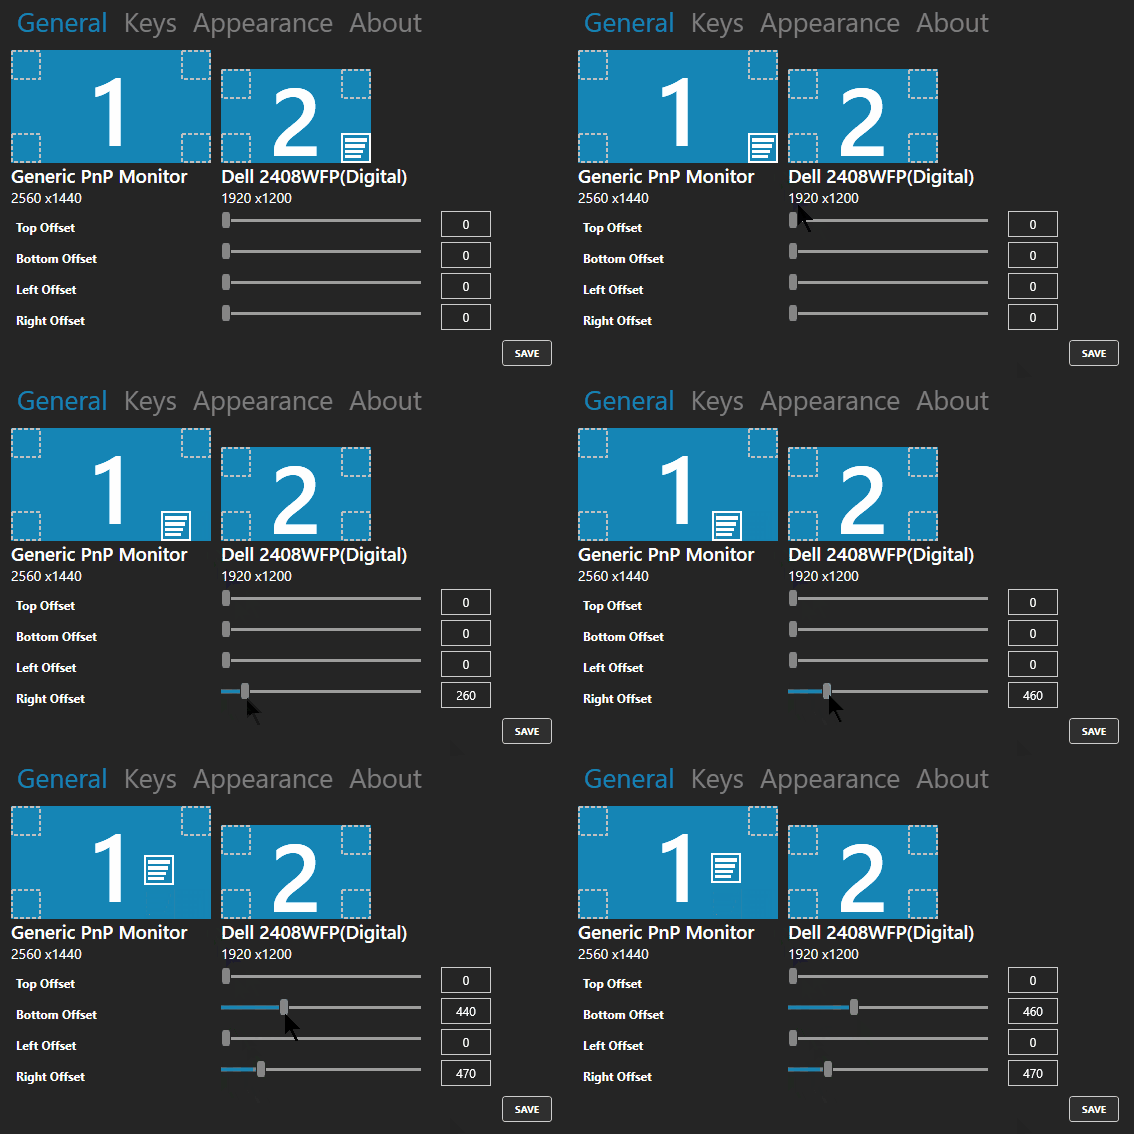
  • Double-click on the Carnac icon and it opens a setting window.
  • You’ll see the option to select monitors and where the object is displayed. You start by selecting the screen and then adjust how much you want to offset it.

screencast tutorials set properties

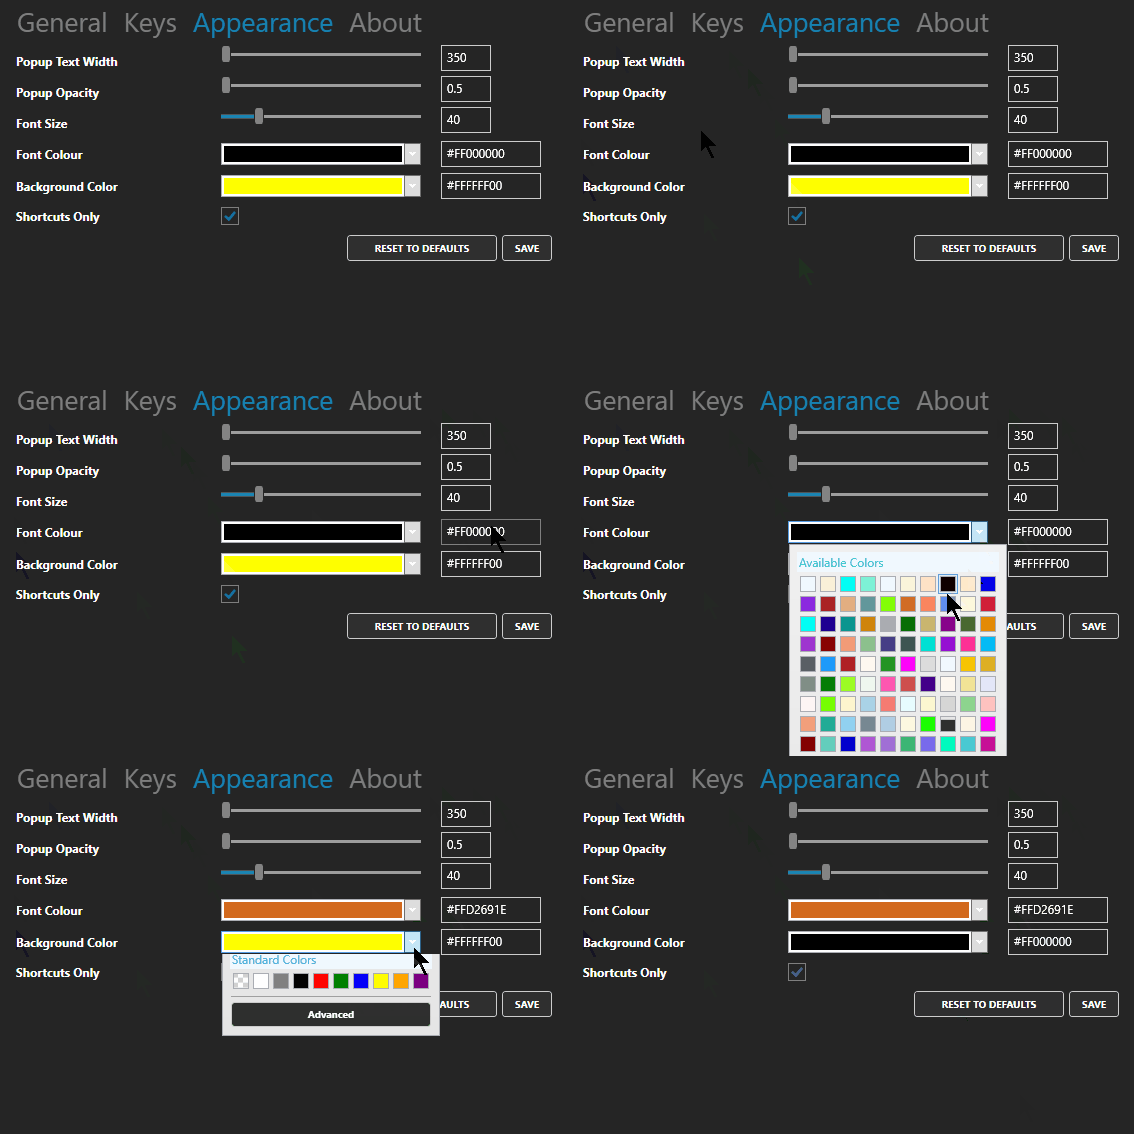
  • You can also change the appearance of what’s displayed. This includes the width, font size, and color. I couldn’t get the sliders to work, but manually entering the values did work for me. Save your changes.

screencast tutorials change appearance

It’s a fairly easy to use and it’s free. But you get what you pay for, so if you need help, you’re stuck. But I’ve found it works fine and as expected.  If you need a way to display keyboard shortcuts, then this solution should work for you.

Events

Free E-Learning Resources

Want to learn more? Check out these articles and free resources in the community.

Here’s a great job board for e-learning, instructional design, and training jobs

Participate in the weekly e-learning challenges to sharpen your skills

Get your free PowerPoint templates and free graphics & stock images.

Lots of cool e-learning examples to check out and find inspiration.

Getting Started? This e-learning 101 series and the free e-books will help.