Timely post Tom, thanks! We’ll be building a software demo course very soon and it’s just not complicated enough to warrant screencasting. Great ideas in your post. But I see you’re breaking out some beta features with those annotations! How unfair to us lowly v5ers. 🙂 cheers.
Here Are Some Time Saving Tips for Your Next Software Demo
May 13th, 2008I’ve done a lot of software training. Many times the elearning part of the course is to introduce the software and give an overview of its features or basic uses. I like to call it "show and tell" training.
There are many ways to approach software training. You can make it as complex or simple as you want. It really depends on your needs and the software. I’m not going to go into great detail about how to design software training. However, I will show you some simple tips and tricks that are effective and generally easy to do. Using them has saved me a lot of time.
Some Quick Thoughts on Screencasting
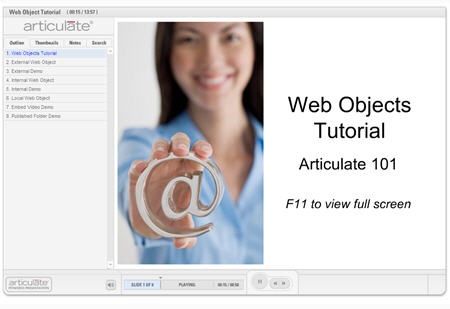
It seems that the default for software training is to do a screencast where you make a movie that shows the mouse movement and walks through the steps. In fact, I’ve used them in previous posts, when I do my own tutorials. For example, here’s one I did for the Word of Mouth blog that shows how to insert web objects.
Click here to view the tutorial.
I love screencasting. It works great when you want to do some of those "over the shoulder" tutorials that have a lot of complex steps like breaking apart clip art.
However, what I don’t love about screencasting is the time it can take to get it right. Anyone who has done them knows that there’s a lot that goes into making a good one. It’s definitely more than just plug and play.
Besides, I’m a little dimwitted so I always start by trying to wing it. That doesn’t work well because I end up stopping and starting over again and again. Some will say, "So what. You can always edit it out later." And that gets to my point. Unless you really plan your screencast well, you end up doing a lot of time-consuming edits later. This is what I don’t want to do. And even if you do plan it well, you still end up doing some edits and tweaking.
So here’s what I do: for the more complex "show and tell" courses, I’ll do a screencast. However, for those where the steps are simple, I’ll avoid a screencast and try a different approach, which I detail below.
The following tips will help you the next time you have to do a "show and tell" elearning course. It’ll save you time and help keep your file size down. And for those of you who don’t own screencasting software, you’ll learn some simple ways to mimic the "show and tell" effect.
Keep it Simple
Typically when we focus on software, we show the entire software application. So we print the entire screen, which might be 1024×768, and then put it on the slide which is only 720×540. Anytime you alter the original image and make it smaller, you’ll get some image degradation and lose the crispness that you started with.
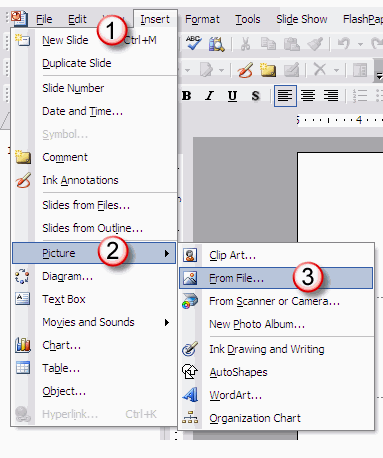
I’ll show some tricks to maintain decent image quality and still effectively teach people to use the software. For this example, I’ll use the task of inserting a picture into a PowerPoint slide.
Don’t discount text and simple graphics. It might not be as cool as a movie, but it can be just as effective and whole lot easier to edit. I don’t need a movie to figure out how to follow the image below. For simple instructions, this is more than adequate and it only took me about 2 minutes to build this.

You don’t need the whole screen. A lot of people capture the entire screen and only focus on one small part of it. You end up with a lot of wasted space and the worst image quality because you have to compress the image to fit it on the slide. Here are two easy ways to avoid focusing on the entire screen to show just part of it.
- Create simple callouts. Start with a full screen image to establish the overall screen layout and then use call outs to draw attention to certain parts of the screen.
- Just focus on the area that you want to show. Your learners aren’t stupid, with a few visual clues (like the numbers in the image above) they can figure out what they’re looking at. You can spice it up with some simple PowerPoint animation. Or if your software has an annotations feature, just use those. They’ll save you a lot of time.
Leverage PowerPoint’s hyperlinking to create a virtual simulation that doesn’t require a screencast. You’ll get a similar feel but need less time and fewer edits.
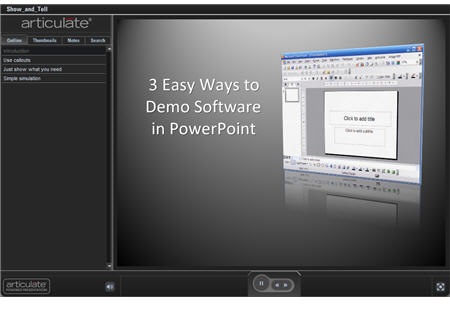
Here’s a quick demo where I show you the various steps in action. As you can see, they are all viable solutions and can make building your demos a lot easier and take less time.
How Much Motion Do You Need?
When you break down a show and tell course, a lot of the time is spent watching the mouse move around. Recording the mouse movement makes your movie longer and increases the file size. Some people will edit out the unnecessary mouse movement, but that goes back to the issue of extra time spent editing.
I had an IT manager who was always making changes to his software. Then he’d call me and want my team to redo his demos. We didn’t have the resources to support him, so what I did was get him some screencasting software and then showed him how to use it. This way he could make the changes he needed.
While the software worked for him, I was soon getting calls asking how to do this or that with the screencasting software. His problem was similar to what many of you experience: he wasn’t doing screencasts often enough to develop expert skills. So it cost him a lot of time and money to get them right.
Since the screencasting software wasn’t the right solution, I got him a copy of Engage. He was excited because it was easy for him to use and we ended up getting fewer calls. Usually, he just called to show off what he was doing. It saved our organization tens of thousands of dollars because we didn’t have to commit our resources to his projects and he was able to self-serve and get his needs met a lot faster.
So, if you’re using Engage, let me show you a few ways to leverage the tool for software demos. You can use any of the interactions, but I typically use either the labeled graphic or process interactions. They give the most space and seem to be a good logical fit for software training.
In the demo below, I inserted three labels all using slightly different ways to show parts of the software. What’s nice with this approach is that you can use a number of ways to teach. Include only text and images where the steps are simple. And when you need to show more, inse
rt a screencast if you want. You’ll be able to keep them smaller and easier to edit.
As you can see, there are some effective ways to do demos without spending too much time building screencasts. It all depends on what you have to do and how much time you have. I don’t just consider the time it takes to produce. I also consider how much time it takes to maintain or do future edits. I find that for most demos the tips above work. And when they don’t I’ll invest my time in other options.
Feel free to share comments or feedback in the comments section.
Events
- Everyday. Check out the weekly training webinars to learn more about Rise, Storyline, and instructional design.
Free E-Learning Resources
 |
 |
 |
|
Want to learn more? Check out these articles and free resources in the community. |
Here’s a great job board for e-learning, instructional design, and training jobs |
Participate in the weekly e-learning challenges to sharpen your skills |
 |
 |
 |
|
Get your free PowerPoint templates and free graphics & stock images. |
Lots of cool e-learning examples to check out and find inspiration. |
Getting Started? This e-learning 101 series and the free e-books will help. |
31 responses to “Here Are Some Time Saving Tips for Your Next Software Demo”
Thanks for another great post, Tom.
In the last demo on the page you showed that you could enter in a flash video into Engage. I’ve run into different problems with inserting flash video’s, so I’m wondering if I am doing it correctly. Would you be able to do a future post on how to use flash videos in Engage and Presenter?
Thanks again!
Hello Tom,
What a great post. I’ve been out of touch with your blogs. I’m working on a new project now with another company. You are the champion of Rapid E-learning. I’d like to try this with my current project.
Thanks again.
Kathie
Great post, Tom!
In the past, I, too, have effectively used Engage’s Labeled Graphic and Process interactions to demo software features, specifically as a “How To” for easily described menu actions. (Similar to your demo in your post above.)
I tend to use PowerPoint’s hyperlinks for navigation, and thank you for reminding me to think outside the “Main Menu” box. I’ll be upgrading to PPT 2007, soon, and can’t wait to put its new features to use in Articulate.
Annotation tool…hmmm…like Chris A., I wonder…are you giving us little tidbits or tastes of the upgrades to come?
[…] Some Time Saving Tips for Your Next Software Demo Posted on May 14, 2008 by Rupa I read an interesting post by Tom
Thanks for yet another useful post, Tom. I already have exposure in using the labeled graphic or process interactions in Articulate Engage to show different parts of an application screen. Those are amazing interactvity features. I am eagerly waiting to use the annotation feature too. Good luck for the upcoming release 🙂
Great post Tom. I don’t even use Articulate yet but I am very impressed so far. Does Articulate have screencasting capability? If not, what tool do you use?
Cheers
Andrew
Thank you Tom! I really enjoyed this entry from you! I also agree with you that simple screen shots do just as well in PowerPoint or leveraging either the labeled graphic or process interaction of Articulate Engage.
What screencasting software do you use? I have Camatasia Studio and Adobe Captivate and use both. Thanks again! Cheers, Jason
I agree Tom, screencasting can be very difficult to successfully orchestrate. I’ve found that I can get better results by simulating a screencast with animated static screen captures, as you described. The visual quality is better and it’s far easier to coordinate than to try to get everything right “as the camera is rolling” in a screencast.
And as you mentioned, by using that technique it’s far easier to make changes later.
Excellent. I agree that the screencasting can be time consuming. I have resorted at times to using still images to get the better quality and increasing find myself asking “Is my screencast really necessary?
You are the BEST!!!!!! Thank you for this!
What version of Articulate are you using.
I ask because I was able to tab to all the player controls and usually that isn’t possible with Articulate.
Hi Tom
Great post. We are running PowerPoint 2003. Is the hyperlinking you demonstrated in the PowerPoint simple simulation exclusive to the PowerPoint 2007 version?
Cheers
interesting information, pls send me more…
Hi Tom,
Thanks very much for this post.
I’ve just built an e-learning course using Camtasia screencasting and decided to use this method because the course teaches people to use, in detail, a piece of software (not PowerPoint).
I save a lot of time by writing a script first so that I know what I’m going to say, when – and if I say “er” too many times, stumble over my words, or, heaven forbid, sneeze, I can always edit it out.
But I think the PowerPoint idea is brilliant for teaching people the detail about an individual area of some software. And I’m going to investigate Engage again.
Dave, I do hyperlinking on PowerPoint 2003.
M
Hi Tom – Do you have a recommendations for screen capture software? I understand Snagit is good, but wanted to get your thoughts…
thanks, Brent
For Mac users, I highly recommend ScreenFlow from Vara Software. We’re not connected with the company but really enjoy it’s solid feature set, ease of use and smooth results. Screencasts are helping us train internally and, soon, some of our clients as well.
Good post and ideas. Thanks.
When doing screen simulations, I’m often perplexed by the best way to do them. Typically I just record the steps so people can review them over and over without having to step through the process. Since it’s an informal learning situation, I don’t include an “assessment” at the end (such as building a practice into the session). Have you found any particular method of setting up these simulations works better than others (showthen practice, just show, or practice as they are going as you did in the one tutorial example on inserting images into power point)?
Hi Lisa, I agree with you – don’t create eLearning products that force the end-user to go from A to Z if it’s an eLearning product you would like them to be able to access on-demand and as often as they please in order to confirm / refresh knowledge; hence, be able to jump around to the part they care about. With demos / app sims, I personally don’t agree with the money maker strategy of an eLearning development department that religiously creates see me’s and try me’s for each and every demo / app sim. I think, if you’re going to expect the end-user to take time out of their busy schedule to review / learning from / interact with the content / eLearning product, then make that recording a mixed demo / app sim with a little see me and a little try me here and there. Engage them, talk with them with your voice narration (OK, now it’s your turn, etc.) and let them see you do something and then have them do something (click here, type this here, etc.). That’s how I like to do demos / app sims. Cheers, Jason
[…] the post, Here Are Some Time Saving Tips for Your Next Software Demo, I wrote for the Rapid E-Learning Blog, I showed some ways that PowerPoint can be effective as an […]
I am new to Articulate and am learning as fast as I can. I love the web tutorials and all the outstanding advice (and examples). My problem is that I don’t have time to follow all of the tutorial links to see all of the techniques that are available. Is there a central index or catalog that provides short descriptions (and associated links) so that I can find what I need quickly? Note that I am a knuckle-dragger raised during the Golden Age of the last century, so I need all the help I can get. If no index is available, I will endeavor to build one (sigh). BTW: I am using Articulate to create sponsorship promos for non-profit organizations that feed the hungry and needy children of the world. I thank you, and the children thank you too. UGH!
[…] can learn more about this example in this blog post, Here Are Some Time Saving Tips for Your Next Software Demo. The source files are available via the download […]
[…] This is a good example of how you can use Articulate Engage's labeled graphic interaction to create quick software demos. Use a fullscreen static image and then place labels over the specific parts of the screen on which you want to focus. Inside the labels, you can add text, audio, and multimedia (such as small screencasts). You can learn more about this example in this blog post, Here Are Some Time Saving Tips for Your Next Software Demo. […]
This is very nice! Can you tell me how you achieved the gradient affect on the “Show What You Need” slide? I also really like the reflection affect. How did you do that?
I really like the “Show and Tell” demo.
One thing that puzzles me though is how good your screen captures are. How did you manage to get a full screen captured, yet have the image quality still so good in Engage.
I always struggle to show a full screen because the image needs to be max 720×540
[…] Here Are Some Time Saving Tips for Your Next Software Demo […]


0
comments