3 Quick Steps to Tracking Users in Articulate Online
![]()
Articulate Online is our version of a Learning Management System — without the usual cost and hassle.
In this article, we’ll explore the three basic steps to start tracking your users’ activity in your Articulate Online account:
- Create and publish content
- Set content permissions
- Distribute content
We’ll explore each of these areas below.
First, though, note that you’ll see references to content in this article. Content refers to any content item in your Articulate Online account created by one of the Articulate authoring tools. It could be a course, a presentation, a quiz, a survey, or an interaction. The rule of thumb that defines a content item: Every time you publish from an Articulate authoring tool, that’s one content item.
A course or presentation created with Articulate Presenter ’09 can also contain any number of quizzes, surveys, or interactions (the course will count as a single content item). As with publishing for any other LMS, if you prefer to use quiz-based tracking vs. slide-based tracking and your course contains more than one quiz, you must select a single quiz to use for tracking purposes. (That said, there is a work-around for tracking multiple quizzes in the same course.)
1. Create and publish content
The first step to tracking users in Articulate Online is to get some content into your account. To publish content you’ll need to use one of the Articulate authoring tools. You can publish directly to your account from within Presenter, Quizmaker, or Engage, or you can manually upload content to your account.
Here’s a screencast about how to publish content to your account:
View this screencast in a new window
2. Set content permissions
The next step for tracking users in your Articulate Online account is to decide whether you want your content to be publicly available — so that anyone with the link can view it — or restricted only to authorized users or groups. (See also: User roles in Articulate Online.)
You can set your content permissions like this:
- Login to your account as an administrator or publisher.
- Click the Content tab and then the name of the content in question.
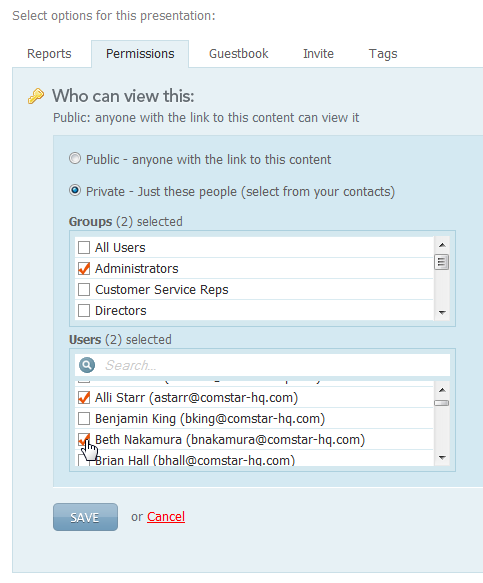
- Click the Permissions tab for the content and then the Change button to specify Public or Private.
- For Private content, select the Groups and/or Users who can access the content, then click Save.

Jeanette also covers this process in the above screencast.
If your content is public, a login is not required. So if your content is proprietary or not intended for anyone outside your organization to view it, make sure your content permissions are set to Private. Note that the default permission setting in Articulate Online is Public, so make sure you make this change if your material is sensitive.
With public content, you also will not get as detailed tracking capabilities when you run reports on your content since you won’t know who’s viewing the content. One way around this, which some of our customers do for public content that they’d still like to track, is to add a Guestbook in front of the content and require the email address from the user. With this method, you can still track quiz results and more with public content, but if users are sharing a computer, subsequent accesses of the same content from the same computer by different users will appear as the same user — since a local cookie is set on the computer.
If securing your content and ensuring the correct user is viewing it is important to you, be sure to set your content to Private.
Setting your content to Public is great for distributing a marketing presentation or a survey via your website, when it’s not as important to know who exactly is viewing the content, and when it’s not proprietary information.
3. Distribute content
Now that you’ve published your content and set desired permissions, the final step for tracking users in your account is to distribute your content to your users.
Here’s a screencast about the two primary ways users can access private content in your Articulate Online account:
View this screencast in a new window
If your content is public, you can still assign it to users in your User Portal or distribute it to users without private accounts by using the Link or Launch Button methods.
And that’s it! After you’ve distributed your content to your users, you’re ready to start tracking results and user progress, which you can do by running any of the available reports. Here’s a primer on running reports in Articulate Online.
