6 Tips for Managing & Developing Your E-Learning Projects
This guest blog entry was written by Kevin Thorn, an Articulate user who designs e-learning for AutoZone in Memphis, Tennessee.
Being a great e-learning developer also means being a great project manager. The entire process from concept to evaluation can take many turns and can become overwhelming at times. And if you ask a dozen people how they set up and manage their e-learning projects, you’ll probably get a dozen different answers. But the important thing is to have a method in mind before you begin.
Over time, I’ve tweaked and adjusted my own process into a method that works for me. I’ve come to rely on six key practices to help ensure a smooth development cycle. I’d like to share them with you.
1. Decide How You’ll Manage Your Assets & Files
I consider this the most valuable tip of all. It used to be that whenever I’d receive documents, images, or other assets, in a hurry I’d save them off to some directory “I won’t forget” — but then later I’d have a hard time finding what I needed. Now, the first thing I do for any project is set up my folder structure so that I can keep everything well organized. Here’s a little bit about how I use folders to manage my project assets:
View this screencast at Screenr
2. Storyboard the Project
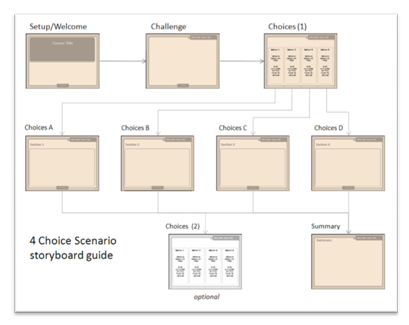
In PowerPoint, your list of slides is displayed vertically in a linear fashion on the left edge of the screen. For click-&-read courses this is fine. But for scenario-based or branching courses I find it best to build a visual storyboard before building my slides. My storyboards look a lot like flowcharts. I build them on a blank PowerPoint slide, using slide thumbnails that I’ve created by screen-capturing slide mockups in PowerPoint’s slide sorter view.
Here’s a sample of a storyboard I built for a branching course:

Once I build the storyboard on a blank PowerPoint slide, I save the file as storyboard_projectname. Then I immediately save a second copy, with just the project name. In that second file, I begin building my slides. The storyboard slide stays in the file as a reference during development. Later, once my slides are built and everything’s in place, I can delete the storyboard slide, knowing that I still have the original storyboard_projectname file on hand, in case I ever need to refer back to it.
There are lots of benefits to using a storyboard. First, it’s a great way to visually plan how the navigation works, and it’ll quickly show where there are bottlenecks or dead ends. Second, when I’m presenting a course design to SMEs or other stakeholders, doing it this way is intuitive, looks professional, and makes it easy for them to see how their course will function. You can even bring the slide up on a screen in a meeting and have a collaborative process of moving, adding, and deleting thumbnails until everyone is happy.
3. Decide on a Theme
 Determining a theme for your course in advance can really help bring unity to its look & feel. I like to choose themes based on an environment or setting that helps convey & support the course content.
In a lot of cases the theme can also be a springboard for the learning scenarios you build into your course. For example, a course that teaches learners how to read a profit & loss statement might use the metaphor of a lemonade stand. This kind of theme can be a simple but fun way to walk learners through the basics of a P&L statement, including concepts like profit, expenses, supplies, equipment, etc.
4. Decide on a Style
Style is important, too. By style, I mean the kinds of images and fonts I choose for my course. These need to work well with the theme. For example, I wouldn’t use Arial Bold and photos of business people in the lemonade stand example. I’d choose a more whimsical, fresh style — like cartoon illustrations and a font that resembles handwriting.
Let your theme help drive the style of the images and fonts you choose. You don’t want your theme and style to seem mismatched, or else they’ll end up distracting the learner rather than enhancing the learning experience. And once you decide on a style, stick with it so that your course feels consistent.
If you’re struggling to find themed images of a particular style, Tom Kuhlmann wrote a helpful blog post last fall about finding styles of clip art in the Microsoft clip art library. And here’s a great post on choosing fonts.

5. Leverage Presenter’s Customizable Player Templates
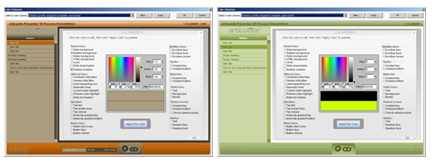
Another way I’ve optimized my development process is by customizing a library of player templates in Articulate Presenter. This comes in handy because now I can reapply the same look and player functions across multiple courses. And I’ve customized the colors of my player templates too, based on the branding of the different departments I serve. The template shown below on the left is the one I use for new-hire courses. The one on the right is the player template I’ve customized for my company’s Loss Prevention department.

6. Leverage PowerPoint’s Slide Masters
Finally, it’s important to give some thought to how you’ll use slide masters. They’re a great timesaver because they prevent you from having to manually reapply global design elements like backgrounds, logos, and other persistent objects to each of your slides. This not only saves you development time, it speeds up your publishing time, since Presenter only has to process items on the slide masters once, rather than for every slide where they appear.
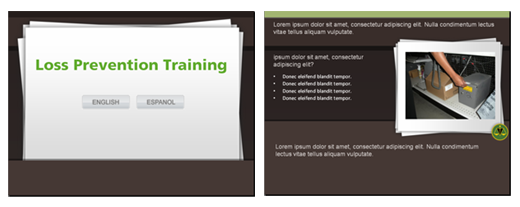
Below are a couple examples of slide masters that I use for a Loss Prevention module. You might notice that they’re similar to ones that Tom Kuhlmann gave away on the Rapid E-Learning Blog. I used Tom’s files as a starting point and then tweaked them a bit to fit the needs of my course.

Since the course is in two languages, the first master is used as the title slide so that learners can select their language. Once a learner makes their choice, a different set of slide masters carries them through the remainder of the course.
I save each set of master slides with the same name as the Presenter player template that I’ve built to go with them. This makes it easier to find and apply the same look to future courses whenever I need to.
Want to discuss?
I hope these tips help trigger some ideas that’ll help you streamline and improve your own development process, or inspire you in your next project. If you have questions or would like to talk more about what I’ve covered here, feel free to post a thread in the Articulate Community Forums or connect with me on Twitter or my blog. You might also want to review this recent thread where other Articulate users share some of their best practices for workflow.

7 responses to “6 Tips for Managing & Developing Your E-Learning Projects”
Kevin,
Thank you for sharing the process you use in developing e-learning projects. It’s very helpful for novices to learn from the experiences of the expert. I especially like your first advice on managing assets. I need to work on this one.
@Suha – Managing assets have always been one of my crutches, too until I realized it is probably the most important part in setting up a new project. Simply massage and work through your method until you get one that works for you.
Thank you!
This is an area that I know I need to work on and you gave me some great tips and starting points!
I like your practice of including your storyboard in your development file. I’m going to use that right away!!! Great post.
Thanks for these great tips, Kevin. There really are useful. However, how would you be able to design an e-learning course that allows us(designers of the e-learning courses) gauge how effective it is? A feedback form, Pre and post tests? what?
Not sure a course itself will allow how effective it is. The course is as good as it was designed. However, gauging how effective it is determines the overall objective of what performance levels your goal was to achieve. Other mechanisms outside of the course itself should be planned to measure its effectiveness. A couple of really good resources are Will Thalheimer’s “Will at Work Learning” blog > http://www.willatworklearning.com/, and Bob Mosher’s “Performance Support: Learning @ The Moment Of Need” blog > http://performancesupport.blogspot.com/
Hope this helps.
[…] you want additional ideas, check out Kevin Thorn’s post where he shares six tips for managing elearning courses. He covers how he manages his elearning courses and includes a quick […]
Comments are closed on this post. Need more help? Post your question in the E-Learning Heroes Discussions.