Articulate 101: Engage Slides and Tabs
This is the 8th post in the Articulate 101 series. It was written by Articulate Customer Support Engineer David Moxon.
Once you’ve started using Engage with Articulate Presenter, it is difficult to imagine life without it. Slick ‘n quick is what I call it!
Engage is “slick” because you have 10 great-looking animated interactions just waiting to be inserted into your latest projects to give it that extra “wow” factor you are looking for so that you can impress and keep your users awake.
And Engage is “quick” because it is so beautifully easy to get that remarkable-looking interaction slotted exactly where you want it between, say, your first introduction slide and your next chapter.
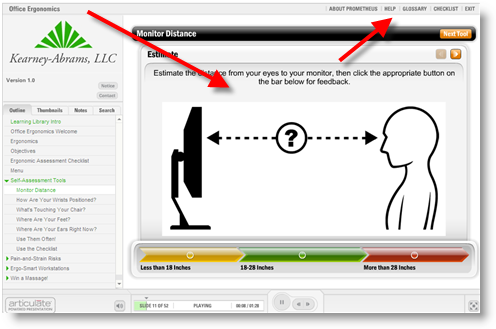
With Engage in Articulate Presenter, you have another option: Place your Engage interaction as a tab at the top of the player. You can even have the same interaction as a slide and as a tab. You can have, say, a glossary of some of the main terms in your presentation as a tabbed interaction, which your users can access throughout the course, or have a “Help” tab telling people how to navigate in the course. Or how about an “About Us” tab giving the user more information about you or your company?

The ergonomics course from Prometheus Training Corp. is a great example that combines both Engage slide interactions and drop-down tab interactions:
Once you’ve decided which interaction type best suits your needs, and you’ve filled it up with multimedia content — including anything from WAV files to Flash video — and you’ve decided whether you want to embed it as a slide or as a tab, then:
- Make sure that your PowerPoint file is open.
- If you’ve opted to publish as a slide, click on the slide after which you’d like your Engage interaction to appear:
- Click on the “Publish'” button in Engage and select the Articulate Presenter tab.
- Select “Insert as a Slide in the presentation” or “Select as a tab in the player”:
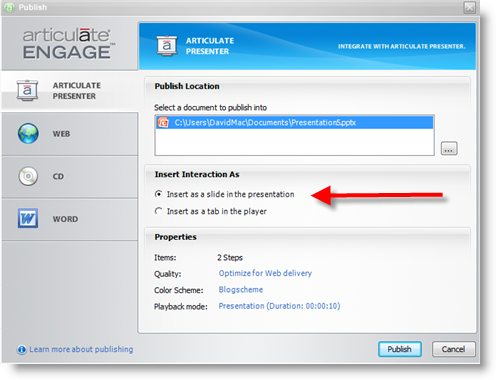
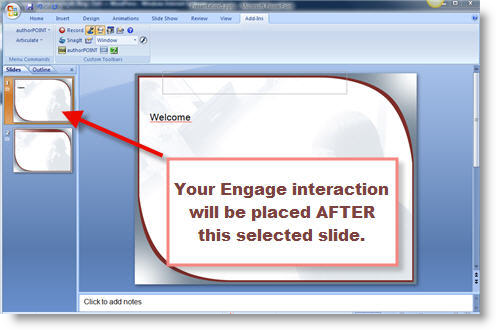
That’s it. Your Engage interaction is sent to your PowerPoint file.
Once your interaction is in your PowerPoint file project, you can customize some of the features. If you’ve inserted it as a slide, then you can decide if you want a “Next Slide” button to appear at the end of your Engage interaction or even what the button will say.
- In PowerPoint, go to the Engage slide and click on the “Properties” button:
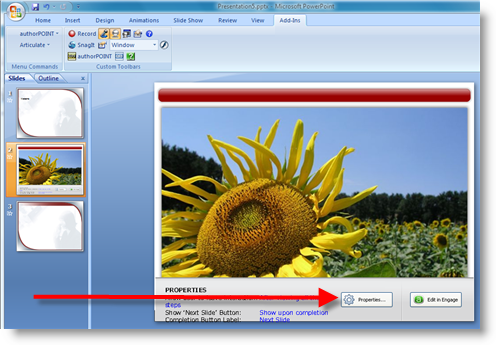 .
. - You can decide if you want your viewer to see all the steps in the interaction before moving onto the next slide or if they are free to navigate as they want:
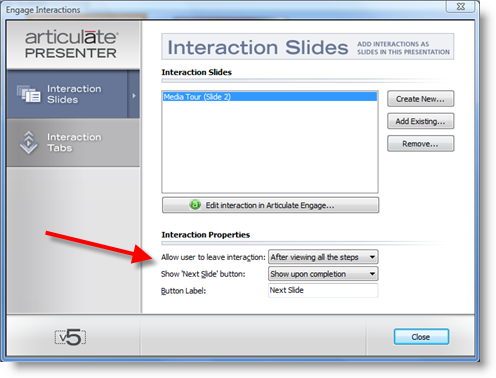
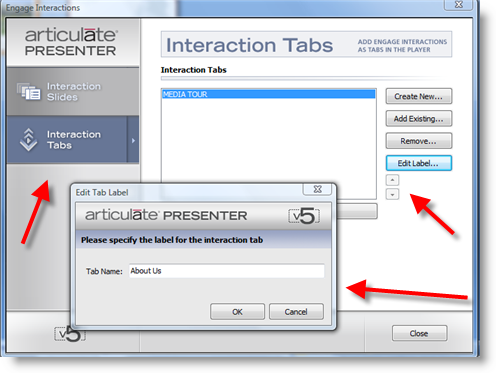
If you’ve inserted your interaction as a tab, you can decide how you want your tab to appear, and where it appears. Do you want it before the glossary tab or after?
- Go to your Articulate menu and click on “Articulate Engage Interactions.”
- Click the “Interaction tabs” option and edit the label or move its position using the arrows:
As Dave Mozealous will show us tomorrow, Engage is a really great way of including multimedia content in your courses without the headache normally associated with mixing up different format types.
Subscribe to the blog via email or RSS feed to make sure you don’t miss out on tomorrow’s tip.

1 response to “Articulate 101: Engage Slides and Tabs”
[…] Engage Slides and Tabs […]
Comments are closed on this post. Need more help? Post your question in the E-Learning Heroes Discussions.