The Rapid Elearning Blog

Archive for June, 2011


The Rapid E-Learning Blog - mLearning 101: I'll take my rapid e-learning to go.

Last week I spent a couple of days in San Jose at mLearnCon. Lots of interesting stuff.  One thing that stood out was that most people haven’t jumped into the pool yet.  Lots of interest, but not a lot of implementation.

The challenge for many people is figuring out what mobile learning is and what they can do to get started.  And they don’t want to spend a lot of money doing so.  The cool thing is that while you’re still figuring things out, it’s easy enough to stick your toes into the m-learning pool.  In today’s post, I’ll share some simple tips to help you get started with mobile learning.

You Already Have a Great Mobile Learning Tool

Sometimes we make things complicated.  This is especially true for new technology or whenever we slap a letter in front of the word learning.  Because of this, it can be hard to take a step forward.  No one wants to make the wrong decision or a big investment that doesn’t pan out.

The good thing is that you can stick your toes into the mobile learning waters with little investment and actually produce a viable product.  And you already have the tool to do so.

The Rapid E-Learning Blog - PowerPoint's a great tool for mobile learning

If you want to get started with mobile learning, all you need is PowerPoint.  I’ve already proven in dozens of posts how great it is as an authoring tool.  And it still remains true for mobile learning.

Simple Ways to Get Started

So you have the tool.  Let’s talk about how to use it for mobile learning.  Keep in mind, this isn’t an exhaustive list of everything mobile.  Consider it more a way to get started and play around with some ideas before you make a big investment in something else.

Android devices play your current Flash content.

Before you spend a lot of time reworking your current content it’s important to know that the Android devices and most non-Apple tablets already play your current Flash content.  So you may already be set.

Many of the complaints about Flash and tablets deal with some of the video streaming and games. I’ve tested a few of my published courses on the Android tablets (like the Samsung Galaxy) and they run fine.

The Rapid E-Learning Blog - Android devices play Flash

With that said, it doesn’t mean your current content is ideal for a mobile audience.  So you probably want to develop a strategy around the needs of your audience and what works best for mobile delivery.

“What about the real tablet?”

I looked around the conference and to tell you the truth, the only non iPad I saw was at the vendor booths.  Whether you like it or not, the iPad is driving a lot of the conversation around mobile, especially HTML5. Since it doesn’t play Flash, you have to think about different ways to get your content on the device.  And that’s easy enough with PowerPoint output.

Do you need the Internet?

The first tip is that you need to decide if the content needs to be on the iPad to play locally or if you need an internet connection.  For the most part, the tips below let you load the content locally.  I like this because it allows me access when I don’t have an internet connection.

Images and video can be saved to the iPad easily using iTunes.  I like to use the GoodReader app to load HTML pages and interactive PDFs.

Remote Desktop Applications

An easy way to access your PowerPoint-to-Flash content on the iPad is via remote desktop.  Many organizations use Citrix.  They have a solution that gives you remote access to a PC desktop.  From there you can play your Flash content.  If you have decent internet speed, it’s a really good solution.

The Rapid E-Learning Blog - use the Citix remote desktop app to view your elearning courses

If you don’t have Citrix, then another option is LogMeIn.  I’ve tested it on my 3G connection and it worked fine.  You only get visual and no audio, though.  So you need to plan for that.

The Rapid E-Learning Blog - LogMeIn is an inexpensive way to view the courses via remote desktop

A free solution is the Puffin app.  You load a web page and it will play it, audio and all.  There is a slight lag, but worked fine in my tests if you don’t click too fast.

The Rapid E-Learning Blog - Puffin is a free app that you can use to view your Flash elearning courses on the iPad

Screenr

The Articulate Community team uses Screenr every day.  It’s great for quick hit, just-in-time learning.  We use it for our product tutorials and PowerPoint tips.  We also use it a lot for internal collaboration and communication.

What I like about Screenr for mobile learning is that it’s easy to use.  Also, the five minute limit (on the free version) really is a perfect time limit for how most people seem to be using mobile content.

The Rapid E-Learning Blog - Screenr is a simple way to add videos and tutorials to your mLearning library

The way I use it with PowerPoint is to frame the window around a slide.  Then record my audio.  When I want to advance the slide, I just click the page-down button.  This works great and the output looks good.  And I don’t have to mess around with an IT department or a bunch of behind the scenes uploading.  If you’re worried about having the content in the public stream, try Screenr Business.

Here’s a demo I made from one of the Dr. Werner presentations I did in PowerPoint.  By the way, I ran the audio output cable into my audio input to capture the slide’s audio.

Save as Image

Create your PowerPoint slides and save as images.  Then upload them as a photo album.  I treat the albums as “courses.”  When you click an album you see all of the thumbnails and it’s easy to locate the image you need.

The Rapid E-Learning Blog - convert your PowerPoint slides to images and load on your iPad

When you view the slides in the iPad, you can swipe back and forth to navigate.  This is so simple, and actually works really well.

Save as Video

PowerPoint 2010 outputs the file as a video.  It keeps the transitions, audio, and animations.  The quality is really great.  In fact, I think PowerPoint 2010 is probably one of the best ways to work with video on the cheap.

The Rapid E-Learning Blog - convert your PowerPoint slides to video and put on your iPad

Save the file as .WMV video.  Then you’ll need to convert it to a format that plays on the iPad.  I downloaded Handbrake (which is free).  There’s an iPad preset so all you need to do is click one button and convert the video.

Following is the Duarte demo that I converted to video.  It was built entirely in PowerPoint and published to video.  I think it’s a great example of what you can do with PowerPoint and rivals the output you’d get in some high-end tools.  Download the video here and load on your iPad to test it out.

Save as PDF

Save the slides as .PDF.  This is another simple solution that’s inexpensive.  If you want some interactivity, play around with the PowerPoint hyperlinks (which I did in the image below).  I created a master slide that had hyperlinks to specific slides.  They worked great when played through GoodReader, but didn’t seem to work over the net.  Not sure why, but I didn’t spend a lot of time testing it.

In either case, it’s easy enough to publish as an informative .PDF or add some links for simple interactivity.

The Rapid E-Learning Blog - create interactive PDFs that you can view on your iPad

There’s a lot more you can do with PowerPoint for mobile learning.  The tips are above are meant as a way to kick start your program and figure out what works for your organization.  They’re simple solutions to help you get started.  Obviously, these solutions aren’t going to work for every organization, but they are good solutions that are easy to implement and cost-effective.

You already own the tools.  So if you’re looking to get started use these tips to stick your toes in the water.  You’ll get a better sense of what you can do and probably help define what you’re real needs are before you make any major investment in more expensive solutions.

Events

Free E-Learning Resources

Want to learn more? Check out these articles and free resources in the community.

Here’s a great job board for e-learning, instructional design, and training jobs

Participate in the weekly e-learning challenges to sharpen your skills

Get your free PowerPoint templates and free graphics & stock images.

Lots of cool e-learning examples to check out and find inspiration.

Getting Started? This e-learning 101 series and the free e-books will help.


The Rapid E-Learning Blog - time saving tips that are out of this world

Last week I shared a free PowerPoint template that was inspired by the iPad’s notebook app.  Hopefully, you can find a use for the template.  If not, check out some of the other free templates that are available in the Elearning Heroes community.

In last week’s template, I purposely only included the final template and not the original source file.  The reason is that I want to show you a few production tips that will help you build your own templates and speed up your production.

How to Create Your Own Textured Objects

In PowerPoint you can create all sorts of shapes.  There are dozens of predetermined shapes from which to choose.  And if they’re not good enough, you can always right click, edit the points, and make just about any shape you want.  That’s how I created the flap shape on the notebook cover.

The Rapid E-Learning Blog - choose various shapes in PowerPoint

The Rapid E-Learning Blog - create custom shapes in PowerPoint

If you have PowerPoint 2010, you can even combine shapes to quickly create custom shapes.  Here’s a quick demo that shows how.

To get a richer look fill your shapes with images rather than color.  That’s basically what I did for the leather notebook.  Only I added an extra step to give the leather a richer look and to give me an opportunity for even more customization.

The secret is to create two shapes.  Fill the first shape with the color.  Then duplicate it.  Fill the second shape with a picture and set it to partially transparent.  Align it on top of the color shape and you create a softer and richer looking shape.  Check out the tutorial below.

Click here to view the PowerPoint tutorial.

As you can see, it’s a simple trick that softens the image and lets you create all sorts of textures.  It works really great with wood grain and different fabrics.

Soften up The Bright Background Colors

Speaking of softening your image…

PowerPoint’s a great illustration application.  But many of the default colors are very bright and bold, almost cartoonish.  By using a technique similar to the one above, you can create semi-transparent shapes that sit on top of the PowerPoint colors.

To learn more check out the tutorial below.

Click here to view the tutorial.

Create Smaller File Sizes

Building rapid elearning courses in PowerPoint requires a few production techniques that are different than when you build presentations in PowerPoint.  This is especially true if you’re using PowerPoint to author Flash content.

The PowerPoint flash tools like Articulate Presenter are going to convert your PowerPoint content on each slide to a Flash movie file (.swf).  The size of the .swf can vary based on the content on the slide.  This can have an impact on how well your content runs over a network since larger files can take longer to load.  In addition, the more content on the slide, the longer it will take to publish your file.

A good time-saving technique is to use two PowerPoint files during your production.  Use one to create your graphics in PowerPoint.  Save those graphics as images.  And then import the images into the other PowerPoint file that you’ll use to build your course.

The Rapid E-Learning Blog - create two project files, one for graphics the other for the course

You’ll notice that in the notebook template, all of the graphics on the master slide layouts are single images.  Even though I created everything in PowerPoint, the course file doesn’t have anything but background images.

The advantage is that I can keep my graphics and illustration development separate from my course production.  This makes maintenance of the course easier.  It also speeds up production since each slide will have a lot less content on it.

Click here to view the tutorial.

Here’s the PowerPoint file that I used to create the notebook images.

If you’ve been working in PowerPoint for years then switching how you do work can be a hassle.  But if you’re building rapid elearning courses and using PowerPoint, keeping your graphics production separate from your course production is a good practice and will pay dividends in the long run.

Events

Free E-Learning Resources

Want to learn more? Check out these articles and free resources in the community.

Here’s a great job board for e-learning, instructional design, and training jobs

Participate in the weekly e-learning challenges to sharpen your skills

Get your free PowerPoint templates and free graphics & stock images.

Lots of cool e-learning examples to check out and find inspiration.

Getting Started? This e-learning 101 series and the free e-books will help.


With a budget you can hire a graphic artist who can come up with some different design ideas for your elearning courses. But that’s not the case for many of us.  So we’re usually stuck with courses that all start to look the same.

One reason is the same person is designing all of the courses. For the most part, we tend to stick with the same design ideas and are limited by our graphic design skills.  And because of that, we get courses that all kind of look the same.

In earlier posts I’ve discussed how you can get around this by finding inspiration from other sources. I like to find inspiration at some of the template websites like template monster. What I look for is different layout ideas and color schemes.

The Rapid E-Learning Blog - find inspiration for your PowerPoint templates

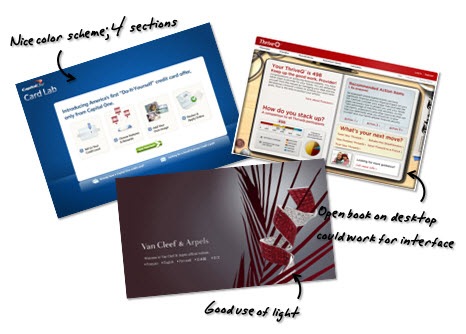
Another great way to find some inspiration is via the new mobile apps available for the smart phones and tablets.  In many ways their screens are similar to those we might find in an elearning course.

As I was on the plane to Philadelphia jotting down some notes for upcoming blog posts, it struck me that the notes app in the iPad would make a great user interface for an elearning course.  You can see an example of the notes app below.

The Rapid E-Learning Blog - notes app for the iPad

The white section is great for key points and side notes.  But you could use it as a menu to navigate the course.  And of course the yellow paper area would house most of your core content.

Below are a couple of images from the PowerPoint template I quickly mocked up.  The template consists of a cover screen and two content screens.  I also duplicated the content screens without the side pocket.  This way if you want to add the pocket to the top of the actual slide you can tuck content under the pocket.  You can see an example in the demo below.

The Rapid E-Learning Blog - cover image

The Rapid E-Learning Blog - notebook image

Everything’s created in PowerPoint (another example of how great it is as an illustration tool).  If you want the template, you can download it here.

In previous posts, I shared some hand-drawn graphics and fonts. Those are also available in the downloads section and work well with this type of template.

The Rapid E-Learning Blog - demo of the notebook template

Click here to view the demo.

Feel free to download and use the template as you wish. Are there any other mobile apps that you think would make a great template for an elearning course?

Events

Free E-Learning Resources

Want to learn more? Check out these articles and free resources in the community.

Here’s a great job board for e-learning, instructional design, and training jobs

Participate in the weekly e-learning challenges to sharpen your skills

Get your free PowerPoint templates and free graphics & stock images.

Lots of cool e-learning examples to check out and find inspiration.

Getting Started? This e-learning 101 series and the free e-books will help.


The Rapid E-Learning Blog - License to Illustrate

PowerPoint’s a great authoring environment for elearning.  If you can step away from the “bullet point” mindset and all of the complaints, you’ll see that PowerPoint’s got a lot to offer those who build elearning courses.

  • Blank screen.  Your screen can look any way you want it to.  It doesn’t need to have that PowerPoint look.
  • Animations. PowerPoint offers a pretty good selection of animations that let you mimic a lot of what you see in Flash.
  • Multimedia. Record and sync audio to animations. Also insert an assortment of video and multimedia files.
  • Illustrations.  With a little practice, you can quickly build your own illustrations.

With a rapid elearning tool, you’re using PowerPoint’s easy authoring environment to create Flash movies.  Essentially, you’re creating Flash content without the requirement of learning to program Flash.

The challenge is learning to get more out of PowerPoint.  The more you can do, the better you can make your courses.

In last week’s post I shared a simple elearning template that I built in PowerPoint.  I got a lot of questions about how to work with the template and make customizations.  Many of the questions dealt with fundamental production techniques when working with PowerPoint.  So in today’s post I’m going to offer a few tips that will not only help you customize the template, but also get you thinking about some new production techniques.

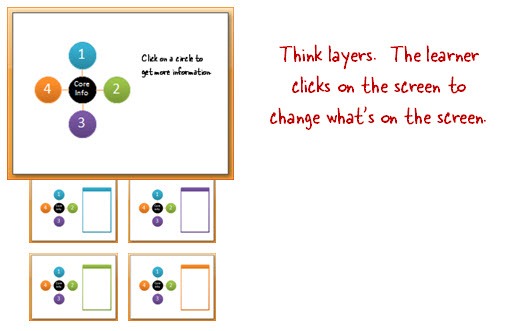
Layers not linear.

PowerPoint’s designed mostly as a linear presentation tool; which is fine.  There’s nothing wrong with linear.  However, when you want to use PowerPoint for elearning you kind of have to step away from linear.

The Rapid E-Learning Blog - layers not linear

A key is to see each slide (which becomes a Flash movie) as a piece of information.  Your job is to assemble to information.  You can do so using the default linear structure or use PowerPoint’s hyperlinking feature to direct the user’s access to the next piece of information.  Couple that with the branching features in your rapid elearning tool and you can create some pretty sophisticated multimedia.

Masters make it easy.

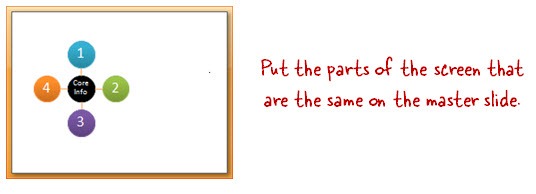
Many of the slides have the same core content because usually only a few things change over a series of slides.  So instead of making copies of slides with the same stuff on them, put as much as you can on the master slide.

The Rapid E-Learning Blog - use the master slides

The benefit is that you’ll save time in production (especially when making changes) and publishing from PowerPoint to Flash will be much faster.  Also, you can have more than one slide master.

You have a license to illustrate.

PowerPoint’s illustration capabilities are pretty amazing.  As I’ve shown in previous posts, you can easily create your own illustrated assets.  A good way to learn more is to find some illustrated images that come with tutorials.  Practice creating them in PowerPoint.  You may not really need the asset, but you’ll definitely increase your expertise using PowerPoint’s drawing features.

The Rapid E-Learning Blog - create your own graphics

When I create the templates for the blog, I usually use the default “Office” color scheme to keep things simple.  This lets you apply your own custom theme colors.  But you’re not limited to theme colors.  Why not fill the shapes with textures or images?

Below is an example of a template I gave away in the blog previously.  As you can see, it has the default color scheme.  However, in the second example, you can see that the template looks much more dynamic when the fill option is changed from color to picture.  The depth and richness makes the template seem much more sophisticated and less PowerPointy.

The Rapid E-Learning Blog - fill images with pictures and textures

Now that I covered some of the basics, let’s look at how this works with the template I gave away last week.

Tutorials

If you more questions about the template or creating rapid elearning course, feel free to ask.

Events

Free E-Learning Resources

Want to learn more? Check out these articles and free resources in the community.

Here’s a great job board for e-learning, instructional design, and training jobs

Participate in the weekly e-learning challenges to sharpen your skills

Get your free PowerPoint templates and free graphics & stock images.

Lots of cool e-learning examples to check out and find inspiration.

Getting Started? This e-learning 101 series and the free e-books will help.