The Rapid Elearning Blog

Archive for June, 2015


interactive e-learning: why do we do it

What is interactive elearning?

In previous posts we discussed different ways to interact with onscreen elements. Generally, interactions are limited to click, mouse over, or dragging interactions.

Then we explored two key points when building interactive elearning. The first point is to get the users to “touch” the screen. Find ways to have them interact with onscreen elements. The second point is to have them interact with the content to create a great learning experience.
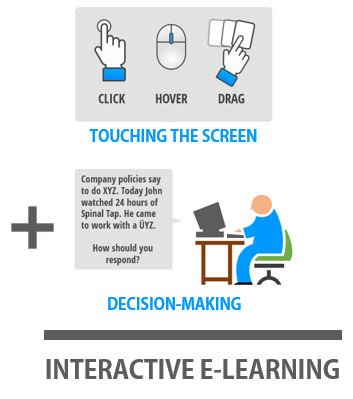
 

Interactive e-learning comes from interacting with the screen and the e-learning content

Now let’s look at common reasons why people interact with the elearning courses and then we can use that to build better interactive elearning. To keep things simple, we’ll look at three common reasons why people interact with their courses.

Interactive E-Learning: Course Navigation

The most obvious reason why people interact with the elearning course is to navigate from one point to the next. The “next” button is the most common form of interaction. We click it to navigate from one screen to another.

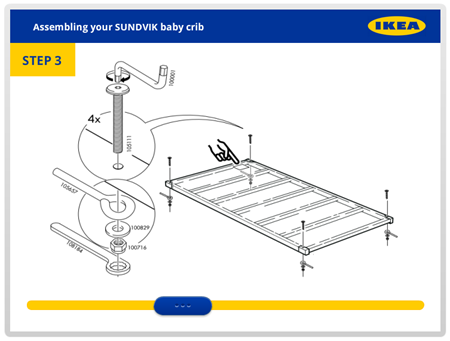
Of course, there are all sorts of others ways to navigate content. It could be an onscreen button, like a gate screen that we click to advance. Or perhaps it’s something like the example below that uses a slider instead of next buttons to navigate from one screen to the next.

What I like about the slider interaction is that we are able to replace a clickable button with a draggable slider. This novelty helps engage those viewing the course and gives them better control of the navigation.

interactive e-learning slider example

Click here to view the slider navigation.

When building your next interactive elearning course, think about ways that the user navigates the content. Play around with ideas that move beyond clicking and the next button. Perhaps there’s a way to include more mouseovers and dragging.

Interactive E-Learning: Exploration

Another common reason why people interact with the onscreen content is to explore and collect information. Most courses are linear and they require that a person click in a specific sequence. However, by allowing for non-linear interactivity, the user gets a bit more control and can access the content they need, when they need it—or at least start with the content that seems the most interesting to them.
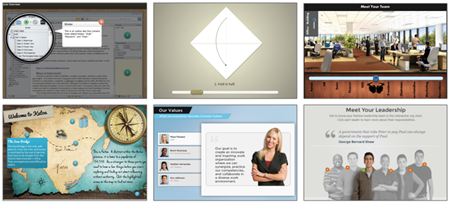
interactive e-learning examples

Here are a few common types of exploratory interactions to give you some ideas:

Couple exploratory interactions with decision-making and you have the foundation for solid interactive elearning and dynamic branched scenarios. They let users explore and collect information to make the decisions required to demonstrate their understanding of the course content.

Interactive E-Learning: Make Decisions

Outside of navigation, the most common reason we interact in our online courses is to make decisions. Usually, it’s a simple quiz question with a submit button. But interactive elearning could also include decision-making scenarios or other non-standard assessments.

Ideally, it’s designed to make decisions and then get feedback based on our decisions. Sometimes the feedback is immediate and sometimes it’s delayed and compounded.
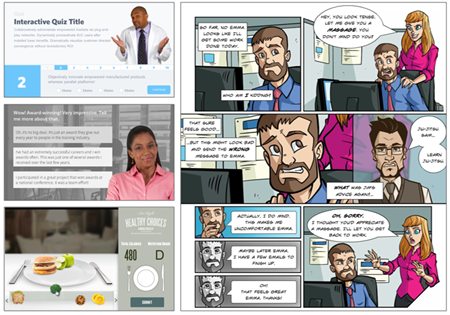
interactive e-learning decision-making branched navigation

Here are a few simple decision-making interactions:

As you can see, assessments and decision-making interactions don’t have to rely on the out-of-the-box quiz questions. There are all sorts of ways to make the decision-making interactive to create a better learning experience. As you plan your next assessment, see if there’s a way to add some novelty or different ways to interact during the decision-making.

Interactive elearning means the learner interacts with the screen and course content. There are only a few ways to interact with the screen. In addition, there are specific reasons why they’re interacting. Do you want them to go from one piece of information to another? Are you giving them opportunities to explore? Or do you want them to collect some information and make decisions?

Understanding why they’re interacting with the course content will help you better determine how you want them to interact. And in turn, you’ll build better interactive elearning courses.

Events

Free E-Learning Resources

Want to learn more? Check out these articles and free resources in the community.

Here’s a great job board for e-learning, instructional design, and training jobs

Participate in the weekly e-learning challenges to sharpen your skills

Get your free PowerPoint templates and free graphics & stock images.

Lots of cool e-learning examples to check out and find inspiration.

Getting Started? This e-learning 101 series and the free e-books will help.


free vector images online

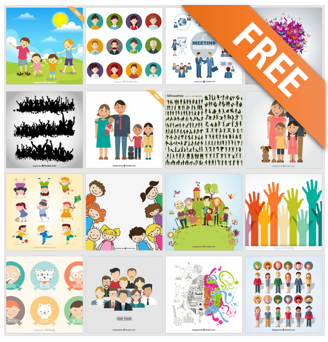
Do a search for “free vector images” and you’ll find hundreds of sites that boast tens of thousands of free images. The problem is many of them are junk and not even worth your time. Besides, how many free vector images do you really need?

Websites that Offer Free Vector Images

As you may know, many of the sites that offer “free” resources only allow them to be used for personal use. That won’t work for your courses and presentations. To make things simple, I reviewed dozens of websites that claim they offer free vector images and narrowed them down to just a few. My criteria for listing the sites below is that they really are free for commercial use. [updated 3/17/2023]

Some of the sites may require credit or attribution. That’s OK. Here are some tips on how to provide attribution in commercial projects when you use free vector images.

Other Sources for Free Vector Images

Another good source for free vector images is from artist community sites or a graphic artist’s own page. Here are a few additional places to locate some good quality, free vector images:

free vector images via dribbble

  • Dribbble: mostly professional quality images
  • Deviant Art: miscellaneous artist site; it’s a mixed bag but there are a lot of free images
  • Snap2Objects: images created by Mauricio Duque
  • E-Learning Heroes: whatever you find in the community you are free to use for your elearning projects and presentations.
  • PageResource: if you sport a mullet and watch Full House, then this site has the perfect free clip art for you.

Editing Free Vector Images

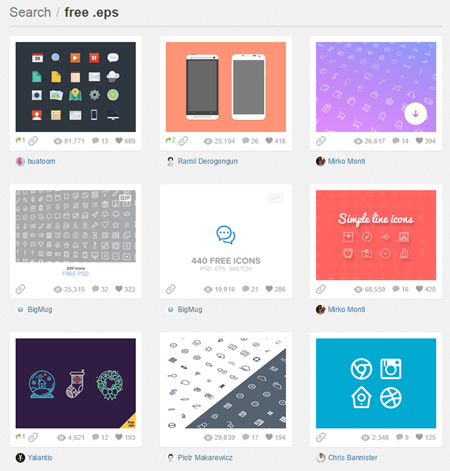
Most of the free vector images are going to be in .AI or .EPS format. If they’re .PNG or .JPG they’re not vectors. Editing the images requires an illustration application like Illustrator or Inkscape (free). However, you can edit most free vector images that are in .EPS format using PowerPoint.

edit free vector images in PowerPoint

Here’s a post that explains how to edit free vector images in PowerPoint and a tutorial video. Unless you’re comfortable with the illustration apps, I’d look for .EPS files first and use PowerPoint.

So there you go, a complete list of sites that provide free vector images that you can freely use in your presentations and elearning courses.

Events

Free E-Learning Resources

Want to learn more? Check out these articles and free resources in the community.

Here’s a great job board for e-learning, instructional design, and training jobs

Participate in the weekly e-learning challenges to sharpen your skills

Get your free PowerPoint templates and free graphics & stock images.

Lots of cool e-learning examples to check out and find inspiration.

Getting Started? This e-learning 101 series and the free e-books will help.


edit free vector images in PowerPoint header

EDITOR’S NOTE:

Unfortunately this is no longer possible in PowerPoint. However, here’s a post where you can learn to edit EPS files for free.


In this post we’ll explore how to edit free vector images in PowerPoint. You’ll be able to use them in your presentations and online training courses.

There are hundreds of sites to download free vector images that can be used for your presentations and online training courses. The challenge is that to edit most of the free vector images requires an illustration application like Illustrator or Inkscape (free). However, if you get them in .EPS format you may be able to edit the free vector images in PowerPoint.

Formats to Edit Free Vector Images

Vector images are not like bitmap images that are based on pixels. Vector images use a mathematical formula to draw the images onscreen. That’s why they always look nice and crisp when scaled.

Generally speaking they’re made up of a bunch of shapes that when combined represent the image. Because of this, they can be ungrouped and the individual shapes can be edited.

edit free vector images as .EPS in PowerPoint

Whether you purchase the vector images or get them for free, they are typically in one of two formats: .AI or .EPS and can be edited in an illustration program. If the free vector image is in .EPS format you may be able to edit it in PowerPoint.

How to Edit Free Vector Images in PowerPoint

This process works the same way as if you were ungrouping clip art in PowerPoint. Here’s how:

  • Locate a vector image in .EPS format and insert it on the PowerPoint slide. You’ll notice that initially it may look a bit jagged. That’s OK, it’ll change when we do the next step.
  • Ungroup the .EPS file. Right-click on the image and select “Ungroup.” Vector images are often made up of multiple groups of shapes so you may have to ungroup the groups a few times.
  • Edit the image as if it were any other shape in PowerPoint. Change colors, position, etc.
  • Group the image when you’re done editing it. Select it, right-click, and select “Group.” That’s it.

Bonus Tips to Edit Free Vector Images

  • Speed up your grouping and ungrouping using keyboard shortcuts in PowerPoint. CTRL+G groups selected shapes and CTRL+Shift+G ungroups them.
  • Save the image to use in other applications like Storyline or elsewhere. Right-click and select “Save As Picture.” I usually save as .PNG. I also save the PowerPoint file in case I want to make additional changes down the road.

Potential Issues If You Edit Free Vector Images

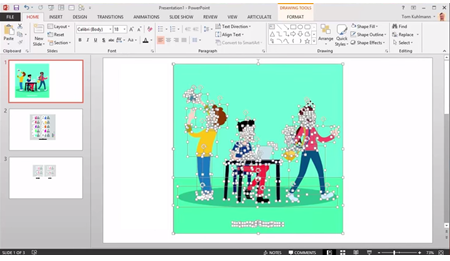
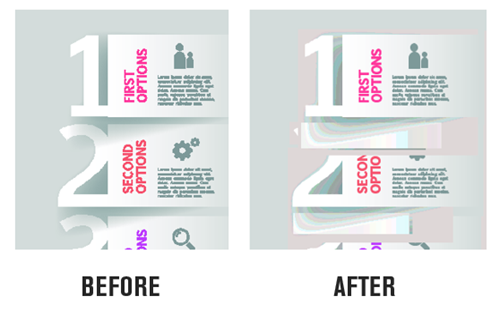
For the most part, ungrouping .EPS files in PowerPoint works well. However, it does break down if the shapes are made of gradients and not solid colors. The image below shows the before and after of an ungrouped file in PowerPoint. Ungrouping that image creates about 8500 individual shapes. In that case it’s probably not worth messing with it.

edit free vector images but some EPS files may not work

Also, some of the colors and shapes may change, too. Compare the before and after images below. You’ll notice that the original colors were softer and the lines a bit thinner.

edit free vector images before and after

Here’s a video tutorial that shows how to edit free vector images in PowerPoint. I also add a few extra production tips.

Click here to watch the video tutorial at YouTube.

Microsoft may have gotten rid of clip art for PowerPoint, but there’s no reason why you can’t edit free vector images and get what you need for your presentations and elearning courses. It just takes a little bit of practice.

Events

Free E-Learning Resources

Want to learn more? Check out these articles and free resources in the community.

Here’s a great job board for e-learning, instructional design, and training jobs

Participate in the weekly e-learning challenges to sharpen your skills

Get your free PowerPoint templates and free graphics & stock images.

Lots of cool e-learning examples to check out and find inspiration.

Getting Started? This e-learning 101 series and the free e-books will help.


closed captions in Storyline

[UPDATE: This tutorial is specific to Storyline2. Storyline 360/3 both have closed captioning as a feature.]

In a previous post we learned how to create closed captions text for your online courses. Now we’ll learn to use that text in Articulate Storyline.

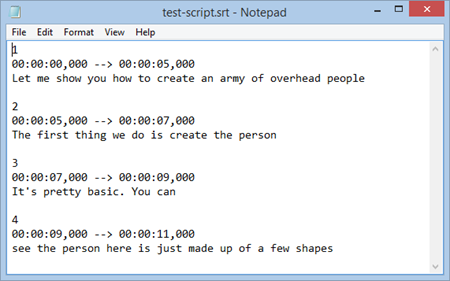
Before we get started, let’s do a quick review of your closed captions source file. Regardless of the application you used to create the closed captions file, you’ll end up with the timing and the text for the captions. It should look similar to the image below.

closed caption storyline SRT

Display Closed Captions in Storyline

Displaying the closed captions in Storyline 2 is a very straightforward process. All we need is a single text variable that is triggered to change to new text based on the timeline.

Here’s a video where I explain how easy it is to create the closed captions in Storyline 2.

Click here to view the closed captions YouTube tutorial.

Here are the basic steps to create the captions in Storyline 2:

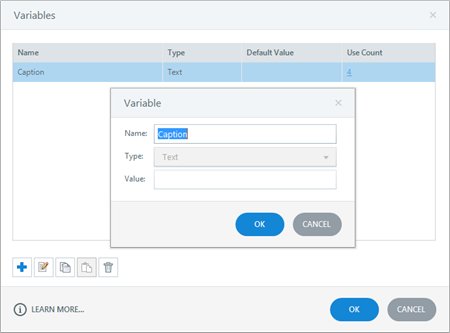
  • Create a text variable titled “Caption.”

closed captions Storyline variable

  • Insert a text reference of the “Caption” variable so that the caption is visible on the slide. The caption displays the variable which will change at different points on the timeline.

closed captions Storyline text reference

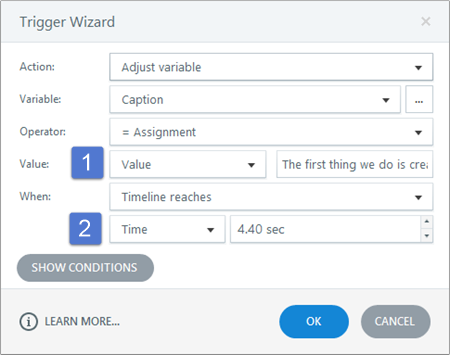
  • Add a trigger to the slide that changes the value of the “Caption” variable at a specific time. The value and specific time come from the SRT file. The value is the text and the time is the starting time for each line. Storyline 1 doesn’t have the timeline trigger. The workaround is to add simple shapes (and move them offscreen) to represent the timing. And then trigger to the start of those shapes on the timeline).

closed captions Storyline trigger

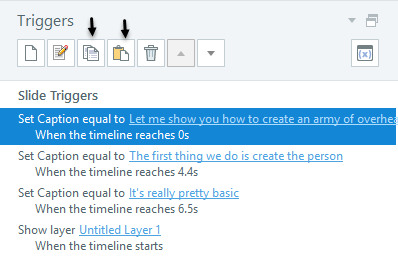
  • Copy and paste the trigger and then add the new values and timing by copying the text from the .SRT files.

closed captions Storyline copy and paste trigger

As you can see, adding closed captions and syncing them to the timeline is pretty easy. Here are a few general tips when working with closed captions:

  • Show or hide the closed captions by adding a button that sets a variable to turn captions on and off.
  • Use a legible text, none of those fancy curly ones. A clean san serif font like Open Sans works well.
  • Come up with a format that is consistent. Because the screen content is constantly changing you want to ensure enough contrast so that people can read the captions. I prefer a semi-transparent black box with white or yellow text.
  • Create a uniform size. The text box that contains the closed captions is dynamic and will change based on the characters (that’s the nature of text variables). That means the font size may increase or decrease based on the character count. Do a test and create a box that accommodates the most text you’ll have at any given time. Then set the font size to that and it should look right as the character count changes.

That’s about it. With a single variable and one trigger you can quickly create as many captions as you need when using Articulate Storyline to build your online training.

Events

Free E-Learning Resources

Want to learn more? Check out these articles and free resources in the community.

Here’s a great job board for e-learning, instructional design, and training jobs

Participate in the weekly e-learning challenges to sharpen your skills

Get your free PowerPoint templates and free graphics & stock images.

Lots of cool e-learning examples to check out and find inspiration.

Getting Started? This e-learning 101 series and the free e-books will help.


free closed captioning software for online training and elearning

In this post we’ll explore a few simple ways to create free closed captioning text for your online training courses. We’ll work off of the assumption that you want closed captioning to sync with your audio narration or an inserted video on your slides.

What is Closed Captioning Text?

Generally speaking, closed captioning text accompanies the audio or video narration in your online training courses. It’s used to help those who are deaf and can’t hear the audio follow along with the course’s narration. However, some people prefer to turn off all audio and read the text (or perhaps they don’t have speakers or headphones) so it’s not just an issue of accessibility.

Alternatives to Closed Captioning?

There are different ways to make the course transcript available to the end user. A common approach is to display a full transcript. It gets added to slide and allows the learner to disregard the audio and just read the transcript.

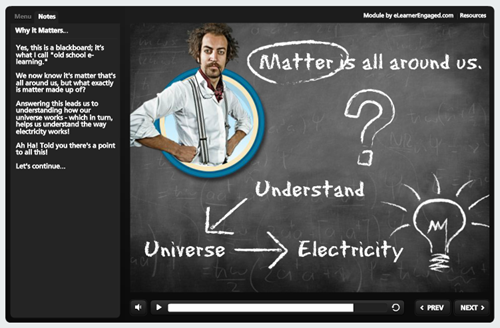
Many of the elearning applications like Articulate Storyline have a transcript or notes feature that allows for this. The transcript can be part of the player or the course designer could add a transcript feature to the actual slide. The image below shows the transcript on the side in the player.

closed captioning transcript in player

This approach works great since most people can read faster than the narrator talks. This is also a viable solution if the slide is mostly static and there isn’t a lot of synced animations or content going on and off the screen. However, it’s not ideal if you want the transcript to sync with the flow of the narration.

How to Create Free Closed Captioning

Let’s say you do want closed captioning in your online training and you want the text synchronized to the audio narration. There are two key components: the first is that you’ll need to create a closed captioning file that has timing and text notations; and the next is using that file to create the actual captions in your elearning software.

Today, I’ll show how to create the free closed captioning file and in a follow up post, I’ll show how to use it in Articulate Storyline. If you have a different authoring application, you’ll have to learn more from that vendor. But in a general sense the steps are probably similar.

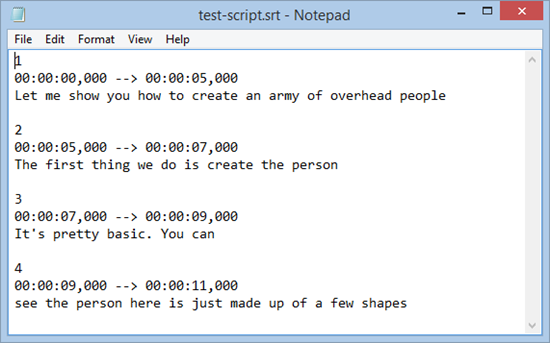
The image below shows a simple closed captioning file. You can see that each caption is indicated by a number and a time range.

closed captioning for online training and elearning .SRT file format

For example, line 2 runs from 5 seconds to 7 seconds with “The first thing we do is create the person…” text onscreen. At the 7 second mark, line 3 is displayed.

There are all sorts of file formats for closed captioning text. You can learn more in this article and at the YouTube site. I like to keep things simple, so we’ll focus on the .SRT files and how to get them. By the way, you can open .SRT files in notepad for easy viewing or editing.

Here are a few ways to create the free closed captioning for your online training courses.

YouTube for Free Closed Captioning

YouTube creates closed captioning when you upload a video. After it’s uploaded it will extract the text and create the timing of the captions. Here’s a great video tutorial that shows how to create free closed captioning in YouTube.

closed captioning for online training via youtube

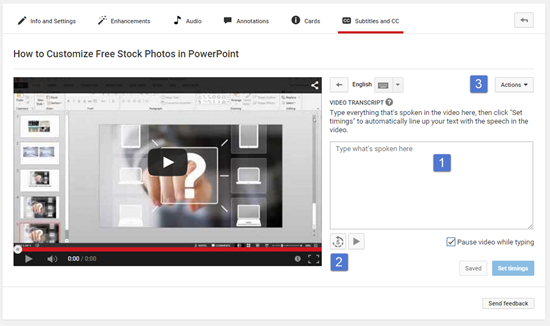
Here’s a quick overview of creating free closed captioning of your own transcript:

  • Listen to the video and insert the text.
  • You can always rewind 5 seconds to repeat it.
  • Once complete, select “Actions” and download the file in .SRT format.

Microsoft’s Free Closed Captioning Text Maker

Note: No longer available.

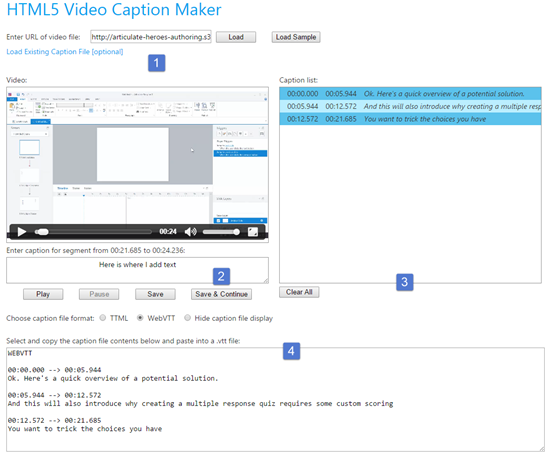
Microsoft offers a simple HTML5-based free closed captioning text maker. It’s on one of their experimental sites so I’m not sure how long it’ll be around; it may end up like Jimmy Hoffa and the screen beans. However, while it’s available, it’s easy enough to use and a good alternative if you have a video link and don’t want to upload your video to YouTube.

free HTML5 closed captioning text

Here are the basic steps to create free closed captioning text:

  • Add a video URL.
  • Play the video and add your text.
  • Caption list displays closed captioning details.
  • Select the WebVTT format. It’s not .SRT, but it’s the same info. You can copy and paste into a text document.

Aegisub Free Closed Captioning Creator

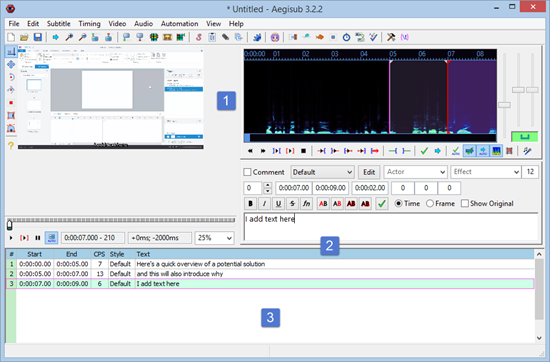
Aegisub is free software to create or modify subtitles and free closed captioning text. It’s a lot more feature-rich than the first two options. And because of that it has a little learning curve.

However, I’m no expert and I was able to insert a video and type in my text with no problems and without a lot of messing around. Most of those features are outside of what we want anyway. We just want a file that gives us the timing and text for the closed captioning so we can add it to our online training courses.

free closed captioning for online training

Adding your closed captioning text is generally straightforward:

  • Insert a video and play it.
  • Add text and press “Enter.”
  • The caption timing displays at the bottom. To export, go to “File” and export and save as .SRT which you can open in Notepad.

So there you have it—three solutions to get free closed captioning for your online training. All of the solutions will generate a file that includes the timing of the closed captions and the text that displays. Once you have those you can use them in your online training software to display the closed captions.

I’ll show how to add closed captions to an Articulate Storyline course in a follow up post.

Events

Free E-Learning Resources

Want to learn more? Check out these articles and free resources in the community.

Here’s a great job board for e-learning, instructional design, and training jobs

Participate in the weekly e-learning challenges to sharpen your skills

Get your free PowerPoint templates and free graphics & stock images.

Lots of cool e-learning examples to check out and find inspiration.

Getting Started? This e-learning 101 series and the free e-books will help.


Articulate Rapid E-learning Blog - pre-assessment scenario

Organizations operate at the speed of business and don’t like to waste time or money. That’s especially true when it comes to pulling people away from their daily tasks. And this is something that happens every time a person is asked to complete an e-learning course. So it’s important to create the most cost-effective process possible and still meet the organization’s goals.

One way to make e-learning courses cost-effective is by sorting your learners and then pushing them to a successful learning path. Some who take the courses are more experienced and don’t need the same course that the new person does. And the new person probably needs a lot more context and content.

Understand Your Learners Before Building a Pre-Assessment Scenario

People come to the courses with varying levels of experience, skills, and understanding. In an ideal world, you can craft an adaptive learning process where everyone gets a unique learning experience, but that’s usually not an option. Most of the time, you have to create one course that meets the needs of everyone.

  • Experienced learners already have a lot of contexts. And often the e-learning courses act more like a certification process than new learning experience. So, in that sense, let them prove what they know and move on to completion.
  • New learners are new and don’t have a record of accomplishment of experience. Often, they don’t know what they don’t know. Some may know more than others. And some may think they already know the content.

Let Learners Test Out Instead of Using a Pre-Assessment Scenario

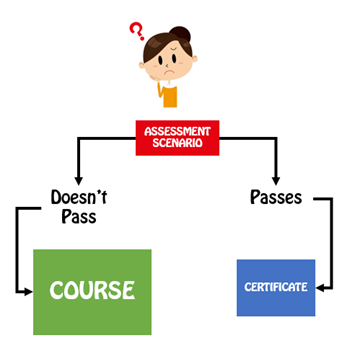
A common option is to let learners test out by successfully completing a pre-test. Present an assessment upfront. If they pass it, they go to the end and are done. If they don’t pass it, they go to the beginning and take the course. This is a viable model and works great for simple compliance training where an annual course completion certificate is the main objective.

Articulate Rapid E-Learning Blog - pre-assessment scenarios let you test out

However, many of those pre-assessment tests are very basic and what do they really prove? They may prove the person knows the content, but it doesn’t mean that they know how to apply it. Or it may prove that they’re good guessers. In either case, they generally don’t prove understanding, especially in a performance environment.

Create a Pre-Assessment Scenario

Functionally a pre-assessment scenario is the same as a pre-test. The goal is to sort the learners and move the experienced and novice learners down different paths. However, the core difference is that the assessment scenario attempts to assess deeper understanding of the content and its proper application.

Pre-tests typically ask a series of multiple-choice questions. And again, this is fine for a simple end-of-year certification. However, if the course is more performance-based, then the scenario allows you to stage an event that lets the learner demonstrate that they can meet the performance requirements by successfully navigating the pre-assessment scenario.

Articulate Rapid E-Learning Blog - pre-assessment scenario flow

A couple of additional benefits is that a pre-assessment scenario helps remind the experienced person of what they need to do and for the new person it helps expose deficient understanding and the types of situations they may encounter in the real world. The pre-assessment scenarios also help cement the objectives for the course. When a person isn’t successful, they’re more apt to pay attention to the course content since they’ve already been proven to lack some of the expected understanding.

A few production tips:

  • Keep it short. Instead of big, long scenarios which take more time to produce, create a series of quick hit scenarios.
  • This is a pre-assessment. So don’t feel obligated to do much to set up or support the assessment with resource content. If they can demonstrate their understanding, they can pass the pre-assessment. If they can’t, well, that’s why you created the course.
  • Create templates. You can create interactive scenario templates and reuse them for quicker production.

Pre-tests are a great way to efficiently and effectively move learners through the training process. However, they are limited in what they can assess. Switching to a real-world pre-assessment scenario provides a better way to assess understanding and application of the training content. It also lets those who don’t pass understand why they need to take the course.

Events

Free E-Learning Resources

Want to learn more? Check out these articles and free resources in the community.

Here’s a great job board for e-learning, instructional design, and training jobs

Participate in the weekly e-learning challenges to sharpen your skills

Get your free PowerPoint templates and free graphics & stock images.

Lots of cool e-learning examples to check out and find inspiration.

Getting Started? This e-learning 101 series and the free e-books will help.