


My institution specifically does not use YouTube’s automatic captioning due to its poor accuracy. I believe there are accuracy goals required by the ADA where captions are concerned, and YouTube has not achieved them yet.
How to Add Closed Captions to Your E-Learning Courses
September 19th, 2017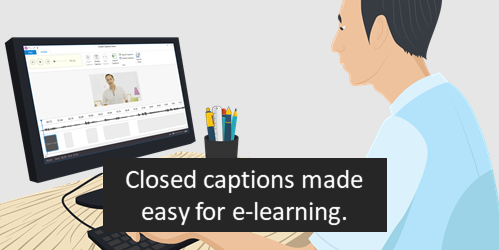
We’ve discussed closed captions in a previous post. We looked at how to create them with free software or online tools. And we also explored how to build closed captions using a single text variable.
Today, we’ll look at how the closed captions feature works in Articulate Storyline 360. You’ll find it a lot easier to use. Here are three video tutorials that go into more detail regarding the steps below.
TUTORIALS
- How to create and edit editing closed captions in Storyline 360.
- How to import closed caption text files into Storyline 360.
- How to create a custom closed captions button.
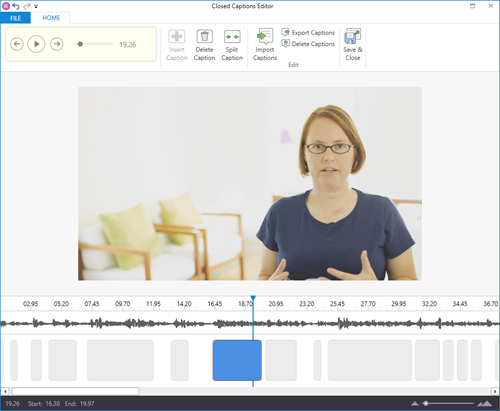
How to Create & Edit Closed Caption Text
Here’s how to add captions to audio narration or videos in your course. You can do it right inside of the authoring tool.
- Insert the video (or audio) file.
- From the toolbar, select Add Captions.
- Storyline opens a caption editor where it analyzes the audio track and creates several placeholder caption boxes for you to insert text.
- Select a caption box and start typing. Hit the return key to restart the caption box until you’re done. Hit the tab key to move to the next box.
- Easy as that.
TUTORIAL: Learn about creating and editing closed captions in Storyline 360.
Editing your captions is fairly straightforward. When you open the Closed Captions Editor, you see a timeline with the audio track and caption boxes.
- You can extend or decrease the time of the caption.
- Edit text.
- Click and move the caption boxes.
- Export the closed captions as a .VTT file, which is standard.
How to Import Closed Caption Text
Many people like to create their closed caption text in separate applications, export the .VTT (or another format), and import the text file into the authoring tool. That makes sense, especially if you have really long audio or video tracks.
Personally, I like to use Youtube to create my captions for long videos. I upload the video to Youtube and make sure it’s not public. Then, I take my text script and paste it into the field. Youtube does the rest. When it’s done, I can download a .VTT file to use in my e-learning course.
Here’s how it works in Storyline 360.
- Insert a video or audio file into the slide.
- Click on the video and in the ribbon, select Import to access your .VTT file.
- Preview the slide and select the Captions button on the player.

TUTORIAL: Learn about importing closed captions.
How to Create a Closed Captions Button
By default, the course player has a captions button. To view captions during the course, click the captions button. That works great if you have the player and captions button enabled. However, some people prefer to diminish the player and want their own captions button on the slide to control when the captions display.
Here’s how to create a custom captions button:
- Insert a button.
- Add a trigger to the button to adjust the Player.Display.Captions variable.
- The variable is like a True/False variable that can be either one or the other when clicked. Set the operator to =NOT Assignment.
- When the button is clicked it toggles the variable value to what is not assigned to. Thus, clicking the button turns the captions or off.

TUTORIAL: Learn about creating a custom closed captions button.
And that’s how you add closed captions to your e-learning courses. Pretty simple, huh?
Events
- Everyday. Check out the weekly training webinars to learn more about Rise, Storyline, and instructional design.
Free E-Learning Resources
 |
 |
 |
|
Want to learn more? Check out these articles and free resources in the community. |
Here’s a great job board for e-learning, instructional design, and training jobs |
Participate in the weekly e-learning challenges to sharpen your skills |
 |
 |
 |
|
Get your free PowerPoint templates and free graphics & stock images. |
Lots of cool e-learning examples to check out and find inspiration. |
Getting Started? This e-learning 101 series and the free e-books will help. |
You might also like:
8 responses to “How to Add Closed Captions to Your E-Learning Courses”
A comment and a question:
– As a result of Google’s purchase of YouTube, the YouTube autogenerated captioning has GREATLY improved – just in the last year, in fact! You owe yourself a favor to try it out and see. Also, you can now either choose to edit captions within the YouTube editor or export the automatically-generated captions in a file and edit them there (which allows you to change them to another language, if desired), and then re-import them. Super easy!
– Question: how much of this information also applies to captioning in Storyline 3?
Thanks –
I’ve been working with a lot of captions lately. I stumbled upon the app called “4K Video Downloader” and it’s slick. Copy/paste a URL where a video (or audio clip is) and you can download the video or audio only, and if captions are present you can download those in any given language. Since it’s a properly formatted captions file (srt or vtt) it’s compatible with Storyline 360 and easy to edit/sync in Storyline for accuracy and timing. I agree with poor accuracy of content out there and manual intervention is still needed in some cases. When I do have to touch up captions, I’m finding that Articulate is making this a much easier process because I can edit captions in the same environment as I author in. A nice step forward!
How do you incorporate Closed Captions for Articulate Storyline 2?
Venice


0
comments