The Rapid Elearning Blog

Archive for February, 2018


Use PowerPoint to edit images

Over the years, I’ve posted hundreds of tutorials using PowerPoint. Some of them to be updated. Today I am going to cover five ways to use PowerPoint as an image editor. This is great for quick image editing or for those who don’t have other image editors on hand.

Save PowerPoint Content as an Image

Since we’re talking about PowerPoint as an image editor, the first tip is that whatever you create in PowerPoint can be saved as an image.

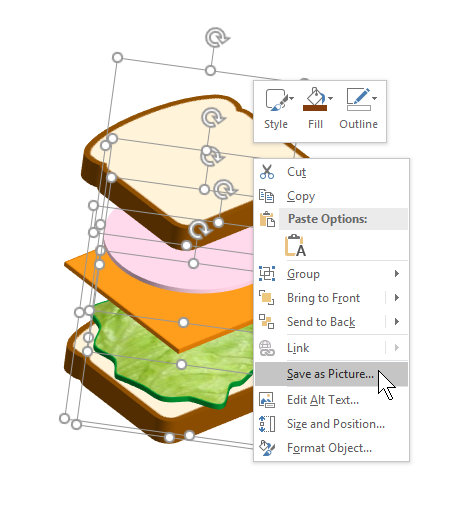
I usually group the objects so it’s one group. And then I right-click and save as picture. I like to save as a .PNG so that the transparent areas of the image are still transparent. If you save as .JPEG, the transparent areas will become white.

In the image below, I used PowerPoint to create the sandwich stack and then right-clicked to save as picture.
PowerPoint as illustrator

Create Custom-Sized PowerPoint Slides

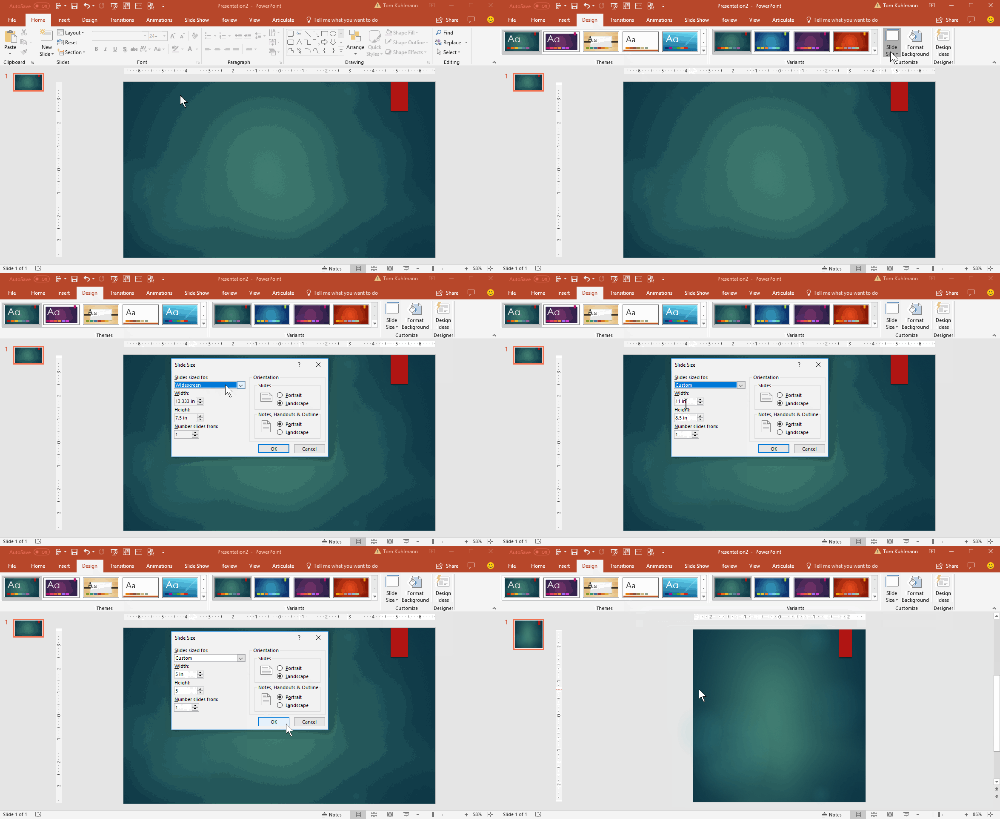
You can make a PowerPoint slide any size you want. By default, they’re 16:9. That and 4:3 are the most common aspect ratios. However, by going to the Design Tab you can set the slides to any size. That means they can be tall and skinny or short and wide.
PowerPoint as illustrator slide size

Why would someone want to do that? Check out the tip below.

Export PowerPoint Slides as Images

PowerPoint slides can be saved as images. That means you can add whatever you want to a slide, layer content, etc and then save that slide as an image. I do this quite a bit when I need to quickly build graphics for my e-learning courses.

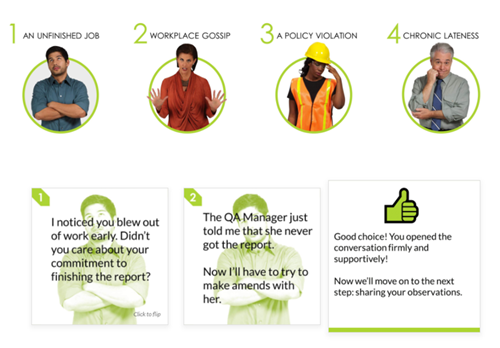
For example, the flashcard interaction in Rise is a 1:1 aspect ratio. So I make a PowerPoint slide that is 1:1 and add my content to the slide. It’s a great way to add titles and images to the flashcards to make them visually richer.

Once I’ve completed the slide, I save the PowerPoint slides as images and insert them into the Rise interaction.
PowerPoint as illustrator

The images above were all created in PowerPoint as slides and inserted into the Rise course. You can see an example of the PowerPoint slide images in this demo course.

Using PowerPoint slides to create images is easy and it gives me more control over the images I use in my e-learning courses.

How to Extend a Photo’s Background

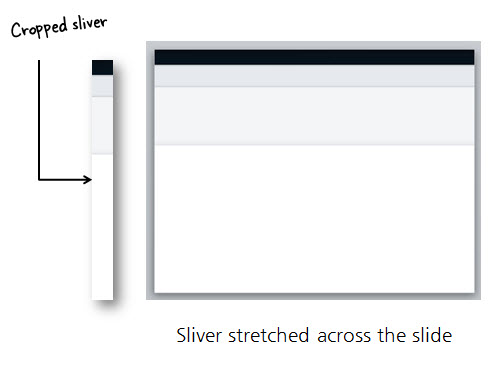
Sometimes you have images where the object is centered which makes it challenging to place other content on the screen. An easy way to fix this is to cut a slice from the image and stretch it. This lets you move the main object over and get some empty space for text or other content.

PowerPoint as illustrator to extend images

I also use this technique to quickly build slide layouts which I showed in this previous blog post on how to create a template from a single image.
Create PowerPoint or e-learning template from image

How to Remove the Backgrounds of Images in PowerPoint

Since PowerPoint 2010, you can use PowerPoint to remove backgrounds from your images. For the most part, it works well. Select your image and the remove background. You can select areas to keep and areas to remove. Once you’ve removed the background, you can play around with softening the edges to get rid of any obvious jaggedness.

How to remove background in PowerPoint

As you can see, PowerPoint is a great tool for building simple illustrations or using it for quick graphics editing.

Events

Free E-Learning Resources

Want to learn more? Check out these articles and free resources in the community.

Here’s a great job board for e-learning, instructional design, and training jobs

Participate in the weekly e-learning challenges to sharpen your skills

Get your free PowerPoint templates and free graphics & stock images.

Lots of cool e-learning examples to check out and find inspiration.

Getting Started? This e-learning 101 series and the free e-books will help.


next generation rapid e-learning

Ten years ago, the e-learning industry was still mostly Flash-based. That meant organizations either had to buy e-learning courses, have them custom-built, or hire a Flash programmer to build them. The cost for doing so meant most organizations didn’t have access to the world of online training.

That all changed when the PowerPoint-to-Flash tools like Articulate Studio, emerged. It democratized the world of online training because it put e-learning into the hands of anyone who wanted to build a course. If you came from that world where building Flash courses took more time and cost more, everything was rapid. Thus, the term, rapid e-learning.

The Evolution of Rapid E-learning

Flash required special skills which made authoring in PowerPoint so attractive. With some creativity, one could build engaging and interactive e-learning courses in PowerPoint. However, the reality is that PowerPoint has a ceiling and doesn’t offer all of the interactive capabilities required for many e-learning courses. I outlined that in this post on why PowerPoint isn’t the right choice for interactive e-learning.

PowerPoint isn't the best for interactive rapid e-learning

  • Interactivity is mostly limited to click-and-reveal.
  • It requires a lot of redundant production which gets exponentially more complex.
  • You can’t use variables to create adaptive training or branched interactions.

When Storyline came out in 2012 it really changed the rapid e-learning industry. For the first time, one could build highly interactive content with PowerPoint comfort and without a background in programming. That was an exciting time for first-generation rapid e-learning developers.

Second Generation Rapid E-Learning

I’m often asked where is the rapid part of rapid e-learning? For those who are entering the industry today, it’s a bit different.

Storyline is still a killer application. However, there is an opportunity for those who want a new type of authoring, or what could be called rapid(er) e-learning. Welcome to the world of Rise.

In a sense, Rise is to Storyline what PowerPoint was to Flash. It offers even easier authoring that allows for quick development and delivery. It’s fully responsive and works great on mobile devices.

Comparing Rise to Storyline

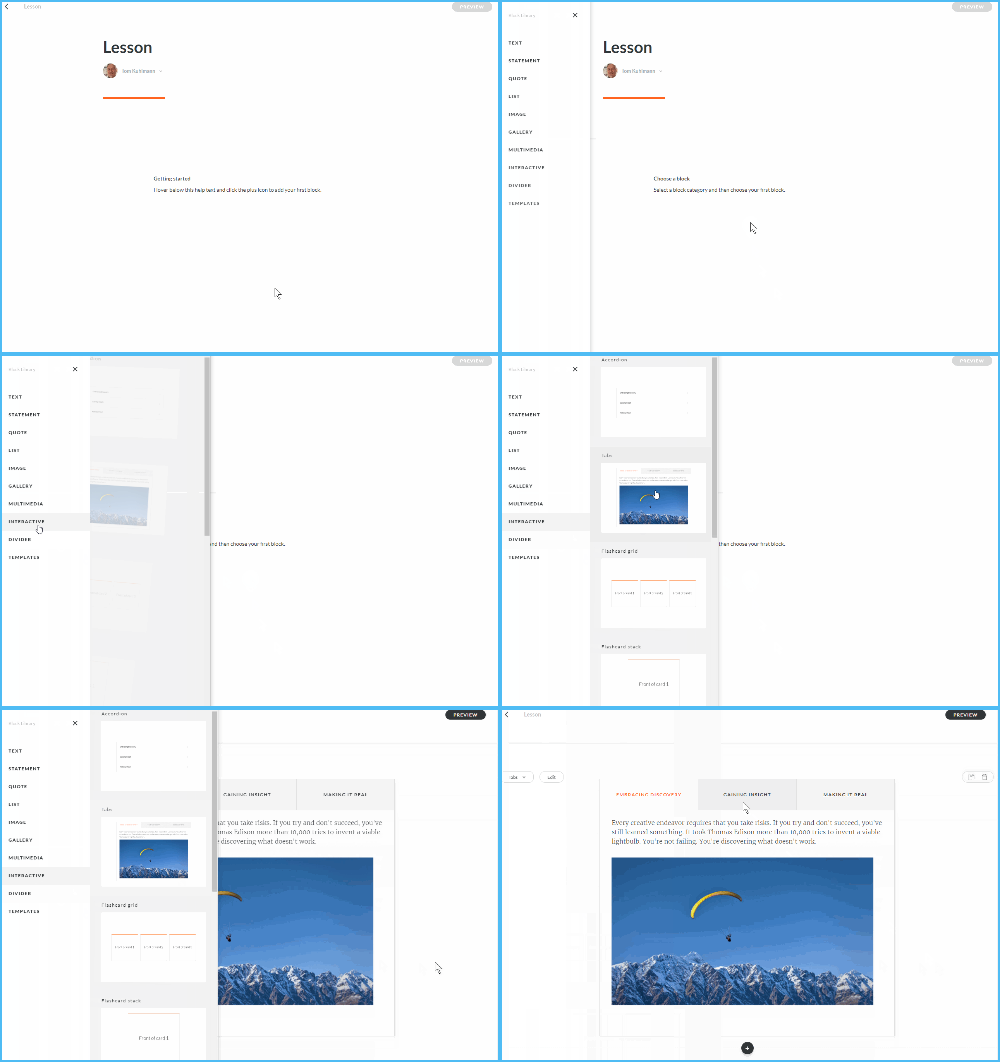
Rise courses are constructed using pre-determined blocks. Choose a block, add content, and publish. Whereas, Storyline is a freeform slide that requires a bit more work.

new rapid e-learning example insert tabs interaction Rise

A great way to see the difference is by looking at how to insert a tabs interaction (one of the most common interaction types). In Rise, select a tabs interaction block and insert the content. That’s it.

In Storyline, it’s relatively easy to build a tabs interaction, but it requires more steps. Decide how it will look and work. And then from there build custom tabs, add layers, and then connect triggers.

As you can see, Rise is a whole lot faster and easier. It’s the new and improved rapid e-learning.

Combining Rise and Storyline for Powerful Rapid E-Learning

The cool thing is that when you want some custom interactions, build them in Storyline and add them to the Rise course. Thus you get the best of both worlds: fast, easy authoring in Rise combined with custom interactivity of Storyline.

rapid e-learning Articulate Rise example

Click here to view the Rise demo.

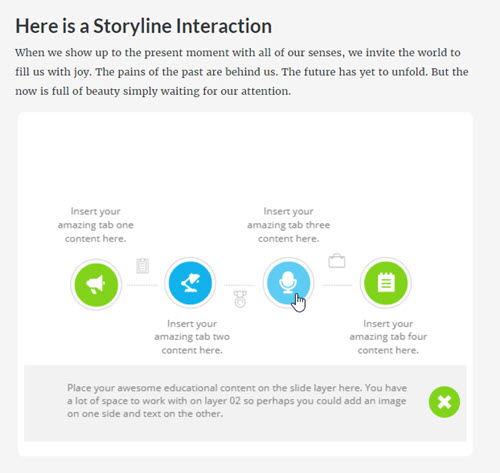
Above is a quick demo where I modified one of the Storyline templates in Content Library to work in Rise as a simple interaction.

Other Examples of Rapid E-Learning Courses in Rise

And for those wondering what you can do, here are few Rise demos:

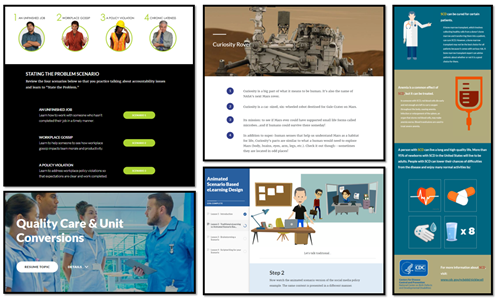
other rapid e-learning examples in Rise

If you haven’t tried Rise, give it a go. Let me know what you think. Eventually, this e-learning stuff will get so easy we’ll just be sitting at home watching Netflix and eating bonbons.

Events

Free E-Learning Resources

Want to learn more? Check out these articles and free resources in the community.

Here’s a great job board for e-learning, instructional design, and training jobs

Participate in the weekly e-learning challenges to sharpen your skills

Get your free PowerPoint templates and free graphics & stock images.

Lots of cool e-learning examples to check out and find inspiration.

Getting Started? This e-learning 101 series and the free e-books will help.


edit SVG in PowerPoint

The good news is that now you can edit SVG images in PowerPoint. And that’s a big deal because we’re starting to see more SVG images every day.

In fact, one of the sites where I buy images has the option to download SVG images. This is great because they can be edited and customized. However, to edit them requires knowing how to do so with an illustration program. Unless of course, you know how to use PowerPoint.

Insert & Edit SVG Image in PowerPoint

This first step is really easy. Insert a picture by using Insert>Pictures on the toolbar. Locate your SVG image and insert it. Voila! I will add, that I’ve had a few SVG files that didn’t work, but for the most part it’s been smooth sailing.

SVG PowerPoint

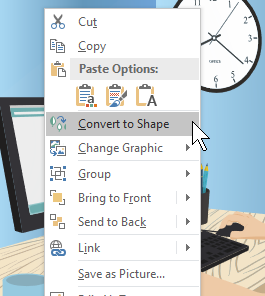
The next step is also very easy. What you’ll do is convert the SVG image into an object that can be edited in PowerPoint. The newest version of PowerPoint has a “Convert to Shape” feature. If you don’t see it in your version of PowerPoint, you’ll need to upgrade to the Office 365 version.

  • Select the image
  • In the format toolbar (or via right-click) select Convert to Shape. It will ask if you want to convert it.
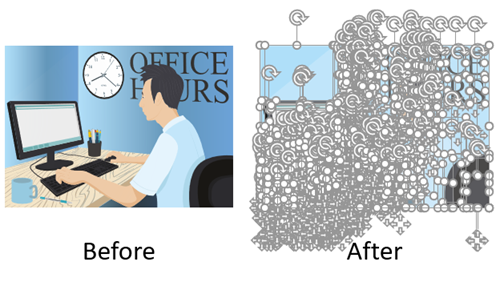
  • Once it’s converted, you need to ungroup the image. Right-click, and select Ungroup.
  • Now the image is broken into multiple shapes where you can edit them as you wish.

convert and edit SVG in PowerPoint

Once the image is ungrouped you can edit it. For example, I removed the background content and just isolated the guy on the computer. now I can insert it anywhere I want. You can regroup the object and right-click to save as an image. I like to save as a PNG file so that the transparent part of the image remains transparent.

edit SVG in PowerPoint computer man

How to Edit SVG in PowerPoint Video Tutorial

Here’s a video tutorial where I show how to convert and edit an SVG in PowerPoint.

Click here to watch the YouTube tutorial.

As you can see, it’s super easy to edit SVG files in PowerPoint. That should open the doors to all sorts of possibilities as you find free SVG files at those various sites that offer free stock images.

Events

Free E-Learning Resources

Want to learn more? Check out these articles and free resources in the community.

Here’s a great job board for e-learning, instructional design, and training jobs

Participate in the weekly e-learning challenges to sharpen your skills

Get your free PowerPoint templates and free graphics & stock images.

Lots of cool e-learning examples to check out and find inspiration.

Getting Started? This e-learning 101 series and the free e-books will help.


interactive video

This is part two of the series on working with 3D models and interactive video. In the previous post, we looked at how to create a video using 3D models in PowerPoint. Today, we’ll discover how to use them to create interactive videos in Storyline. And then of course, once you have an interaction you can also insert it into a Rise course, which is what I did in this Rise lesson.

Create the Interactive Videos in PowerPoint using 3D Models

If you want to create a different kind of interactive video, you can apply what you learn here. The process is similar. For this demo, make sure you understand how the video is created and how it plays all the way through because we’re going to add a trigger to pause it before it completes.

For this demo, I created a video where the object rotates in and then rotates back out. It was built using a three-slide PowerPoint file and exported as a video.

Tutorial: how to create a three-slide video using 3D models in PowerPoint.

A Teardown of the 3D Model Interactive Videos

There are a few nuanced steps in this process. Let’s review what happens and then we can look at how to create it in Storyline:

Interactive video in Storyline using 3D models in PowerPoint

  • User clicks on the side tab which shows a layer.
  • The layer plays the video we created in PowerPoint.
  • Since the 3D object in the video rotates in and out, we set the video to pause when the object is rotated in.
  • Then we add a trigger to resume the timeline (with a hotspot or button) which continues to play the video and shows the object rotate out as the video completes.
  • The completion of the media (the video) triggers the layer to hide which takes us back to the base slide with the side tabs.

Create the Interactive Videos in Storyline

The video I create in PowerPoint is the exact same aspect ratio as the Storyline file. For the most part, 16×9 is fine. But if you change the aspect ratio of your .story file make sure you do the same on the PowerPoint slide.

  • Go to slide 1 in PowerPoint and save it as a .PNG image. This image will be what the user sees on the base slide in Storyline and perfectly aligns with the videos that will be on the layers.
  • In the Storyline slide, insert the slide image from PowerPoint.
  • Create the appropriate number of layers based on how many interactive elements you have.
  • On each layer add the appropriate video. Each video should play automatically. I also recommend putting a hotspot over the video so the user can’t click on the video to start/stop it.
  • On the video layer, add a trigger to pause the video when it reaches either a certain time or cue point. I like to add cue points so I can nudge them without modifying the trigger. The video should pause at the apex of the object rotation.
  • Add a trigger to unpause the video. It could be a simple button or perhaps a hotspot.
  • Add a trigger to hide the layer when the media completes. This should take you back to the base slide.

Click here to view the tutorial on creating an interactive video.

That’s basically it. Of course, there’s a lot more you can do to decorate the layer or add additional content. It just depends on your needs. Practice the technique first and once you have it set, see what you can do.

If you do create something, please share it with us so we can see it.

Events

Free E-Learning Resources

Want to learn more? Check out these articles and free resources in the community.

Here’s a great job board for e-learning, instructional design, and training jobs

Participate in the weekly e-learning challenges to sharpen your skills

Get your free PowerPoint templates and free graphics & stock images.

Lots of cool e-learning examples to check out and find inspiration.

Getting Started? This e-learning 101 series and the free e-books will help.