Great tips, Tom!
These are good reminders, Tom; I’ll save it to my Favorites.
I’m still working on my puzzle sample, and hope to post it soon on my blog.
Jenise | http://www.RidgeViewMedia.com
I’ve gotten a lot of emails about my last post on creating simple puzzle animations in PowerPoint. Based on some of the questions in the emails, I thought it would be good to go over some simple tips and tricks that I’ve learned over the years. They help make working with PowerPoint more productive.
Review the tips below and then watch the tutorial for more detailed information.
Click here to view the PowerPoint tips tutorial.
The tutorials are a little more detailed than the post so they take a little more time. The link above takes you to the entire tutorial. If you want to see individual parts of the tutorial, click the links below:


There are a bunch of keyboard shortcuts that you can use to make your production process faster. The options for PowerPoint 2003 and 2007 are a little different.
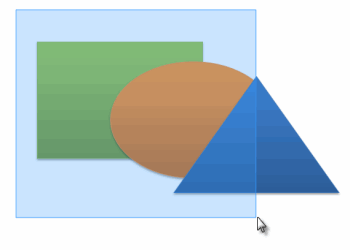
There are some basic shortcuts that I use all the time for copying and pasting. I also do a lot of grouping and duplicating. I can’t go through every shortcut in this post. However, if you review the links below you can see what they are. You might even find features that you didn’t know existed.
Here are links for the two:

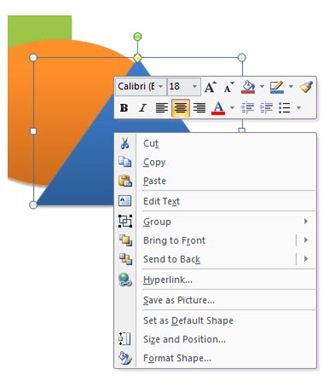
In addition to learning some keyboard shortcuts, get used to right clicking on objects. That will always open a context sensitive menu that reveals options and features available to you based on what you right clicked. It will save you a lot of time looking for menu items.

I love PowerPoint 2007 and think it really helps make PowerPoint a better tool to author elearning. I’m going to do a post on my observations in the near term. However, if you’re between PowerPoint 2003 and 2007, I found this quick reference guide on the Computerworld site with a good comparison of the keyboard shortcuts for both products.
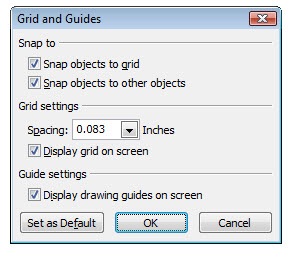
Using PowerPoint’s grid and guides will help you keep objects aligned. As you can see, the menu lets you modify the grid spacing, snapping of objects, and drawing guides.


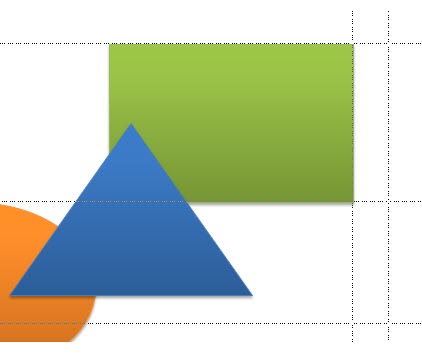
I use the drawing guides on every project. They help me align my objects across screens. Duplicating them is the same as duplicating anything else in PowerPoint. Select the guide, hit CTRL, and then drag the guide where you want it.

PowerPoint is a very effective tool to build elearning courses. The better you get at using some of PowerPoint’s features, the more effective you’ll become when building your courses. Hopefully, these tips and tricks will help you become a little faster at what you do.
If you have some tips and tricks you’d like to share, just add them to the comments section. Also, feel free to share these with others.
 |
 |
 |
|
Want to learn more? Check out these articles and free resources in the community. |
Here’s a great job board for e-learning, instructional design, and training jobs |
Participate in the weekly e-learning challenges to sharpen your skills |
 |
 |
 |
|
Get your free PowerPoint templates and free graphics & stock images. |
Lots of cool e-learning examples to check out and find inspiration. |
Getting Started? This e-learning 101 series and the free e-books will help. |
Great tips, Tom!
These are good reminders, Tom; I’ll save it to my Favorites.
I’m still working on my puzzle sample, and hope to post it soon on my blog.
Jenise | http://www.RidgeViewMedia.com
A new feature of 2007 I find helpful is the Selection Pane. If you layer a lot of items on one slide, and you wanted to select an item that was hidden behind another item, you used to have to click Tab to tab through selecting all the items on the slide.
Now, in 2007, you can go to the Home tab, choose Select in the Editing section, and view the Selection Pane. This pane allows you to select and reorder (bring forward or backward) any item on a slide. It’s a big help!
Thanks Tom!
Another great post. Question. What is the screen capture tool you are using? And, do you regularly get these captured in one take? Great work!
Lisa
Great tips. I especially like the Greek mythology tip. Exactly what I was looking for.
I use PowerPoint 2003 and at the rate my company upgrades, I won’t see PP2007 until 2009 if I am lucky. Before getting PP2003 a couple years ago, we were still using stone tablets.
As far as aligning objects, I like selecting all the objects I wish to align and then in the Drawing menu, I select “Draw”, “Align or Distribute” and it gives you options to align all the objects based on the top, bottom, sides, or middle of the objects. Another thing that is nice is if you want to evenly space multiple objects apart from each other, you can select the horizontal or vertical distribution options. So lets say you have five objects you want evenly spaced across your slide. Just move one as far left as you want it and move another as far right as you want it. Then select “Distribute Horizontally” and it will move the remaining three so that all five are all evenly apart from one another.
Tom
Five steps does the trick! Thanks. While having 2007 at home, workplace still uses 2003. This shortcut will save mucho time to move on to other pesky areas in PPT.
P.S. Love the intro tune on the demo video…;-]
Tom,
Timely post. Last week I was presenting at the National Association of EMS Educators conference and I was challenged by a participant to teach him so “advanced” PowerPoint techniques. My list was very similar to yours. They were:
1) align and distribute
2) drawing grid and guidelines
3) send objects forward and back
4) duplicate objects
5) hyperlink within slide show and out of PowerPoint
I also discussed this top 5 in a yet to be posted video for EMS1.com.
Excellent stuff, Tom. Thanks. On the topic of Powerpoint 03 vs 07, would you say it’s a reasonable enhancement to upgrade in relation to using Articulate with Powerpoint? I can make the case to our organisation if I can demonstrate the benefits.
I think a post on the benefits of 2007 would be great. Swapping objects is also one of my favorite things! I used to use a third-party plug-in called pptXTREME to “copy and paste” PPT animation settings between objects, but now 2007’s swap objects feature does the same thing for me.
Like your posts. Can you also post some tips (or samples) for creating survey/interview questionnaire for job-task analysis?
Tom another great blog. How do you keep your graphics so sharp?
For example the clock on the first slide. I have been trying hundred different thinds to try to keep my png from degrading when going from powerpoint to articulate but nothing seem to work like it does on yours.
WOuld you care to share the secret?
[…] learn a new elearning authoring tool that will let me use some ideas for exploratory elearning.
@Chris K. You are lucky withOUT PowerPOint 2007. Excactly your favorite function Draw > Align and Distribute is broken there: When you apply it to connected objects, the connectors are disrupted!
This is excellent! I love key commands that make my life easier. On that note, does anyone know of a key command within Power Point 2007 to “insert picture”? That would be my biggest wish! Or, does Power Point allow you to bind your own key commands? Thanks in advance for any help.
Tom
Many thanks, a series on graphix would be much appreciated. DO you know if beta version is available for testing?
Great post…5 tips certainly do the trick! and Key commands make life so much easier!
Tom,
Maybe you or some other folks with PPT 2007 experience can help me. I’ve just started working in PPT 2007 and have noticed that the header/footer function on the master pages in the slide/notes view work differently from the 2003 version. It seems you can set the master pages from the Header/Footer menu selection as usual But when you return to the actual slide the header/footer text boxes are still accessible on each individual slide. I’ve had problems with the slide header/footer settings being consistent have had to enter text on individual slides. Am I doing something wrong on the master slides? I’d like to avoid having to fix and refix header/footer text. Thanks!
Have you considered Wiziq’s Virtual Classroom ? Also authorSTREAM offers an excellent web based power point viewing platform.
Tom, great post…I can’t quite make the screen recording function that you explained to Lisa on Sept. 16 work for me, though. How do you “…capture in a size that fits in Articulate Presenter without having to scale down…also lock(ed) the player so it can’t be scaled.” I have downloaded several screen recording tools (freeware…the last one I tried being the free screen recorder from NBXSoft), and when I publish in Articulate, the screen recordings are invariably blurry. Perhaps the free stuff doesn’t have the configuring capacity to do what you suggest?
Re my comment about making screen recorders work…I forgot to mention that some of the recorders I tried can publish to .swf, but the ones that only seem to publish to .avi, I have software that converts to .swf…thanks, Tom.
[…] 5 Must-Know PowerPoint Tips That Will Save You Time (September 16, 2008) […]
I have just discovered the joy and ease of using drawing guide and grids. I have tried saving my presentation as a template to preserve these guide settings for future presenations, however the template files do not seem to preserve the drawing guide settings. I’m using Powerpoint 2003. If you are able to help me understand how Imight do this, i’d be most greateful
Thanks
Mark
[…] 5 Must-Know PowerPoint Tips That Will Save You Time […]
What a fantastic site! I’m mentoring a trainer in China to become an e-learning developer and I’ll definitely refer her to your blog.
Here are some other PPT (2003) shortcuts that I find very handy:
= To move an object vertically or horizontally, Shift+drag it.
= To duplicate an object and keep it aligned with its original, Ctrl+Shift+drag it.
= To resize a selected object about its centre, Ctrl+drag a handle. (Keeps object centre-aligned with others, or with slide.)
= To resize a selected object and keep its proportions, Shift+drag a corner handle.
= To resize a selected object about its centre and keep its proportions, Ctrl+Shift+drag a corner handle.
= To show or hide the guides, press Alt+F9.
= To open the Grid and Guides dialog box, press Ctrl+G.
= To change the case of selected text (or the current word), press Shift+F3 repeatedly.
= To select a sentence, Ctrl+click in it, then Shift+click elsewhere to select consecutive sentences.
Thanks again, and I hope you and others find some of these tips useful too.
[…] Review the tips below and then watch the tutorial for more detailed information. […]
[…] 5 Must-Know PowerPoint Tips That Will Save You Time […]
[…] Oct The Rapid Elearning Blog has a great post on five basic PowerPoint tips. They teach you how to work with objects on the screen and offer some time-saving […]
[…] 5 Must-Know PowerPoint Tips That Will Save You Time […]
[…] […]
Hi! I have published one tip:
http://runakay.blogspot.com/2011/07/displaying-current-slide-with-power.html
[…] 5 Must-Know PowerPoint Tips That Will Save You Time […]
[…] 5 Must-Know PowerPoint Tips That Will Save You Time […]
0
comments