Is there a tutorial on how you created your 3D model from a 2d image?
How to Create a Video with 3D Models in PowerPoint
January 30th, 2018
I shared a cool 3D interaction in a recent workshop demo and have had lots of people ask how I built it. You can check out the interaction in this Rise demo.
Creating the interaction is a two-step process:
- The first step is creating a video of the 3D model as it rotates in and out.
- The second step is to insert the video and add interactive elements in Storyline.
- In the case of the Mars Rover module, there’s a third step because inserted the interactive Storyline module into Rise. This is pretty cool because it allows for really simple and fast authoring in Rise, and then when I need custom interactions, I just build them in Storyline. It’s a win-win.
Here’s a previous post where I detailed more of the construction of the Rise demo. For today’s post, I’ll show you how to create the 3D video you’ll use for a Storyline interaction. The tutorial below shows how to create the video using 3D models in PowerPoint.
Click here to view the tutorial on YouTube.
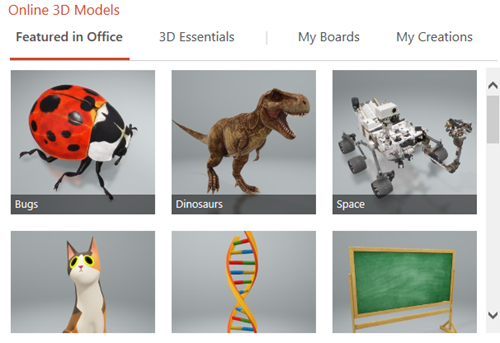
Insert 3D Models in PowerPoint
PowerPoint comes with a number of 3D models. It also supports inserting models shared by the community. You can also build your own 3D models and insert them using standard 3D formats

Most likely you’ll want to insert your own 3D object. So it’s nice that PowerPoint supports the common 3D file formats. Here are the supported 3D formats for PowerPoint:
- .FBX
- .OBJ
- .3MF
- .PLY
- .STL
- .GLB
How to insert the 3D model in PowerPoint:
- Create a slide and then select a 3D object.
- Insert it just like you would a shape or picture.
- Position the object on the screen.
- Duplicate the slide (we’ll need this for the video).
Create the 3D Animation in PowerPoint
The first slide is the starting point from which the 3D object rotates. The second slide is the rotation point. You’ll need to rotate the object so that the position changes from slide 1 to slide 2. You can also move and scale it.

- Reposition the object by either scaling, rotating, or moving it on the slide.
- Go to slide transitions and select a morph transition for slide 2.
- Preview the slideshow.

On preview, you’ll see how the 3D object uses the morph transition to change positions. Pretty slick, huh?
Fine-tune Slide Transitions for 3D models in PowerPoint
That’s the essence of the 3D animation. Now it’s a matter of fine-tuning the animation by playing with the slide timings.
When all is done, the PowerPoint slides will be saved as a video file. That means the animations and transitions need to be automated.

- In the Transitions tab, go to Advance Slide and select to advance after X time. That means the slide will automatically advance at a certain time and doesn’t require you to do anything to trigger the slide movement.
- Slide 1 is just the starting point so it needs to advance as quickly as possible. I usually set it to advance after .25 seconds.
- Slide 2 will trigger the morph animation. On slide 2 you can change the speed of the 3D animation by changing the slide duration.
- Slide 3 (optional) is great if you want to create the sense that the object rotated in and out like the Mars Rover demo.
Save the PowerPoint file as a Video
When all is done, save the PowerPoint file as a video. You have two options: .MP4 and .WMV.
The MP4 format works well but I did find that when I use it with Storyline, the last part of the .MP4 always seems jumpy. It probably has to do with how the .MP4 is encoded by PowerPoint. So if I am using the video to build an interactive file, I save it as a .WMV. Then I let Storyline do the conversion. That resolves any issues you may experience.
That’s basically it for the 3D model video in PowerPoint. You create the two or three slides and save as video. Once you have the video, you can insert it into Storyline or anywhere else you use video. To make it an interactive video like I did with the 3D rover, you’ll need to tune in next week where I show how to create an interactive video in Storyline.
Events
- Everyday. Check out the weekly training webinars to learn more about Rise, Storyline, and instructional design.
Free E-Learning Resources
 |
 |
 |
|
Want to learn more? Check out these articles and free resources in the community. |
Here’s a great job board for e-learning, instructional design, and training jobs |
Participate in the weekly e-learning challenges to sharpen your skills |
 |
 |
 |
|
Get your free PowerPoint templates and free graphics & stock images. |
Lots of cool e-learning examples to check out and find inspiration. |
Getting Started? This e-learning 101 series and the free e-books will help. |
6 responses to “How to Create a Video with 3D Models in PowerPoint”
Didn’t know that morph tool was new to PPT. This is a neat effect, yet another way to add some visual interest. Thanks for putting this together. –Daniel
Hello,
very interesting for our fablab pedagogical projects for example, but I don’t have the 3d models menu in my ppt version (2016)with Win7… May I have Win10 installed instead ?
hummm, then wait and see..! I hope they’ll implement this function in the next powerpoint desktop version 😉


0
comments