The Rapid Elearning Blog

Archive for the ‘Articulate 360’ Category


e-elearning project management

Managing all of the to-do lists and activities for your e-learning projects can be really time time-consuming and a pain. I’ve worked in organizations where it seemed we spent more time managing the bureaucracy related to the project than we actually spent on it.

Someone asked what I use to manage projects. Personally, I prefer a simple process with the least amount of friction as possible. I started using Sortd with my email account and that has really saved me some time. I may do a blog post on that down the road. But for my project management, I use Trello. It’s easy to use and free.

I’ve been using Trello for a few years and what I like best is that it keeps me focused on the actionable items and makes it easy to see the progress I’m making on projects.

Today, I’ll show a few simple tips. This isn’t a comprehensive overview but I’ll show a few of the basic things you can do. And you can take it from there.

Manage E-Learning Projects with Boards, Lists, and Cards

trello-board

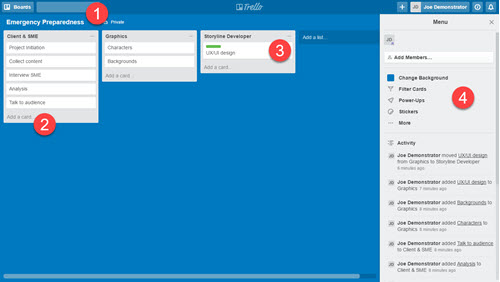
  • BOARDS: start by creating a project board for your course. Give it a name and you’re all set.
  • LISTS: inside the board, you create lists. I usually use lists to represent either clear milestones in the project or places where I need to hand tasks off to others.
  • CARDS: each list contains cards. Cards are great to house individual tasks. They contain checklists and details specific to the tasks. As you move through your project, you move cards from one list to another.
  • MENU: lets you see the activity and other settings within the board.

Here’s a video overview of using Trello to manage your e-learning projects to go with the instructions above.

Click to view the video on how to use Trello.

Some Bonus Tips

  • Combine Trello with Articulate Review and you have a really powerful way to not only manage projects but also manage the review cycle with your clients and subject matter experts.
  • Come up with a system that works and use it consistently. Initially, I found that I was a bit helter-skelter in my approach. This was fine when I only managed a couple of projects, but as I added more, it became less fun and more time-consuming.
  • Project management requires management. It’s not set and forget. Develop a routine to check on the progress of your projects. You can invite people as teams and assign cards to them, but you still need to stay on top of things.
  • It’s easy to get overwhelmed with your boards, cards, and lists. That’s why it’s important to come up with a process. Also, Trello is a great product as long as you keep it simple. But it can quickly get a bit complicated, especially if you have a lot of boards and cards. I know people who have boards to manage boards. To me, that’s too much. I love Trello for the simplicity and that’s the key: keep it simple.
  • Take advantage of the power-ups. The free plan gives you one power-up. If you’re a freelancer explore the options you have to append your Trello boards. For the most part, the free option should be fine.
  • Trello has a good guide that offers some instruction and help. If you want to learn more, check it out.

e-learning project management

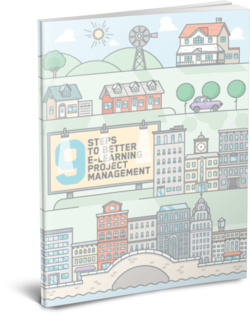
 Also, check out this free e-book on how to manage e-learning projects. If you already use Trello, feel free to share your own tips and suggestions in the comments. If you use a similar low-cost or free solution, let me know.

Events

Free E-Learning Resources

Want to learn more? Check out these articles and free resources in the community.

Here’s a great job board for e-learning, instructional design, and training jobs

Participate in the weekly e-learning challenges to sharpen your skills

Get your free PowerPoint templates and free graphics & stock images.

Lots of cool e-learning examples to check out and find inspiration.

Getting Started? This e-learning 101 series and the free e-books will help.


hotspot drag drop interactions

In an earlier post, we looked at three ways to use hotspots in your e-learning courses. In most cases, hotspots are used as invisible buttons for interactive e-learning. But today we’ll look at ways to use the hotspot feature in your drag and drop interactions where the hotspot isn’t a button.

Drag and Drop Basics

Generally, there are two main components to drag and drop interactions:

  • an object that is dragged
  • a target to accept the dragged object

I covered this in more detail when we looked at how to create drag and drop interactions.

Use the Hotspot as a Catch-all Target

Usually, there’s an obvious correct or incorrect target for drag and drop interactions. But what happens when the object is dropped outside of one of the target choices? In most cases, the object gets kicked back to the starting point as in the image below.

Dropped object snaps back to starting point when dropped outside of the target.

drag and drop

In the above example, the dragged object can only be dropped on one of the targets. If it’s dropped outside of the target, it bounces back to the starting point. This is usually the default setting and most common in drag and drop interactions.

Dropped object triggers an “oops” layer when dropped outside of the target on the catch-all hotspot.

However, the hotspot feature can serve as a catch-all target to provide feedback when objects are dragged and dropped outside of the desired target. When an object is dropped on the catch-all target it triggers the appropriate feedback. In the example below, the catch-all target triggers an “oops, try again” layer.

dragdrop-2

If you create a catch-all hotspot there are two things to do:

  • Put the hotspot underneath all of the other targets. Otherwise, it covers the drop targets and the interaction won’t work.
  • Determine how the dropped object responds. By default the object snaps to the center of the target; and since the target covers the entire screen, it looked weird sitting on top of the guy who’s in the center of the screen. In the example above I let it remain where it was dropped.

drag and drop interaction

Use the Hotspot to Expand and Control the Drop Target

Another great use of the hotspot feature is to better manage the drop target area. Since the hotspot is transparent it can sit on top of other object and be sort of a surrogate drop target. Instead of dropping on what looks like the target, they’re actually dropping on the target hotspot.

By doing this, you can determine where the dropped object is displayed. Here are before and after examples.

Dropped objects align based on the target image and display outside of the box.

drag and drop interaction target free

The objects are dragged to the box. By making the box image the drop target and tiling the objects, you can see that the objects actually align at the top of the box image.

Dropped objects align based on the hotspot target and align inside of the box.

drag and drop interaction drop target hotspot

In the example above, the box image isn’t the drop target. Instead, there’s a hotspot placed on top of the box image and centered over the opened box. This allows control of the alignment of the dropped objects to create the desired visual effect.

drag and drop interaction hotspot target

The hotspot is a great feature for creating interactive content. Most of the times it’s used as an invisible button. However, because it’s an easy-to-see green box (for production) and invisible to the end user, it’s a great feature to create large, catch-all targets. And it also works well for controlling how the dropped objects align and display.

Events

Free E-Learning Resources

Want to learn more? Check out these articles and free resources in the community.

Here’s a great job board for e-learning, instructional design, and training jobs

Participate in the weekly e-learning challenges to sharpen your skills

Get your free PowerPoint templates and free graphics & stock images.

Lots of cool e-learning examples to check out and find inspiration.

Getting Started? This e-learning 101 series and the free e-books will help.


free stock images for e-learning

Apparently, the internet can’t get enough of free stock images as it seems there are new sites popping up every day. Truth be told, many of the sites aren’t very good and most of the images probably don’t have a good context for e-learning design.

Free Stock Images for E-Learning Resources

I’ve already shared some resources for free stock images in previous posts, as well as a few sites that seem to curate most of the free stock images. This saves a bunch of time because you don’t need to visit every single free stock image site.

And of course, if you have Articulate 360, then there’s already an assortment of e-learning templates, character packs, and all sorts of stock images, illustrations, icons, and videos.

Articulate Storyline 360 stock images

More Free Stock Images for E-Learning

But if you need more free stock images for e-learning courses, here’s another new resource and the image quality is really great. The images are part of the Burst site, courtesy of Stopify and under Creative Commons Zero, which means you can do with them what you want and they don’t require attribution for commercial projects. But, it’s still good form to credit the source of the content and give them their props, if you can.

free stock images for e-learning

To make things a bit easier and less time consuming for you, I curated the office, business, and computer stock images. This should save you having to go through all of the images yourself. You can download the free stock images here. And of course, you can go to the source site and check out all of the other available images.

I always like the images of people meeting and working on computers. Which images do you like best? Feel free to share your thoughts via the comments.

Events

Free E-Learning Resources

Want to learn more? Check out these articles and free resources in the community.

Here’s a great job board for e-learning, instructional design, and training jobs

Participate in the weekly e-learning challenges to sharpen your skills

Get your free PowerPoint templates and free graphics & stock images.

Lots of cool e-learning examples to check out and find inspiration.

Getting Started? This e-learning 101 series and the free e-books will help.


character templates for e-learning

Looking for just the right images is one of the most time-consuming activities we have when building our courses. It’s easy to get distracted and waste a lot of time. It’s gotten a lot easier over the years now that the software comes with professional templates and thousands of character poses.

As I build courses, I often use the same characters and a few common poses. Which means I don’t need to always search through all of the poses available. And I suspect many of you do the same. So today, I’m going to show you a simple tip to help speed up your production. It’s all based on assembling your own character templates. I walk through the steps below, but the video provides more detailed instructions.

Click here to view the video.

Create E-Learning Character Sets

Even if you have hundreds of characters, odds are you use the same handful over and over again. Here’s how to create some simple pre-built character sets that make it easy to use characters and repeat poses.

e-learning characters sets

  • Select a character and insert it on the slide.
  • Create multiple states of the character. This trick works if you only insert a handful of frequently used or common poses. Otherwise, it defeats the purpose of the template.
  • Name the slide the same as the character or descriptive of the type of poses. For example, you may insert only sign-holding poses. In that case, the slide could be titled, Brandon-Holding-Signs.

Create E-Learning Character Set Templates

e-learning characters templates using sets

  • Once you have a slide with the character, save it as a template. This creates a template you can insert into your course. That’s it. Whenever you want to use that character, insert the slide and then copy and paste the character where you need it. Then set the initial state.
  • Ideally, you maintain one character template so it’s easier to manage. In that case, import the new character slide into the main character template file. And keep adding to it as you create custom character sets. This way it’s much easier to view and manage.
  • Bonus tip: you can do the same thing for custom interactions by saving them in a single interaction template.

Save Time Using E-Learning Characters

Now that you have some pre-built character poses, you’ll save some time in your production. When you need one of those characters, insert it from the template and then copy and paste the character into your slide.

The character will always include those starting states. You can set an initial state and use triggers to dynamically change it if you like. Another benefit is sharing the template with your team.

And you’re not limited to just the characters that come with the software. You can also do this with your own characters and the photos you take. Or you can do it for background images. Perhaps you want a template of production images, inside a warehouse, or the cubicle farm in the office. The process is the same.

The software already comes with characters so searching and inserting characters is easy enough. This tip works great if you use a few common poses and don’t want to spend time searching. Set up the templates and you have a good starting point.

Assuming that you want to create some character templates like this, what groups would you create? Talking poses? Sign holders?

Events

Free E-Learning Resources

Want to learn more? Check out these articles and free resources in the community.

Here’s a great job board for e-learning, instructional design, and training jobs

Participate in the weekly e-learning challenges to sharpen your skills

Get your free PowerPoint templates and free graphics & stock images.

Lots of cool e-learning examples to check out and find inspiration.

Getting Started? This e-learning 101 series and the free e-books will help.


rapid e-learning

I’ve been reviewing some of my older blog posts to fix links and update some of the examples. After ten years, most of the posts are still relevant but some are obsolete like using clip art in PowerPoint. Going through ten years of blog posts brings up some interesting observations. For example, some of the media companies I referenced no longer exist. It’s a good reminder for us to not always jump on what’s hot until it’s really proven its worth.  In addition, the industry has changed quite a bit when I first started blogging.

In 2007, when Flash was king, I stated that the e-learning tools would evolve and become easier to use. You’d no longer need to learn specialized skills like Flash and ActionScript. This wasn’t a prediction of Flash’s demise. The key point was that it didn’t matter what underlying technology drove the content, the next generation course designer could build e-elearning with no programming skills required. This would be empowering and disruptive to our industry. And I think it’s fair to say, that is the case today.

Catching the Rapid E-Learning Bug

About 14 years ago, I saw the light. I consulted for a company that serviced non-profits. They needed help figuring out “this e-learning thing” and how to get their training online. One of their Flash programmers built a player that could dynamically load content. It worked but it was not easy to use. I was looking for something a lot easier that anyone could use, something more like PowerPoint. I searched for “PowerPoint and e-learning” and stumbled upon this Articulate company and Articulate Presenter. And it changed my life forever and my perspective on the industry.

articulate rapid e-learning PowerPoint

I couldn’t believe how easy it was to take what I built in PowerPoint and easily convert it to an e-learning course. Back then I even used a hidden notes panel to create a simple learning management system where a person searched their name and the courses they need to take showed up in the menu.

For me the big eye opener was that anyone could build courses. This was going to change the industry and take a lot of course construction away from programmers and put it in the hands of instructional designers. From that point on, anywhere I went I was touting this rapid e-learning stuff. Of course, most people immediately tuned out because they heard PowerPoint (which comes with its own baggage) or they were the Flash programmers (the equivalent to Swiss watch makers during the quartz revolution).

Eventually I prevailed and was able to bring the rapid e-elearning applications to a number of organizations. And at each, the teams that used those tools outperformed the Flash development teams.

Here’s one of my favorite stories. I won’t mention the e-learning company (because they’re really well known in our industry).

Shortly after getting hired at Articulate, I was at a big e-learning conference. Someone from one of the big well-known e-learning companies came by and asked if I knew someone who could take a bunch of courses off their hands. Some of their customers had PowerPoint slide decks and wanted to convert them into courses. Essentially she said that they built “real” e-learning and that this type of work was beneath them. None of their developers wanted to work on the courses.

I challenged her thinking and stated that the PowerPoint slides were just content and that any good course designer could convert the content into an effective and engaging course. Who cares how it’s built? And besides, this rapid e-elearning thing wasn’t a trend but the future of e-learning. She literally laughed at me and walked away. Today, they no longer employ Flash developers and the bulk of their courses are built using a rapid e-learning product.

How the E-Learning Industry Has Evolved

The industry is evolving and the tools are getting easier to use. And that’s not going to change. It started with simple PowerPoint-to-Flash conversions but today you can build some pretty complex interactions with no programming background. Here are a few things I see:

  • Most companies have some sort of investment in rapid e-learning. In fact, Articulate is in over 60,000 companies and most of those have replaced their Flash teams with Storyline developers.
  • Most of the Flash developers I know have shifted to Storyline. They do some customization using JavaScript and other hacks. But they’re still not doing a lot of custom programming because the software has made it easy to do.
  • Most of the complainers of rapid e-learning are e-learning companies who charge a lot for custom development. It hurts them to see you empowered to build your own courses. You know who they are because all of their blog posts complain about what’s wrong with e-learning. I see them as the elephant companies that are big and slow. But the reality is that most companies are looking for cheetahs and not elephants. If you’re an elephant, you’ll have plenty of time to look at your gorgeous mechanical watch.
  • There’s always a need for sound instructional design (which should be part of any course, rapid or not) and custom development. In fact, I think the advent of rapid e-learning has helped our industry grow which has created more opportunity for the custom developers and those who can help organizations build better e-learning and do more than push out bullet point screens.
  • Today, rapid e-learning has progressed beyond simple PowerPoint conversions. Essentially you have a choice between tools like Storyline that allow for custom development or form-based tools like Rise, where you assemble content and drop it into specific forms. Both form and freeform authoring are viable options to meet different needs.

What You Need to Do in 2017

  • Templates are powerful. They get dismissed, but you can build a template for anything and they don’t need to be those simple bullet point templates. They can include all sorts of pre-built interactivity. One of my favorite features in Storyline is to save any interaction as a template. Here’s an example of a simple interaction that could be a template for quick knowledge checks. It’s one slide and no layers. Adding a new card is just a matter of copying and pasting. Super easy to build and make into a template. And it’s a big time saver when you need this type of interaction. Make an investment to build a few interactive templates or download some of the free ones and then you always have a tool chest of interactive templates.
  • Build the right course for the right project. Not every course requires elaborate decision-making interactions. And at the same time, instructional design is more than slapping some content on a screen. Figure out which requires what and then spend your resources wisely. And remember most learning doesn’t happen in the course. Here are a couple of posts to know if you’re building the right course and separating information from performance courses.
  • Smaller courses are easier to consume (and create). There’s a trend towards microlearning as if it’s something new, but it’s not. It’s just that creating the content in smaller chunks is now more viable and the reality is people can only take in so much content. It’s easier to build smaller modules and then deliver them over spaced intervals. You’ll most likely see more impact and you’ll definitely be able to maintain and update the smaller modules more efficiently.
  • Understand the tools. Generally you have a choice between form and freeform applications. Form-based tools allow you to copy and paste content into pre-determined forms; or you build your content in a freeform environment. Both are great options but they each have different requirements. If you use a form, you’re mostly constrained to the form. If you don’t want those constraints, then use a freeform application, but understand you need to determine how things will look and work as opposed to just adding them to forms.
  • Focus on your development. Commit to a few e-learning challenges this year to build your skills and your professional network. Read some e-learning books and then apply what you learn to your courses. Build a portfolio to document your skills.
  • Share what you know and do. I am a big proponent of community and I know that many course developers are either by themselves or on small teams. The community provides a place to interact with and learn from your peers. It’s also a place to trade files and show examples. If you need more help figuring this out, read Share Your Work.

What are your plans for the 2017? Do you have any e-learning goals? How has the industry changed for you? What are you looking forward to?

Events

Free E-Learning Resources

Want to learn more? Check out these articles and free resources in the community.

Here’s a great job board for e-learning, instructional design, and training jobs

Participate in the weekly e-learning challenges to sharpen your skills

Get your free PowerPoint templates and free graphics & stock images.

Lots of cool e-learning examples to check out and find inspiration.

Getting Started? This e-learning 101 series and the free e-books will help.