The Rapid Elearning Blog

Archive for the ‘E-learning Examples’ Category


Articulate Rapid E-Learning Blog - create interactive stories with simple pictures and comic-book like panels

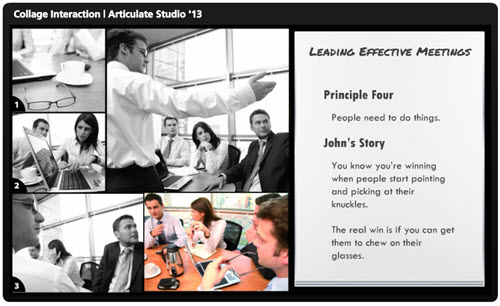
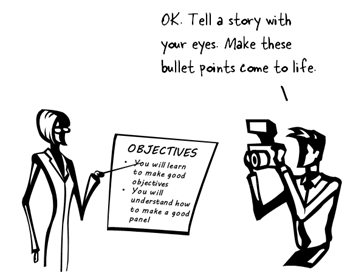
The other day I was doing a search for business meeting images and ran into this collage image. It kind of looks like a comic book layout. I played around with some ways to use this image in an elearning course.

Articulate Rapid E-Learning Blog - create an interactive story with this collage image

Here’s a quick demo of the image converted into an interactive slide. I just added some place holder content since the images are not contextual. But in your case, you’d create a collage where the images work together to tell a story.

Articulate Rapid E-Learning Blog - example of an interactive story to replace bullet points

Click here to view the interactive story demo.

Tips & Tricks for Creating an Interactive Story

Here are a few ideas on how you could approach this type of interaction:

  • Create a story. Many courses tend to be heavy on the information and light on relevant context. Rework your content and frame it like a mini story or scenario. In this case, it’s not about a long branched interaction. It’s more like a quick scenario where the course content is framed in a relevant context. People love stories so why not build a story around your information? Plus, the comic-book style layout is kind of popular.
  • Get rid of bullet points. A lot of elearning is linear and the screens are loaded with bullet points. Get rid of those bullet points! Why not use a panel for each bullet point? I’d use the large panel to represent the essential point of the slide. And the smaller panels would represent the bullet points or supporting information.
  • Feel free to take your own photos. You don’t need to be a pro to create your own stock photos. Besides many of the smart phones have those cool filters that convert your images and give them a pro feel. So outline a story and then storyboard the photos you’d need to support that story.
  • Create a few panel layouts so that you can rotate through your screens and make them visually a bit different. This post on comic book layouts will help come up with some ideas.

This is a simple technique but and an easy way to convert bullet point slides into something a bit more visually engaging. And with a little effort you can frame the information into something more story-like and interactive. It’s a step away from a content dump and a step into meaningful content.

What do you think? Would this work with any of your elearning courses?

Events

Free E-Learning Resources

Want to learn more? Check out these articles and free resources in the community.

Here’s a great job board for e-learning, instructional design, and training jobs

Participate in the weekly e-learning challenges to sharpen your skills

Get your free PowerPoint templates and free graphics & stock images.

Lots of cool e-learning examples to check out and find inspiration.

Getting Started? This e-learning 101 series and the free e-books will help.


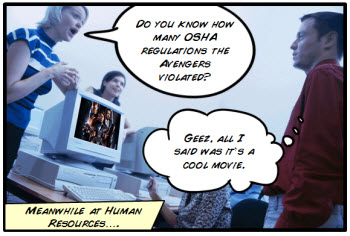
The Rapid E-Learning Blog - did the Avengers skip their safety compliance training?

Comic book layouts are pretty popular. And they work well for elearning courses. For one, they look different. It’s that type of contrast that can hook your learners who might be bored with the standard-looking corporate elearning.

On top of that a comic-like layout breaks the content into panels which allows you to control the pacing and flow of information as each panel progressively reveals more. It’s a great way to still have the simplicity of a linear course, but make it seem more engaging.

A while back I shared how to be inspired by others and included links to two comic-style elearning courses. Based on the feedback, the examples were a hit. I got quite a few emails asking how to build a similar type of course.
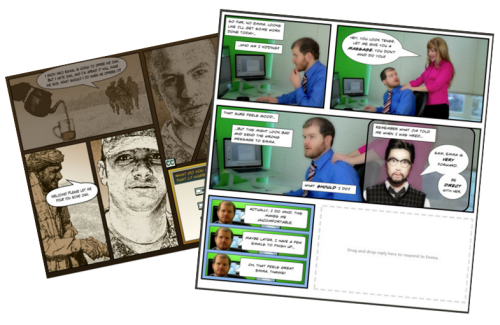
The Rapid E-Learning Blog - examples of comic book style elearning

In today’s post I’m going to show three ways to build a comic-style layout for your courses. To keep it simple we’ll use PowerPoint, but the ideas should work regardless of the tool you use.

Choose a Layout

Layouts are the key distinguishing feature for the comic book look. Typically they follow some sort of grid. The good thing is that there’s really no right or wrong way to create the grid. Some comics use straight lines and even sized panels. And some use an assortment of panel sizes.
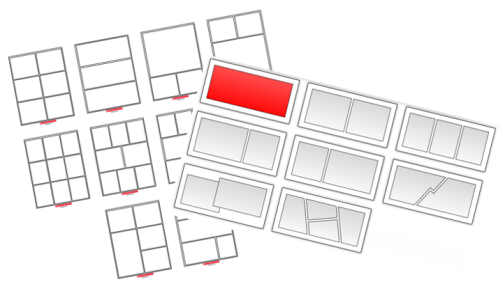
The Rapid E-Learning Blog - layouts for comic book style elearning

If you’re looking for layout ideas, the first place to look is at comic books. You could attend a comic book convention, but you’ll probably have to wear a goofy costume. A better solution is to go to one of those comic creation sites and see what types of layouts they offer. Here are a couple of good sites:

You can also create your own layouts with existing clip art. Here’s an example I shared in this blog post on using Clip Art to create your elearning template. This also lets you build a layout that has that hand-drawn look.
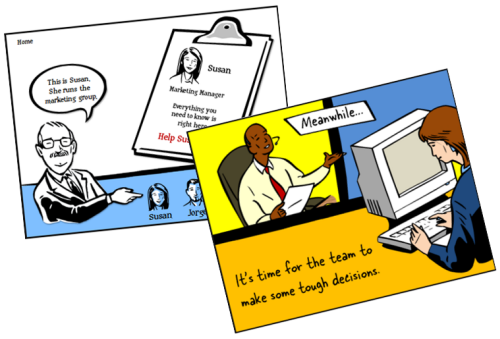
The Rapid E-Learning Blog - build your own comic style elearning using PowerPoint clip art

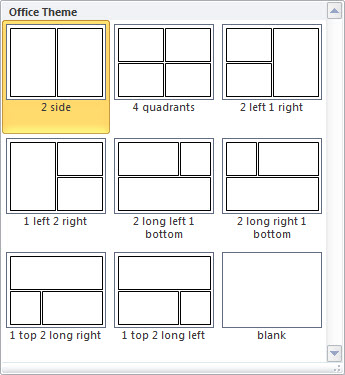
For this demo, we’ll use a few simple layouts. I created them as shapes in PowerPoint. As you can see below, creating the layout’s pretty simple. Feel free to create as many layouts as you want.

Keep in mind that too many choices can be overwhelming. Instead of building 200 possible layouts, stick with 5-10 common layouts.
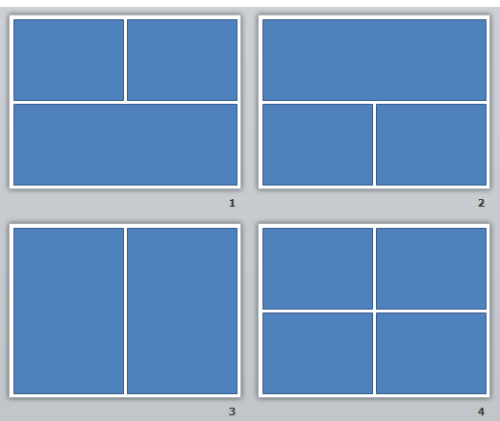
The Rapid E-Learning Blog - comic style elearning layouts built in PowerPoint

Another consideration with layouts is determining how you’ll present the content. Review the two elearning examples above and notice how the layouts follow a consistent pattern. For example, you may have one type of layout for information, another for decision-making, and another for feedback.

Deciding how to use the layouts will help you best determine which types of layouts you need.

One last point, the more panels you add to the layouts, the less space you get. If you have too many panels the content make look cluttered and seem confusing. I’d err on the side of fewer panels.

Option 1: Create Master Slide Panels & Layouts

Use PowerPoint’s master slides to create the layouts. You can have as many masters as you like so the best bet is to create all of the possible layouts that you’d use in a single file. And then when you’re ready to go, select a layout for the slide and add your content.
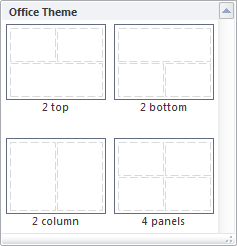
The Rapid E-Learning Blog - build as many layouts in PowerPoint master template as you like

Two ways to work with the master layouts:

  • Create the entire panel look on the slide master. Then apply it to a slide and add content within the panel.
  • Create watermarked panels on the master slide and use them as guides to control placement of your content. The benefit to this is that you have the general layout mapped, but you’re not confined by the panels if your content doesn’t fit perfectly.
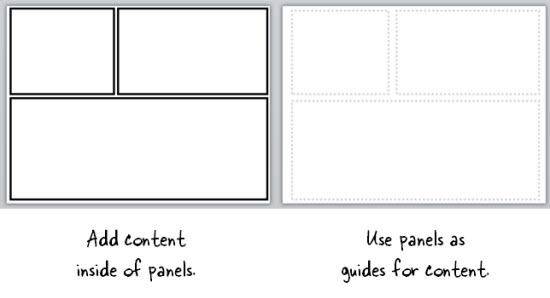
The Rapid E-Learning Blog - create two types of layouts

A few tips when working with these types of layouts:

  • Use thick lines and determine how colorful you want the panels to be. Think loud and in your face.
  • Not all of your content will fit perfectly in the panels. That’s OK. Build your content on the panel and get it to fit the best you can. Then copy and paste it as an image. Use the crop feature to perfectly crop it to the panel.
  • Tutorial: this tutorial walks through the template and shows a few production tips.

Option 2: Create Custom-Sized Slides for Each Panel

Instead of building the layouts on the master template, build them on the slides. This gives you more control over the panels because you have direct access to them since they’re not buried in the masters.

Build a master PowerPoint file that has all of the layouts you’d use. Then start with that file when you want to build a comic-inspired course. Make sure to save it with a different name. Duplicate the layouts you want and then add your content.

How to add content to the panels:

  • Instead of creating your panel shapes on the master slide, create them on the slide. This lets you manipulate the shape at the slide level. Add content on top of the panel shape.
  • Create panel shapes with thick lines and no fill color. Then place them on top of the content. The thick lines will cover up anything that doesn’t fit perfectly.
  • Fill the panel shapes with an image. I like this approach because the panels and content will always align perfectly. The only thing that changes is the fill image for the shape.

Bonus tips:

Option 3: Create a Master Panel Image

This is probably the easiest way to create a comic layout. Instead of messing with a bunch of images and trying to get everything laid out perfectly, just create a series of layout images that you place on top of your content.

Essentially, you have one image of the entire page. Then you cut a hole out of the page for each panel. All of the content sits underneath the page image and can only peak through the holes. This guarantees that everything is perfectly aligned inside the panel.

I like this approach because you can move each object in the panel and the overlaid master image masks any overflow to create the illusion of panels.

Extra tips:

  • Add your page images to the master slides so that you have a layout. This will act as a general guide. Your slide for each layout you provide should consist of a master slide with the same page layout and the page layout image on the actual slide that acts as the cover.
  • Be sure to use the selection pane in PowerPoint (starting with PowerPoint 2007). Hide the page image and add your content using the master as a guide. Then unhide the page layout on the slide when you’re ready to publish. Make sure the cover image is always on top in the selection pane.
  • Tutorial: How to create layout mask images to use as panel covers.

To help you out, I created a starter PowerPoint template pack. You can download it in the elearning community. It includes folders for each type of template. You can use them as they are or build your own.
The Rapid E-Learning Blog - example of the free PowerPoint template demo

Comic strip layouts are popular and a nice way to make your courses look a bit different. The trick is to determine the type of layout you want and how to get the content into the panels with the least amount of work.

There are many ways to layout the comic panels. Once you decide the type of layout you want, then you need to determine how you will get the content into the panels.

Events

Free E-Learning Resources
Want to learn more? Check out these articles and free resources in the community.

Here’s a great job board for e-learning, instructional design, and training jobs

Participate in the weekly e-learning challenges to sharpen your skills

Get your free PowerPoint templates and free graphics & stock images.

Lots of cool e-learning examples to check out and find inspiration.

Getting Started? This e-learning 101 series and the free e-books will help.


The Rapid E-Learning Blog - 3 PowerPoint tutorials

I know it’s hard to believe, but apparently, there are many people who don’t like PowerPoint. Obviously, there are a lot of bad presentations created with PowerPoint, but it seems to me the blame rests on the shoulders of the presenter and not the tool. Besides, PowerPoint’s a versatile tool that’s used for more than bad presentations.

Personally, I think PowerPoint’s one of the single best multimedia applications. The secret is to look at PowerPoint in a different way. And once you do that you’ll see that it offers an assortment of capabilities.

I just returned from the Training 2012 Conference in Atlanta where I presented on some PowerPoint tips and tricks. For those of you who couldn’t attend, I’ve included links to PowerPoint resources that I’ve shared in previous sessions.

The Rapid E-Learning Blog - free PowerPoint resources and tutorials.

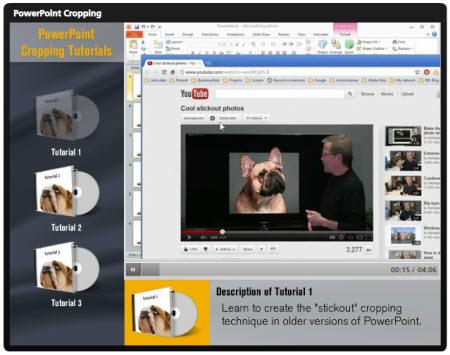
Recently, I was sharing how PowerPoint makes a good image editor. After the session, someone asked about this video where you learn to create a stickout effect that lets the image stick outside the box. It’s a basic cropping technique that allows you to open up the page and add more visual interest to the screen. The person wanted to know how to do that in PowerPoint.

The Rapid E-Learning Blog - the stickout cropping technique

I like this question for a few reasons. It lets me demonstrate how PowerPoint can be used to edit images. And it helps teach more about the features and capabilities of PowerPoint in general. Even if you don’t use PowerPoint to do this on a regular basis, practicing this technique is an excellent way to learn more about PowerPoint’s features.

So let’s look at a few ways to create the “stickout” effect in PowerPoint.

PowerPoint Tutorial 1

The Rapid E-Learning Blog - edit images in PowerPoint tutorial

Click here to view tutorial 1.

PowerPoint 2010 has a background removal feature. However, if you’re using older versions of PowerPoint you can still get the stickout effect. This tutorial shows how.

PowerPoint Tutorial 2

The Rapid E-Learning Blog - edit images in PowerPoint tutorial

Click here to view tutorial 2.

In this tutorial you learn to use PowerPoint 2010’s background removal feature to create the stickout effect.

PowerPoint Tutorial 3

The Rapid E-Learning Blog - edit images in PowerPoint tutorial

Click here to view tutorial3.

This tutorial combines the background removal feature with a duplicate image. Learning to work with layers and multiple images is definitely going to open possibilities when editing images in PowerPoint.

Consolidated PowerPoint Tutorials

I know some of you can’t access the YouTube tutorials at work, so I downloaded the video files and used them to test a drag and drop video player idea in Articulate Storyline. You drag the DVD icon to the orange box and it loads the video. The cool thing is that it only took a few minutes to build the functionality.

The Rapid E-Learning Blog - PowerPoint tutorial videos in Articulate Storyline drag and drop elearning

Click here to view the three PowerPoint tutorials.

You may never need to use this specific image editing technique in PowerPoint, but going through these tutorials will help you learn more about PowerPoint’s features and develop a greater appreciation for the application’s capabilities.

Events

Free E-Learning Resources

Want to learn more? Check out these articles and free resources in the community.

Here’s a great job board for e-learning, instructional design, and training jobs

Participate in the weekly e-learning challenges to sharpen your skills

Get your free PowerPoint templates and free graphics & stock images.

Lots of cool e-learning examples to check out and find inspiration.

Getting Started? This e-learning 101 series and the free e-books will help.


performance vs information

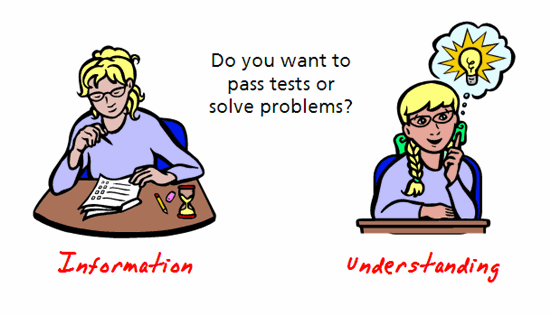
Information isn’t the same as understanding. Many e-learning courses are designed to just share information. In some cases, that’s fine. But, there are many e-learning courses that are performance-based and in those cases we need to change how the learner thinks and acts rather than just regurgitate facts.

One evening I was working late and we had a fire drill. Everyone did what we learned to do in our safety course and we made our way to the exit. However, the exit was a sliding door that shut down during the drill.

Since the training didn’t provide information on how to open the sliding door once power was lost, we just sat there waiting for someone to come by and open the door for us. What struck me was that no one really knew what to do once we were presented with a challenge that wasn’t part of our training.

This was a reminder that there’s a difference between passing a site safety course (information) and really knowing what to do in the event of an emergency (understanding).

tests1.gif

The safety course was typical of many e-learning courses. They’re designed to share information, but don’t usually go beyond that. Information sharing doesn’t work for courses where the learner is expected to take action or complete tasks. In those cases, the e-learning course needs to be designed to go beyond the facts and move towards creating new levels of understanding.

How Do I Create Understanding?

When we teach others we’re not looking for them to just know information. Instead, we want them to use information in context to make good decisions.

The challenge when creating e-learning courses is knowing how to build an environment where the learner can process the information and place it in the appropriate context and through that demonstrate greater levels of understanding. This all starts with some fundamental ideas around course design.

1. Establish clear learning objectives.

For the e-learning course to be successful, you need to establish clear learning objectives. This seems obvious. However, I’ve been involved in enough training programs to know that that’s not always the case.

Without clear objectives, you’ll have problems reaching your goals and you’ll probably not engage the learner. Like the old saying goes, “If you don’t know where you’re going, most likely you’ll have no problems getting there.”

2. Determine what evidence proves understanding.

Once you establish the learning objectives, you need to determine how you’ll know they’ve been met. What evidence proves that the learner is able to meet the goals?

This goes beyond just creating a multiple choice quiz. What you really need to shoot for is evidence that demonstrates understanding not just how to do something but why.

3. Build the course to provide information AND create a learning experience.

Once I determine the right type of evidence to prove the learner’s understanding, I can build the experiences into my course that helps the learner get to the desired level of understanding.

I want to measure the learner’s grasp of the facts and I want to put the learner in a situation where she can use the facts and apply them to the nuances of real life decisions. This helps me see that not only does she get the information but that she is able to use the facts in an appropriate manner to make performance-based decisions.

4. Create the ability for learners to reflect on the information.

E-learning courses are good at sharing facts and information. The goal is to help the learner pull all of the information together and make good decisions. A step in the direction of creating real understanding is to help the learner reflect on the new information.

So often we share information and then move on assuming that the learner understands why the information is important. By reflecting on the information, you put the learner in a position to take abstract and disconnected facts and place them in an appropriate context. Here are some ideas on how to build reflection as part of the learning process:

  • Ask questions to hook the learners and get them to think about the information in a context that is important to them.
  • Have the learner’s review scenarios or case studies so that they can take the information out of the course and put it into the real world.
  • Create some sort of learning journal where the learners have to think about the course’s information and write out their thoughts. This helps them personalize the information and make it more than just a bunch of facts.

5. Create a way for learners to explore.

The other day I was out walking and I saw a skateboarder practice jumping in the air with the board. In the time I observed him, he must have jumped unsuccessfully at least twenty times. What intrigued me was that each time he jumped, somewhere in his brain he was making minor adjustments to his technique that will allow him to eventually become proficient at jumping.

How does this translate to e-learning? To get a learner beyond rote facts means that you have to create a place where the learner can make those “minor adjustments.” Learners need the ability to explore, to have a place of “what if’s” to see cause and effect.

  • Take a cue from Google. Free up the course navigation and give the learners the ability to click around and explore like they would online or if using a search engine. Present a challenge and have them look for an answer rather than just giving them the information.
  • Create scenario-based branches that allow the learner to make a choice and get feedback specific to the choice made.
  • Build an environment where the learners can modify variables to see the cause and effect of their decisions. Create interactive visual models where the learner can play around with “what if” scenarios.

To create an e-learning course that empowers the learner to make good decisions means that you have to create an environment where the learner gets important information and has time to reflect on its meaning and where it fits in the learner’s world.

Events

Free E-Learning Resources

Want to learn more? Check out these articles and free resources in the community.

Here’s a great job board for e-learning, instructional design, and training jobs

Participate in the weekly e-learning challenges to sharpen your skills

Get your free PowerPoint templates and free graphics & stock images.

Lots of cool e-learning examples to check out and find inspiration.

Getting Started? This e-learning 101 series and the free e-books will help.