The Rapid Elearning Blog

Archive for the ‘Interaction Design’ Category


variables dashboard to save time e-learning

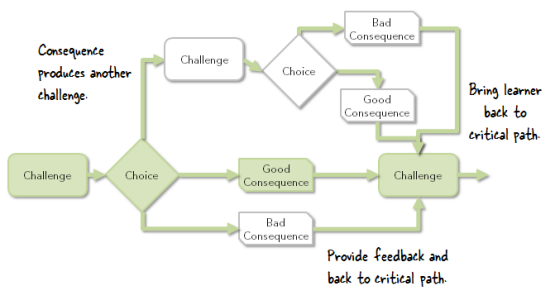
Variables add all sorts of capability to the learning experiences you create. They allow to move past linear, click-and-read content to more complex interactions with branched scenarios and personalized, adaptive learning.

Today I’d like to share a tip that really comes in handy when working with variables. It’ll save time and really help when you use a bunch of variables that are interdependent.

The 1-2-3 of Variables

Working with variables is a three-step process:

  • Create the variable: which is a like a bucket waiting to have a value
  • Adjust the variable: some action or trigger changes the value of the variable
  • Use the value: once the variable has a value or new value, that information can be used to trigger a different action

I explain that in more detail in this post on how to simplify working with variables in e-learning.

Add a Reference to the Variable for Troubleshooting

When working with variables, there is some trial and error and continuous testing. I always recommend adding a variable reference to the screen so that when troubleshooting or testing you can see the current value of the variable. This really comes in handy. If triggers depends on the value of the variable, you want to see that the variable is actually changing. If not, then you know where to start looking.

I explain that in more detail in this post on how to work with reference variables in e-learning.

Testing Variables in Your E-Learning Course

Here’s where it gets tricky. Some courses can have a ton of variables. For example, you may have a slide at the end of the course that requires dozens of interactions throughout the course. These interactions allow you to display personalized feedback. And each interaction is connected to interdependent variables.

Testing that everything works requires going through the course to activate triggers that adjust the values of the variables. This is really time-consuming. Unless you create a variables dashboard.

How to Create a Variables Dashboard

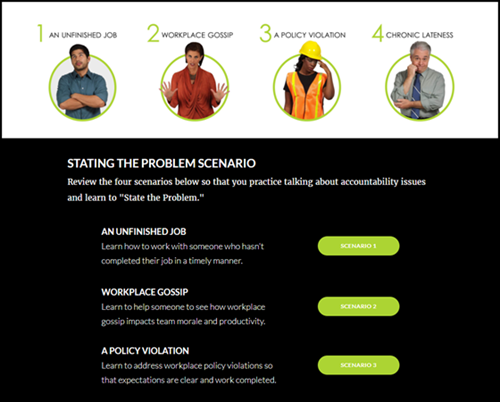
A variables dashboard allows you to be anywhere in the course and test how something would work depending on the value of certain variables.

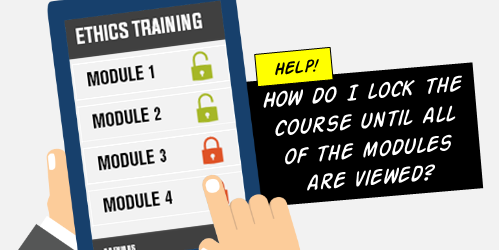
For example, in a previous post we discussed how to lock navigation based on completing specific actions. To test it, requires completing all of the actions.

However, with a variables dashboard you can manually adjust the variables and then go to that single slide to test it. That saves a ton of time and frustration.

variables dashboard

Here are the basic steps to create a variables dashboard:

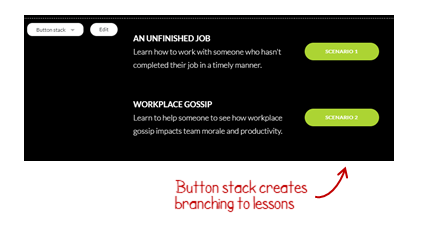
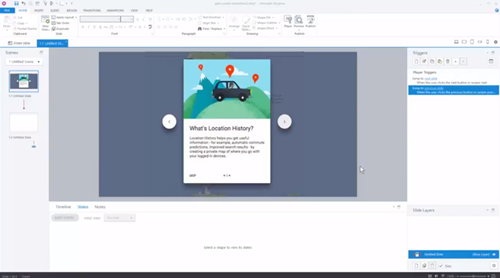
  • Create a slide that shows the current value of the variables and also allows you to manually adjust them. In the image below you can see I have buttons that let me change from true to false. There are text input boxes to add text-based values, and ways to adjust the numbers for variables that count specific activities.
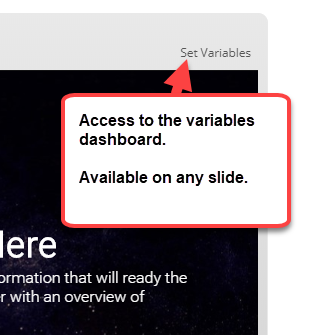
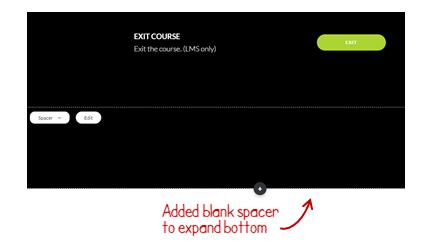
  • Add this slide as a lightbox slide. I add it to the player so that it’s persistent and available throughout the course.
  • Prior to final publishing, get rid of the lightbox slide so that it’s not available to those who actually take the course.

variables dashboard

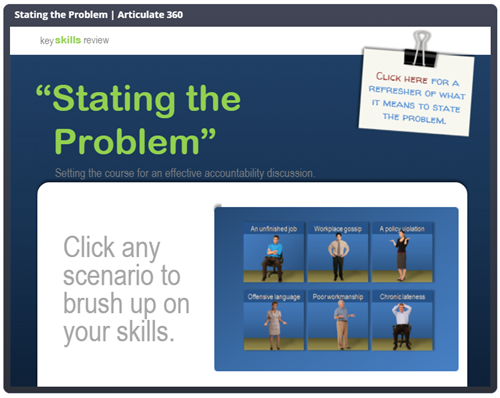
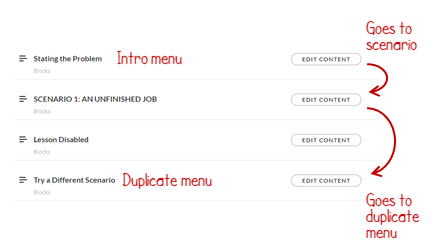
Below is an example of a test module I used for a recent gamification webinar. You’ll notice the “Set Variables” link on the top right corner. Go ahead and test it.

variables dashboard example

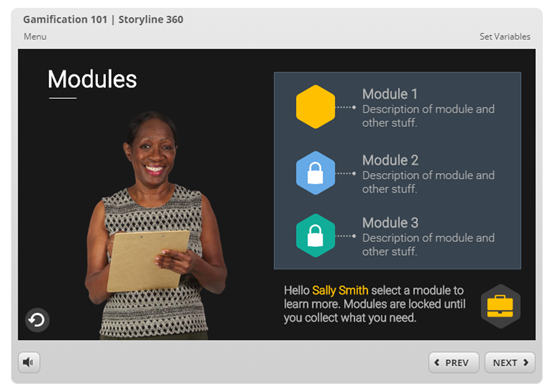
Click here to test the variables dashboard.

If you want to learn more, here’s a tutorial where I explain how and why it’s set the way it is.

Hopefully, you’ll find using a variables dashboard helpful and productive when build your own courses.

Learn More About Variables

If you haven’t used variables before, it’s time to learn how and then start to create all sorts of cool courses.

Here are some posts that will help you learn more:

Events

Free E-Learning Resources

Want to learn more? Check out these articles and free resources in the community.

Here’s a great job board for e-learning, instructional design, and training jobs

Participate in the weekly e-learning challenges to sharpen your skills

Get your free PowerPoint templates and free graphics & stock images.

Lots of cool e-learning examples to check out and find inspiration.

Getting Started? This e-learning 101 series and the free e-books will help.


locked navigation

The question I see asked almost every day revolves around locking navigation until a user has completed a task. In the most common case, the first slide is a course menu. The user clicks a button, goes to a module, completes it, and comes back.

At that point, the module is marked complete and the user goes to another module and repeats the process until all of the modules are complete. Once that is satisfied, the user can continue.

There are a number of ways to approach this, but I’ll show the way that probably makes the most sense and is easiest to troubleshoot. In the process, I’ll offer a few bonus tips. Watch the tutorials for the details.

It Starts with Variables

Learn to use variables. The getting started tutorials show how and they offer some practice activities. In fact, the true false variable tutorials actually answer the top question asked.

For the novice, variables may seem intimidating, but once you understand them, they’re easy to use and give you a lot more control over the design of your course.

In Storyline, working with variables is a three-step process:

  • Create a variable
  • Use a trigger to adjust the value
  • Use that value to do something

A variable is a piece of information. In this case, we use a variable to track if the person’s done something. We’ll use a true/false variable and start with an initial value of false (1. create variable). When the user completes a module, we create a trigger to change the value from false to true (2. adjust value). When all of the module variables are true, we can use a trigger to unlock the navigation (3. do something).

Tracking Navigation with Variables

Now let’s get started. I’ll write out the basic steps, but I recommend watching the video tutorial to get the detail.

Download the source file here.

Menu Slide

  • Create a trigger to disable the next button when the timeline starts. This prevents the user from clicking forward.
  • On the module buttons, add a custom “complete” state rather than using the “visited” state. You’ll use this to indicate the module is completed.
  • Add a trigger on the buttons to jump to the specific modules.
  • Add a trigger to change the state of the module button to complete when slide starts on the condition that the variable for that module is equal to true.
  • Add a trigger to change the state of the next button to normal when the slide timeline starts on the condition that all variables are true.

Module Slides

  • Create a true/false variable for each module that you’re tracking.
  • Set the initial value to false.
  • Name the variable so when it’s read it makes sense: such as Module1Complete = False
  • On each module, add a trigger that adjusts the variable from false to true. It doesn’t matter what you use to trigger the event. Some people use a button and some use the last slide’s timeline. It really doesn’t matter. The main point is to have a trigger that adjusts the variable from false to true.
  • Create a button that returns to the menu slide.

A few tips and common issues:

  • Trigger order matters. Often the button has two triggers. One jumps to a slide and the other adjusts the variable. If the user jumps to the slide first, it leaves before the variable can be adjusted. Change the trigger order so that the variable changes and then leave the slide.
  • “When timeline starts” is key when you visit the slide. Many people use a trigger to do something when the variable changes. However, when returning to the slide, the variable has already been changed. Thus nothing happens. You need to load the slide and then evaluate the value of the variables.
  • Create custom states and don’t use the built-in visited state. I like to create custom states so that there’s no conflict with pre-built states. The built-in visited state doesn’t require triggers. If a user clicks on the object, it is visited. I’ve seen dozens of examples where users create conflicts between their triggers and the built-in states. It’s good to create your own states for specific control.
  • Variables are best when leaving slides. A lot of people use states to trigger objects, such as change next button when the state of all buttons are visited. However, states are slide-specific and variables are available throughout the course. Variables also give you complete control. It just makes it easier to troubleshoot when using variables because you can see what’s going on.
  • Use text references for variables. They let you see that the values are set and what they need to be. It’s challenging to troubleshoot if you can’t be sure that the variables are changing.

While today’s tutorial is relatively simple and limited to locking navigation, once you understand the core concepts, you can use similar techniques to create branched scenarios and adaptive learning paths.

That’s a quick run down of the most commonly asked question. Be sure to watch the video tutorial to see all of the details and some bonus tips. And if you haven’t watched the getting started tutorials, make the investment to go through them. They do answer many of the the questions I see in the community.

Events

Free E-Learning Resources

Want to learn more? Check out these articles and free resources in the community.

Here’s a great job board for e-learning, instructional design, and training jobs

Participate in the weekly e-learning challenges to sharpen your skills

Get your free PowerPoint templates and free graphics & stock images.

Lots of cool e-learning examples to check out and find inspiration.

Getting Started? This e-learning 101 series and the free e-books will help.


interactive e-learning

I get a lot of questions about interactive e-learning. Often people are looking for specific “interactive” features in the software. However, the key isn’t specific features as much as it applying a few simple strategies and understanding what can be done with the e-learning software.

Part 1: Interactive E-Learning Strategies

Here’s a simple strategy I use when building interactive e-learning courses: focus on a few basic building blocks (which I’ve written about before).

  • Relevance: the first step is to make sure the content is relevant to the learner. Courses have content but often it’s not framed in a relevant context. That means it’s difficult to engage and motivate the learner.
  • Pull: most courses tend to push content out. It’s how we usually teach. We push content in learning docs, cheat sheets, videos, lectures, etc. One goal should be to get the learner to pull content in. Give them a reason to explore and consume content.

3C interactive e-learning model

I also try not to formally grade the interactions (especially decision-making activities) while they’re in the learning process. I want them to freely make decisions; and if they get things wrong, that’s just part of the learning experience. It’s also an opportunity to continue teaching. Formal grading tends to shut that down.

Part 2: Interactive E-Learning Features

I like to think of the e-learning software as a tool that creates multimedia. Most of the time that is used for training, but not all online multimedia needs to be training.

Most e-learning software has out-of-the box interactions like tabs, process, and labeled graphics. However, I try to step away from the intended interactivity and look for different use cases. I look for features that lets the person interact with the screen and then try to find ways for the person to interact with the content using the onscreen interactions.

Flash Card 3C Model

For example, in the simple scenario below, I created a 3C structure and used the Flash Card interaction as a means to review choices and get feedback. The Flash Cards aren’t technically designed for scenarios, but because one can click and reveal, they’re perfect to ask and answer questions in a scenario. And because the learner can click the other options, it lets them explore.

interactive e-learning flash card

Process Interaction Many Ways

Below is another example to show how to stretch the features to create all sorts of interactive content. I took the same general content which fits perfectly as a process interaction and applied it to different types of blocks to see how they’d work. Essentially they’re all a process interaction, it’s just that I used different features to package the content.

Click here to view the demo.

interactive e-learning 1

Obviously, some make more sense than others. But the point of the exercise is to review the features available and think of different ways to use the interactive parts. Today, it’s a simple process interaction, but next time it could be a decision-making scenario.

E-learning interaction alternative

3C Model: Labeled Graphic

Here’s an example, where I leveraged the Content Library characters with Studio 360 and PowerPoint to create a decision-making image with the labeled graphics.

interactive e-learning labeled graphic

3C Model: Combined Blocks & Accordion Interaction

And another example of a 3C model where I combined a few blocks to create the structure (which I can save as a reusable template) and leveraged the accordion interaction as the way to ask and answer questions in the scenario.

interactive e-learning scenario

As you can see, it’s easy to combine the basic building blocks with interactive features to create an assortment of interactive options that go beyond what the software gives you out-of-the-box. The secret is to start with a simple model and then leverage the interactive features (whether designed for decision-making or not).

Events

Free E-Learning Resources

Want to learn more? Check out these articles and free resources in the community.

Here’s a great job board for e-learning, instructional design, and training jobs

Participate in the weekly e-learning challenges to sharpen your skills

Get your free PowerPoint templates and free graphics & stock images.

Lots of cool e-learning examples to check out and find inspiration.

Getting Started? This e-learning 101 series and the free e-books will help.


custom video in PowerPoint

PowerPoint’s one of my favorite multimedia applications. It’s easy to use, almost everyone has a copy so it’s easy to share what’s created, and it does more than create presentations.

In fact, I regularly use PowerPoint to create the graphics and custom assets for my e-learning courses. Here are a few examples:

As you can see, PowerPoint is great for all sorts of multimedia production especially when combined with great e-learning software.

Create a Shaped Video

Recently someone in the community asked how to create a circle-shaped video for an e-learning interaction in Storyline.

circle video in PowerPoint

A real easy solution is to create an image with a circle hole in it and then place the video underneath only allowing the video to show through the circle hole. That’s fast and doesn’t require any editing of the video.

PowerPoint circle hole over video

If you want a circle-shaped video, you can create one in a video editing application. However, this requires having a video-editing application that allows you to do that and also having the expertise to use the video editor (which most of us don’t have).

And this is where PowerPoint comes in handy. It’s a tool most of us have, and it can do exactly what you need with minimal effort.

Here’s a video tutorial that quickly walks through the steps outlined below.

  • Customize slide size. A circle has a 1:1 aspect ratio. Change the custom slide size to 1:1 (something like 10″ wide and 10″ high). That should give you a video that’s almost 1000×1000 pixels.
  • Insert a video. Choose your favorite video.
  • Crop video to 1:1. Most likely the video is 16:9 or 4:3. You’ll need to crop it to 1:1 to get a perfect circle.
  • Scale the video to fill the slide. You want the video to be as big as possible inside the slide.
  • Save the file as video. Select .mp4. If you have an older version of PowerPoint you may have to save as .WMV. That’s OK, you can still use it in Storyline and Rise. You won’t get a circle video. The video is still going to be rectangular. But inside the rectangle will be the custom-shaped video.

Bonus tips:

  • Play around with some of the video formatting options in PowerPoint. There are lots of neat things you can do.
  • Same thing with animations and transitions. Anything you create in your PowerPoint slides can be save as video.
  • The corners are not going to be transparent. You’ll want the video background to match the course background to get a seamless experience.

Hope that helps and is something you can use in an upcoming e-learning course.

Events

Free E-Learning Resources

Want to learn more? Check out these articles and free resources in the community.

Here’s a great job board for e-learning, instructional design, and training jobs

Participate in the weekly e-learning challenges to sharpen your skills

Get your free PowerPoint templates and free graphics & stock images.

Lots of cool e-learning examples to check out and find inspiration.

Getting Started? This e-learning 101 series and the free e-books will help.


no LMS

Generally, delivering e-learning courses is a two-step process: 1) create the course in your favorite e-learning software and 2) host the course in a learning management system.

There are many small organizations that don’t use formal learning management systems; however they want simple tracking of the courses. I had someone ask how they could track people in their organization who have taken a compliance course. He didn’t have a lot of learners and wanted something simple.

Here are two quick solutions that work well. They don’t require a lot of work to set up and they’re mostly free.

This solution assumes that the user gets a URL that links to the course. We have no identifying information so we need a simple way to collect who they are and track their completion.

Create a Form

Create a form using a hosted service. In these examples I am using Google Forms and Jot Form. However, you can use a different service if you want (or create your own form on a server). It doesn’t matter. The main thing is you have a way for the person to share info and send it your way.

form no LMS

Embed the Form

Once you have the form, you’ll embed it into the course. In these examples we’re using Rise’s embed block. If you use Storyline, the web object works perfectly for this.

Embed form no LMS

Create a Gate to the Form

The goal is to only expose the form when the course is complete. There are many ways to do this. For these demos, I’ll show two ways. In the first, I use a continue block that is locked until the learner affirms completion of the course and agreement with the content. In the second example, I use a quiz to serve as the gate.

no LMS two options

Examples of Embedded Forms

These are simple examples to show how the form looks embedded in the course and how you could create a gate to get to the form.

  • Jot Form Example: the course has free navigation and user affirms completion to unlock the the gate
  • Google Form Example: the course is locked and passing the final quiz unlocks the certificate of completion

Jot Form offers a bit more control and looks more integrated with the course. I colorized the block to match the form’s color.

JotForm example no LMS

On the other hand, Google Forms has that enormous header space and scrollbar. I removed the header image and filled it with white to avoid the Frankenform look but it still looks like something pasted into the course. It would be nice to have more control over the look, but it still works fine for what we need and it’s free. Also, the integration with Google Sheets saves a few steps later.

Google fomr example no LMS

Upload the Course

Since we’re not using an LMS, we need a place to upload the course. I use Amazon S3 which I showed how to set up in a previous post; but it could also be Google Storage. But it can be any web server.

no LMS Amazon S3 free

Track Course Completion

The form collects the data and sends it to the service. Jot Form displays a table with the option to download. Google Form sends the data to a Google Sheet.

Google Sheet no LMS

Of course, there are many other ways to do something similar to avoid using an LMS, especially if you have programming skills.

At a previous place, we used the course URL to drop a cookie on the person’s computer. At the end of the course, we inserted an .ASP file via a web object. The .ASP file collected the info from the cookie and sent it to the database. Thus we knew who took the course, when they completed it, and their minimum passing score.

Do you have any other ways you use to track the course without using an LMS or paid service? Please share in the comments.

Events

Free E-Learning Resources

Want to learn more? Check out these articles and free resources in the community.

Here’s a great job board for e-learning, instructional design, and training jobs

Participate in the weekly e-learning challenges to sharpen your skills

Get your free PowerPoint templates and free graphics & stock images.

Lots of cool e-learning examples to check out and find inspiration.

Getting Started? This e-learning 101 series and the free e-books will help.


effective e-learning tips

Here’s part two of a recent presentation I did on letting learners drive. It presented foundational ideas on how to build engaging e-learning courses and then focused on tips that help make the courses more learner-centric.

In part one, we looked at how to create engaging training. And in this part, we’ll look at how to make it effective.

Generally speaking, most training is info-centric where content plays the main role. Obviously, content is important. But when it comes to building a course, content in a meaningful context is what matters.

Here are some tips on how to create courses that focus on the learner’s context.

Effective Courses Creating Relevant Context

effective courses are relevant

As we mentioned in the previous post, content needs context and that context needs to be relevant to the end user. How is the content used in what they do in real life situations?

Effective Courses Address Diverse Learner Needs

effective courses

Some people come to the courses as experts and some as novices. Thus, courses can’t all be one size fits all. Do a user analysis to understand the learners and their needs. Then build mechanisms in the course that give them the freedom to learn where it works best for them.

Effective Courses Give the Learners Control

effective courses let users choose

Think of your course live a textbook. Many are designed to flow in a linear path, but most people jump around topics for reference. They don’t always read everything. They usually just read to learn what they need.

That’s how it works online, as well. Want to learn something? Do a  search on YouTube.

effective courses free navigational control

My guess is you jump right into the heart of the matter and skip over a lot of nice-to-know content that wasn’t critical to your search objective.

Why not design the learning experience more like that? Why does it have to be linear?

Effective Courses Expose the Need for Learning

effective courses expose the need to learn

We tend to push content out, but we want the learner to pull it in. But we need to give them a reason to pull. One way is to expose the need to acquire content. We could challenge what they know—challenge their understanding.

This could happen with a simple assessment upfront. Not designed to pass or fail them, but instead, it’s designed to expose their need to know more. Or the assessment can be more complex like an interactive scenario.

Effective Courses Let the Learners Explore

effective courses let learners explore content

The learning experience is more than just presenting information. Information needs to be used in context. A great way to do this is to allow the learner to explore and discover content. Of course, they need to have a reason to explore.

Effective Courses Provide Contextual Scenarios

effective courses decision-making scenarios

One way to get learners to pull in contact is to have them make decisions. Create decision-making scenarios where they have to solve a problem or take some sort of action. Then use that as a way to present content they can explore, collect, and consume to make the best decision.

Effective Courses Sort Learners by Experience

effective courses sort learners

One way to provide better learning experiences is to sort learners. This can be by role, tenure, or competency. The sorting process can be simple or complex, adaptive learning paths. In either case, it helps you build a better course and it creates a better experience for the one who has to go through it.

Effective Courses Sort by Understanding

effective courses sort by understanding and competency

An easy way to sort learners is by how much they understand. This is an effective way to design annual compliance training. At the front end, challenge their level of understanding. If they demonstrate competency, then move them past content (or to the end). If they can’t demonstrate competency, move them through the content.

Effective Courses Sort by Experience or Role

effective courses sort by experience

Another common way to build the learning path is by role or experience. Create a mechanism at the front end to sort learners and then create a path that adapts to how they were sorted. If there are places where this is common content, put that up front and then branch them once they get past it.

There’s a lot that goes into building effective courses. It all starts will clear objectives that can be measured. From there, create meaningful and contextual decision-making opportunities. Ultimately, a course is designed for learning, so giving the learner as much control as possible in the process will only make it that much more effective.

Events

Free E-Learning Resources

Want to learn more? Check out these articles and free resources in the community.

Here’s a great job board for e-learning, instructional design, and training jobs

Participate in the weekly e-learning challenges to sharpen your skills

Get your free PowerPoint templates and free graphics & stock images.

Lots of cool e-learning examples to check out and find inspiration.

Getting Started? This e-learning 101 series and the free e-books will help.


interactive scenarios

What happens when you convert an old PowerPoint course into a Rise course?

The other day I found an older interactive scenario that was built in PowerPoint. I wanted to see what it would take to rebuild something similar in Rise. This isn’t an uncommon situation for those who are trying to convert and update older courses with new technology.

Today, I’ll show what I did to convert the course and a few production tips that helped me.

The Original Interactive Scenario

Back in the day, this was a pretty cool example of what you could do with PowerPoint to create interactive scenarios. By design, PowerPoint is a linear presentation tool. However, with some creativity, one can create interactive content. And that’s exactly what Jeanette did.

interactive scenario demo 1

Click here to view the interactive scenario.

With that said, PowerPoint’s not the best authoring tool if you want to create interactive content. Once you add the interactive capabilities the slide count goes up quite a bit and it becomes a mess to manage. I highlighted this in the post on why PowerPoint isn’t the right tool for interactive e-learning.

The New & Improved Interactive Scenario

We looked at different types of authoring tools in this post. PowerPoint and Rise offer two different types of authoring. PowerPoint is freeform with a blank screen that allows placement of objects. Whereas, Rise is form-based where you assemble content blocks and build the course that way. Freeform gives you more freedom in where you place content, but a tool like Rise offers a better mobile experience because it’s fully responsive. And as you see, it’s a lot easier to work with, as well.

interactive scenario demo 2

Click here to view the interactive scenario.

Production Tips to Build the Interactive Scenario

I had three goals with this conversion:

  • How long would it take to move content from PowerPoint to Rise?
  • What are some production considerations?
  • How to work around constraints?

Design the Interaction

The first thing is to determine how you want to design the interaction. When it comes to interactive scenarios, I always follow my 3C model of challenge, choice, and consequence. If I can click on something, then I can make it part of a 3C interaction.

In this case, I used the Flashcards block as a way to show choices and consequences. The user is presented with a challenge and clicks on a card to get feedback. Since I’m not grading it, I can keep the other options available so that the learner can see what is shared if they had clicked something else. This gives them more control over the learning experience.

  • Mission: identify the different interactive blocks that allow for 3C type interactivity. For starters, there are tabs and accordions. But those are obvious choices. Look for other interactive elements.

Build a Branched Scenario

Branched scenarios are possible in Rise with some considerations. Here are a few production tips:

  • Build your branched interaction with the Button Stack block. The button stack lets you jumps from lesson to lesson.
  • Don’t let them see what’s under the hood. Turn off the Sidebar view so that users don’t see the menu and how the course jumps around between lessons.

interactive scenario tip 1

  • Create a faux navigational cul-de-sac. Since Rise is designed to follow a lesson-to-lesson flow I want to prevent the learner from advancing past the end of a scenario or the button stack. To do so, I added a lot of padding on the bottom and an extra Spacer block as a buffer.

interactive scenario tip 2

  • Create duplicate menus to deal with revisits. The introductory lesson has some initial content and below it are the choices to view the scenarios. When they complete a scenario and come back to the other choices, I didn’t want all of that introductory content visible. I just want them to go to a list of other buttons. So I made a duplicate menu lesson with just the button menu. That’s where they end up after they complete a lesson. They never go back to the original introductory lesson.

interactive scenario tip 3

  • Control how much they see. This makes the content smaller to consume. You don’t need to show everything at once. Keep people from scrolling by adding an interactive Continue button. This holds all the content below it until the learner clicks on the button. In a sense, they are affirming that they are ready and when they click, they get more info.

interactive scenario tip 4

  • Play around with the imagery. Rise courses don’t need to look the same. You can insert images in all sorts of ways. An image doesn’t need to be a picture. It could be a white box that fills in an area to create more white space. Be creative in how you use the blocks. Also, don’t stick with the defaults. Play around with filling the blocks with color. The key is to learn to see them in a different way.

interactive scenario tip 5

How long did it take?

Once I planned how to build the interaction, it only took about 15 minutes to copy and paste the content from PowerPoint to Rise.  I used different images, so I had to create those. And I had to play around with ideas to see what worked best. All-in-all it took about 2 hours to build the module as it is.

The nice thing is that once I build an interactive lesson, I can save it as a template an re-use it again. And to add additional modules is just a matter of duplicating a single lesson. To do so in PowerPoint would require another 20+ slides per module.

As you can see, working with Rise is so much easier than working with PowerPoint.

Events

Free E-Learning Resources

Want to learn more? Check out these articles and free resources in the community.

Here’s a great job board for e-learning, instructional design, and training jobs

Participate in the weekly e-learning challenges to sharpen your skills

Get your free PowerPoint templates and free graphics & stock images.

Lots of cool e-learning examples to check out and find inspiration.

Getting Started? This e-learning 101 series and the free e-books will help.


interactive video

This is part two of the series on working with 3D models and interactive video. In the previous post, we looked at how to create a video using 3D models in PowerPoint. Today, we’ll discover how to use them to create interactive videos in Storyline. And then of course, once you have an interaction you can also insert it into a Rise course, which is what I did in this Rise lesson.

Create the Interactive Videos in PowerPoint using 3D Models

If you want to create a different kind of interactive video, you can apply what you learn here. The process is similar. For this demo, make sure you understand how the video is created and how it plays all the way through because we’re going to add a trigger to pause it before it completes.

For this demo, I created a video where the object rotates in and then rotates back out. It was built using a three-slide PowerPoint file and exported as a video.

Tutorial: how to create a three-slide video using 3D models in PowerPoint.

A Teardown of the 3D Model Interactive Videos

There are a few nuanced steps in this process. Let’s review what happens and then we can look at how to create it in Storyline:

Interactive video in Storyline using 3D models in PowerPoint

  • User clicks on the side tab which shows a layer.
  • The layer plays the video we created in PowerPoint.
  • Since the 3D object in the video rotates in and out, we set the video to pause when the object is rotated in.
  • Then we add a trigger to resume the timeline (with a hotspot or button) which continues to play the video and shows the object rotate out as the video completes.
  • The completion of the media (the video) triggers the layer to hide which takes us back to the base slide with the side tabs.

Create the Interactive Videos in Storyline

The video I create in PowerPoint is the exact same aspect ratio as the Storyline file. For the most part, 16×9 is fine. But if you change the aspect ratio of your .story file make sure you do the same on the PowerPoint slide.

  • Go to slide 1 in PowerPoint and save it as a .PNG image. This image will be what the user sees on the base slide in Storyline and perfectly aligns with the videos that will be on the layers.
  • In the Storyline slide, insert the slide image from PowerPoint.
  • Create the appropriate number of layers based on how many interactive elements you have.
  • On each layer add the appropriate video. Each video should play automatically. I also recommend putting a hotspot over the video so the user can’t click on the video to start/stop it.
  • On the video layer, add a trigger to pause the video when it reaches either a certain time or cue point. I like to add cue points so I can nudge them without modifying the trigger. The video should pause at the apex of the object rotation.
  • Add a trigger to unpause the video. It could be a simple button or perhaps a hotspot.
  • Add a trigger to hide the layer when the media completes. This should take you back to the base slide.

Click here to view the tutorial on creating an interactive video.

That’s basically it. Of course, there’s a lot more you can do to decorate the layer or add additional content. It just depends on your needs. Practice the technique first and once you have it set, see what you can do.

If you do create something, please share it with us so we can see it.

Events

Free E-Learning Resources

Want to learn more? Check out these articles and free resources in the community.

Here’s a great job board for e-learning, instructional design, and training jobs

Participate in the weekly e-learning challenges to sharpen your skills

Get your free PowerPoint templates and free graphics & stock images.

Lots of cool e-learning examples to check out and find inspiration.

Getting Started? This e-learning 101 series and the free e-books will help.


3D models in PowerPoint

I shared a cool 3D interaction in a recent workshop demo and have had lots of people ask how I built it. You can check out the interaction in this Rise demo.

Creating the interaction is a two-step process:

  • The first step is creating a video of the 3D model as it rotates in and out.
  • The second step is to insert the video and add interactive elements in Storyline.
  • In the case of the Mars Rover module, there’s a third step because inserted the interactive Storyline module into Rise. This is pretty cool because it allows for really simple and fast authoring in Rise, and then when I need custom interactions, I just build them in Storyline. It’s a win-win.

Here’s a previous post where I detailed more of the construction of the Rise demo. For today’s post, I’ll show you how to create the 3D video you’ll use for a Storyline interaction. The tutorial below shows how to create the video using 3D models in PowerPoint.

Click here to view the tutorial on YouTube.

Insert 3D Models in PowerPoint

PowerPoint comes with a number of 3D models. It also supports inserting models shared by the community. You can also build your own 3D models and insert them using standard 3D formats

3D models in PowerPoint

Most likely you’ll want to insert your own 3D object. So it’s nice that PowerPoint supports the common 3D file formats. Here are the supported 3D formats for PowerPoint:

  • .FBX
  • .OBJ
  • .3MF
  • .PLY
  • .STL
  • .GLB

How to insert the 3D model in PowerPoint:

  • Create a slide and then select a 3D object.
  • Insert it just like you would a shape or picture.
  • Position the object on the screen.
  • Duplicate the slide (we’ll need this for the video).

Create the 3D Animation in PowerPoint

The first slide is the starting point from which the 3D object rotates. The second slide is the rotation point. You’ll need to rotate the object so that the position changes from slide 1 to slide 2. You can also move and scale it.

3D models in PowerPoint


  • Reposition the object by either scaling, rotating, or moving it on the slide.
  • Go to slide transitions and select a morph transition for slide 2.
  • Preview the slideshow.

3D models PowerPoint

On preview, you’ll see how the 3D object uses the morph transition to change positions. Pretty slick, huh?

Fine-tune Slide Transitions for 3D models in PowerPoint

That’s the essence of the 3D animation. Now it’s a matter of fine-tuning the animation by playing with the slide timings.

When all is done, the PowerPoint slides will be saved as a video file. That means the animations and transitions need to be automated.

3D models in PowerPoint 3D PowerPoint morph transition timing

  • In the Transitions tab, go to Advance Slide and select to advance after X time. That means the slide will automatically advance at a certain time and doesn’t require you to do anything to trigger the slide movement.
  • Slide 1 is just the starting point so it needs to advance as quickly as possible. I usually set it to advance after .25 seconds.
  • Slide 2 will trigger the morph animation. On slide 2 you can change the speed of the 3D animation by changing the slide duration.
  • Slide 3 (optional) is great if you want to create the sense that the object rotated in and out like the Mars Rover demo.

Save the PowerPoint file as a Video

When all is done, save the PowerPoint file as a video. You have two options: .MP4 and .WMV.

The MP4 format works well but I did find that when I use it with Storyline, the last part of the .MP4 always seems jumpy. It probably has to do with how the .MP4 is encoded by PowerPoint. So if I am using the video to build an interactive file, I save it as a .WMV. Then I let Storyline do the conversion. That resolves any issues you may experience.

That’s basically it for the 3D model video in PowerPoint. You create the two or three slides and save as video. Once you have the video, you can insert it into Storyline or anywhere else you use video. To make it an interactive video like I did with the 3D rover, you’ll need to tune in next week where I show how to create an interactive video in Storyline.

Events

Free E-Learning Resources

Want to learn more? Check out these articles and free resources in the community.

Here’s a great job board for e-learning, instructional design, and training jobs

Participate in the weekly e-learning challenges to sharpen your skills

Get your free PowerPoint templates and free graphics & stock images.

Lots of cool e-learning examples to check out and find inspiration.

Getting Started? This e-learning 101 series and the free e-books will help.


e-learning instruction screen interactive start screen

It’s common that when getting to a new web service or starting a new application you see some sort of instructions or start screen. Basically, the screen freezes your interaction with the site until you’re oriented and then lets you continue. Some force the interaction and others allow you to opt-out.

Those are not much different than the gate screens I’ve written about in the past (with free downloads). The gate screen sort of does the same thing. It stops your progress, provides instructions, and lets you continue.

Examples of Start Screens

Here are some examples of different instruction screens I’ve seen online. I’m sure you’ve seen something similar.

instruction screen

examples of interactive start screen

How to Create an Interactive Start Screen

Today I’ll walk through the process of creating an interactive start screen. Below I highlight the main considerations and you can watch the video tutorial to get the details.

  • Is the screen mandatory or can the user click away at any time? I prefer the freedom to leave, however, there may be times where it’s important the person is exposed to all of the instructions. Sometimes people tend to skip out and they may benefit from not doing so, especially when it comes to matters of compliance training.
  • Does the instruction only move forward or does it go backward, as well? Probably more a matter of preference, but if they can go back make sure you build the navigation to work properly. You’ll also notice that one of the images above offers a single “continue” button thus limiting it to forward movement only.
  • Do you need the progress dots? Many of those instruction screens have dots. They’re good for progress indicators. You’ll notice that some of the screens display numbers or timelines. If you do use dots, are they clickable? Do they need to be?
  • How are the instructions displayed? Are they on cards, which seems to be the most common. Or are they displayed fullscreen? Fullscreen gives you more real estate. Cards are usually laid over the main screen with some sort of lightbox design.
  • Is the content animated? There are some nice effects you can create with entrance and exit animations. But sometimes when building these types of screens, the time it takes to make them look right, may not be worth the value you get.
  • How do the instructions end? Some disable the navigation buttons and others offer a “get started button.” The main consideration is what is the next step? If they need to continue, make that clear. Or if all they need is to close the screen, then make that clear, as well.

How-to Tutorial

Here’s a tutorial where I build a quick prototype and discuss some of the considerations and approaches you can take building an interactive start screen.

instruction screen e-learning interactive start screen tutorial

Click here to view the tutorial.

There are a lot more considerations, but those are a good start. And when you actually start to build the screens for your course, you’ll find there are many different ways to do so.

Events

Free E-Learning Resources

Want to learn more? Check out these articles and free resources in the community.

Here’s a great job board for e-learning, instructional design, and training jobs

Participate in the weekly e-learning challenges to sharpen your skills

Get your free PowerPoint templates and free graphics & stock images.

Lots of cool e-learning examples to check out and find inspiration.

Getting Started? This e-learning 101 series and the free e-books will help.


expectations e-learning

We recently finished our E-learning Roadshows in Europe and the United Kingdom. One of the things I really enjoyed about the trip was riding trains. Where I live in the United States, there aren’t many opportunities for me to ride trains between cities.

One thing that does make me a bit nervous when taking a train ride (especially in new places) is not knowing how to find my way around the station to ensure I don’t miss the train. And it doesn’t help when each station seems to have its own system to manage the schedule boards. I’m sure to the person who rides the train frequently, it all makes sense. But when it’s a new experience, it can be a bit nerve-wracking, especially when pressed for time.

Which gets me to some points that are relevant to e-learning course design.

Set Clear Expectations

Not knowing my way around the train station or even the local language means I’m a bit off balance. And since each station looks different, the experience is different. When I travel, I usually Google map the area and take a virtual walk. This helps me know more about the location and what to expect when I get there. However, this isn’t possible for most train stations around the world.

Thinking about your e-learning course: how is the experience for a new learner? Is there a comfort level when starting the course or is it all new and a bit unsteady? Let people know what they should expect in the course and what is expected of them.

What is going to happen? What are the requirements? What type of experience should be expected?

Provide an Orientation

Often it’s assumed that the user interface or experience is intuitive, but that may not be the case. A person who rides the train every day knows the way around the station and what the signs mean and probably doesn’t even need them. The person who rides a train once in a lifetime looks for signs and probably will need more time to figure them out and how to move around the station.

The same can be said for your e-learning course. Provide an orientation so that the user knows what’s there and when and how to use the resources. It doesn’t mean you need a course on how to take the course but you need to make things familiar and provide a means for people to figure out how things work.

Create a Consistent Experience

Each train station I visited had different types of reader boards and most had their own layouts with icons and not means to discern what they were. It was all a bit confusing and it took more time to find what I needed. At one station, I think it required having an engineering degree to ride the train.

Review your e-learning courses and ensure that how you present content and interactive experiences are consistent. This is especially true if you change the flow of content such as going from a screen of text to an interactive decison-making activity.

The more consistent, the less time you need to explain the course and the more time the learner can spend on the actual learning.

Familiarity is a Key Part of Learning

The goal of the course is generally to teach something. To teach means we need an environment that is conducive to learning. One consideration is how familiar the learning process is to the learner. Do they know what’s going on and what to do?

Familiarity can exist in how the content is structured to the user interface that displays it. For the learner, it’s important to have a level of understanding and know where things fit contextually. Once that’s in place, it’s easier to learn.

As a course developer, I used to complain about not being able to customize my course player. I always wanted to create something new for each course. However, over time I came to realize that there’s a lot of value in a consistent and familiar player. The same can be said for how you structure interactions like tabs and more complex ones like scenarios.

The more uniformity you can add, the better. But I will say that it’s also based on the context of what you’re doing. Not all courses need to look the same or behave the same. However, whatever you choose to do should be consistent and as intuitive as possible. The goal is to help people learn and the method to do that shouldn’t get in the way of learning.

Look at your courses with fresh eyes and try to experience them from the learner’s perspective. Are there any things you’d change?


Events

Free E-Learning Resources

Want to learn more? Check out these articles and free resources in the community.

Here’s a great job board for e-learning, instructional design, and training jobs

Participate in the weekly e-learning challenges to sharpen your skills

Get your free PowerPoint templates and free graphics & stock images.

Lots of cool e-learning examples to check out and find inspiration.

Getting Started? This e-learning 101 series and the free e-books will help.


e-learning tools

Over the weekend, I was supposed to paint the house but was watching TV instead. My wife asked why I wasn’t painting and I told her I couldn’t because I lost the paint lid opener and couldn’t open the paint can. She handed me a screwdriver.

“No dice,” I said. “That’s for screws. I can only use a paint lid opener.”

Ridiculous, right?

E-Learning Tools from a Different Perspective

Here’s the deal, e-learning vendors make products and those products have a purpose. However, the products often do more than they’re designed to do. It’s just a matter of looking at the tools from a different perspective. I always tell people to look at the e-learning applications as a means to create multimedia content and not just to create e-learning courses.

For example, Articulate’s Quizmaker obviously is great for building quizzes. That’s why it’s called Quizmaker. However, if you step away from its title, the features allow it to create simple decision-making scenarios or pop-up videos. All of these are more than the quizzes promised by the software’s title.

The same with PowerPoint. It’s a great tool for presentations…and illustrations…and video production…and much more. In fact, years ago, I used to use PowerPoint to create posters that I’d print on large format printers. You just have to step away from PowerPoint as a presentation tool and see it as a means to create multimedia. And once you do that, you’ll get more out of the investment you’ve made in the software.

Here are few tips to help you get there:

  • Learn to use the tools. The more fluent you are, the more you’ll be able to leverage the features. We always promote the weekly e-learning challenges so that you can learn to see and use the tools in different ways. They’re also intended to push you a bit out of what you may do at work, especially since most work projects are the same ones over and over and over.
  • Understand the features and then think outside the box on how to use them. For example, years ago I came up with a simple formula for building interactive scenarios: the 3Cs…challenge, choice, and consequences. If there’s a place in the software where I can interact and expose content, there’s a place to create an interactive scenario. Common click and reveal interactions like tabs, accordions, markers, etc. become simple interactive scenarios. Are they labeled as interactive scenario features? No. But that’s what you can create with them.
  • Look at what other people build with the same tools. There are all sorts of great examples in the community, in the weekly round-ups, and in the challenge activities. Review what they did, deconstruct them, and try to build the same.
  • Find ideas outside of e-learning. Looks for any type of interactive content and ask if you can do the same with your software. You may not always be able to replicate what you find, but often you can and worst case, you still build something neat and learn a few new production tips that will help on your next e-learning project.

What do you do with your software that it wasn’t designed to do?

Events

Free E-Learning Resources

Want to learn more? Check out these articles and free resources in the community.

Here’s a great job board for e-learning, instructional design, and training jobs

Participate in the weekly e-learning challenges to sharpen your skills

Get your free PowerPoint templates and free graphics & stock images.

Lots of cool e-learning examples to check out and find inspiration.

Getting Started? This e-learning 101 series and the free e-books will help.