The Rapid Elearning Blog

Archive for the ‘Production Tips’ Category


Articulate Rapid E-Learning Blog - easy way to back up files to the network drive

In today’s post we’ll look at two free applications you can use to synchronize your files between your computer and a network drive or Dropbox folder.

Saving to a Network Drive

Many of you keep your elearning project files on a network drive. But working with multimedia projects from the network drive isn’t always ideal. That means you’re copying files from your network to the desktop. And ideally, you move them back over when you’re done.

Articulate Rapid E-Learning Blog - move files from the local desktop drive to your network drive

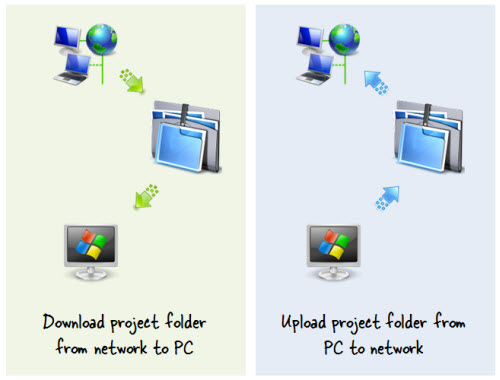
It sure would be nice if there was an easy way to make sure that the files on your desktop are sync’d to your network drive.

Working with Dropbox

Dropbox is great for syncing folders between computers. I use it all the time. But you can only sync from a folder within your Dropbox folder. So that means your project folders have to be in your Dropbox folder.

Articulate Rapid E-Learning Blog - sync your folders so they're added to your Dropbox folder

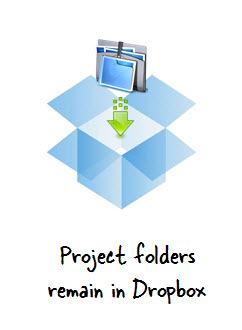
I prefer to manage my files outside of Dropbox. But I do like using Dropbox to sync my files between computers. I also prefer working outside of Dropbox when I am editing my project files. I don’t want to run the risk that Dropbox’s active syncing interferes with my multimedia production.

It would be great to have a solution that lets me work on my projects outside of Dropbox and then automatically move them to Dropbox so I have access to them on my other computers.

The good news is that there’s an easy and inexpensive way to make sure to backup your network drive or a Dropbox folder. Here’s how.

Microsoft SyncToy

SyncToy is a free application from Microsoft. You select a “Left” and “Right” folder to sync. And then you determine how and when you want to sync them.

Articulate Rapid E-Learning Blog - sync two folders using Microsoft SyncToy

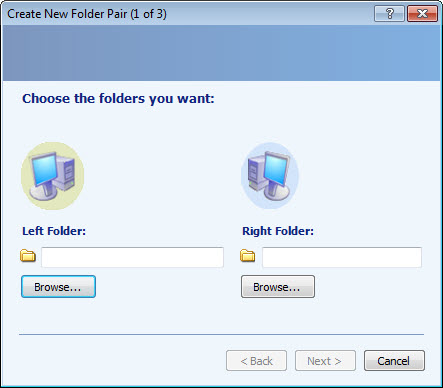
The left folder is what’s active on my desktop and I sync that folder to the right folder which would be either the network or Dropbox folder.

Here’s a tutorial that shows how to set up and sync two folders using Microsoft SyncToy.

  • View the SyncToy tutorial [updated March 2022].
  • Download SyncToy [Microsoft discontinued SyncToy, but the application is available to download here].

To sync the folders, open SyncToy and select “Run.” Of course, that requires you remembering to do so, but that’s where the next step comes in.
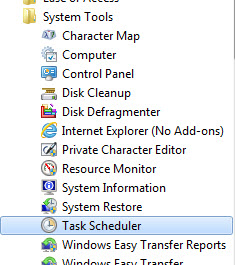
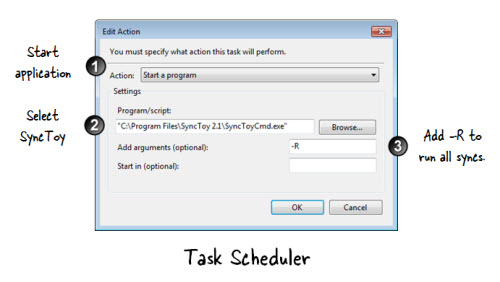
Task Scheduler

Your PC comes with a task scheduler. It’s in the Systems Tools folder. With Task Scheduler, you schedule tasks (funny how those names work) to run at specific times.

Articulate Rapid E-Learning Blog - task scheduler is in your accessories folder

In this case, we want to create a task that opens and runs SyncToy so that the left and right folders are sync’d automatically. I schedule the task to run around 7:00 PM when I am mostly done with work and usually not at my desk.

Articulate Rapid E-Learning Blog - how to set up task schedule to run SyncToy

You can learn more about Task Scheduler here. There are a lot more options, but for this post I kept it really simple.

  • View the Task Scheduler tutorial [updated March 2022]
  • Access Task Scheduler from windows: Start > Accessories folder > System Tools folder

Let’s review the process:

  • Create a folder on your PC for elearning projects.
  • Create a folder on your network (or Dropbox) that will sync with your PC folder.
  • Use SyncToy to synchronize the two folders.
  • Automate syncing the two folders using Task Scheduler to run SyncToy at a scheduled time.

That’s about it. It’s an easy process and great way to make sure that what you have on your PC is sync’d with your network files and Dropbox. It sure beats having to manually copy things back and forth.

Events

Free E-Learning Resources

Want to learn more? Check out these articles and free resources in the community.

Here’s a great job board for e-learning, instructional design, and training jobs

Participate in the weekly e-learning challenges to sharpen your skills

Get your free PowerPoint templates and free graphics & stock images.

Lots of cool e-learning examples to check out and find inspiration.

Getting Started? This e-learning 101 series and the free e-books will help.


project management tip header

Managing elearning projects requires good communication between the instructional designers and subject matter experts.  In most cases, this communication happens via email.  Thus, better email communication ultimately leads to better project management, which most likely means better elearning courses.

At a recent ASTD conference, I ran into Mike Song, the author of The Hamster Revolution.  It’s a book on how to effectively manage emails.  Mike gave me a free copy which I skimmed through on the plane flight home.

It’s a quick read and very practical, but I’ll have to admit, I kind of ignored it until I saw a funny video on Youtube a couple of weeks ago.  The video is of a presentation at Ignite Boise, one of those fun 5 minutes and 20 slide events.  The title is “You Don’t Know How to Email.”  Check it out.

The Rapid E-Learning Blog - video from the IgniteBoise event

Click here to view the video.

At about the 1:48 mark, Erik introduces his friend Dan and Dan’s emails.  It’s both funny and eye-opening.  After watching the video, I looked through my sent emails and sure enough, there were dozens that began with “Hey…”

I am Dan!  And perhaps you’re Dan, too.

Here’s the deal, if you’re swamped with emails, so are your co-workers, manager, and most important your clients and subject matter experts.  By following some of the tips from the Hamster book, you’ll communicate better, your subject matter experts will be happier, and you’ll do a better job managing your emails.

Use Descriptive Titles in Your Email Subject

In the book, Mike recommends that you use categories to provide context to the email subject line.  Look at the image below.  “Action” is one of his recommended categories.  It alerts the reader that there’s an action item associated to the email.

Outside of the Action category, you can also see that the there’s enough information in the subject line to let the reader know the email’s important and requires a response.  A descriptive subject line communicates clearly and is a lot easier to search, as well.

The Rapid E-Learning Blog - actionable email subject line

Just this tip alone will make your subject matters happy.  But wait, there’s more.

Email is Money

As Erik in the Youtube video said, “Time is money.  Email takes time.  So email is money.”  Everyone’s busy; so you need an easy way to clearly communicate and manage emails.  Below is an example of a typical email.

The Rapid E-Learning Blog - email before applying the ABCs

This email is kind of typical of the types of emails we get.  They can be a bit long-winded and pointless.  It’s hard to quickly pull out the important information.  And the action items (if any) are not clearly discerned.

Reviewing the email above, you’ll notice a few key issues:

  • The subject line is not specific so you’re not quite sure if the email is critical or not
  • The formatting of the email makes it hard to quickly scan
  • It’s difficult to identify any action items
  • The key points are not easily found
  • Expectations and next steps are not clear

Break the Body of the Email into Three Sections

As I mentioned earlier, a good email starts with a specific subject line.  This helps the reader know the purpose of the email and what’s expected.  From there, you implement the A-B-C approach which is:

  • Action summary: Think of this like the abstract of the email.  It’s a quick summary of what you expect the reader to do based on the email.
  • Background: This is the body of your email.  Use bullet points or numbers to focus on key points.  It’s an email, not Salinger’s next great novel.
  • Close: This is where you can add incidental notes that might distract at the beginning of the email.  And you can also highlight some expected next steps.

Now let’s compare the email below to the one above.  It’s essentially the same email, only by using the A-B-C approach you’re able to quickly get to the point, focus on what’s important, and identify any expectations or pending actions.

The Rapid E-Learning Blog - email reformmated using the ABCs

I think you’ll agree that the format of the second email makes communicating with your subject matter experts a lot easier.  Odds are that you’ll exchange a lot less email and that your projects will run much better.

So if you’re inbox is overrun with emails, there’s hope.  It just takes a little practice.  You’ll have less email stress and your subject matter experts will love you.  What tips do you have to make managing the emails for your elearning projects easier?

Events

Free E-Learning Resources

Want to learn more? Check out these articles and free resources in the community.

Here’s a great job board for e-learning, instructional design, and training jobs

Participate in the weekly e-learning challenges to sharpen your skills

Get your free PowerPoint templates and free graphics & stock images.

Lots of cool e-learning examples to check out and find inspiration.

Getting Started? This e-learning 101 series and the free e-books will help.


This is kind of a bittersweet post.  Originally, I was going to write about using Google Lively’s virtual world to build scenes and characters for your elearning courses.  The application was free and had some potential as a learning tool.  Apparently, I was the only one who was using it, so Google decided to pull the plug.  Oh well.  If it’ll help the stock price, I’m all for it.  The 8 shares I own aren’t doing too well right now.

Even with the demise of Lively, the essence of the post still stands.  So I’m moving forward with it.  You’ll just need to find a different virtual world tool.  Any of them should work.  Make sure to read the terms of agreement.  If you’re not quite sure where to start, there’s always Second Life.  TechCrunch recently did a blog post that mentions a few of them for even more choices.

What makes this approach so compelling for rapid elearning is the cost, ease of use, and ability to create virtually any type of scenario for your courses.

Build Characters

The Rapid E-Learning Blog: create avatars

Almost all of the virtual world applications let you build your own avatars.  You typically get a broad range of choices.  In the demo above, I created a couple of characters and then made them look like normal people.  I wanted something that looked more like the real world for my scenes.

Unless you’re doing training for groundhogs in Wyoming then the avatar above probably isn’t the best choice. However, that doesn’t mean you couldn’t use a creature like that as a guide or character in your scenes.  It could lighten up the tone or add a little humor.

Set Your Scene


The Rapid E-Learning Blog: create diverse scenes

Most virtual worlds come with all sorts of rooms and settings.  I created the images above in just a few minutes.  I didn’t have to build anything.  I just entered the room and made the image.

As you can see, there are many options.  The character can go from discussing the movie My Cousin Vinny to being a discriminating blog reader.  You get a ton of freedom and creativity in where your characters can interact.

Build Your Scenario

Virtual worlds give you an assortment of characters and settings.  But the real power comes from the camera movement and views.  Because you’re in a 3D environment, you can move the camera around to quickly change the look and feel of your scenario.

The Rapid E-Learning Blog: switch camera angles

Here are a few images.  The characters are in the same location.  I changed the camera angle and then added an action to add a little drama.  The advantage to this approach is that the custom camera angles lets you set your scenario from multiple perspectives.  This is really helpful when you have dialogue between two people.  I think you’d agree that it seems more engaging.

So, how did I do it?

It really is pretty easy.  We’ll assume that you already have a script and know what types of images you want.

  • Log into the virtual world of your choice.
  • Add you characters.
  • Choose your setting.
  • Move your camera (view) into position.
  • Do a screen capture.  Depending on what you can do in the virtual world, you might even be able to make quick videos and add your own audio, like I did in the demo.

That’s it.  Pretty simple and a great way to get the types of images you want.  Of course, this approach doesn’t work for everybody and every organization.  However, it is a very easy and inexpensive way to make your elearning scenarios look a bit more engaging.

I’d love to hear what you think.  Or if you’ve done something similar, feel free to share examples or give us some tips.

Events

Free E-Learning Resources

Want to learn more? Check out these articles and free resources in the community.

Here’s a great job board for e-learning, instructional design, and training jobs

Participate in the weekly e-learning challenges to sharpen your skills

Get your free PowerPoint templates and free graphics & stock images.

Lots of cool e-learning examples to check out and find inspiration.

Getting Started? This e-learning 101 series and the free e-books will help.


time_money

Unless you work for the Count of Monte Cristo, you most likely have limited resources to build your e-learning courses.  Here are three techniques I’ve used that will make your e-learning development go faster and cost less.

Don’t Create an E-Learning Course

Clients typically think every problem can be solved through training.  Sometimes the best value you bring is that of a gatekeeper.  If you can avoid creating a course, do so.

Your job is to help your clients make the right decisions by assessing their needs and advising them on the best course of action.  By avoiding unnecessary e-learning projects, you free your resources to work on those that bring real value.

Use Kuhlmann’s E-Learning Hierarchy

I use a three-tiered approach for e-learning design.  I start by automating as much of the production process as I can and freeing up my more expensive developers to work on projects that best utilize their skills.

  1. Make rapid e-learning the default approach unless you need more. This allows you to meet your objectives without committing more expensive resources to the project.
  2. Build custom e-learning pieces that you can drop into your rapid e-learning course.  Rapid e-learning software is very flexible and allows you to add custom content such as web objects or iframes.  This hybrid approach allows you to build the pieces you need and still leverage the benefits of quicker production using the rapid e-learning software.
  3. Commit your multimedia resources to custom development.  If you follow the first two steps, then you can free up your resources to build custom content.  It doesn’t make sense to pay a skilled multimedia programmer to build something that you can do with a rapid e-learning tool.  Instead, push as much work to the rapid development side as you can and get your expensive developers to work on those projects that require custom development and best utilize their skills.

Incorporate External Content Resources

Most of the e-learning is focused on delivery of information.  And most of these courses use content that is already available elsewhere, like the organization’s intranet.  Instead of just regurgitating content, do this.  Build your course to teach the learner how to find the content outside of the course.

If you do this, you won’t need to cover everything in the course.  This allows you to create learner independence and means you must build less content.  It also helps with maintaining the course as the content changes.

In addition, many step-by-step courses only require a brief overview and then some cheat sheets or simple tips that the learners can use at their workplaces.  Why build a time-consuming course, when you might be able to provide a less expensive document that serves the same purpose?

The key to your success is investing your time and resources where you get the most value.  Following these tips helps you do that.

Events

Free E-Learning Resources

Want to learn more? Check out these articles and free resources in the community.

Here’s a great job board for e-learning, instructional design, and training jobs

Participate in the weekly e-learning challenges to sharpen your skills

Get your free PowerPoint templates and free graphics & stock images.

Lots of cool e-learning examples to check out and find inspiration.

Getting Started? This e-learning 101 series and the free e-books will help.