The Rapid Elearning Blog

Archive for the ‘Tutorials’ Category


PowerPoint graphics

[UPDATE: this post is republished in the Tips & Tricks blog.]

In a recent post, I showed how I use PowerPoint to build the graphics for my Rise courses. I had a few questions on how to create the person sticking out of the circle image (apparently that is popular).  So today’s post shows how to do this. It’s pretty easy.

How to Create a 3D Pop-Out Graphic in PowerPoint

PowerPoint graphics Content Library

  • Insert a character and crop it until it is square.
  • Insert a circle.
  • The circle and image should be a similar size.
  • Crop the image to a circle shape.
  • Position the character over the circle.
  • Scale it up to suit your need for the overhanging image.
  • Duplicate the character.
  • Crop the first image to fit in the circle.
  • Crop the second image and place on top of the first image to cover.
  • Group together so you don’t accidentally nudge them out of place.

PowerPoint graphic steps

As you can see, it’s relatively simple to do. Then whatever you build in PowerPoint can be saved as an image. Either right-click it and save as .PNG or save the slide itself as .PNG.

Watch the tutorial below to get more of the specific detail. And here’s a bonus tutorial on how I created the 3D pop-out header image above.

Click here to view the YouTube tutorial.

Events

Free E-Learning Resources

Want to learn more? Check out these articles and free resources in the community.

Here’s a great job board for e-learning, instructional design, and training jobs

Participate in the weekly e-learning challenges to sharpen your skills

Get your free PowerPoint templates and free graphics & stock images.

Lots of cool e-learning examples to check out and find inspiration.

Getting Started? This e-learning 101 series and the free e-books will help.


Google storage share courses online free

[UPDATE March 08, 2022: The essence of the post is still accurate, but you can find an updated tutorial and instructions here.]

I get a lot of questions about free ways to share courses and portfolios. In previous posts, I shared tips on managing an e-learning portfolio and I also shared a few ways to share courses online for free.

Another way to get free storage to share your courses and files is via Google’s Storage Platform. It’s pretty easy to set up.

Tutorials on How to Share Courses Online

I created a tutorial on YouTube so you can see the steps, which may be easier. You can upload the files via the browser.

Share Courses Online: Setting Up a Google Storage Account

  • You’ll need to sign up. Just follow the directions for adding your contact info.
  • You do need to provide a credit card number. However, the cost of storage is nominal and I believe Google gives you a 5 GB/month allowance for free. Odds are that anything you upload will be much smaller. Even if you do pay for storage, my guess is that it’ll only be a few dollars per year.
  • Once your account is established, you’ll create a bucket to hold your files. Inside the bucket, you can add other folders. All of that is covered in the video above.

Share Courses Online: Make Your Google Storage Files Public

  • Set the permissions for the bucket to allow public access to view.
  • Go to the bucket in the browser. To the right, you’ll see three dots. Click that and select “edit access.”
  • Select “Add Principal” and type in “allUsers” under New Principal.
  • Give them a role to be a “storage object viewer.” This allows them access to the files to view.

Google Storage share courses online free create permissions

Share Courses Online: Add Content to Your Google Storage Account

  • Adding content is easy. There’s an option to upload files and/or folders.
  • Once you’ve added the course folder, to the right of the index.html (or whatever you click on for the course) you’ll see a “public link.”
  • Share the public link.

Google Storage share courses online free share files and folders

The process is straightforward. Obviously, there’s a lot more to learn, but these simple steps will let you upload and share your e-learning courses and portfolio for free (or close to it).

Events

Free E-Learning Resources

Want to learn more? Check out these articles and free resources in the community.

Here’s a great job board for e-learning, instructional design, and training jobs

Participate in the weekly e-learning challenges to sharpen your skills

Get your free PowerPoint templates and free graphics & stock images.

Lots of cool e-learning examples to check out and find inspiration.

Getting Started? This e-learning 101 series and the free e-books will help.


Use PowerPoint to edit images

Over the years, I’ve posted hundreds of tutorials using PowerPoint. Some of them to be updated. Today I am going to cover five ways to use PowerPoint as an image editor. This is great for quick image editing or for those who don’t have other image editors on hand.

Save PowerPoint Content as an Image

Since we’re talking about PowerPoint as an image editor, the first tip is that whatever you create in PowerPoint can be saved as an image.

I usually group the objects so it’s one group. And then I right-click and save as picture. I like to save as a .PNG so that the transparent areas of the image are still transparent. If you save as .JPEG, the transparent areas will become white.

In the image below, I used PowerPoint to create the sandwich stack and then right-clicked to save as picture.

PowerPoint as illustrator

Create Custom-Sized PowerPoint Slides

You can make a PowerPoint slide any size you want. By default, they’re 16:9. That and 4:3 are the most common aspect ratios. However, by going to the Design Tab you can set the slides to any size. That means they can be tall and skinny or short and wide.

PowerPoint as illustrator slide size

Why would someone want to do that? Check out the tip below.

Export PowerPoint Slides as Images

PowerPoint slides can be saved as images. That means you can add whatever you want to a slide, layer content, etc and then save that slide as an image. I do this quite a bit when I need to quickly build graphics for my e-learning courses.

For example, the flashcard interaction in Rise is a 1:1 aspect ratio. So I make a PowerPoint slide that is 1:1 and add my content to the slide. It’s a great way to add titles and images to the flashcards to make them visually richer.

Once I’ve completed the slide, I save the PowerPoint slides as images and insert them into the Rise interaction.

PowerPoint as illustrator

The images above were all created in PowerPoint as slides and inserted into the Rise course. You can see an example of the PowerPoint slide images in this demo course.

Using PowerPoint slides to create images is easy and it gives me more control over the images I use in my e-learning courses.

How to Extend a Photo’s Background

Sometimes you have images where the object is centered which makes it challenging to place other content on the screen. An easy way to fix this is to cut a slice from the image and stretch it. This lets you move the main object over and get some empty space for text or other content.

PowerPoint as illustrator to extend images

I also use this technique to quickly build slide layouts which I showed in this previous blog post on how to create a template from a single image.

Create PowerPoint or e-learning template from image

How to Remove the Backgrounds of Images in PowerPoint

Since PowerPoint 2010, you can use PowerPoint to remove backgrounds from your images. For the most part, it works well. Select your image and the remove background. You can select areas to keep and areas to remove. Once you’ve removed the background, you can play around with softening the edges to get rid of any obvious jaggedness.

How to remove background in PowerPoint

As you can see, PowerPoint is a great tool for building simple illustrations or using it for quick graphics editing.

Events

Free E-Learning Resources

Want to learn more? Check out these articles and free resources in the community.

Here’s a great job board for e-learning, instructional design, and training jobs

Participate in the weekly e-learning challenges to sharpen your skills

Get your free PowerPoint templates and free graphics & stock images.

Lots of cool e-learning examples to check out and find inspiration.

Getting Started? This e-learning 101 series and the free e-books will help.


edit SVG in PowerPoint

The good news is that now you can edit SVG images in PowerPoint. And that’s a big deal because we’re starting to see more SVG images every day.

In fact, one of the sites where I buy images has the option to download SVG images. This is great because they can be edited and customized. However, to edit them requires knowing how to do so with an illustration program. Unless of course, you know how to use PowerPoint.

Insert & Edit SVG Image in PowerPoint

This first step is really easy. Insert a picture by using Insert>Pictures on the toolbar. Locate your SVG image and insert it. Voila! I will add, that I’ve had a few SVG files that didn’t work, but for the most part it’s been smooth sailing.

SVG PowerPoint

The next step is also very easy. What you’ll do is convert the SVG image into an object that can be edited in PowerPoint. The newest version of PowerPoint has a “Convert to Shape” feature. If you don’t see it in your version of PowerPoint, you’ll need to upgrade to the Office 365 version.

  • Select the image
  • In the format toolbar (or via right-click) select Convert to Shape. It will ask if you want to convert it.
  • Once it’s converted, you need to ungroup the image. Right-click, and select Ungroup.
  • Now the image is broken into multiple shapes where you can edit them as you wish.

convert and edit SVG in PowerPoint

Once the image is ungrouped you can edit it. For example, I removed the background content and just isolated the guy on the computer. now I can insert it anywhere I want. You can regroup the object and right-click to save as an image. I like to save as a PNG file so that the transparent part of the image remains transparent.

edit SVG in PowerPoint computer man

How to Edit SVG in PowerPoint Video Tutorial

Here’s a video tutorial where I show how to convert and edit an SVG in PowerPoint.

Click here to watch the YouTube tutorial.

As you can see, it’s super easy to edit SVG files in PowerPoint. That should open the doors to all sorts of possibilities as you find free SVG files at those various sites that offer free stock images.

Events

Free E-Learning Resources

Want to learn more? Check out these articles and free resources in the community.

Here’s a great job board for e-learning, instructional design, and training jobs

Participate in the weekly e-learning challenges to sharpen your skills

Get your free PowerPoint templates and free graphics & stock images.

Lots of cool e-learning examples to check out and find inspiration.

Getting Started? This e-learning 101 series and the free e-books will help.


interactive video

This is part two of the series on working with 3D models and interactive video. In the previous post, we looked at how to create a video using 3D models in PowerPoint. Today, we’ll discover how to use them to create interactive videos in Storyline. And then of course, once you have an interaction you can also insert it into a Rise course, which is what I did in this Rise lesson.

Create the Interactive Videos in PowerPoint using 3D Models

If you want to create a different kind of interactive video, you can apply what you learn here. The process is similar. For this demo, make sure you understand how the video is created and how it plays all the way through because we’re going to add a trigger to pause it before it completes.

For this demo, I created a video where the object rotates in and then rotates back out. It was built using a three-slide PowerPoint file and exported as a video.

Tutorial: how to create a three-slide video using 3D models in PowerPoint.

A Teardown of the 3D Model Interactive Videos

There are a few nuanced steps in this process. Let’s review what happens and then we can look at how to create it in Storyline:

Interactive video in Storyline using 3D models in PowerPoint

  • User clicks on the side tab which shows a layer.
  • The layer plays the video we created in PowerPoint.
  • Since the 3D object in the video rotates in and out, we set the video to pause when the object is rotated in.
  • Then we add a trigger to resume the timeline (with a hotspot or button) which continues to play the video and shows the object rotate out as the video completes.
  • The completion of the media (the video) triggers the layer to hide which takes us back to the base slide with the side tabs.

Create the Interactive Videos in Storyline

The video I create in PowerPoint is the exact same aspect ratio as the Storyline file. For the most part, 16×9 is fine. But if you change the aspect ratio of your .story file make sure you do the same on the PowerPoint slide.

  • Go to slide 1 in PowerPoint and save it as a .PNG image. This image will be what the user sees on the base slide in Storyline and perfectly aligns with the videos that will be on the layers.
  • In the Storyline slide, insert the slide image from PowerPoint.
  • Create the appropriate number of layers based on how many interactive elements you have.
  • On each layer add the appropriate video. Each video should play automatically. I also recommend putting a hotspot over the video so the user can’t click on the video to start/stop it.
  • On the video layer, add a trigger to pause the video when it reaches either a certain time or cue point. I like to add cue points so I can nudge them without modifying the trigger. The video should pause at the apex of the object rotation.
  • Add a trigger to unpause the video. It could be a simple button or perhaps a hotspot.
  • Add a trigger to hide the layer when the media completes. This should take you back to the base slide.

Click here to view the tutorial on creating an interactive video.

That’s basically it. Of course, there’s a lot more you can do to decorate the layer or add additional content. It just depends on your needs. Practice the technique first and once you have it set, see what you can do.

If you do create something, please share it with us so we can see it.

Events

Free E-Learning Resources

Want to learn more? Check out these articles and free resources in the community.

Here’s a great job board for e-learning, instructional design, and training jobs

Participate in the weekly e-learning challenges to sharpen your skills

Get your free PowerPoint templates and free graphics & stock images.

Lots of cool e-learning examples to check out and find inspiration.

Getting Started? This e-learning 101 series and the free e-books will help.


3D models in PowerPoint

I shared a cool 3D interaction in a recent workshop demo and have had lots of people ask how I built it. You can check out the interaction in this Rise demo.

Creating the interaction is a two-step process:

  • The first step is creating a video of the 3D model as it rotates in and out.
  • The second step is to insert the video and add interactive elements in Storyline.
  • In the case of the Mars Rover module, there’s a third step because inserted the interactive Storyline module into Rise. This is pretty cool because it allows for really simple and fast authoring in Rise, and then when I need custom interactions, I just build them in Storyline. It’s a win-win.

Here’s a previous post where I detailed more of the construction of the Rise demo. For today’s post, I’ll show you how to create the 3D video you’ll use for a Storyline interaction. The tutorial below shows how to create the video using 3D models in PowerPoint.

Click here to view the tutorial on YouTube.

Insert 3D Models in PowerPoint

PowerPoint comes with a number of 3D models. It also supports inserting models shared by the community. You can also build your own 3D models and insert them using standard 3D formats

3D models in PowerPoint

Most likely you’ll want to insert your own 3D object. So it’s nice that PowerPoint supports the common 3D file formats. Here are the supported 3D formats for PowerPoint:

  • .FBX
  • .OBJ
  • .3MF
  • .PLY
  • .STL
  • .GLB

How to insert the 3D model in PowerPoint:

  • Create a slide and then select a 3D object.
  • Insert it just like you would a shape or picture.
  • Position the object on the screen.
  • Duplicate the slide (we’ll need this for the video).

Create the 3D Animation in PowerPoint

The first slide is the starting point from which the 3D object rotates. The second slide is the rotation point. You’ll need to rotate the object so that the position changes from slide 1 to slide 2. You can also move and scale it.

3D models in PowerPoint


  • Reposition the object by either scaling, rotating, or moving it on the slide.
  • Go to slide transitions and select a morph transition for slide 2.
  • Preview the slideshow.

3D models PowerPoint

On preview, you’ll see how the 3D object uses the morph transition to change positions. Pretty slick, huh?

Fine-tune Slide Transitions for 3D models in PowerPoint

That’s the essence of the 3D animation. Now it’s a matter of fine-tuning the animation by playing with the slide timings.

When all is done, the PowerPoint slides will be saved as a video file. That means the animations and transitions need to be automated.

3D models in PowerPoint 3D PowerPoint morph transition timing

  • In the Transitions tab, go to Advance Slide and select to advance after X time. That means the slide will automatically advance at a certain time and doesn’t require you to do anything to trigger the slide movement.
  • Slide 1 is just the starting point so it needs to advance as quickly as possible. I usually set it to advance after .25 seconds.
  • Slide 2 will trigger the morph animation. On slide 2 you can change the speed of the 3D animation by changing the slide duration.
  • Slide 3 (optional) is great if you want to create the sense that the object rotated in and out like the Mars Rover demo.

Save the PowerPoint file as a Video

When all is done, save the PowerPoint file as a video. You have two options: .MP4 and .WMV.

The MP4 format works well but I did find that when I use it with Storyline, the last part of the .MP4 always seems jumpy. It probably has to do with how the .MP4 is encoded by PowerPoint. So if I am using the video to build an interactive file, I save it as a .WMV. Then I let Storyline do the conversion. That resolves any issues you may experience.

That’s basically it for the 3D model video in PowerPoint. You create the two or three slides and save as video. Once you have the video, you can insert it into Storyline or anywhere else you use video. To make it an interactive video like I did with the 3D rover, you’ll need to tune in next week where I show how to create an interactive video in Storyline.

Events

Free E-Learning Resources

Want to learn more? Check out these articles and free resources in the community.

Here’s a great job board for e-learning, instructional design, and training jobs

Participate in the weekly e-learning challenges to sharpen your skills

Get your free PowerPoint templates and free graphics & stock images.

Lots of cool e-learning examples to check out and find inspiration.

Getting Started? This e-learning 101 series and the free e-books will help.


e-learning instruction screen interactive start screen

It’s common that when getting to a new web service or starting a new application you see some sort of instructions or start screen. Basically, the screen freezes your interaction with the site until you’re oriented and then lets you continue. Some force the interaction and others allow you to opt-out.

Those are not much different than the gate screens I’ve written about in the past (with free downloads). The gate screen sort of does the same thing. It stops your progress, provides instructions, and lets you continue.

Examples of Start Screens

Here are some examples of different instruction screens I’ve seen online. I’m sure you’ve seen something similar.

instruction screen

examples of interactive start screen

How to Create an Interactive Start Screen

Today I’ll walk through the process of creating an interactive start screen. Below I highlight the main considerations and you can watch the video tutorial to get the details.

  • Is the screen mandatory or can the user click away at any time? I prefer the freedom to leave, however, there may be times where it’s important the person is exposed to all of the instructions. Sometimes people tend to skip out and they may benefit from not doing so, especially when it comes to matters of compliance training.
  • Does the instruction only move forward or does it go backward, as well? Probably more a matter of preference, but if they can go back make sure you build the navigation to work properly. You’ll also notice that one of the images above offers a single “continue” button thus limiting it to forward movement only.
  • Do you need the progress dots? Many of those instruction screens have dots. They’re good for progress indicators. You’ll notice that some of the screens display numbers or timelines. If you do use dots, are they clickable? Do they need to be?
  • How are the instructions displayed? Are they on cards, which seems to be the most common. Or are they displayed fullscreen? Fullscreen gives you more real estate. Cards are usually laid over the main screen with some sort of lightbox design.
  • Is the content animated? There are some nice effects you can create with entrance and exit animations. But sometimes when building these types of screens, the time it takes to make them look right, may not be worth the value you get.
  • How do the instructions end? Some disable the navigation buttons and others offer a “get started button.” The main consideration is what is the next step? If they need to continue, make that clear. Or if all they need is to close the screen, then make that clear, as well.

How-to Tutorial

Here’s a tutorial where I build a quick prototype and discuss some of the considerations and approaches you can take building an interactive start screen.

instruction screen e-learning interactive start screen tutorial

Click here to view the tutorial.

There are a lot more considerations, but those are a good start. And when you actually start to build the screens for your course, you’ll find there are many different ways to do so.

Events

Free E-Learning Resources

Want to learn more? Check out these articles and free resources in the community.

Here’s a great job board for e-learning, instructional design, and training jobs

Participate in the weekly e-learning challenges to sharpen your skills

Get your free PowerPoint templates and free graphics & stock images.

Lots of cool e-learning examples to check out and find inspiration.

Getting Started? This e-learning 101 series and the free e-books will help.


e-learning mars rover demo

I created a demo course in Rise for a workshop. One of my goals with the demo was to show off different ways to add content and how the various blocks work and look in a real-ish project. This produced a lot of questions in the community on how I built it.  So I’ll try to answer them here.

First, I’ll have to admit that I didn’t really do all that much because Rise did all of the heavy-lifting. There is one custom piece in lesson 6 where I inserted a Storyline interaction. But for the most part, I just opened Rise and added my content. Then Rise did the rest.

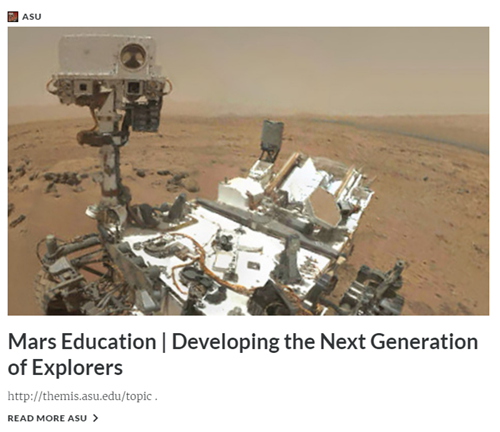
Of course, some of the assets are colorful and eye-catching, but I didn’t create those. I used the information from the NASA site (which by the way is pretty darn cool). Check out what’s in the works for Mars 2020.

[If you haven’t worked with Rise, here’s a good overview video.]

Visual Design

Like I mentioned earlier, the actual assets in this demo module are from NASA, so they get all of the credit. However, I will add that when you create e-learning projects, it is important to have consistency in image quality and the assets used in your courses.

Just because you can add content easily into the Rise courses, doesn’t mean you need to. Like any e-learning module, you want to be intentional and avoid the Frankencourse.

One thing that does really catch your eye in this particular demo is the animated .gif cover screen. I think it looks cool and gives the module some personality. That’s a key first step in engaging learners. You’ll also notice animated .gifs in some of the other lessons.

Lesson 1: The Mission

For this lesson, I opted for a full-width image. I think it anchors the content well. This works best with higher resolution images. By not having margins, it kind of forces your eyes down the page.

I also added a hyperlink to the text body.

Lesson 2: Learn More…

I wanted to show a way to create an easy branching structure to direct people to specific lessons. This feature could also be used for simple branched scenario interactions.

e-learning branching interaction

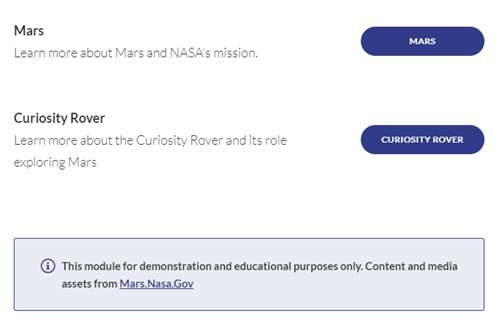
I also added a disclaimer using the Notes block. It’s a great way to draw attention to important points.

Lessons 1 and 2 are the pre-content. The lessons after those are broken into three distinct groups and you’ll notice I used Section Titles to show those groups.

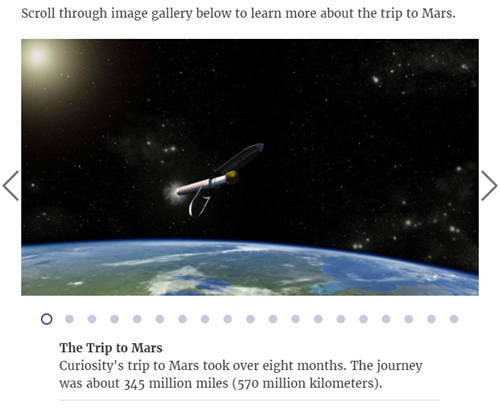
Lesson 3: The Trip to Mars

I leveraged the image carousel and the captions to provide more information about the trip to Mars. This content could be presented in a number of ways, but I like to give the user a way to touch the screen and this is a good interaction type for that. I also increased the size of the caption text.

e-learning image carousel interaction

Lesson 4: Fun Facts & Trivia about Mars

This lesson includes a lot of features. There’s a clickable image gallery. Again, the animated .gifs look nice and pull you in. Click on the thumbnail to zoom in and see the entire image.

I attached some additional content and you can download a PDF.

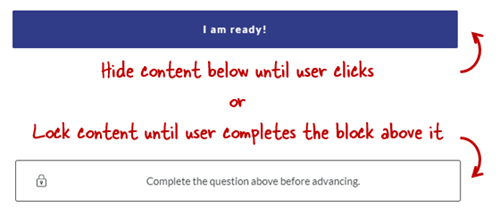
The Mars Trivia section includes a couple of dividers. One just holds back information until the user is ready and clicks. And the other forces the user to complete the interaction before advancing.

e-learning lock navigation

The trivia section includes two different types of knowledge checks: traditional quiz question and one that requires watching a video before answering.

Lesson 5: Did You Know?

There are a few different ways to insert videos into a Rise lesson. This is the pre-built lesson block which is full width and contains no additional content.

If you want to add additional content like text to the video block, you’ll need to create a custom block and insert the video that way. That’s what I did in lesson 8.

Lesson 6: Explore the Rover

This is the lesson that generated the most questions (and will require an additional blog post and tutorial). One of my favorite features is the Storyline block in Rise. In this lesson, I create a single slide interaction in Storyline, the 3D Rover, and inserted it into Rise.

For the Storyline module, I created a transparent player and got rid of the player features so it sits in the block and looks like it’s part of the Rise lesson and not something inserted into it.

e-learning interactive Mars Rover

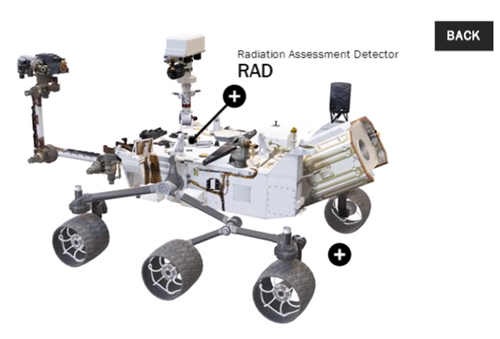
This block gives me the best of both worlds: fast and easy production in Rise coupled with custom interactivity from Storyline. I’ll do a more detailed write up on how I created the 3D Storyline interaction in an upcoming post.

Lesson 7: Access Mars – Virtual Reality

This only works in the Chrome browser.

This is a webpage inserted into Storyline as a web object. And then the Storyline slide is inserted into Rise. It lets you navigate Mars in virtual reality.

e-learning Mars rover virtual reality 360

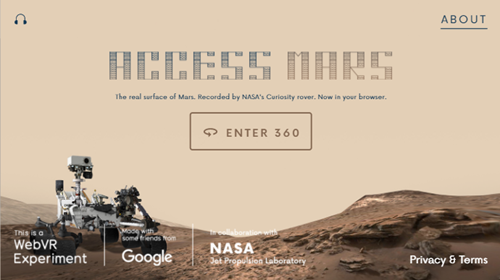
For course developers, this means you can insert all sorts of interactive web content into your Rise courses using web objects and the Storyline block.

Pretty cool, huh?

Lesson 8: Rover POV – Five Years on Mars

This is a different way to insert a video. In lesson 5, I inserted the video as a video block. In this lesson, I inserted it using custom blocks. The advantage of the custom blocks is being able to combine more blocks with additional content, interactions, and knowledge checks.

Lesson 9: 3D Ride Along with Rover

This is yet another way to insert a video. In this case, the video comes from YouTube and it’s also 360 so you can move around the screen. This really opens up what you can do with your videos, especially as the 360 video production is becoming more affordable. Look at how inexpensive the cameras are currently.

e-learning insert Youtube Mars rover 360

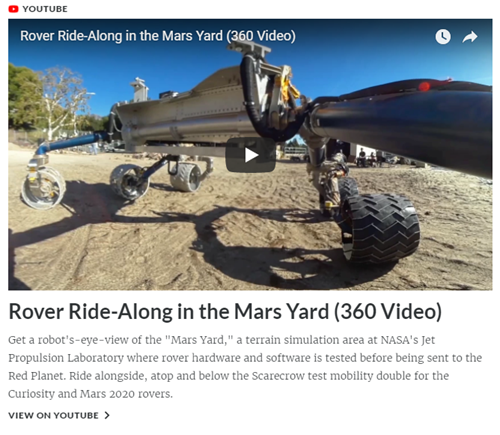
I did notice that the 3D doesn’t work on my smartphone iPhone 6 (it did work on my Android Pixel 2XL), which is something to keep in mind when adding media content to your courses: be sure to test different devices.

Lessons 10: Free Posters

Just another image gallery. Secretly I just wanted to point to the free posters. They’re pretty cool. I did use an animated .gif for the title image.

Again, those animated .gifs just add a lot of pop to the course content.

Lessons 11-13: Inserted Web Sites

Adding resource links is pretty common. These lessons are are the URL/embed blocks. As you can see Rise pulls in the metadata from the site to make the link more interesting. You can turn that off if you want.

e-learning Mars training program ASU

So there you have it, a really quick run through of the Rise Rover demo module. From the Rise perspective, it’s super easy to build. It’s just a matter of collecting your content, determining the lesson structure, and then dropping it in. Just don’t tell your boss how easy it is.

What I think really wowed people was how nice the content looks. Part of that is the way Rise handles lessons and makes everything nice and clean. And the other part is that I had great assets from which to work.

I’ll do a followup post on the 3D rover interaction in Storyline. Let me know if you have any more questions about this module and go check out all of that great content on the Mars site.

Events

Free E-Learning Resources

Want to learn more? Check out these articles and free resources in the community.

Here’s a great job board for e-learning, instructional design, and training jobs

Participate in the weekly e-learning challenges to sharpen your skills

Get your free PowerPoint templates and free graphics & stock images.

Lots of cool e-learning examples to check out and find inspiration.

Getting Started? This e-learning 101 series and the free e-books will help.


gamified e-learning

The other day I got one of those marketing emails that I tend to delete without looking over. However, this one featured some ideas on gamification. And what got me most interested was looking at their examples. As we all know, gamification is a hot topic and it’s always neat to see how different groups build the gamified elements in their courses.

Ingenuiti put together a portfolio page with three different gamified examples. They use three micro games to teach and demonstrate some core gamification concepts.

I reviewed their modules and want to highlight a few production tips that not only work for gamified e-learning courses, but are just as useful in other contexts. For today’s post, I’ll focus on the first micro game.

Here’s a link to the video tutorial series.

Gamification Micro Game #1

gamified e-learning example

The first micro game focuses on three types of learning activities:

  • Simple Game: challenge the learners understanding in a common game format. It’s a great way to rehearse and recall information and do it in a fun way that is familiar to most people.
  • Explore Activity: have the learner explore the environment and collect information or rewards. I always consider exploration to be one of the core building blocks for interactive learning. Given the right context, exploration is a great way to engage and inspire critical thinking.
  • Simple Scenario: the learner observes an interaction, reflects on it, and then offers constructive input. Mimicking real-world type interactions is a good way to reinforce the learning experience. They do some clever things with the commenting, liking, and bookmarking.

There’s a lot going on in their modules. I isolated a few things that they did so that I can show some production tips and nuances of the software. Keep in mind, there’s always a few ways to do the same thing in software. So if you have different or even better ideas, feel free to share them in the comments.

Here are some videos that offer some real quick tutorials on how you can create similar effects and interactions in your own e-learning courses. I’m using Storyline because it’s easy to use, but you’re free to use the software of your choice, especially if you have plenty of time on your hands and not rushed to get things done. 🙂

E-Learning Tip #1: Gate Screens

gamification example gate screen

Many courses have starter pages with simple instructions. Also, it’s also a good idea to stop progress in the course when changing directions on types of interactivity or navigation. It helps set expectations and orients the user. I call those gate screens.

E-Learning Tip #2: Custom Markers with Animated Content Boxes

gamified e-learning example custom markers

In their demo, they used the marker feature but turned off the marker labels and had their own content appear. Also, after clicking the marker, the pulsing stops. When clicking the marker, the background fades and the content box animates in and out (upon leaving).

E-Learning Tip #3: Turn Audio On/Off

In a few places, they have running background audio which can be turned on or off. Normally, one oculd use the player volume control, but since the player isn’t present, custom controls need to be enabled.

E-Learning Tip #4: Simulated Posting of Chat Response

gamified e-learning example simulated conversation and text chat

I really like the way they build this mini scenario and the simulated chat. Have the user post a response to a chat. You notice that you can post and edit comments. As you do that, the other comments are disabled.

E-Learning Tip #6: Free Dragging Objects

gamified e-learning example free dragging interaction

This exploration activity let’s the user drag objects and move them. Normally, dragging objects are associated with drag and drop activities. However, these are free moving objects with no specific interaction to them. They just let the user move objects freely out of the way to see what’s underneath.

E-Learning Tip #7: Changing State of Selected Objects

gamified e-learning example selected states

When a correct choice is made, the object displays a star to indicate it’s been selected correctly. You’ll also notice that the side panel indicates which objects are selected and which remain.

E-Learning Tip #8: Play Again Option

gamified e-learning example retry interaction

Let the user quit or play the game again. This resets the interaction to the initial state.

These are a few of the cool things the Ingenuiti developers did in their module. Whether you’re building a gamified e-learning course or something else, these production tips should come in handy.

Events

Free E-Learning Resources

Want to learn more? Check out these articles and free resources in the community.

Here’s a great job board for e-learning, instructional design, and training jobs

Participate in the weekly e-learning challenges to sharpen your skills

Get your free PowerPoint templates and free graphics & stock images.

Lots of cool e-learning examples to check out and find inspiration.

Getting Started? This e-learning 101 series and the free e-books will help.


share your e-learning courses header

This is a tip I stumbled upon this week and thought I’d share it because one of the most frequent questions I get from people trying to manage a work portfolio is how to easily share e-learning courses.

Let’s quickly review some of the options that we’ve mentioned in the past:

Today, we’ll look at another option. It’s not free, but it’s inexpensive and comes with other benefits.

Share Your E-Learning Courses with pCloud

I won’t bore you with all the details and benefits regarding pCloud because you can learn that on your own. To keep it simple, it’s a cloud-based storage service similar to Google Drive and Dropbox. What I like that’s different is that it works like a virtual drive so I don’t need to have all of the files on my computers like I do with Dropbox.

Examples of E-Learning Courses 

Anyway, I was testing out their public folder and loaded a few published Storyline courses to see if they work and guess what, they do. Here are three demos:

As you can see, the courses play fine. Thus making it a simple solution for those who want to easily share their courses.

Steps to Share Your E-Learning Courses

Here are a few general steps to share your courses using pCloud.

share your e-learning courses public folder

  • Create a folder inside of your Public Folder to share courses.
  • Copy your published course to that folder. pCloud looks like a drive on your computer so you just need to move the files to the pCloud drive.
  • The files are uploaded to pCloud.
  • Go to your my.pCloud.com site and access the folder where you saved your published course.

share your e-learning courses link

  • Locate the story.html and click on Share>Get Link. That creates a link to the HTML file which loads the course. You don’t want to share the HTML file itself because the user will only be able to see the HTML file and not see the course load and play.
  • Here’s a quick video tutorial that walks through the steps.

I did notice that when accessing the files from the mobile app, you can only share the file and not a link, so it looks like you can only use the share link from the desktop app.

I find pCloud to be a good solution for my online storage needs, especially since I don’t need to have all of the files on my computers like I do if I want to access them in Dropbox. I also like the upload folder option for people who want to share their files at workshops.

If you’ve tried pCloud to share your courses, I’d love to hear about your experience. Share your thoughts in the comments.

Events

Free E-Learning Resources

Want to learn more? Check out these articles and free resources in the community.

Here’s a great job board for e-learning, instructional design, and training jobs

Participate in the weekly e-learning challenges to sharpen your skills

Get your free PowerPoint templates and free graphics & stock images.

Lots of cool e-learning examples to check out and find inspiration.

Getting Started? This e-learning 101 series and the free e-books will help.


e-learning experts

In the past, I’ve referenced a number of instructional designers who are active in the community where they share all sorts of free downloads, examples, and answer questions.

Today, I’d like to focus on a few instructional designers and course developers who tend to share more advanced course development tips. They go through the nuances of the software, share hacks, and how to leverage JavaScript when using Storyline.

These are peers worth following.

Melissa Milloway

Melissa is a passionate learner and actively shares what she learns (often while she learns).  She’s also been a presenter at a few of our Articulate Roadshows.

e-learning developers mel milloway

Here’s a good series she did on getting started with xAPI and Storyline.

Kevin Thorn

Years ago Kevin won an Articulate Guru award. From there here’s built quite a presence in the e-learning industry. Many of you probably know him from his iconic Nugget head character.

e-learning developers kevin thorn

If you want to learn how he comes up with ideas and builds his courses, check out his recent series on constructing a gamified module.

Zsolt Olah

Zsolt is a like a zsolt of lightning especially when it comes to talking gamification and how to engage learners. He has all sorts of really neat ideas and hacks to help you learn more. One of the most original and creative people in the industry.

e-learning developers zsolt olah

Check out this example of alternatives to multiple choice questions. Pretty cool.

Nick Shelton

Nick shares all sorts of cool tips and tricks with his unique brand of humor. His site has lots of good tutorial videos and advanced tips.

e-learning developers nick shelton

Check out this example of how to add Cool Overlay Effects in Articulate Storyline with Basic After Effects & JavaScript.

Matthew Bibby

Matthew’s nickname should be the “E-learning Thunder from Down Under.” He presents really organized and detailed tutorials and tips in his blog.

e-learning developers matthew bibby

Look at this post on how to use Google Fonts with a variable.

David Charney

David always shares clever tips and examples. I recall sitting at the airport on my way to London and spending a couple of hours trying to deconstruct one of his demos for the weekly challenges.

e-learning developers david charney

Here’s a video where he shares a way to mask content using the scroll panel feature. And of course, his review of the original Storyline 0.

Owen Holt

Owen does a great job showing how to use JavaScript with Storyline. He’s presented at the Austin Roadshow. He’s also got some popular tutorials.

e-learning developers owen holt

Here’s one he recently shared that’s gotten lots of play: how to add a print button to the course player [video].

Ron Price

Ron is CLO for Yukon where he manages and conducts a lot of Articulate training. Ron is also a fixture in our Articulate Live webinars where he shares all sorts of cool tips and tricks.

e-learning expert

If you’re an Articulate 360 subscriber you don’t want to miss those Friday Quick Tips & Tricks sessions. Here’s a recent tutorial Ron posted where he answered a training question: Why Does My Custom Menu Lose Track of My Progress?

To the ones above, thanks for what you do to support the community and industry. I know that there are a lot more really talented developers worth mentioning. Feel free to give them props in the comments section below.

Events

Free E-Learning Resources

Want to learn more? Check out these articles and free resources in the community.

Here’s a great job board for e-learning, instructional design, and training jobs

Participate in the weekly e-learning challenges to sharpen your skills

Get your free PowerPoint templates and free graphics & stock images.

Lots of cool e-learning examples to check out and find inspiration.

Getting Started? This e-learning 101 series and the free e-books will help.


screencast tips

Screencast tutorials are some of the most common forms of online training. This makes sense since a large part of e-learning is predicated on learning new software. One challenge is creating effective and engaging screencasts. So today, we’ll look at a few simple production tips to help you get started.

Screencast Tip: Establish Context Quickly

It helps to know what you’re learning and why. At the beginning of the screencast, introduce what you’re going to teach and why (or what the outcome should be). Many screencasts aren’t clear about what the value of the screencast is. They either jump into instruction with no context, or they spend too much time on non-essential content.

Screencast Tip: Get to the Point Quickly

The other day I was reviewing a product video for some new gadget. The video was about seven minutes long. I wanted to know how the gadget worked and what features it had but the guy in the video spent the first three minutes talking about a bunch of nonsense that had nothing to do with the video topic. As Archie Bunker used to say, “Get to the point, Edith.”

Screencast Tip: Don’t Focus on Features

Many of the screencasts I view go through a feature list. They spend way too much time on the user interface and the features buried within it. You don’t need to explain everything in the software or everything you can do with it. And not all features are created equal. Some are used all the time and some rarely. Skip the feature-by-feature dissertation. Focus on the key features and the ones most critical to the user’s objectives.

Screencast Tip: Focus on Action

What are people supposed to do with the software? Make a list of required actions or responsibilities. Then build your screencasts around actionable objectives and how to meet them. Give them real-life challenges and how the software meets them. For example, if I were teaching someone how to use a spreadsheet, instead of showing them how to to use specific features, I’d start with a real-world challenge: “You need to create a report using this data.” And then from there, I’d go through the process of instruction and focus on the features relevant to the objective.

Screencast Tip: Don’t Stop at One

People need multiple opportunities to practice. Many screencasts and the associated activities are built on a single action. This is fine. However, use the activities to reinforce a previous lesson as you introduce new skills. Give them opportunities to review and repeat the previous process.

The more practice, the more fluent they’ll be. This is really key with software training where you build on skills from previous training videos.

Screencast Tip: Keep it Short

Shorter videos are better. Stay focused and get to the point, as I noted above. It’s better to have a series of shorter videos than to have a single long one that forces the user to scrub through looking for relevant info. Try to stay focused on a single objective.

Screencast Tip: Provide Post-Screencast Resources

Because the screencast videos will be shorter and tied to specific actions there may be some learning gaps or other things the person wants to know. It’s always a good idea to curate a list of additional resources for the viewer to access after they’ve completed the screencast video.

Screencast Tip: Don’t Make a Screencast

Screencasts take time and some require multiple edits. And if the content changes (like a new interface or features) then they need to be redone. Often it’s easier to show a static screen and use labels to highlight specific areas. These are also easier to update when the subject matter is still in flux. And it helps you avoid long videos when they just need simple information.

I like this interactive screenshot prototype that David built a while ago. It looks good and it’s easy to build. It’s also available as a free download.

Here are some additional resources for those who want to create screencasts:

What tips do you have to share?

Events

Free E-Learning Resources

Want to learn more? Check out these articles and free resources in the community.

Here’s a great job board for e-learning, instructional design, and training jobs

Participate in the weekly e-learning challenges to sharpen your skills

Get your free PowerPoint templates and free graphics & stock images.

Lots of cool e-learning examples to check out and find inspiration.

Getting Started? This e-learning 101 series and the free e-books will help.