Great post, Tom! This is the easy peasy stuff that can differentiate polished content from unprofessional looking content. I like how you always reinforce the fact that you don’t need to be a graphic designer to create pleasant looking e-learning. I think most people can sense when something doesn’t look right or is incongruent. The tactical skills required to improve the design in our world are almost always found in mastery of the tool. Trying things out in PPT or Storyline and learning what all the toolbars and buttons are capable of accomplishing is definitely worth the effort!
Three Common E-Learning Design Issues & How to Avoid Them
February 26th, 2013
I review lots of elearning courses and demos. Since elearning is a mostly visual medium visual inconsistencies tend to stand out. They’re the types of things that cause the Frankencourse design.
I’ve been making a list of some of the more common issues that I find. So in today’s post I’ll highlight three that I see quite a bit and offer some feedback on how to avoid them.
Images are Skewed
Images on the screen are obviously not the right dimensions. They’re usually skewed or flattened. This is probably the number one issue I see and easily fixed. The most common reason an image is skewed is because it’s resized to fit a specific area or shape. To get it to fit, we use the anchors on the side or top and bottom to change the shape. What happens is that the shape is resized but doesn’t maintain its aspect ratio. So it looks off.
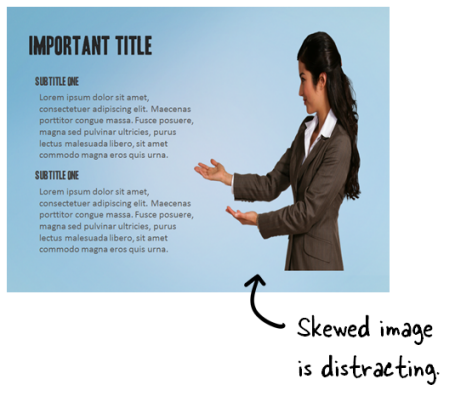
Here are a couple of quick fixes:
- Use the corner anchors. To scale or reposition the image without skewing it, hold the SHIFT key and drag from one of the corner anchors. That resizes and keeps it from skewing. This also goes for shapes, especially circles. I notice that a lot of circles become egg-shaped when resized without proper scaling.

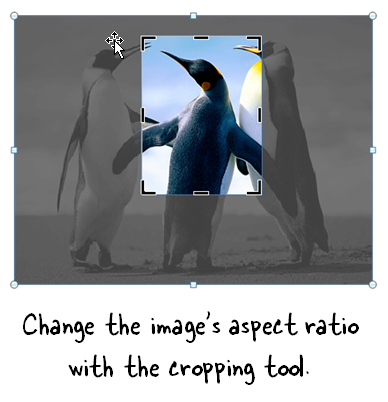
- The cropping tool can change the image dimensions without skewing. The cropping tool in PowerPoint 2010 and Articulate Storyline lets you crop the image to a specific aspect ratio to meet the size requirement for the space available without losing the image quality. You can also move the image around inside the crop to get exactly what you need.
Font Confusion
Many courses tend to use too many fonts and without rhyme or reason. I usually tell people to limit the fonts they use to about seven. Just kidding! Often I’ll see all sorts of whacky fonts plastered on the screen. When I ask why they chose a certain font it’s usually because they wanted to make the course more interesting or engaging.
That’s a good goal. But an interesting font is not going to make your course interesting. And a poorly chosen font may even distract from it. Or just make it seem less polished.
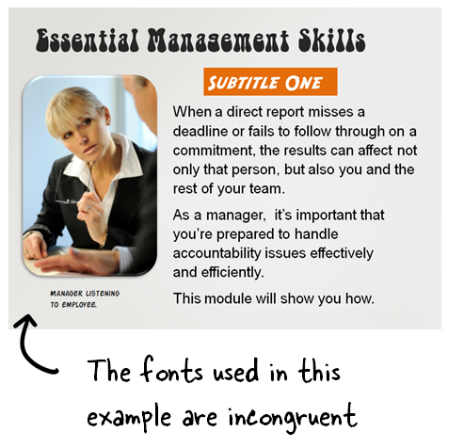
As a general rule of thumb (especially for those just getting started) limit yourself to two or three fonts. Typically you need:
-
Title
- Subtitle
- Body font
- Emphasis: this could be the body font bolded or recolored
Being deliberate about your font choice and user fewer in your courses is an easy way to add consistency and polish to your elearning course. Here’s a previous post on working with fonts which offers some ideas on which ones to select.
Text Alignment Issues
Text is the most common element on the screen. Obviously we use text to read and acquire information, but the text also is part of the course’s visual design. Because of this, alignment is important. Here are three common issues I see regarding text:
- Large blocks of text are centered. Centering works for titles or small chunks of descriptive text, but not for big chunks of text. A clean side margin looks good and makes it easier for the eye to track.
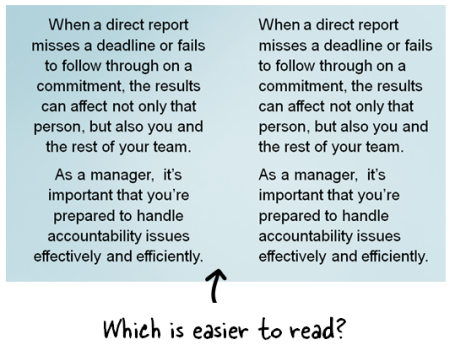
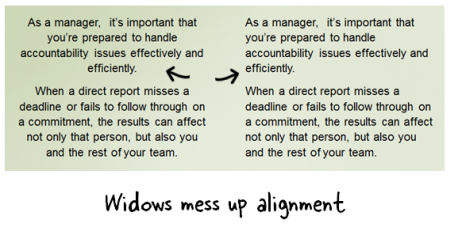
- Avoid widows. If you’re inclined to help the widows and orphans that’s good. But you don’t want any widows hanging around your elearning course. What’s a widow? They’re those single words that hang out at the end of a block of text. Fix them by resizing the text box.
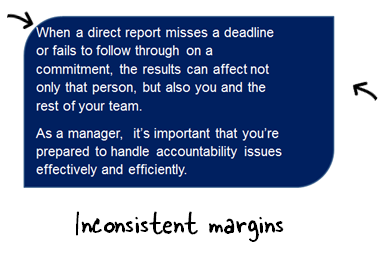
- Margins in textboxes are inconsistent. This is fairly common. Sometimes text is scrunched to the side or top with no margins and sometimes the margins are too big; or they’re not applied consistently. This is easily fixed by modifying how the text appears in the box/shape. I like to create a separate text box over the shape. This gives more control to nudge the text inside the shape without being constrained by the shape’s text formatting.
You don’t need to be a graphic designer to know when something doesn’t look right. We may not always be able to explain why something doesn’t look right, but we do know it when we see it. And that’s the case with these little annoyances. If they don’t exist no one notices. But when they do, things just don’t look right.
The good thing is that they are easily fixed and doing so will help your course have more polish.
Events
- Everyday. Check out the weekly training webinars to learn more about Rise, Storyline, and instructional design.
Free E-Learning Resources
 |
 |
 |
|
Want to learn more? Check out these articles and free resources in the community. |
Here’s a great job board for e-learning, instructional design, and training jobs |
Participate in the weekly e-learning challenges to sharpen your skills |
 |
 |
 |
|
Get your free PowerPoint templates and free graphics & stock images. |
Lots of cool e-learning examples to check out and find inspiration. |
Getting Started? This e-learning 101 series and the free e-books will help. |
10 responses to “Three Common E-Learning Design Issues & How to Avoid Them”
Hi Tom,
This is exactly what I have been trying to explain to some of our ‘new’ team members!
I could never put my finger on ‘why’ something didn’t look right, but you’ve explained it ‘perfectly in this post.
I will make sure our ‘entire’ team reads this post!
And thanks again:)
Hi – could you please let us know about the dates and location for the Miami workshops as soon as possible? I would like to register.
Is it through ASTD?
Thanks!
Valuable tips Tom. Thanks a lot
Thank you for this article. I found it informative and useful.
Great tips! Not all of us are design gurus but I’ll make sure that I pass this along and hope that it results in more professional presentations.
Thanks Tom!! Very useful and helpful.
Thank you so much for this info. I am new to eLearning development. The tip on fonts was extremely helpful. I like using different types to emphasize text. I will keep this in mind while developing.
Thanks
Hi Tom,
Not sure if my comment was posted so I’m trying again.
Just wanted to say thanks for the info. I am just getting started and like using fonts to emphasize text. I will keep this rule of thumb in mind.
Thanks
Irene
Hi Tom,
e learning is a very good way of learning for the students and distance learning seeker. because this is a single way to complete his study without face any kind of problem in his work and other things. This provide us so much flexibility and class room free education.
Thank’s.




0
comments