The Rapid Elearning Blog

Archive for August, 2015


draw custom characters

In previous posts we discussed how visual thinking helps us focus on core concepts and teaches us to communicate those with graphics and other visual elements. We also looked at ways to practice developing your visual thinking skills so that you can effectively apply them to your course design.

In today’s post we’ll look at how to create custom characters that you can use in your visual thinking activities and course design.

The Case for Hand Drawn Custom Characters

You don’t have to be an artist to create custom characters. In fact, there’s a lot of value in hand drawn characters because they add personality and stand in contrast to the more typical (and often sterile) characters used in a lot of elearning courses. It’s just a matter of learning a few production techniques and then taking some time to practice.

Here are some examples of hand drawn characters I found online. You’ll notice that they’re relatively simple and that’s the key. Unless you’re really skilled, keep them simple. I think you’ll agree that the characters below are something most of us can create.

custom characters found in online search

I like the custom characters below created by Ella Zheng. They’re clean and based on a few simple shapes. And they work well with the other icons in her examples.

custom characters built with simple shapes

I could see something like these characters and icons working in an elearning course. And for you, they’re easy enough to build in PowerPoint because they’re simple combinations of some basic shapes. This is something we discussed in the post on creating your own pictograph characters.

create custom characters in PowerPoint

 Step 1: Decide on a Style for Hand Drawn Custom Characters

Start with a simple stick person. There are a number of ways to create them. You can go with straight lines, thick/bent lines, filled in shapes, square or oval bodies, or just trace over pictures. Below are a few ideas I played with. I like the first one which is a head and lines for legs and arms with no body. It’s easy to create and has a distinct style.

examples of hand-drawn custom characters

Once you develop a style, practice creating that character over and over again so you feel comfortable creating the custom character when you need it. What makes a simple character like this work is the expression and pose. We’ll look at both below.

Step 2: Identify Some Common Facial Expressions for Your Custom Characters

Identify a few facial expressions and practice drawing them. Look at what others have done for inspiration. I like this guy’s approach below, draw some circles and practice the expressions.

custom characters with different facial expressions

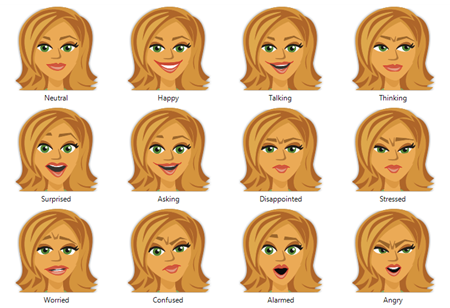
Articulate’s illustrated characters have twelve common expressions. That’s probably all you need for expressions. Practice by recreating those twelve expressions with your own custom characters.

12 simple expressions for your custom characters

And here’s a good example from blogger, Chinie Hidalgo Diaz, who’s created a distinct look for her characters. As you can see the style of drawing isn’t overly complex. And the water color brush is an easy effect to apply using some of the mobile drawing apps or other graphics editors. These would work great in a comic-panel style course. She also offers some of her own tips on creating facial expressions.

example of custom characters

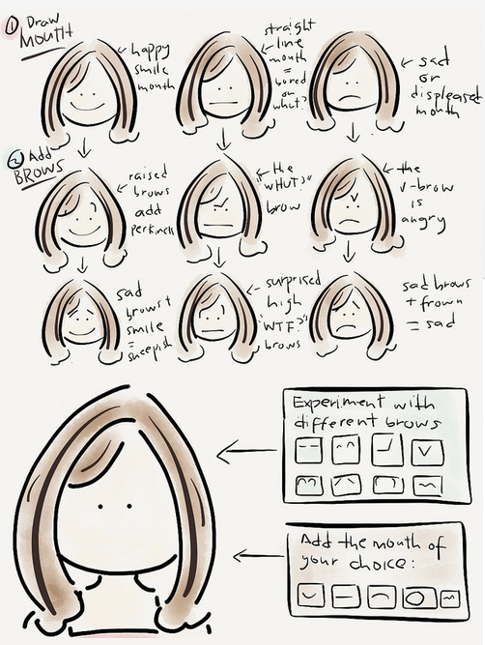
She focuses on two key areas: the mouth and brows. Start with her expressionless face and then practice drawing mouths and brows to create simple expressions.

Here are some other examples that require a little more practice. And finally, here’s a site that has all sorts of drawing tips for those who really want to push their skills.

As far as the expressions, I’d probably build the expressions as images that I can copy and paste into faces. That means I only have to work on them once and then just pick and choose what I need later.

Step 3: Create Common Poses for Your Custom Character

Poses are a bit more challenging. The easiest way to practice is to find common poses and then apply those to your custom character style. I’d start by copying what you see so that you get a good feel for the pose and then draw your character in the poses you prefer. This is also a good reason to keep the custom character’s detail limited. It’s easier to create a pose for a stick figure than it is a character in an outfit.

poses for your custom characters

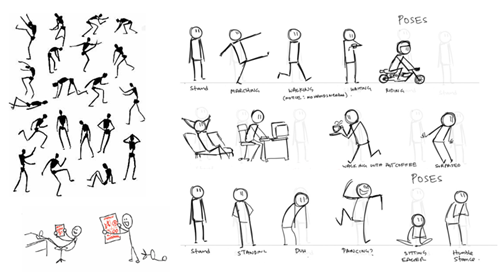
Here’s a good tutorial on drawing characters with poses.  And ScrawlerMauler shows some of his practice poses.

Here are some people who sell stick figure characters if you’re inclined to buy some. You can also find inspiration in how they pose their characters and try your hand at creating the same pose with your custom characters.

Here are some free stick figure downloads in various poses:

free custom characters to download

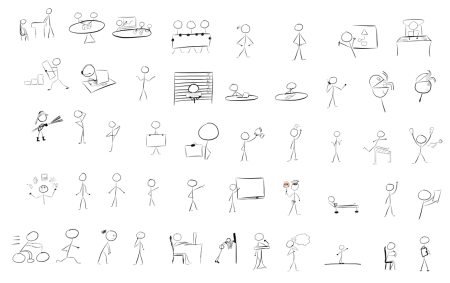
What are some poses to practice? Here are a few ideas:

  • Sitting
  • Pointing
  • Talking
  • Surprised
  • Angry
  • Holding a paper
  • Thinking
  • Interacting with someone else

I quickly drew the images for this presentation on how rapid elearning is so simple that even a monkey can do it.  As you can see, nothing fancy, but they work.

hand drawn custom characters and images

If you want to learn more, Dan Roam released a great how-to workbook that shows how to create the images for visual thinking.  You may also be interested in Beyond Words: A Guide to Drawing Out Ideas.  You can learn some simple drawing techniques that can be applied to your elearning courses (and wow your peers as you doodle during those boring staff meetings).

The goal in all of this is recognize that for some of your courses and presentations you can create your own illustrated graphics. This also works well when combined with visual thinking skills. And learning to create your own may help speed up your production and lend itself to courses with more personality.

Have you ever applied hand drawn images to your courses? If so, how did they turn out?

Events

Free E-Learning Resources

Want to learn more? Check out these articles and free resources in the community.

Here’s a great job board for e-learning, instructional design, and training jobs

Participate in the weekly e-learning challenges to sharpen your skills

Get your free PowerPoint templates and free graphics & stock images.

Lots of cool e-learning examples to check out and find inspiration.

Getting Started? This e-learning 101 series and the free e-books will help.


free interactive image template and tutorials

As noted in an earlier post, an easy way to build interactive elearning modules is by choosing a single image and adding interactive elements to it. This is a great solution for those who don’t have graphic design skills or access to a graphic designer. The key is finding a single image that has a few potential content buckets.

Finding images is relatively easy today. I look for images like the ones below. They need to have some visual interest, a consistent context, and potential content areas that can be clicked on or zoomed into.

interactive image examples

Interactive Image Example

In a previous post, I shared this interactive image demo and had lots of questions about the zoom effect I used and how it was built. To help you out, I recorded a few tutorials that go through the basics. I used a different image for the tutorials and included a new free template for you to download.

Here’s the new template in action:

interactive image example

Click here to view the demo.

Interactive Image Tutorials

Here are some tutorials that walk through how I created the zoom in and out effect in this elearning template.

Free Interactive Image Templates

I’ve included the source file for the original demo and a new template based on the image I used in the video tutorials. As a bonus, I used the same image to create a free PowerPoint template.

free interactive image template and characters

  • The templates also include a slide of individual characters. Create additional slides in the template and add the characters.

So now it’s up to you—find some images, watch the tutorials above, and create your own interactive image templates.

Events

Free E-Learning Resources

Want to learn more? Check out these articles and free resources in the community.

Here’s a great job board for e-learning, instructional design, and training jobs

Participate in the weekly e-learning challenges to sharpen your skills

Get your free PowerPoint templates and free graphics & stock images.

Lots of cool e-learning examples to check out and find inspiration.

Getting Started? This e-learning 101 series and the free e-books will help.


Articulate Rapid E-Learning Blog - customize free stock photos

Most of us are scrambling to find free assets to use in our presentations and elearning courses. The good news is that there are more than enough free stock images available, such as these three earlier posts where I shared 80 free stock photos45 free stock photos, and 60 more free stock photos.

The challenge with all of these free stock photos is that it’s not always easy using them for your presentations or elearning courses as they are. The characters are easy enough to figure out. But whatr about the various background images? Here are some tips to help customize free stock photos to work with your courses.

If you’re not inclined to use the free images, you can always find inexpensive stock photo subscriptions. In fact Graphic Stock (which has a good selection) regularly runs a $99/year subscription with unlimited downloads. They also have a video  and audio service that is reasonably priced.

7 Ways to Overlay Text & Customize Free Stock Photos

One of the biggest issues is that while the image looks great, it’s too busy for your content. So you need to find some ways to add contrast. Nicole shared some good tips on how to overlay text on images. These should come in handy for many of your presentations and courses.

Articulate Rapid E-Learning Blog - 7 ways to customize free stock photos

Apply a Blur to Customize Free Stock Photos

An easy fix is to blur the image (or add other effects). This gives you some texture and visual interest without the image being too distracting. Also, our eyes are naturally drawn to the text (and other objects) that are in focus. So that’s a great way to direct the viewer’s eyes to the content.

Articulate Rapid E-Learning Blog - apply a blur filter to customize free stock photos

Most graphics editing applications have blur filters. Even PowerPoint has a blur feature. So that should be easy to accomplish.

Make a Content Area as You Customize Free Stock Photos

Sometimes the image is great and you don’t want to add a blur or overlay text. But what you do need is room for your text and other objects. Here’s an example from a presentation I recently delivered on interactive video.

As you can see in the image below, the original photo I used was too narrow for the slide since the image was 4:3 and the slide was 16:9. And the image is so busy that there’s no room to place any content over it. I liked the image but need some free space.

Articulate Rapid E-Learning Blog - problems customize free stock photos

Usually what I try to do is crop the image in a way where I end up with space for the content. In this particular case cropping the image wasn’t a viable solution.

  • So I cropped the image to show what I wanted (the three boxes).
  • And then to fill in the blank area, I duplicated the image and cropped a sliver from one end and stretched it across the slide. This only works if the sliver is mostly solid. It wouldn’t have worked if I had used the other side of the image (which has a blur of colors). The colors would cause streaking.
  • To cover any artifacts from stretching (stretch marks?) I applied a blur to the sliver image. This softens it and lets in blend in.

Articulate Rapid E-Learning Blog - customize free stock photos

As you can see, the end result worked well. And all of this was done right in PowerPoint so I didn’t need to use an image editor. If you want to learn more, I created a quick PowerPoint tutorial.

Click here to view the PowerPoint tutorial.

If you need to customize the free stock photos then this tip should come in handy. While it doesn’t work for every image, it does work for quite a few. Give it a try and see what you can do to customize the free stock photos you get online.

Events

Free E-Learning Resources

Want to learn more? Check out these articles and free resources in the community.

Here’s a great job board for e-learning, instructional design, and training jobs

Participate in the weekly e-learning challenges to sharpen your skills

Get your free PowerPoint templates and free graphics & stock images.

Lots of cool e-learning examples to check out and find inspiration.

Getting Started? This e-learning 101 series and the free e-books will help.


free desktop PowerPoint template for interactive course

This post gives you a two-fer: that’s two freebies for one. I found a free desktop image made available by Anastasia Kolisnichenko. I used the free image to create an interactive course prototype for an upcoming workshop activity. The template is free for you to download and use as you wish.

Below is an example of the template in action. It’s embedded on the blog page. Click here to view the template if the embedded version isn’t visible in the email.

The example above was created in Storyline and uses the zoom region feature and triggers to pause the timeline. Here’s a PowerPoint (no zoom). I like the push transition.

How to Create an Interactive Course Using a Single Image

If you had access to a graphics designer, you could create anything you want. But for many of you, that’s not an option. This means you’re limited to searching the Internet for free downloads and then using those for your courses. The challenge with this is that it can be difficult to modify or customize the free downloads that you find.

However, here’s a simple technique that doesn’t require a lot of extra work. It just requires an image that has clear potential content buckets. Then you add links to those buckets and add your content. It’s a straightforward way to create an exploratory interactive course.

  • Locate an image that has multiple components. The free desktop download is a good example. It has areas that can be made clickable with links to additional content. Another example could be a collage style image or a comic book layout image.

free template layouts for interactive course

  • Create a separate slide for each distinct area. In the example above I made slides for the computer, picture frame, bookshelf, microphone, and calendar. Those are all exciting potential content buckets.
  • Link from the main image to a slide of the isolated element. Also add a link back.
  • Apply a transition. In Storyline, the zoom feature is a wonderful way to transition in and out. In PowerPoint, it’s a bit more challenging to create a zoom that’s easy to edit. In that case, I used a push transition.

In this demo I used the free desktop image to create the interactive course design. However, this production technique works great with other images. The key is that you start with a single image, so you need to do minimal editing and customization.

Download the Free Templates to Create an Interactive Course

Here are the download links to the free template. I also included the original graphic in case the link breaks somewhere down the road. Be sure to give props to Anastasia Kolisnichenko who made it available to use.

Enjoy!


Events

Free E-Learning Resources

Want to learn more? Check out these articles and free resources in the community.

Here’s a great job board for e-learning, instructional design, and training jobs

Participate in the weekly e-learning challenges to sharpen your skills

Get your free PowerPoint templates and free graphics & stock images.

Lots of cool e-learning examples to check out and find inspiration.

Getting Started? This e-learning 101 series and the free e-books will help.