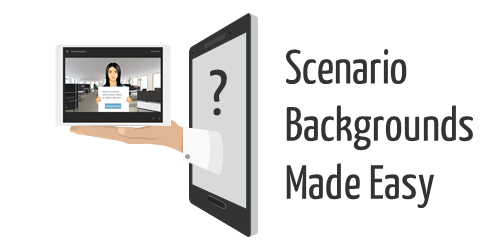
The Rapid Elearning Blog

Archive for October, 2018


branched scenario tips

Developing the content and flow of an interactive branched scenarios is one thing. Creating the visual structure is another. In today’s post we’ll look at some key considerations when building scenarios and come up with a simple storyboarding process to help think through the scenario design and layouts.

Branched Scenarios: 3C Model

Years ago, I introduced the 3C model to build interactive scenarios: challenge, choices, and consequences. It’s a simple model to help think through the content requirements. It starts with challenging the learner’s understanding through some sort of contextual and real-world situation where decisions need to be made. Give them some choices to make. And the choices produce consequences.

3C model branched scenario

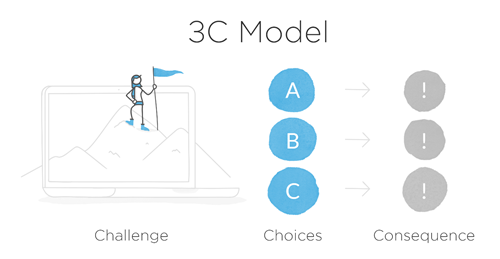
The consequences can be simple with immediate feedback or the 3C model can be compounded where each consequence produces another challenge and branches indefinitely. Of course, it’s hard enough to get your subject matter expert to give you ten good multiple-choice questions, let alone provide all of the content and nuance to build a complex branched interaction. I prefer a simple scenario structure.

Branched Scenarios: Visual Structure

A branched scenario starts with a blank screen. And from there, we add the scenario structure. But what exactly is it that we need and how do we design the screen layouts?

Let’s start with what needs to be on the screen. Here are a few of the main onscreen components that make up many branched scenarios:

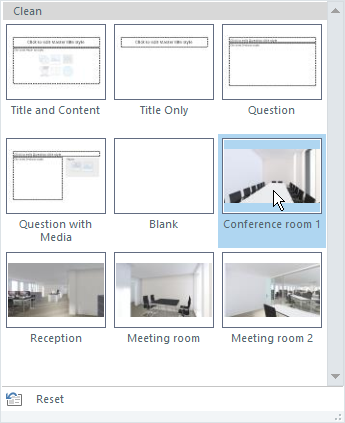
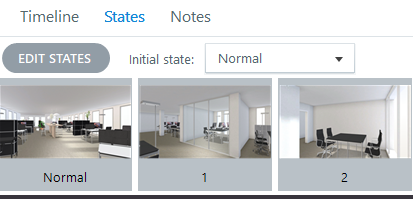
  • Background: the background (or environment) is an easy way to establish context. I usually look for a single image that helps do that.
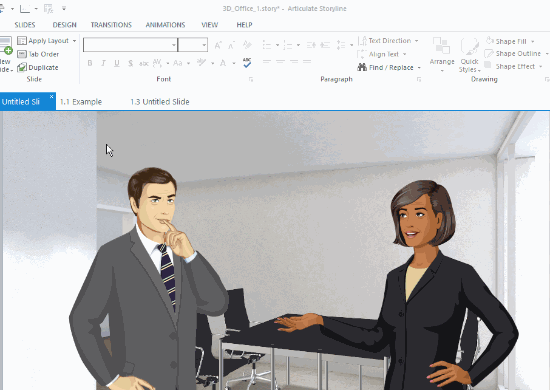
  • Characters: generally speaking there are actors in the scenario. Sometimes they can be implied and don’t need to be onscreen. For example, looking at an email or text message implies that someone in the scenario is viewing it. Or perhaps, the learner is the character. However, in many cases, the scenario actually features characters. Is it one or more? How do you show back and forth conversation?
  • Challenge: the screen consists of some text that presents the situation and challenge. That text needs to go somewhere. Does it go up, down, left or right? Is it there to start, or does it get exposed when the user does something like click a button?
  • Choices: once the challenge is presented, the learner has to make a decision. That usually means there’s an assortment of choices and then some sort of button (or other interaction) to make the selection. Where will that be on the screen?
  • Consequences: each choice usually includes some sort of feedback. It could be all of the feedback or perhaps an alert that the decision has created a new challenge. In either case, how is that displayed?

Branched Scenario: Simplify with a Storyboard

As you review the list above, it becomes apparent that there’s a lot to put on the screen. In workshops we usually create a blank slide and then a box to represent all of those things above. Then we play around with layouts to see what we can get onscreen. After that, we explore different ways to move the content offscreen and use triggered actions to expose the content.

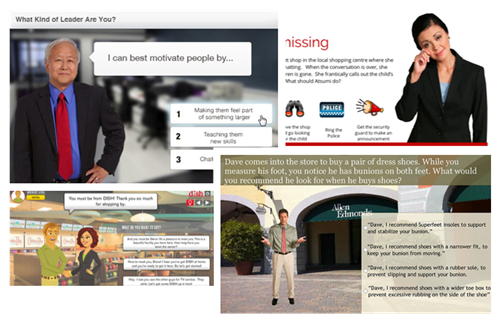
There’s a lot that makes up the scenario layout. The image below represents some common scenario layouts.

branched scenario layout ideas

Of course, there are all sorts of ways to structure a scenario. Keep in mind not everything needs to go on one screen. You can use layers and lightboxes to expose additional content. Mouseover interactions are great to expand information without requiring that the person leave the current screen.

One way to get started is to create three blank slides: one for each part of the 3C model.

  • Challenge slide: set up the scenario by adding visual context and all the supporting text. You’re not writing War and Peace. Keep it short and get right to the point.
  • Choice slide: determine how many choices the person will have. Also determine if you will present ancillary options. For example, you may want some links to talk to team members or contact HR for more assistance. What will those look like, where will they be placed on the screen, and what does the content look like?
  • Consequence slide: what feedback needs to be displayed? Is it just text? Will there be a character?

branched scenario layouts

Once you have the three elements on separate slides, it’s easier to see what you have to expose during the scenario. From there you can begin to assemble the screen. Some people create cheats. For example, create a “folder” that can be placed on a different slide or layer. The folder is a good metaphor and fits a lot of contexts. It’s also a nice visual that can hold a lot of content. It allows you to get rid of character images, buttons and a lot of the other clutter that you have using a single slide.

In a previous post, I simplified the process by suggesting that you use a visual container. The container adds context and holds the text. That’s one option. But there are a lot more. The key is to determine what you need first using the three slides. And then from there play around with ideas on what to add to the screen and what to expose later and when to expose it.

Events

Free E-Learning Resources

Want to learn more? Check out these articles and free resources in the community.

Here’s a great job board for e-learning, instructional design, and training jobs

Participate in the weekly e-learning challenges to sharpen your skills

Get your free PowerPoint templates and free graphics & stock images.

Lots of cool e-learning examples to check out and find inspiration.

Getting Started? This e-learning 101 series and the free e-books will help.


e-learning programmer

Do you need to be an e-learning programmer to build e-learning courses?

A lot has changed with e-learning over the past decade or so. As noted before, it used to require a team of people that usually included someone with some programming skills. However, as the rapid e-learning market emerged, the need for programming skills virtually disappeared. That’s great because it opened the industry to a lot of people and organizations.

The challenge though is that while you don’t need to be a programmer, it is still good to know a little about some basic programming. For example, one question we see quite a bit is how to use web objects in Storyline or embed content using the embed block in Rise. Often this involves using an iframe or some other simple web page. For the most part, it’s straightforward. But sometimes it means tweaking the embed codes provided by some services.

Because many people come to the industry without this type of experience or a background in programming, it’s a good idea to have access to some resources and tools. Today, we’ll look at a few places to go for quick help.

E-Learning Programmer: HTML Basics

W3 Schools: I recommend this site quite a bit. There’s a lot of good info, tutorials, and ways to test code on your own.

  • Learn to create a basic web page to use for local web objects in Storyline. Often, I create simple pages with resource links and then link to them locally. This allows the html page to become part of the published course.
  • Learn to work with iframes and embed codes in Rise. Embed codes can be tricky sometimes based on what the source site provides. Often there’s a lot of gibberish that needs to be removed. The more you know about the iframe basics, the better off you’ll be.
  • Here’s a good resource from David Tait on using iframes in Storyline.

Like many of you, I’m no programmer, so I lean on this site to learn to do basic tweaks to some of the code I need to modify for my courses.

E-Learning Programmer: JavaScript Basics

Some of you may think that JavaScript is some sort of note you write to pass to your local barista. That’s OK. Because this post is for you.

Again, you don’t need to be a programmer to build great e-learning. The authoring software does all of the heavy lifting. However, using JavaScript does extend what you can do with the software and adds a lot more customization and functionality. Thus, knowing a little can go a long way. This is especially true with Storyline because on the Storyline side it’s just a matter of adding a trigger to execute some code pasted in the trigger. But it does mean, you have some code and you know at least what to do with it to get the results you want.

e-learning programmer JavaScript examples

Here are some examples from the community to get ideas on how to leverage JavaScript in your e-learning courses.

Here are some good resources to learn JavaScript for free:

You don’t need to be a programmer but having some basic understanding of the code that can extend what you do in your e-learning courses is a good idea. Are there other free resources for learning code that you’ve used? If you do use JavaScript in your Storyline course, what are ways you’ve used it?

Events

Free E-Learning Resources

Want to learn more? Check out these articles and free resources in the community.

Here’s a great job board for e-learning, instructional design, and training jobs

Participate in the weekly e-learning challenges to sharpen your skills

Get your free PowerPoint templates and free graphics & stock images.

Lots of cool e-learning examples to check out and find inspiration.

Getting Started? This e-learning 101 series and the free e-books will help.


interactive scenarios backgrounds

There’s a lot that goes into building interactive scenarios. Obviously content is king and critical to building a branched scenario that is both engaging and effective. One key part of the scenario construction is establishing context. The good thing is that a single image often suffices to establish the scenario context.

The free stock images I shared recently are perfect for building interactive scenarios and establishing visual context.

I’ve had a few questions on how to set up the slides using the scenario images, so I’ll show a couple of easy ways to use them.

Interactive Scenarios: Create Multiple Layouts

interactive scenarios

You can create as many layouts as you like in the master slide. Thus you can create a scenario slide with dozens of layouts and save it as a template. Anytime you want to build a scenario, start with the scenario template and it saves you from looking for the images and inserting them into the slides. Everything’s already there and ready to go.

Here’s a quick tutorial to show how that works.

Click to view the scenario tutorial.

Interactive Scenarios: Create Multiple States

interactive scenarios states

Another reusable option is to insert a background image and then establish a number of states for that image. You can set any state as the initial state and never have to access the other states. And if you want to be clever, you can use triggers to dynamically switch the background from one environment to another using a single image.

Here’s a quick tutorial that show how to set up the background states and dynamically change them with triggers.

Click to view the scenario tutorial.

There are advantages to each method:

  • Working from the master slide means that the background image can be applied universally to the layout and impact all of the slides that use the layout.
  • Working with image states on the slide level gives you more control over the background and how it’s used with triggers specific to that slide.
  • There’s no reason you couldn’t apply the image states to the layouts which would mean fewer layouts. The layouts can be swapped using triggers and variables.

Key Point: it’s easy to get lost in building complex scenarios which can consume a lot of production time. I always work from the perspective of keeping production simple and as reusable as possible. And with Storyline 360, you can share with your co-workers using the team slides feature.

Inserting the images into a file and saving it as a template will save you lots of time and means you won’t have to dig around looking for the images. They’ll always be right at your fingertips.

Events

Free E-Learning Resources

Want to learn more? Check out these articles and free resources in the community.

Here’s a great job board for e-learning, instructional design, and training jobs

Participate in the weekly e-learning challenges to sharpen your skills

Get your free PowerPoint templates and free graphics & stock images.

Lots of cool e-learning examples to check out and find inspiration.

Getting Started? This e-learning 101 series and the free e-books will help.


branched scenarios

A while back I shared some free illustrated backgrounds that you can use for your branched scenario courses in e-learning. Those worked great for the classic illustrated characters.

branched scenarios

I’ve been working on interactive scenarios for a few upcoming workshops and created some background images that we’ll use to build interactive branched scenarios. As you can see below, the backgrounds work well for the modern illustrated characters as well as with the photographic characters.

branched scenarios

The free download includes the original images as well as a folder with images cropped to 16:9 so they fit perfectly in 16×9 slides.

Bonus Tip for Branched Scenario Images

One way to use the images, is to create a course file and insert all of the backgrounds on different layouts in the master slide. This way you can have one starter file for those interactive scenarios and then dynamically select the layout when creating new slides. Here’s a tutorial that shows how to create templates for reusable interactive scenarios.

branched scenarios

Free Downloads

Here are links to download the backgrounds to use with your branched scenarios.

I hope you can use them in your courses and for your branched scenarios. If you do, let me know.

Events

Free E-Learning Resources

Want to learn more? Check out these articles and free resources in the community.

Here’s a great job board for e-learning, instructional design, and training jobs

Participate in the weekly e-learning challenges to sharpen your skills

Get your free PowerPoint templates and free graphics & stock images.

Lots of cool e-learning examples to check out and find inspiration.

Getting Started? This e-learning 101 series and the free e-books will help.