The Rapid Elearning Blog

Archive for the ‘E-learning’ Category


e-learning programmer

Do you need to be an e-learning programmer to build e-learning courses?

A lot has changed with e-learning over the past decade or so. As noted before, it used to require a team of people that usually included someone with some programming skills. However, as the rapid e-learning market emerged, the need for programming skills virtually disappeared. That’s great because it opened the industry to a lot of people and organizations.

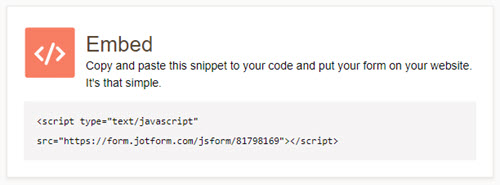
The challenge though is that while you don’t need to be a programmer, it is still good to know a little about some basic programming. For example, one question we see quite a bit is how to use web objects in Storyline or embed content using the embed block in Rise. Often this involves using an iframe or some other simple web page. For the most part, it’s straightforward. But sometimes it means tweaking the embed codes provided by some services.

Because many people come to the industry without this type of experience or a background in programming, it’s a good idea to have access to some resources and tools. Today, we’ll look at a few places to go for quick help.

E-Learning Programmer: HTML Basics

W3 Schools: I recommend this site quite a bit. There’s a lot of good info, tutorials, and ways to test code on your own.

  • Learn to create a basic web page to use for local web objects in Storyline. Often, I create simple pages with resource links and then link to them locally. This allows the html page to become part of the published course.
  • Learn to work with iframes and embed codes in Rise. Embed codes can be tricky sometimes based on what the source site provides. Often there’s a lot of gibberish that needs to be removed. The more you know about the iframe basics, the better off you’ll be.
  • Here’s a good resource from David Tait on using iframes in Storyline.

Like many of you, I’m no programmer, so I lean on this site to learn to do basic tweaks to some of the code I need to modify for my courses.

E-Learning Programmer: JavaScript Basics

Some of you may think that JavaScript is some sort of note you write to pass to your local barista. That’s OK. Because this post is for you.

Again, you don’t need to be a programmer to build great e-learning. The authoring software does all of the heavy lifting. However, using JavaScript does extend what you can do with the software and adds a lot more customization and functionality. Thus, knowing a little can go a long way. This is especially true with Storyline because on the Storyline side it’s just a matter of adding a trigger to execute some code pasted in the trigger. But it does mean, you have some code and you know at least what to do with it to get the results you want.

e-learning programmer JavaScript examples

Here are some examples from the community to get ideas on how to leverage JavaScript in your e-learning courses.

Here are some good resources to learn JavaScript for free:

You don’t need to be a programmer but having some basic understanding of the code that can extend what you do in your e-learning courses is a good idea. Are there other free resources for learning code that you’ve used? If you do use JavaScript in your Storyline course, what are ways you’ve used it?

Events

Free E-Learning Resources

Want to learn more? Check out these articles and free resources in the community.

Here’s a great job board for e-learning, instructional design, and training jobs

Participate in the weekly e-learning challenges to sharpen your skills

Get your free PowerPoint templates and free graphics & stock images.

Lots of cool e-learning examples to check out and find inspiration.

Getting Started? This e-learning 101 series and the free e-books will help.


interactive scenarios backgrounds

There’s a lot that goes into building interactive scenarios. Obviously content is king and critical to building a branched scenario that is both engaging and effective. One key part of the scenario construction is establishing context. The good thing is that a single image often suffices to establish the scenario context.

The free stock images I shared recently are perfect for building interactive scenarios and establishing visual context.

I’ve had a few questions on how to set up the slides using the scenario images, so I’ll show a couple of easy ways to use them.

Interactive Scenarios: Create Multiple Layouts

interactive scenarios

You can create as many layouts as you like in the master slide. Thus you can create a scenario slide with dozens of layouts and save it as a template. Anytime you want to build a scenario, start with the scenario template and it saves you from looking for the images and inserting them into the slides. Everything’s already there and ready to go.

Here’s a quick tutorial to show how that works.

Click to view the scenario tutorial.

Interactive Scenarios: Create Multiple States

interactive scenarios states

Another reusable option is to insert a background image and then establish a number of states for that image. You can set any state as the initial state and never have to access the other states. And if you want to be clever, you can use triggers to dynamically switch the background from one environment to another using a single image.

Here’s a quick tutorial that show how to set up the background states and dynamically change them with triggers.

Click to view the scenario tutorial.

There are advantages to each method:

  • Working from the master slide means that the background image can be applied universally to the layout and impact all of the slides that use the layout.
  • Working with image states on the slide level gives you more control over the background and how it’s used with triggers specific to that slide.
  • There’s no reason you couldn’t apply the image states to the layouts which would mean fewer layouts. The layouts can be swapped using triggers and variables.

Key Point: it’s easy to get lost in building complex scenarios which can consume a lot of production time. I always work from the perspective of keeping production simple and as reusable as possible. And with Storyline 360, you can share with your co-workers using the team slides feature.

Inserting the images into a file and saving it as a template will save you lots of time and means you won’t have to dig around looking for the images. They’ll always be right at your fingertips.

Events

Free E-Learning Resources

Want to learn more? Check out these articles and free resources in the community.

Here’s a great job board for e-learning, instructional design, and training jobs

Participate in the weekly e-learning challenges to sharpen your skills

Get your free PowerPoint templates and free graphics & stock images.

Lots of cool e-learning examples to check out and find inspiration.

Getting Started? This e-learning 101 series and the free e-books will help.


scenario

Between the workshops I run, blog emails received, and helping in the community, I get to see hundreds of e-learning courses. A common issue for many courses is transitioning from sharing content to helping people use the content to make the appropriate decisions.

Many course developers focus on making the content interactive, which is good. But much of the interactivity is novel or exists at a very basic level. What tends to be missing is the more complex decision-making interactivity.

The challenge is how to move past rote facts and get to a place where the learners can practice making the kinds of decisions they’d  make in the real world.

Interactive E-Learning 101

There are some core building blocks for interactive e-learning:

  • provide relevant content that fits in context to their real world
  • instead of pushing content, getting them to pull it
  • create ways to explore the content
  • challenge them with decision-making activities or scenarios

We’ve discussed many of these things in previous blog posts.

“What If?” Scenarios

The one thing that could add to this pursuit is to provide more “what if” scenarios:

“What happens if I do this? Or what happens if I choose this other option?”

I was thinking more about this the other day as we were presenting on how to use variables in one of our webinars. Variables allow the learner to do something that can be tracked. And then use that information to provide feedback unique to the learner’s experience. They’re perfect for creating this type of training.

scenario

  • Challenge the learner to analyze all of the available information and form some sort of hypothesis.
  • And then create the means for them to apply it and see what happens.
  • Provide the appropriate feedback based on the results.
  • Let them make adjustments and test it again.

The obvious reason why we don’t do more of this in our courses is that it takes more time to build. The reality is that most clients seem satisfied with basic click-and-read type content. And building more complex interactivity takes time, especially if we want to do it right. It also means more nuance to the way we package the course content. This wouldn’t work if all of the decisions to be made are very obvious.

Another challenge is that we tend to be in this somewhat nonsensical tracking and quizzing mode where it seems we’re less concerned with the actual learning and more concerned with course completion. In that world, there’s little room for testing ideas. And once the course is completed, it’s usually locked down by the learning management system. Thus it’s not even a great resource for reviewing later.

Creating these types of “what if” scenarios won’t work for all courses and content. And they do take more time and skill to build. However, they can enhance the learning experience and make the courses more engaging.

What types of courses do you think lend themselves to this type of training? And how would you set up the scenarios and process to test ideas?

Events

Free E-Learning Resources

Want to learn more? Check out these articles and free resources in the community.

Here’s a great job board for e-learning, instructional design, and training jobs

Participate in the weekly e-learning challenges to sharpen your skills

Get your free PowerPoint templates and free graphics & stock images.

Lots of cool e-learning examples to check out and find inspiration.

Getting Started? This e-learning 101 series and the free e-books will help.


how to create animated gif

Some people asked how I created the animated .gifs similar to the ones I gave away for free in this recent blog post. So today I’ll share a simple way to create them.

Start with Animated .Gif Software

There are a number of tools to create animated .gifs. I’m going to focus on just one for this post.

ScreenToGif is free and you don’t need to install it. Just run the .EXE file. It’s a great product and I use it all the time for quick demos or some of the animations I use in the blog.

I’m not going to do an exhaustive overview, so I recommend downloading the app and playing with it a bit. It’s intuitive and easy to figure out. As a side note, if you do use it, I encourage supporting the developer.

Understanding the Cover Image .Gifs

Cover images are mostly decorative. And because of the responsive nature of the Rise courses, the cover image gets cropped based on the screen’s aspect ratio. That means what you see in portrait won’t look the same in landscape.

animated .gif responsive design

The key is keep the cover images simple. Animated .gifs can become very large files. The more visual information on the screen, the larger the file size. And if the file is too large, it’ll take too long to download and ruin the effect and experience.

Stick with fewer colors. Solid backgrounds are good because you don’t get that blocky color striping that you get with pictures.

We’ll look at two ways to create the cover image animated .gifs. One way is by recording something onscreen and the other is to import a video.

Record Screen to Create Animated .Gif

The easiest thing it to play a video and record the screen. Then do some basic editing. Since the animated .gif is decorative, you just need something simple. The key is not to have a massive file. The more you record, the larger the file.

View the animated .gif tutorial on Youtube

Once you have a recording, figure out what you want and where to cut it. Again, I look for something simple that looks good looping. Subtle movements or repeating animations (like a spinning gear) work perfectly.

It does take some messing around. I usually do a basic edit and then save the file to see how large it is. Then I play around with more edits and image size to find the right balance between quality and file size.

You’ll have a lot more luck recording vector images that are solid versus photos. The less the screen has to change from one frame to the next, the better quality you’ll get and smaller file size.

For the .gifs where the quality doesn’t look as good, I set the cover images’s overlay color darker. This way the text really pops off the screen and the animation quality isn’t as much of an issue. That’s what I did in this example where there were so many colors it just didn’t look as good as I wanted.

Import a Video to Create Animated .Gif

ScreenToGif makes it really easy to import a video. It breaks down all the frames and from there it’s just a matter of editing it to what you want.

Just like above, play around with different settings to see what gives you the right balance between file size and quality. And keep in mind, they’re header images so subtle movement is fine. For this overhead desk video, I just focused on the pencil moving and cut out hundreds of frames.

View the animated .gif tutorial on Youtube

Bonus tips:

  • You won’t get crisp images because the file size needs to be manageable. I try not to go over 1.5 MB. That’s why you have to play around with settings that strike the right balance.
  • You need to test different dimensions, but I generally keep the images somewhere between a 16:9 and 2:1 aspect ratio. There’s no golden rule. It’s mostly based on what you are showing. The image is going to crop based on the screen, anyway. I make different versions and modify the image size to see what I get for file size and quality.

animated gifs from vector videos

  • Solid and/or fewer colors is best. There are a lot of free or inexpensive ways to create simple vector-based animation videos. That’s what I did to create these two headers above which you can see in these two examples: Call Center and Team Meeting. I inserted some animated characters and published a video. Then I made the .gif from the video. Because I’m not building a big animated explainer video, this only took a few minutes to do and looks decent.

Animated .gifs add some flavor and visual novelty to your courses. And as you can see, they’re easy to create.

Events

Free E-Learning Resources

Want to learn more? Check out these articles and free resources in the community.

Here’s a great job board for e-learning, instructional design, and training jobs

Participate in the weekly e-learning challenges to sharpen your skills

Get your free PowerPoint templates and free graphics & stock images.

Lots of cool e-learning examples to check out and find inspiration.

Getting Started? This e-learning 101 series and the free e-books will help.


create videos in PowerPoint

One of my favorite features in PowerPoint is saving the PowerPoint slideshow as a video. That means anything you put on the PowerPoint slides (from animations to slide transitions) is output as video. With some creativity, you can pull together some pretty slick explainer-type presentations with a tool most of us already have.

Today, I want to show something simple that may give you some ideas for your own training videos.

Create Videos in PowerPoint: Examples

Before we get started, here’s a cool example from Duarte that Microsoft included in the PowerPoint 2010 template pack. The Duarte team created a great presentation that showed off what could be done with the new features back in PowerPoint 2010. And as you can see below, their presentation translates to video, as well.

Create Videos in PowerPoint: Slide or Slideshow?

While the example above was an entire slideshow that included some cool animations and effective transitions, you don’t need to create whole presentations. You can publish single slides, too.

And the slide doesn’t need to be normal slide content. It could be a single video. And that video can be formatted using the PowerPoint features.

That means you can insert video into a PowerPoint slide, make some simple edits, and then output that slide as a video. Pretty slick when you think about the possibilities.

And that’s the trick I want to share.

Customize Framed Videos in PowerPoint

Why do videos need to be rectangular? Why can’t they have frames or display as shapes? That’s all possible in PowerPoint.

Here are the basic steps to create framed videos in PowerPoint.

  • Insert a video on the slide.
  • Add whatever effect you want for the video.
  • Size the video to fit the slide.
  • Save the video as MP4.

Here’s a demo of some of the videos in a Rise.

Click here to view Rise demo.

As you can see, there are some neat things you can do, especially considering that you are doing all of this in PowerPoint and not required to use a more sophisticated video application.

Now it’s your turn.

Events

Free E-Learning Resources

Want to learn more? Check out these articles and free resources in the community.

Here’s a great job board for e-learning, instructional design, and training jobs

Participate in the weekly e-learning challenges to sharpen your skills

Get your free PowerPoint templates and free graphics & stock images.

Lots of cool e-learning examples to check out and find inspiration.

Getting Started? This e-learning 101 series and the free e-books will help.


free animated gifs

I did a workshop on simple ways to create animated .gifs for e-learning courses. In part of the workshop we play around with using them as header graphics for Rise courses.

Header graphics are mostly decorative so the trick is to get decent enough quality while keeping the file size down (which is a major challenge with animated .gifs). I created a number of .gifs from some generic videos and figured I’d share them here for those who may be interested in using them.

Examples of Headers Using Animated Gifs

Here are some nice example courses that use .gifs. I think the animations really work well because they add some visual novelty and interest.

animated .gif headers from Rise

Click through the course examples because there are some other really cool uses of animated .gifs throughout.

Examples of Free Animated Gif Headers

free downloads animated .gif headers for Rise

Here are a few demos to see what they look like as headers in Rise courses. Personally, I am more partial to the vector examples. Which do you prefer?

There are more in the folder. You can download the animated .gifs here.

Keep in mind that these were used for training activities, but I did keep the headers somewhat generic so that they may be used in other projects. Hopefully you can use them and get some ideas on how you could create your own.

Events

Free E-Learning Resources

Want to learn more? Check out these articles and free resources in the community.

Here’s a great job board for e-learning, instructional design, and training jobs

Participate in the weekly e-learning challenges to sharpen your skills

Get your free PowerPoint templates and free graphics & stock images.

Lots of cool e-learning examples to check out and find inspiration.

Getting Started? This e-learning 101 series and the free e-books will help.


The training industry likes acronyms so today we’ll revisit one I shared a few years ago to help new course designers remain focused on producing real value.

It starts with the cookie story.

Two people are selling cookies in the neighborhood. One person bakes a bunch of chocolate chip cookies and sells them door-to-door. Unfortunately that person lives in a hipster neighborhood of Keto enthusiasts and those hostile to gluten. Not many want chocolate chip cookies. They prefer cookies that fit better with their diet.

The other person doesn’t start by baking cookies. Instead that person decides to canvas the neighborhood and asks what the neighbors prefer and takes orders specific to their tastes. From there, the person buys the ingredients required for each order, bakes cookies, and delivers them to satisfied customers.

The first person committed valuable resources to a product that many didn’t need or want. The second was able to manage resources by committing them to a product that customers did want.

Build E-learning Courses People Need

There are some lessons in here for us because often the courses we design are made to fit a general need, but not specific enough to provide value to everyone. The main culprits for this are lack of time (so we just crank out a course to get it delivered) and content-centric courses (rather than ones focuses on the user or performance goals).

Training needs to be designed with the end-user in mind. Often we start with content and figure out how to package it into a”course” that we can deliver online. The mistake is that while the content may be valuable, we tend to focus on delivery of the content as the end-goal. Then we become like the first cookie seller where we peddle a generic product that doesn’t meet real needs.

Here’s a simple cookie-themed acronym to help with working through the course design: OREO

While this isn’t revolutionary advice, it is still a good reminder to have clear objectives and manage the resources appropriately. What tips would you share for beginner course designers?

Events

Free E-Learning Resources

Want to learn more? Check out these articles and free resources in the community.

Here’s a great job board for e-learning, instructional design, and training jobs

Participate in the weekly e-learning challenges to sharpen your skills

Get your free PowerPoint templates and free graphics & stock images.

Lots of cool e-learning examples to check out and find inspiration.

Getting Started? This e-learning 101 series and the free e-books will help.


variables dashboard to save time e-learning

Variables add all sorts of capability to the learning experiences you create. They allow to move past linear, click-and-read content to more complex interactions with branched scenarios and personalized, adaptive learning.

Today I’d like to share a tip that really comes in handy when working with variables. It’ll save time and really help when you use a bunch of variables that are interdependent.

The 1-2-3 of Variables

Working with variables is a three-step process:

  • Create the variable: which is a like a bucket waiting to have a value
  • Adjust the variable: some action or trigger changes the value of the variable
  • Use the value: once the variable has a value or new value, that information can be used to trigger a different action

I explain that in more detail in this post on how to simplify working with variables in e-learning.

Add a Reference to the Variable for Troubleshooting

When working with variables, there is some trial and error and continuous testing. I always recommend adding a variable reference to the screen so that when troubleshooting or testing you can see the current value of the variable. This really comes in handy. If triggers depends on the value of the variable, you want to see that the variable is actually changing. If not, then you know where to start looking.

I explain that in more detail in this post on how to work with reference variables in e-learning.

Testing Variables in Your E-Learning Course

Here’s where it gets tricky. Some courses can have a ton of variables. For example, you may have a slide at the end of the course that requires dozens of interactions throughout the course. These interactions allow you to display personalized feedback. And each interaction is connected to interdependent variables.

Testing that everything works requires going through the course to activate triggers that adjust the values of the variables. This is really time-consuming. Unless you create a variables dashboard.

How to Create a Variables Dashboard

A variables dashboard allows you to be anywhere in the course and test how something would work depending on the value of certain variables.

For example, in a previous post we discussed how to lock navigation based on completing specific actions. To test it, requires completing all of the actions.

However, with a variables dashboard you can manually adjust the variables and then go to that single slide to test it. That saves a ton of time and frustration.

variables dashboard

Here are the basic steps to create a variables dashboard:

  • Create a slide that shows the current value of the variables and also allows you to manually adjust them. In the image below you can see I have buttons that let me change from true to false. There are text input boxes to add text-based values, and ways to adjust the numbers for variables that count specific activities.
  • Add this slide as a lightbox slide. I add it to the player so that it’s persistent and available throughout the course.
  • Prior to final publishing, get rid of the lightbox slide so that it’s not available to those who actually take the course.

variables dashboard

Below is an example of a test module I used for a recent gamification webinar. You’ll notice the “Set Variables” link on the top right corner. Go ahead and test it.

variables dashboard example

Click here to test the variables dashboard.

If you want to learn more, here’s a tutorial where I explain how and why it’s set the way it is.

Hopefully, you’ll find using a variables dashboard helpful and productive when build your own courses.

Learn More About Variables

If you haven’t used variables before, it’s time to learn how and then start to create all sorts of cool courses.

Here are some posts that will help you learn more:

Events

Free E-Learning Resources

Want to learn more? Check out these articles and free resources in the community.

Here’s a great job board for e-learning, instructional design, and training jobs

Participate in the weekly e-learning challenges to sharpen your skills

Get your free PowerPoint templates and free graphics & stock images.

Lots of cool e-learning examples to check out and find inspiration.

Getting Started? This e-learning 101 series and the free e-books will help.


meaningful content

The reality is that many e-learning courses are irrelevant to the needs of the person who has to take them. Lawsuits and regulatory compliance dictates a lot of demand for e-learning courses. It puts instructional design on the back-burner and end-of-year certification becomes the priority.

It’s just a reality of our industry.

Information vs Performance

I’ve always split courses into one of two groups: information or performance

  • Information: share information and certify a basic level of awareness/understanding
  • Performance: change behavior to meet a specific metric

By splitting into those groups, I know what resources to commit to the projects. Performance-based training takes more effort to build and I want to have the resources to build those courses. I don’t want to squander my limited resources on courses that just require a few slides and final quiz.

relevant meaningful e-learning

With that said, regardless of the content, courses should still be framed in a manner relevant to the person who has to take the course. It may be compliance-based content, but there’s a relevant context for compliance. And framing the content in that context helps ensure understanding and compliance (which is the objective).

Here are three ways to take generic compliance content and make it more meaningful to the end-user.

Get to the Know the Learners & Their Environment

Try to spend time with the learners. Become familiar with their routines and how they do what they do. Often, the procedures they perform in real life aren’t congruent with what the managers or subject matter experts expect. It’s good to know this before building a course that people ignore because it’s not the way they do things.

relevant activities for e-learning

Share with them the objectives of the course and some of the essential content. Ask how that plays out in their real, day-to-day activities. They’ll give you some good fodder for case studies and simple scenarios.

Be a Bridge Between the Content Owner and the Learner

The content owners and those who commission the course often have different objectives than the person who takes the course. This is especially true for compliance training that often seems pointless to the learner.

bridge between customer and learner

Part of your role is to blend the organization’s needs with the learner’s needs. Get the learner’s involved. It helps build awareness of the training that is being developed and they may offer valuable insight.

Content is Relevant in the Right Context

In live training sessions, you can generate meaningful conversation and engaging the attendees is easier. They share and comment. Online learning can be a challenge because a lot of compliance training is equal to a X minute lecture.

You may not engage in active conversations but there are things you can do:

Even if the course is a compliance course and may not be the most relevant, by getting the learners involved, the content can be placed in a relevant context that is engaging and keeps the people from tuning out or discounting what’s trying to be shared.

What are things you do to keep your elearning courses relevant?

Events

Free E-Learning Resources

Want to learn more? Check out these articles and free resources in the community.

Here’s a great job board for e-learning, instructional design, and training jobs

Participate in the weekly e-learning challenges to sharpen your skills

Get your free PowerPoint templates and free graphics & stock images.

Lots of cool e-learning examples to check out and find inspiration.

Getting Started? This e-learning 101 series and the free e-books will help.


interactive e-learning

I get a lot of questions about interactive e-learning. Often people are looking for specific “interactive” features in the software. However, the key isn’t specific features as much as it applying a few simple strategies and understanding what can be done with the e-learning software.

Part 1: Interactive E-Learning Strategies

Here’s a simple strategy I use when building interactive e-learning courses: focus on a few basic building blocks (which I’ve written about before).

  • Relevance: the first step is to make sure the content is relevant to the learner. Courses have content but often it’s not framed in a relevant context. That means it’s difficult to engage and motivate the learner.
  • Pull: most courses tend to push content out. It’s how we usually teach. We push content in learning docs, cheat sheets, videos, lectures, etc. One goal should be to get the learner to pull content in. Give them a reason to explore and consume content.

3C interactive e-learning model

I also try not to formally grade the interactions (especially decision-making activities) while they’re in the learning process. I want them to freely make decisions; and if they get things wrong, that’s just part of the learning experience. It’s also an opportunity to continue teaching. Formal grading tends to shut that down.

Part 2: Interactive E-Learning Features

I like to think of the e-learning software as a tool that creates multimedia. Most of the time that is used for training, but not all online multimedia needs to be training.

Most e-learning software has out-of-the box interactions like tabs, process, and labeled graphics. However, I try to step away from the intended interactivity and look for different use cases. I look for features that lets the person interact with the screen and then try to find ways for the person to interact with the content using the onscreen interactions.

Flash Card 3C Model

For example, in the simple scenario below, I created a 3C structure and used the Flash Card interaction as a means to review choices and get feedback. The Flash Cards aren’t technically designed for scenarios, but because one can click and reveal, they’re perfect to ask and answer questions in a scenario. And because the learner can click the other options, it lets them explore.

interactive e-learning flash card

Process Interaction Many Ways

Below is another example to show how to stretch the features to create all sorts of interactive content. I took the same general content which fits perfectly as a process interaction and applied it to different types of blocks to see how they’d work. Essentially they’re all a process interaction, it’s just that I used different features to package the content.

Click here to view the demo.

interactive e-learning 1

Obviously, some make more sense than others. But the point of the exercise is to review the features available and think of different ways to use the interactive parts. Today, it’s a simple process interaction, but next time it could be a decision-making scenario.

E-learning interaction alternative

3C Model: Labeled Graphic

Here’s an example, where I leveraged the Content Library characters with Studio 360 and PowerPoint to create a decision-making image with the labeled graphics.

interactive e-learning labeled graphic

3C Model: Combined Blocks & Accordion Interaction

And another example of a 3C model where I combined a few blocks to create the structure (which I can save as a reusable template) and leveraged the accordion interaction as the way to ask and answer questions in the scenario.

interactive e-learning scenario

As you can see, it’s easy to combine the basic building blocks with interactive features to create an assortment of interactive options that go beyond what the software gives you out-of-the-box. The secret is to start with a simple model and then leverage the interactive features (whether designed for decision-making or not).

Events

Free E-Learning Resources

Want to learn more? Check out these articles and free resources in the community.

Here’s a great job board for e-learning, instructional design, and training jobs

Participate in the weekly e-learning challenges to sharpen your skills

Get your free PowerPoint templates and free graphics & stock images.

Lots of cool e-learning examples to check out and find inspiration.

Getting Started? This e-learning 101 series and the free e-books will help.


successful e-learning

Successful e-learning is measured in many ways. It’s important to provide measurable value. However, a large part of success revolves around how others view your contributions. Thus it’s important to manage how you work with customers and how they understand your contributions.

If you’re just getting started, here are some things to keep in mind:

Successful E-Learning Pleases the Customer

Your customer is why you have a job. Thus it’s important to ensure the customer’s needs are met.

Who is your customer? The obvious answer is the one who commissions the e-learning course. However, there’s also the dynamic between you and your manager (who may not be the customer) but is the person who influences your employment.

How to Please the Customer

There are many things you can do, but here are a few basics:

  • Establish clear expectations. Write them down and get affirmation. This way everyone is on the same page. I create a Service Level Agreement that documents the project details and expectations.
  • Find ways to make your customers look good. Often I’ll send encouraging emails and CC their managers. I try to deflect credit from myself and pass it to others. Give them the credit when possible.
  • Control your costs and resources. Everyone’s on a budget and has limited time.
  • Finish ahead of schedule. I try to pad extra time into the production, get agreement on the production schedule, and then work to be done early. Sometimes it doesn’t matter if you’re early because they may not be prepared for it, but it builds your reputation and how they perceive you.
  • Take care of details before they become issues. Be proactive and do this before the customer is aware. The more projects you do, the more you’re able to anticipate potential issues. I always make a list of things that may derail the process so that I can think through a work around before it happens.

Successful E-Learning Knows that the Business is the Business

Ultimately you’re hired to help meet specific organizational goals. Sometimes we lose sight of that. It’s easy to get stuck in the way things have always been done or on our own pet projects. Keep your focus on what the organization says is important and the metrics they use.

When working with customers, try to steer them towards measurable results and not just content. From there you set clear objectives that are tied to a metric which helps measure the course’s efficacy. If the client has no metrics (sometimes that happens with compliance training) measure cost and production time as well as a reduction in training time.

How to Report the Results of Successful E-Learning

It’s important to show the results of your work. The challenge is knowing what to report, getting the numbers, and how to report them. Here are a few thoughts:

  • Performance results. Create courses with measurable objectives. That gives you something to measure. How does the client know that they need training? What metrics are they using? Use the same process. Connect with the team that collects and curates results. Often training is a small part of the process thus you may not see significant results from training alone.
  • Measure before and after performance. Create a means to pre-assess the learners and then compare how they did after the training. You may not directly impact real-world performance but you can state that before the training they were at X and after they were at Y.
  • Measure what was saved. Some training is not performance-based. Thus it’s a challenge to report performance metrics. In those cases, track how much training costs before and how the e-learning courses saved time by reducing travel costs, etc. Another benefit is the flexibility training offers because it is time-shifted. Worst case, compare your production costs to that of an outside vendor.

Building engaging and relevant e-learning is the main measure of success. That happens in the context of supporting a customer and your organization. Develop some strategies to manage those relationships and the expectations. Help them focus on real results and do a good job reporting your success. And their success will be your success.

Events

Free E-Learning Resources

Want to learn more? Check out these articles and free resources in the community.

Here’s a great job board for e-learning, instructional design, and training jobs

Participate in the weekly e-learning challenges to sharpen your skills

Get your free PowerPoint templates and free graphics & stock images.

Lots of cool e-learning examples to check out and find inspiration.

Getting Started? This e-learning 101 series and the free e-books will help.


no LMS

Generally, delivering e-learning courses is a two-step process: 1) create the course in your favorite e-learning software and 2) host the course in a learning management system.

There are many small organizations that don’t use formal learning management systems; however they want simple tracking of the courses. I had someone ask how they could track people in their organization who have taken a compliance course. He didn’t have a lot of learners and wanted something simple.

Here are two quick solutions that work well. They don’t require a lot of work to set up and they’re mostly free.

This solution assumes that the user gets a URL that links to the course. We have no identifying information so we need a simple way to collect who they are and track their completion.

Create a Form

Create a form using a hosted service. In these examples I am using Google Forms and Jot Form. However, you can use a different service if you want (or create your own form on a server). It doesn’t matter. The main thing is you have a way for the person to share info and send it your way.

form no LMS

Embed the Form

Once you have the form, you’ll embed it into the course. In these examples we’re using Rise’s embed block. If you use Storyline, the web object works perfectly for this.

Embed form no LMS

Create a Gate to the Form

The goal is to only expose the form when the course is complete. There are many ways to do this. For these demos, I’ll show two ways. In the first, I use a continue block that is locked until the learner affirms completion of the course and agreement with the content. In the second example, I use a quiz to serve as the gate.

no LMS two options

Examples of Embedded Forms

These are simple examples to show how the form looks embedded in the course and how you could create a gate to get to the form.

  • Jot Form Example: the course has free navigation and user affirms completion to unlock the the gate
  • Google Form Example: the course is locked and passing the final quiz unlocks the certificate of completion

Jot Form offers a bit more control and looks more integrated with the course. I colorized the block to match the form’s color.

JotForm example no LMS

On the other hand, Google Forms has that enormous header space and scrollbar. I removed the header image and filled it with white to avoid the Frankenform look but it still looks like something pasted into the course. It would be nice to have more control over the look, but it still works fine for what we need and it’s free. Also, the integration with Google Sheets saves a few steps later.

Google fomr example no LMS

Upload the Course

Since we’re not using an LMS, we need a place to upload the course. I use Amazon S3 which I showed how to set up in a previous post; but it could also be Google Storage. But it can be any web server.

no LMS Amazon S3 free

Track Course Completion

The form collects the data and sends it to the service. Jot Form displays a table with the option to download. Google Form sends the data to a Google Sheet.

Google Sheet no LMS

Of course, there are many other ways to do something similar to avoid using an LMS, especially if you have programming skills.

At a previous place, we used the course URL to drop a cookie on the person’s computer. At the end of the course, we inserted an .ASP file via a web object. The .ASP file collected the info from the cookie and sent it to the database. Thus we knew who took the course, when they completed it, and their minimum passing score.

Do you have any other ways you use to track the course without using an LMS or paid service? Please share in the comments.

Events

Free E-Learning Resources

Want to learn more? Check out these articles and free resources in the community.

Here’s a great job board for e-learning, instructional design, and training jobs

Participate in the weekly e-learning challenges to sharpen your skills

Get your free PowerPoint templates and free graphics & stock images.

Lots of cool e-learning examples to check out and find inspiration.

Getting Started? This e-learning 101 series and the free e-books will help.