The Rapid Elearning Blog

Archive for the ‘PowerPoint’ Category


PowerPoint graphics

[UPDATE: this post is republished in the Tips & Tricks blog.]

In a recent post, I showed how I use PowerPoint to build the graphics for my Rise courses. I had a few questions on how to create the person sticking out of the circle image (apparently that is popular).  So today’s post shows how to do this. It’s pretty easy.

How to Create a 3D Pop-Out Graphic in PowerPoint

PowerPoint graphics Content Library

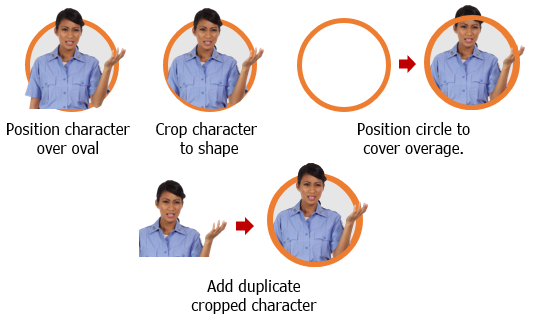
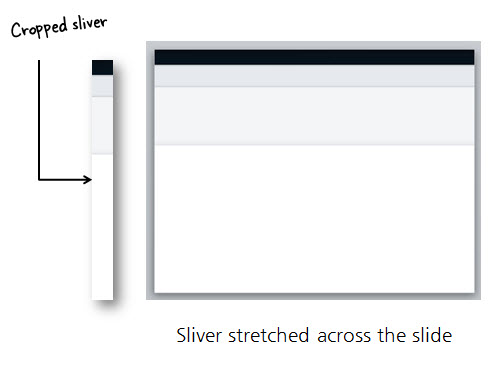
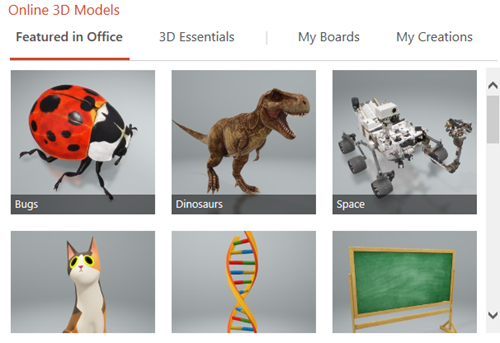
  • Insert a character and crop it until it is square.
  • Insert a circle.
  • The circle and image should be a similar size.
  • Crop the image to a circle shape.
  • Position the character over the circle.
  • Scale it up to suit your need for the overhanging image.
  • Duplicate the character.
  • Crop the first image to fit in the circle.
  • Crop the second image and place on top of the first image to cover.
  • Group together so you don’t accidentally nudge them out of place.

PowerPoint graphic steps

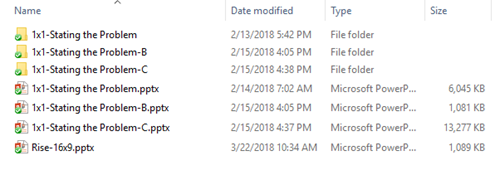
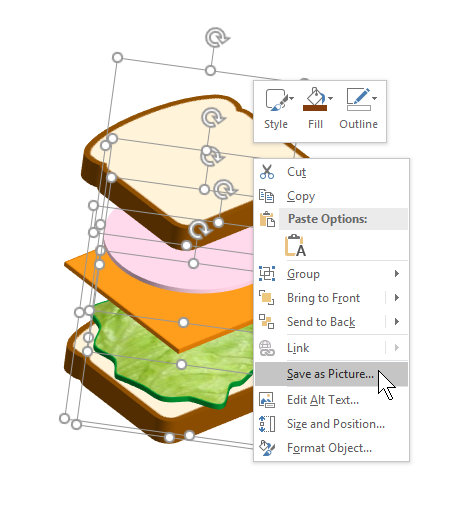
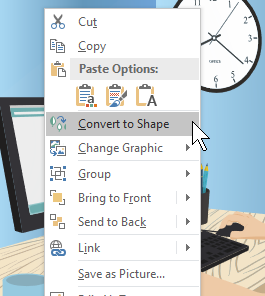
As you can see, it’s relatively simple to do. Then whatever you build in PowerPoint can be saved as an image. Either right-click it and save as .PNG or save the slide itself as .PNG.

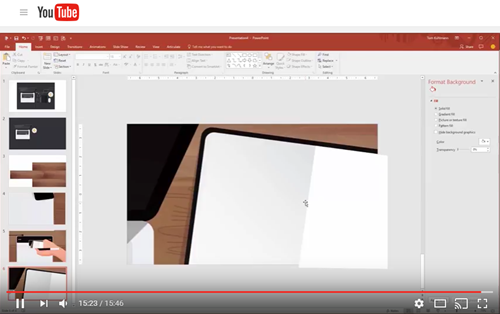
Watch the tutorial below to get more of the specific detail. And here’s a bonus tutorial on how I created the 3D pop-out header image above.

Click here to view the YouTube tutorial.

Events

Free E-Learning Resources

Want to learn more? Check out these articles and free resources in the community.

Here’s a great job board for e-learning, instructional design, and training jobs

Participate in the weekly e-learning challenges to sharpen your skills

Get your free PowerPoint templates and free graphics & stock images.

Lots of cool e-learning examples to check out and find inspiration.

Getting Started? This e-learning 101 series and the free e-books will help.


PowerPoint graphics

In a previous post, I shared how I built an interactive scenario in Rise. I’ve gotten lots of emails asking how I built the graphics like the headers and the flashcard interactions for the interactive scenario. So in today’s post, I’m going to show you a simple way to build graphics for your Rise e-learning courses.

PowerPoint graphics headers for Rise blocks

PowerPoint graphics flashcard interaction

Understanding the Image Blocks in Rise

Rise offers a number of blocks that support inserted images (such as image, gallery, and some of the interactions). Most them work perfectly in one of two aspect ratios:

  • 1:1 (square)
  • 16:9 (rectangle)

There are a few blocks that have text overlay where the image is scaled. Those are mostly decorative images so we won’t worry about them.

Understanding PowerPoint Slides

PowerPoint is easy-to-use screen and with some practice, you can build almost any type of visual. Because of this, I build my simple graphics in PowerPoint and save the slides as images.

In PowerPoint, we need to do two things: set slide size and then whatever we build we export as an image.

  • Go to Design>Slide Size and modify the slide size.
  • To save the slide as an image, go to Save As and choose an image format. You can save a single slide or all slides. I usually save in PNG format.

Create PowerPoint Graphics to Use in Rise

Since there are two aspect ratios, I create two PowerPoint files for my Rise graphics. One is 1:1 and the other is 16:9. You can see the PowerPoint files I created for the scenario demo.

PowerPoint graphics example of file

PowerPoint is a freeform slide. I can build virtually anything I need quickly. In the interactive scenario, I created 1:1 images for the flashcards. One side of the flashcard has the question text and the other has the feedback.

I used the various image editing features in PowerPoint to colorize the graphics. I also used the emjoi features to create some simple feedback graphics. While it’s easy enough to build these graphics with other tools I just find PowerPoint to be easy and fast. However you’re not confined to PowerPoint, you can use the tool of your choice.

PowerPoint graphics flashcard questions

PowerPoint graphics flashcard answers

The images above are relatively simple. The images below required a bit more work. I had to build it so the character extends out of the frame. You can see that I created a couple of versions. I opted for the lighter version because it made the Rise screen seem more open with more white space.

PowerPoint graphics header image

When you’re all done building your slides, save the slides as images rather than a .pptx file. Then you’ll have a folder of images that work with your Rise courses.

Bonus PowerPoint Graphics Tip

With Articulate 360, you get Studio 360 that includes Presenter and works with PowerPoint. That means you have access to all of the Content Library characters and templates. So if you want the same Content Library characters in Rise, use PowerPoint slides to build the graphics like I did above.

Here’s another example I mocked up for the blog post using the same techniques.

PowerPoint graphics interactive scenario 2

So there you have it. In the first, post we looked at how to build the interactive scenario in Rise. And in this one, we reviewed how to use PowerPoint to quickly build the graphics you need.

Events

Free E-Learning Resources

Want to learn more? Check out these articles and free resources in the community.

Here’s a great job board for e-learning, instructional design, and training jobs

Participate in the weekly e-learning challenges to sharpen your skills

Get your free PowerPoint templates and free graphics & stock images.

Lots of cool e-learning examples to check out and find inspiration.

Getting Started? This e-learning 101 series and the free e-books will help.


interactive scenarios

What happens when you convert an old PowerPoint course into a Rise course?

The other day I found an older interactive scenario that was built in PowerPoint. I wanted to see what it would take to rebuild something similar in Rise. This isn’t an uncommon situation for those who are trying to convert and update older courses with new technology.

Today, I’ll show what I did to convert the course and a few production tips that helped me.

The Original Interactive Scenario

Back in the day, this was a pretty cool example of what you could do with PowerPoint to create interactive scenarios. By design, PowerPoint is a linear presentation tool. However, with some creativity, one can create interactive content. And that’s exactly what Jeanette did.

interactive scenario demo 1

Click here to view the interactive scenario.

With that said, PowerPoint’s not the best authoring tool if you want to create interactive content. Once you add the interactive capabilities the slide count goes up quite a bit and it becomes a mess to manage. I highlighted this in the post on why PowerPoint isn’t the right tool for interactive e-learning.

The New & Improved Interactive Scenario

We looked at different types of authoring tools in this post. PowerPoint and Rise offer two different types of authoring. PowerPoint is freeform with a blank screen that allows placement of objects. Whereas, Rise is form-based where you assemble content blocks and build the course that way. Freeform gives you more freedom in where you place content, but a tool like Rise offers a better mobile experience because it’s fully responsive. And as you see, it’s a lot easier to work with, as well.

interactive scenario demo 2

Click here to view the interactive scenario.

Production Tips to Build the Interactive Scenario

I had three goals with this conversion:

  • How long would it take to move content from PowerPoint to Rise?
  • What are some production considerations?
  • How to work around constraints?

Design the Interaction

The first thing is to determine how you want to design the interaction. When it comes to interactive scenarios, I always follow my 3C model of challenge, choice, and consequence. If I can click on something, then I can make it part of a 3C interaction.

In this case, I used the Flashcards block as a way to show choices and consequences. The user is presented with a challenge and clicks on a card to get feedback. Since I’m not grading it, I can keep the other options available so that the learner can see what is shared if they had clicked something else. This gives them more control over the learning experience.

  • Mission: identify the different interactive blocks that allow for 3C type interactivity. For starters, there are tabs and accordions. But those are obvious choices. Look for other interactive elements.

Build a Branched Scenario

Branched scenarios are possible in Rise with some considerations. Here are a few production tips:

  • Build your branched interaction with the Button Stack block. The button stack lets you jumps from lesson to lesson.
  • Don’t let them see what’s under the hood. Turn off the Sidebar view so that users don’t see the menu and how the course jumps around between lessons.

interactive scenario tip 1

  • Create a faux navigational cul-de-sac. Since Rise is designed to follow a lesson-to-lesson flow I want to prevent the learner from advancing past the end of a scenario or the button stack. To do so, I added a lot of padding on the bottom and an extra Spacer block as a buffer.

interactive scenario tip 2

  • Create duplicate menus to deal with revisits. The introductory lesson has some initial content and below it are the choices to view the scenarios. When they complete a scenario and come back to the other choices, I didn’t want all of that introductory content visible. I just want them to go to a list of other buttons. So I made a duplicate menu lesson with just the button menu. That’s where they end up after they complete a lesson. They never go back to the original introductory lesson.

interactive scenario tip 3

  • Control how much they see. This makes the content smaller to consume. You don’t need to show everything at once. Keep people from scrolling by adding an interactive Continue button. This holds all the content below it until the learner clicks on the button. In a sense, they are affirming that they are ready and when they click, they get more info.

interactive scenario tip 4

  • Play around with the imagery. Rise courses don’t need to look the same. You can insert images in all sorts of ways. An image doesn’t need to be a picture. It could be a white box that fills in an area to create more white space. Be creative in how you use the blocks. Also, don’t stick with the defaults. Play around with filling the blocks with color. The key is to learn to see them in a different way.

interactive scenario tip 5

How long did it take?

Once I planned how to build the interaction, it only took about 15 minutes to copy and paste the content from PowerPoint to Rise.  I used different images, so I had to create those. And I had to play around with ideas to see what worked best. All-in-all it took about 2 hours to build the module as it is.

The nice thing is that once I build an interactive lesson, I can save it as a template an re-use it again. And to add additional modules is just a matter of duplicating a single lesson. To do so in PowerPoint would require another 20+ slides per module.

As you can see, working with Rise is so much easier than working with PowerPoint.

Events

Free E-Learning Resources

Want to learn more? Check out these articles and free resources in the community.

Here’s a great job board for e-learning, instructional design, and training jobs

Participate in the weekly e-learning challenges to sharpen your skills

Get your free PowerPoint templates and free graphics & stock images.

Lots of cool e-learning examples to check out and find inspiration.

Getting Started? This e-learning 101 series and the free e-books will help.


Use PowerPoint to edit images

Over the years, I’ve posted hundreds of tutorials using PowerPoint. Some of them to be updated. Today I am going to cover five ways to use PowerPoint as an image editor. This is great for quick image editing or for those who don’t have other image editors on hand.

Save PowerPoint Content as an Image

Since we’re talking about PowerPoint as an image editor, the first tip is that whatever you create in PowerPoint can be saved as an image.

I usually group the objects so it’s one group. And then I right-click and save as picture. I like to save as a .PNG so that the transparent areas of the image are still transparent. If you save as .JPEG, the transparent areas will become white.

In the image below, I used PowerPoint to create the sandwich stack and then right-clicked to save as picture.

PowerPoint as illustrator

Create Custom-Sized PowerPoint Slides

You can make a PowerPoint slide any size you want. By default, they’re 16:9. That and 4:3 are the most common aspect ratios. However, by going to the Design Tab you can set the slides to any size. That means they can be tall and skinny or short and wide.

PowerPoint as illustrator slide size

Why would someone want to do that? Check out the tip below.

Export PowerPoint Slides as Images

PowerPoint slides can be saved as images. That means you can add whatever you want to a slide, layer content, etc and then save that slide as an image. I do this quite a bit when I need to quickly build graphics for my e-learning courses.

For example, the flashcard interaction in Rise is a 1:1 aspect ratio. So I make a PowerPoint slide that is 1:1 and add my content to the slide. It’s a great way to add titles and images to the flashcards to make them visually richer.

Once I’ve completed the slide, I save the PowerPoint slides as images and insert them into the Rise interaction.

PowerPoint as illustrator

The images above were all created in PowerPoint as slides and inserted into the Rise course. You can see an example of the PowerPoint slide images in this demo course.

Using PowerPoint slides to create images is easy and it gives me more control over the images I use in my e-learning courses.

How to Extend a Photo’s Background

Sometimes you have images where the object is centered which makes it challenging to place other content on the screen. An easy way to fix this is to cut a slice from the image and stretch it. This lets you move the main object over and get some empty space for text or other content.

PowerPoint as illustrator to extend images

I also use this technique to quickly build slide layouts which I showed in this previous blog post on how to create a template from a single image.

Create PowerPoint or e-learning template from image

How to Remove the Backgrounds of Images in PowerPoint

Since PowerPoint 2010, you can use PowerPoint to remove backgrounds from your images. For the most part, it works well. Select your image and the remove background. You can select areas to keep and areas to remove. Once you’ve removed the background, you can play around with softening the edges to get rid of any obvious jaggedness.

How to remove background in PowerPoint

As you can see, PowerPoint is a great tool for building simple illustrations or using it for quick graphics editing.

Events

Free E-Learning Resources

Want to learn more? Check out these articles and free resources in the community.

Here’s a great job board for e-learning, instructional design, and training jobs

Participate in the weekly e-learning challenges to sharpen your skills

Get your free PowerPoint templates and free graphics & stock images.

Lots of cool e-learning examples to check out and find inspiration.

Getting Started? This e-learning 101 series and the free e-books will help.


next generation rapid e-learning

Ten years ago, the e-learning industry was still mostly Flash-based. That meant organizations either had to buy e-learning courses, have them custom-built, or hire a Flash programmer to build them. The cost for doing so meant most organizations didn’t have access to the world of online training.

That all changed when the PowerPoint-to-Flash tools like Articulate Studio, emerged. It democratized the world of online training because it put e-learning into the hands of anyone who wanted to build a course. If you came from that world where building Flash courses took more time and cost more, everything was rapid. Thus, the term, rapid e-learning.

The Evolution of Rapid E-learning

Flash required special skills which made authoring in PowerPoint so attractive. With some creativity, one could build engaging and interactive e-learning courses in PowerPoint. However, the reality is that PowerPoint has a ceiling and doesn’t offer all of the interactive capabilities required for many e-learning courses. I outlined that in this post on why PowerPoint isn’t the right choice for interactive e-learning.

PowerPoint isn't the best for interactive rapid e-learning

  • Interactivity is mostly limited to click-and-reveal.
  • It requires a lot of redundant production which gets exponentially more complex.
  • You can’t use variables to create adaptive training or branched interactions.

When Storyline came out in 2012 it really changed the rapid e-learning industry. For the first time, one could build highly interactive content with PowerPoint comfort and without a background in programming. That was an exciting time for first-generation rapid e-learning developers.

Second Generation Rapid E-Learning

I’m often asked where is the rapid part of rapid e-learning? For those who are entering the industry today, it’s a bit different.

Storyline is still a killer application. However, there is an opportunity for those who want a new type of authoring, or what could be called rapid(er) e-learning. Welcome to the world of Rise.

In a sense, Rise is to Storyline what PowerPoint was to Flash. It offers even easier authoring that allows for quick development and delivery. It’s fully responsive and works great on mobile devices.

Comparing Rise to Storyline

Rise courses are constructed using pre-determined blocks. Choose a block, add content, and publish. Whereas, Storyline is a freeform slide that requires a bit more work.

new rapid e-learning example insert tabs interaction Rise

A great way to see the difference is by looking at how to insert a tabs interaction (one of the most common interaction types). In Rise, select a tabs interaction block and insert the content. That’s it.

In Storyline, it’s relatively easy to build a tabs interaction, but it requires more steps. Decide how it will look and work. And then from there build custom tabs, add layers, and then connect triggers.

As you can see, Rise is a whole lot faster and easier. It’s the new and improved rapid e-learning.

Combining Rise and Storyline for Powerful Rapid E-Learning

The cool thing is that when you want some custom interactions, build them in Storyline and add them to the Rise course. Thus you get the best of both worlds: fast, easy authoring in Rise combined with custom interactivity of Storyline.

rapid e-learning Articulate Rise example

Click here to view the Rise demo.

Above is a quick demo where I modified one of the Storyline templates in Content Library to work in Rise as a simple interaction.

Other Examples of Rapid E-Learning Courses in Rise

And for those wondering what you can do, here are few Rise demos:

other rapid e-learning examples in Rise

If you haven’t tried Rise, give it a go. Let me know what you think. Eventually, this e-learning stuff will get so easy we’ll just be sitting at home watching Netflix and eating bonbons.

Events

Free E-Learning Resources

Want to learn more? Check out these articles and free resources in the community.

Here’s a great job board for e-learning, instructional design, and training jobs

Participate in the weekly e-learning challenges to sharpen your skills

Get your free PowerPoint templates and free graphics & stock images.

Lots of cool e-learning examples to check out and find inspiration.

Getting Started? This e-learning 101 series and the free e-books will help.


edit SVG in PowerPoint

The good news is that now you can edit SVG images in PowerPoint. And that’s a big deal because we’re starting to see more SVG images every day.

In fact, one of the sites where I buy images has the option to download SVG images. This is great because they can be edited and customized. However, to edit them requires knowing how to do so with an illustration program. Unless of course, you know how to use PowerPoint.

Insert & Edit SVG Image in PowerPoint

This first step is really easy. Insert a picture by using Insert>Pictures on the toolbar. Locate your SVG image and insert it. Voila! I will add, that I’ve had a few SVG files that didn’t work, but for the most part it’s been smooth sailing.

SVG PowerPoint

The next step is also very easy. What you’ll do is convert the SVG image into an object that can be edited in PowerPoint. The newest version of PowerPoint has a “Convert to Shape” feature. If you don’t see it in your version of PowerPoint, you’ll need to upgrade to the Office 365 version.

  • Select the image
  • In the format toolbar (or via right-click) select Convert to Shape. It will ask if you want to convert it.
  • Once it’s converted, you need to ungroup the image. Right-click, and select Ungroup.
  • Now the image is broken into multiple shapes where you can edit them as you wish.

convert and edit SVG in PowerPoint

Once the image is ungrouped you can edit it. For example, I removed the background content and just isolated the guy on the computer. now I can insert it anywhere I want. You can regroup the object and right-click to save as an image. I like to save as a PNG file so that the transparent part of the image remains transparent.

edit SVG in PowerPoint computer man

How to Edit SVG in PowerPoint Video Tutorial

Here’s a video tutorial where I show how to convert and edit an SVG in PowerPoint.

Click here to watch the YouTube tutorial.

As you can see, it’s super easy to edit SVG files in PowerPoint. That should open the doors to all sorts of possibilities as you find free SVG files at those various sites that offer free stock images.

Events

Free E-Learning Resources

Want to learn more? Check out these articles and free resources in the community.

Here’s a great job board for e-learning, instructional design, and training jobs

Participate in the weekly e-learning challenges to sharpen your skills

Get your free PowerPoint templates and free graphics & stock images.

Lots of cool e-learning examples to check out and find inspiration.

Getting Started? This e-learning 101 series and the free e-books will help.


interactive video

This is part two of the series on working with 3D models and interactive video. In the previous post, we looked at how to create a video using 3D models in PowerPoint. Today, we’ll discover how to use them to create interactive videos in Storyline. And then of course, once you have an interaction you can also insert it into a Rise course, which is what I did in this Rise lesson.

Create the Interactive Videos in PowerPoint using 3D Models

If you want to create a different kind of interactive video, you can apply what you learn here. The process is similar. For this demo, make sure you understand how the video is created and how it plays all the way through because we’re going to add a trigger to pause it before it completes.

For this demo, I created a video where the object rotates in and then rotates back out. It was built using a three-slide PowerPoint file and exported as a video.

Tutorial: how to create a three-slide video using 3D models in PowerPoint.

A Teardown of the 3D Model Interactive Videos

There are a few nuanced steps in this process. Let’s review what happens and then we can look at how to create it in Storyline:

Interactive video in Storyline using 3D models in PowerPoint

  • User clicks on the side tab which shows a layer.
  • The layer plays the video we created in PowerPoint.
  • Since the 3D object in the video rotates in and out, we set the video to pause when the object is rotated in.
  • Then we add a trigger to resume the timeline (with a hotspot or button) which continues to play the video and shows the object rotate out as the video completes.
  • The completion of the media (the video) triggers the layer to hide which takes us back to the base slide with the side tabs.

Create the Interactive Videos in Storyline

The video I create in PowerPoint is the exact same aspect ratio as the Storyline file. For the most part, 16×9 is fine. But if you change the aspect ratio of your .story file make sure you do the same on the PowerPoint slide.

  • Go to slide 1 in PowerPoint and save it as a .PNG image. This image will be what the user sees on the base slide in Storyline and perfectly aligns with the videos that will be on the layers.
  • In the Storyline slide, insert the slide image from PowerPoint.
  • Create the appropriate number of layers based on how many interactive elements you have.
  • On each layer add the appropriate video. Each video should play automatically. I also recommend putting a hotspot over the video so the user can’t click on the video to start/stop it.
  • On the video layer, add a trigger to pause the video when it reaches either a certain time or cue point. I like to add cue points so I can nudge them without modifying the trigger. The video should pause at the apex of the object rotation.
  • Add a trigger to unpause the video. It could be a simple button or perhaps a hotspot.
  • Add a trigger to hide the layer when the media completes. This should take you back to the base slide.

Click here to view the tutorial on creating an interactive video.

That’s basically it. Of course, there’s a lot more you can do to decorate the layer or add additional content. It just depends on your needs. Practice the technique first and once you have it set, see what you can do.

If you do create something, please share it with us so we can see it.

Events

Free E-Learning Resources

Want to learn more? Check out these articles and free resources in the community.

Here’s a great job board for e-learning, instructional design, and training jobs

Participate in the weekly e-learning challenges to sharpen your skills

Get your free PowerPoint templates and free graphics & stock images.

Lots of cool e-learning examples to check out and find inspiration.

Getting Started? This e-learning 101 series and the free e-books will help.


3D models in PowerPoint

I shared a cool 3D interaction in a recent workshop demo and have had lots of people ask how I built it. You can check out the interaction in this Rise demo.

Creating the interaction is a two-step process:

  • The first step is creating a video of the 3D model as it rotates in and out.
  • The second step is to insert the video and add interactive elements in Storyline.
  • In the case of the Mars Rover module, there’s a third step because inserted the interactive Storyline module into Rise. This is pretty cool because it allows for really simple and fast authoring in Rise, and then when I need custom interactions, I just build them in Storyline. It’s a win-win.

Here’s a previous post where I detailed more of the construction of the Rise demo. For today’s post, I’ll show you how to create the 3D video you’ll use for a Storyline interaction. The tutorial below shows how to create the video using 3D models in PowerPoint.

Click here to view the tutorial on YouTube.

Insert 3D Models in PowerPoint

PowerPoint comes with a number of 3D models. It also supports inserting models shared by the community. You can also build your own 3D models and insert them using standard 3D formats

3D models in PowerPoint

Most likely you’ll want to insert your own 3D object. So it’s nice that PowerPoint supports the common 3D file formats. Here are the supported 3D formats for PowerPoint:

  • .FBX
  • .OBJ
  • .3MF
  • .PLY
  • .STL
  • .GLB

How to insert the 3D model in PowerPoint:

  • Create a slide and then select a 3D object.
  • Insert it just like you would a shape or picture.
  • Position the object on the screen.
  • Duplicate the slide (we’ll need this for the video).

Create the 3D Animation in PowerPoint

The first slide is the starting point from which the 3D object rotates. The second slide is the rotation point. You’ll need to rotate the object so that the position changes from slide 1 to slide 2. You can also move and scale it.

3D models in PowerPoint


  • Reposition the object by either scaling, rotating, or moving it on the slide.
  • Go to slide transitions and select a morph transition for slide 2.
  • Preview the slideshow.

3D models PowerPoint

On preview, you’ll see how the 3D object uses the morph transition to change positions. Pretty slick, huh?

Fine-tune Slide Transitions for 3D models in PowerPoint

That’s the essence of the 3D animation. Now it’s a matter of fine-tuning the animation by playing with the slide timings.

When all is done, the PowerPoint slides will be saved as a video file. That means the animations and transitions need to be automated.

3D models in PowerPoint 3D PowerPoint morph transition timing

  • In the Transitions tab, go to Advance Slide and select to advance after X time. That means the slide will automatically advance at a certain time and doesn’t require you to do anything to trigger the slide movement.
  • Slide 1 is just the starting point so it needs to advance as quickly as possible. I usually set it to advance after .25 seconds.
  • Slide 2 will trigger the morph animation. On slide 2 you can change the speed of the 3D animation by changing the slide duration.
  • Slide 3 (optional) is great if you want to create the sense that the object rotated in and out like the Mars Rover demo.

Save the PowerPoint file as a Video

When all is done, save the PowerPoint file as a video. You have two options: .MP4 and .WMV.

The MP4 format works well but I did find that when I use it with Storyline, the last part of the .MP4 always seems jumpy. It probably has to do with how the .MP4 is encoded by PowerPoint. So if I am using the video to build an interactive file, I save it as a .WMV. Then I let Storyline do the conversion. That resolves any issues you may experience.

That’s basically it for the 3D model video in PowerPoint. You create the two or three slides and save as video. Once you have the video, you can insert it into Storyline or anywhere else you use video. To make it an interactive video like I did with the 3D rover, you’ll need to tune in next week where I show how to create an interactive video in Storyline.

Events

Free E-Learning Resources

Want to learn more? Check out these articles and free resources in the community.

Here’s a great job board for e-learning, instructional design, and training jobs

Participate in the weekly e-learning challenges to sharpen your skills

Get your free PowerPoint templates and free graphics & stock images.

Lots of cool e-learning examples to check out and find inspiration.

Getting Started? This e-learning 101 series and the free e-books will help.


PowerPoint animation tips

I’ve been reviewing a lot of the older PowerPoint tutorials that I’ve posted in the past. Most are still relevant, but a few have changed. In this post, we’ll do a refresh on the basics on PowerPoint animations.

PowerPoint Animation Basics

There are four types of animations in PowerPoint:

  • Entrance: object comes on to the slide
  • Exit: object leaves the slide
  • Emphasis: object remains in place, but animates to provide emphasis or become a focal point
  • Motion path: object follows a drawn path.

powerpoint animation panel

When selecting animations, keep in mind that there are additional animation choices at the bottom of the selection panel. And not all animations are supported when converted for e-learning. And one last tip, because you can animate doesn’t mean you should.

Triggering PowerPoint Animations

Animations are generally triggered by three things:

  • On click: object doesn’t animate until mouse click triggers the animation. This is what you need if you’re syncing animations with narration for your e-learning courses.
  • With previous: object animates with the previous animation. It also animates automatically if it’s the first object on the screen.
  • After previous: object animates after the previous animation.

When you select an animation and when it should start, you also have the option to set its duration and whether to delay or not. Once you understand how to time animations, you can compound them and create all sorts of effects.

You can also set triggers in PowerPoint to animate on other actions, such as clicking on a shape. These work great in PowerPoint by itself but are something I’d avoid when converting PowerPoint slides to an e-learning course.

PowerPoint Animation Pane

The PowerPoint animation pane gives you more control of the PowerPoint animations.

  • You can see the stacking order of animated objects.
  • How the objects are timed to the timeline.
  • Clicking on the drop down arrow exposes more advanced PowerPoint animation options such as start/stop effects and timing.

powerpoint-animation-panel

PowerPoint Animation Painter

You can add multiple animations to a single object. This allows you to create all sorts of complex animations. However, this can also be a time-consuming process. One production tip is to use the animation painter to copy animations from one object to another. This is especially useful if you need to repeat an animation on a different object.

powerpoint animation painter

Here are a Couple of Bonus Tips

When using motion paths, select one of the pre-built motion paths rather than drawing your own. You’ll end up with fewer edit points which will make the animation along the path much smoother. If you do need to draw a custom path, use the curved shape tool and edit the points.

PowerPoint animation motion path edit points

Use the selection pane [Home>Select>Selection Pane] to edit the names of the objects on the slide. It makes it a lot easier to understand what’s happening in the animation pane.

powerpooint animation selection pane

Here are some cool PowerPoint animation tutorials as well as a bunch more. They should spur all sorts of ideas.

Once you understand the basics of PowerPoint animations you’ll be able to create virtually anything you want and build e-learning courses in PowerPoint that won’t give away that they were created in PowerPoint.

Do you have any PowerPoint animation tips?

Events

Free E-Learning Resources

Want to learn more? Check out these articles and free resources in the community.

Here’s a great job board for e-learning, instructional design, and training jobs

Participate in the weekly e-learning challenges to sharpen your skills

Get your free PowerPoint templates and free graphics & stock images.

Lots of cool e-learning examples to check out and find inspiration.

Getting Started? This e-learning 101 series and the free e-books will help.


free PowerPoint template

There are tons of free dingbat fonts available for download. And they’re great to use for your training and e-learning courses. Here’s what you already know:

Great! But what about managing those fonts and quickly previewing the icons and images you can use? It’s a pain to review them one-by-one.

Here’s an easy way to manage all of those free fonts and preview the ones you want to use to create graphic and icon files for your courses and presentation.

Free PowerPoint Template

free powerpoint template icons

You can download the PowerPoint template here. I made a simple video to show how to use it. Essentially you select the font characters and apply the dingbat font to see the correlation between the keystroke and what it produces.

Here are the basic steps:

  • Create a slide for the font characters. I like to create a single slide for each wingding font.
  • Select the characters (watch the video to see how you only select the letters you want to change).
  • Apply the wingding font to the selected characters.
  • This gives you a single screen with all of the characters and corresponding keystroke.
  • If you want to save the slide, type in the name of the font for quick reference.

Click here to view the video.

As a bonus (and slightly different approach) Taylor at Nuts & Bolts Speed Training offers his free font cutter solution and a number of icons.

What do you do to manage and preview those wingding type fonts?

Events

Free E-Learning Resources

Want to learn more? Check out these articles and free resources in the community.

Here’s a great job board for e-learning, instructional design, and training jobs

Participate in the weekly e-learning challenges to sharpen your skills

Get your free PowerPoint templates and free graphics & stock images.

Lots of cool e-learning examples to check out and find inspiration.

Getting Started? This e-learning 101 series and the free e-books will help.


Like many of you, I’m no graphic designer. I do have enough skill to get what I need or know enough to modify existing templates. The good thing is that today, it’s not that big of a deal because you get media assets like Articulate’s Content Library. So you have plenty of quality templates and stock images to help guide your design.

However, there are times when you may be stuck with a specific image and need to figure out how to create different (but matching) layouts without doing a bunch of edits in a different program. Here are some tips based on a presentation I gave recently on creating a professional portfolio. I had three images and used those to create different looks. And I did it all in PowerPoint.

I’ll show you what I look for and a few simple hacks to free up space and create different layouts.

Here’s a PowerPoint tutorial with more detail.

The tutorial below reviews what I’m sharing with more detail so that you can see how to choose and manipulate stock images for your courses and presentations.

PowerPoint Hack tutorial

Click here to view the tutorial video.

  • How to create more whitespace and get rid of extra content.
  • How to create matching backgrounds.
  • How to create content areas.

PowerPoint Hack: Start with Matching Graphics

Whenever I find a stock image that works for my project, I try to find more from the same artist. And if that’s not possible, I try to find images that are very similar in style. This allows me to mix and match elements. In the case of my presentation, I started with these three images:

PowerPoint hack

And with those three images, I was able to create various distinct slides.

PowerPoint hack various slides

PowerPoint Hack: Identify Content Buckets

By themselves, the stock images look fine and really don’t require any edits. However, when it comes to adding custom content, then the stock images have some constraints especially when it comes to adding content.

Identify places where you can add content (like images and text). If you start with a large enough stock image, you’ll be able to scale it and still maintain visual quality.

Here are a few areas from the images that can be modified to become content buckets.

powerpoint hack content area

PowerPoint Hack: Create Whitespace

After identifying places to put content, I look for ways to declutter the image and create more white space. There are a few ways to do that:

  • Cover up part of the stock image to get rid of clutter.
  • Zoom in and focus on clean flat areas.
  • Crop and reposition the image.
  • Create your own white space using image elements.

Here are just a few looks taken from a single image. In the first batch, I created three iterations of the one image.

PowerPoint hack custom layouts

And in the second, I replicated the background to give me enough whitespace and room to create my own matching images. In the presentation, I added a few white boxes to represent pages.

To learn more, watch the tutorial video. It provides the detailed step-by-step process.

The key point is that all of this is done right inside of PowerPoint and doesn’t require special skills or advanced features. What’s nice about this is that it only takes a few minutes and this approach provides an easy way to create professional quality layouts that are consistent in how they look.

Events

Free E-Learning Resources

Want to learn more? Check out these articles and free resources in the community.

Here’s a great job board for e-learning, instructional design, and training jobs

Participate in the weekly e-learning challenges to sharpen your skills

Get your free PowerPoint templates and free graphics & stock images.

Lots of cool e-learning examples to check out and find inspiration.

Getting Started? This e-learning 101 series and the free e-books will help.


free fonts

In an earlier post, we looked at how to convert dingbat and wingding fonts into vector images that you can use in your e-learning courses and presentations. They’re great for creating icons or bullet lists.

Not that you know how to convert the fonts into vector images, you need some fonts to use.

I reviewed a bunch of the free fonts and tried to sort to the those that are free for commercial use. If you want to search on your own, look for facefonts, dingbats, or wingdings. They tend to produce good results. Also, most of the free font sites have an assortment of these fonts.

As always when using free resources, confirm the licensing agreement and provide proper attribution. And it’s still good practice to give the owner props.

Free Faces & Character Fonts

free font icon

Free Icon Fonts

free font icons 2

Free Shape & Arrow Fonts

free fonts arrows

Are there certain fonts like these you like to use?

Events

Free E-Learning Resources

Want to learn more? Check out these articles and free resources in the community.

Here’s a great job board for e-learning, instructional design, and training jobs

Participate in the weekly e-learning challenges to sharpen your skills

Get your free PowerPoint templates and free graphics & stock images.

Lots of cool e-learning examples to check out and find inspiration.

Getting Started? This e-learning 101 series and the free e-books will help.