The Rapid Elearning Blog

Archive for the ‘Tutorials’ Category


Articulate Rapid E-Learning Blog - create free callouts in PowerPoint

In an earlier post I shared over 100 free callouts for you to use with your online training courses. Who doesn’t like free?

There are plenty of free callouts from which to choose. However sometimes the free ones just don’t work and you’ll need to create your own. So today I am going to show you how to create your own callouts.

How to Create Your Own Free Callouts in PowerPoint

One of my favorite features in PowerPoint 2010 is combining shapes. In fact, I have it as a tab in my PowerPoint ribbon so I always have quick access to that feature. Being able to create shapes in PowerPoint means I can create my own callouts. Here’s how:

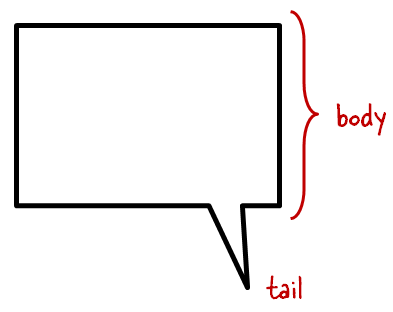
  • What is a callout? The callout is made of the body where we add text. And then it has the tail that points in the direction of the talking character. So it’s basically just two shapes. We’ll combine those in PowerPoint.

Articulate Rapid E-Learning Blog - the anatomy of a callout

  • Add a shape to the slide. I like rounded rectangles because they’re a bit more organic. Ovals are nice, too.
  • Add a tail shape. I like to use the lightning bolt. Some people use the crescent or triangles. It really doesn’t matter as long as you can get the look you want.
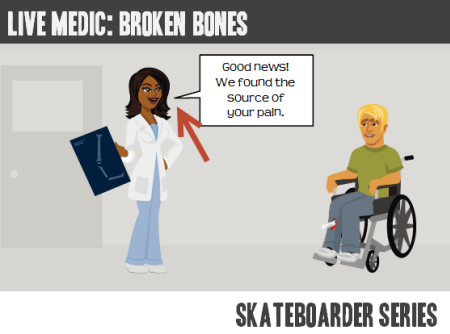
  • Position the callout so that it aligns with the speaker. This is where creating your own comes in handy. You can position the body and tail before creating the final shape.

Articulate Rapid E-Learning Blog - example of a callout in PowerPoint

  • Combine shapes in PowerPoint to create a single shape.
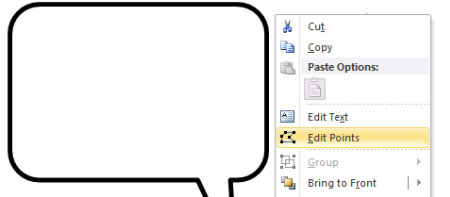
  • Edit points to create more customization. If you want to get fancy, use the Bezier curve. Right click on the shape and select edit points to access this feature.

Articulate Rapid E-Learning Blog - edit points in PowerPoint shapes

Tutorial: How to Create Callouts in PowerPoint

Here’s a quick video to show how to create your own callouts using PowerPoint.

Click here to view the video.

Tutorial: How to Create a Callout Template

This tutorial shows you how to create a template for callouts that you can use to quickly change the shape of the callouts you create.

Click here to view the tutorial.

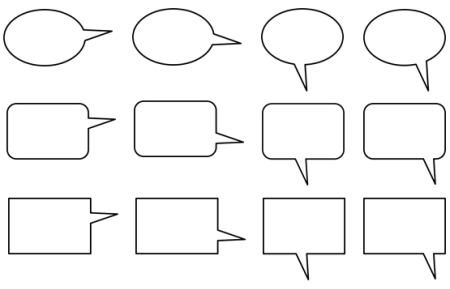
A Dozen Free Callouts

To help you out, I created a few callouts. But I encourage you to create your own.

Articulate Rapid E-Learning Blog - free callout graphics

Click here to download the free callout graphics.

Take advantage of the free downloads. But also learn to build your own callouts. That way you’ll always have what you need when you need it.

If you do create some and want to share them, send me an email and I’ll make them available to the rest of the community.

Events

Free E-Learning Resources

Want to learn more? Check out these articles and free resources in the community.

Here’s a great job board for e-learning, instructional design, and training jobs

Participate in the weekly e-learning challenges to sharpen your skills

Get your free PowerPoint templates and free graphics & stock images.

Lots of cool e-learning examples to check out and find inspiration.

Getting Started? This e-learning 101 series and the free e-books will help.


Articulate Rapid E-Learning Blog - hundreds of free PowerPoint tips and tricks

I’ve been doing this PowerPoint stuff for so long that I often think the tips I share are common knowledge and everyone knows them. But every time I do a workshop, I’m reminded that what may be old to me is often new to others.

Over the years I’ve shared all sorts of PowerPoint tips and tricks. But with the blog approaching 100,000 subscribers that means there’s a lot of people who probably didn’t see many of the previous PowerPoint posts.

So in today’s post, I’ve included a list with every single PowerPoint tip shared in the blog up to this point. They include tips on creating custom graphics, assembly of interactive elearning, and getting more out PowerPoint’s features.

If you’re looking for a good resource on PowerPoint tips, this is a post worth bookmarking.

Tips on Creating Rapid E-Learning Courses in PowerPoint

Building an elearning course with PowerPoint is not the same as building a presentation. Many of the production techniques are different. This list of posts offers some good tips on building your rapid elearning courses in PowerPoint.

Articulate Rapid E-Learning Blog - PowerPoint and rapid elearning rocks, especially with Articulate Studio

Use PowerPoint for Graphic & Visual Design

PowerPoint is a versatile application that lets you build your own graphics and illustrations. This list of posts walks through all sorts of graphic design and illustration tips.

Articulate Rapid E-Learning Blog - a bunch of tutorials on creating graphics in PowerPoint

Get More Out of PowerPoint Using These Tips

Most of us probably use a small fraction of PowerPoint’s features. However, it is a very capable application. And onc
e you understand what you can do with it, it’s like having a brand new tool. The following posts dig through various PowerPoint features so that you can build rapid elearning courses and get more out of PowerPoint’s capabilities.

Articulate Rapid E-Learning Blog - free tutorials that show how to get more out of PowerPoint's features

Never-ending PowerPoint Tips

The elearning community is active in sharing tips and tricks. Many in the community create how-to tutorials in Screenr. We try to capture all of the PowerPoint tutorials we find in the community.

This link is updated every time we bookmark a new PowerPoint tutorial.

So there you have it, a career’s worth of PowerPoint tips and tricks. Of all of the PowerPoint tips I’ve shared, which is your favorite or is the most eye-opening? I’d love to know. Share it via the comments link.

Events

Free E-Learning Resources

Want to learn more? Check out these articles and free resources in the community.

Here’s a great job board for e-learning, instructional design, and training jobs

Participate in the weekly e-learning challenges to sharpen your skills

Get your free PowerPoint templates and free graphics & stock images.

Lots of cool e-learning examples to check out and find inspiration.

Getting Started? This e-learning 101 series and the free e-books will help.


Articulate Rapid E-Learning Blog - easy way to back up files to the network drive

In today’s post we’ll look at two free applications you can use to synchronize your files between your computer and a network drive or Dropbox folder.

Saving to a Network Drive

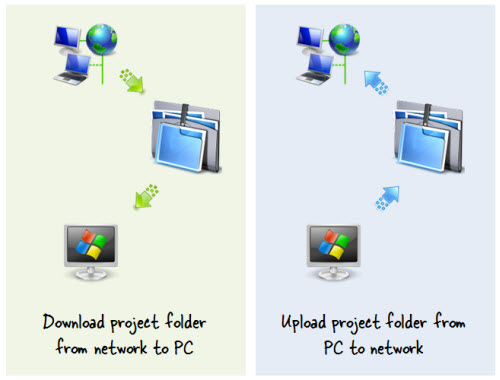
Many of you keep your elearning project files on a network drive. But working with multimedia projects from the network drive isn’t always ideal. That means you’re copying files from your network to the desktop. And ideally, you move them back over when you’re done.

Articulate Rapid E-Learning Blog - move files from the local desktop drive to your network drive

It sure would be nice if there was an easy way to make sure that the files on your desktop are sync’d to your network drive.

Working with Dropbox

Dropbox is great for syncing folders between computers. I use it all the time. But you can only sync from a folder within your Dropbox folder. So that means your project folders have to be in your Dropbox folder.

Articulate Rapid E-Learning Blog - sync your folders so they're added to your Dropbox folder

I prefer to manage my files outside of Dropbox. But I do like using Dropbox to sync my files between computers. I also prefer working outside of Dropbox when I am editing my project files. I don’t want to run the risk that Dropbox’s active syncing interferes with my multimedia production.

It would be great to have a solution that lets me work on my projects outside of Dropbox and then automatically move them to Dropbox so I have access to them on my other computers.

The good news is that there’s an easy and inexpensive way to make sure to backup your network drive or a Dropbox folder. Here’s how.

Microsoft SyncToy

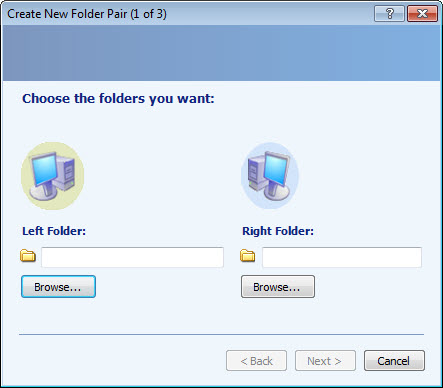
SyncToy is a free application from Microsoft. You select a “Left” and “Right” folder to sync. And then you determine how and when you want to sync them.

Articulate Rapid E-Learning Blog - sync two folders using Microsoft SyncToy

The left folder is what’s active on my desktop and I sync that folder to the right folder which would be either the network or Dropbox folder.

Here’s a tutorial that shows how to set up and sync two folders using Microsoft SyncToy.

  • View the SyncToy tutorial [updated March 2022].
  • Download SyncToy [Microsoft discontinued SyncToy, but the application is available to download here].

To sync the folders, open SyncToy and select “Run.” Of course, that requires you remembering to do so, but that’s where the next step comes in.

Task Scheduler

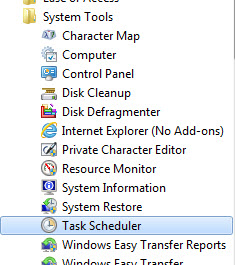
Your PC comes with a task scheduler. It’s in the Systems Tools folder. With Task Scheduler, you schedule tasks (funny how those names work) to run at specific times.

Articulate Rapid E-Learning Blog - task scheduler is in your accessories folder

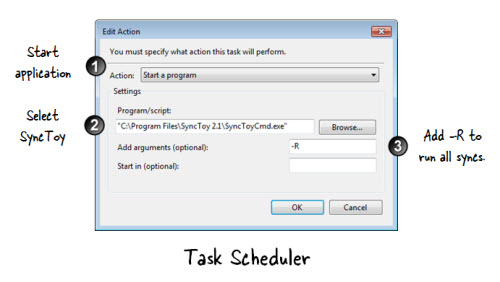
In this case, we want to create a task that opens and runs SyncToy so that the left and right folders are sync’d automatically. I schedule the task to run around 7:00 PM when I am mostly done with work and usually not at my desk.

Articulate Rapid E-Learning Blog - how to set up task schedule to run SyncToy

You can learn more about Task Scheduler here. There are a lot more options, but for this post I kept it really simple.

  • View the Task Scheduler tutorial [updated March 2022]
  • Access Task Scheduler from windows: Start > Accessories folder > System Tools folder

Let’s review the process:

  • Create a folder on your PC for elearning projects.
  • Create a folder on your network (or Dropbox) that will sync with your PC folder.
  • Use SyncToy to synchronize the two folders.
  • Automate syncing the two folders using Task Scheduler to run SyncToy at a scheduled time.

That’s about it. It’s an easy process and great way to make sure that what you have on your PC is sync’d with your network files and Dropbox. It sure beats having to manually copy things back and forth.

Events

Free E-Learning Resources

Want to learn more? Check out these articles and free resources in the community.

Here’s a great job board for e-learning, instructional design, and training jobs

Participate in the weekly e-learning challenges to sharpen your skills

Get your free PowerPoint templates and free graphics & stock images.

Lots of cool e-learning examples to check out and find inspiration.

Getting Started? This e-learning 101 series and the free e-books will help.


The Rapid E-Learning Blog - did the Avengers skip their safety compliance training?

Comic book layouts are pretty popular. And they work well for elearning courses. For one, they look different. It’s that type of contrast that can hook your learners who might be bored with the standard-looking corporate elearning.

On top of that a comic-like layout breaks the content into panels which allows you to control the pacing and flow of information as each panel progressively reveals more. It’s a great way to still have the simplicity of a linear course, but make it seem more engaging.

A while back I shared how to be inspired by others and included links to two comic-style elearning courses. Based on the feedback, the examples were a hit. I got quite a few emails asking how to build a similar type of course.
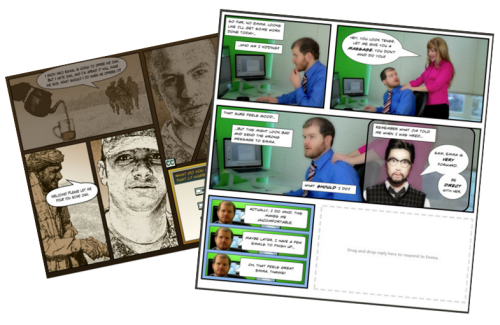
The Rapid E-Learning Blog - examples of comic book style elearning

In today’s post I’m going to show three ways to build a comic-style layout for your courses. To keep it simple we’ll use PowerPoint, but the ideas should work regardless of the tool you use.

Choose a Layout

Layouts are the key distinguishing feature for the comic book look. Typically they follow some sort of grid. The good thing is that there’s really no right or wrong way to create the grid. Some comics use straight lines and even sized panels. And some use an assortment of panel sizes.
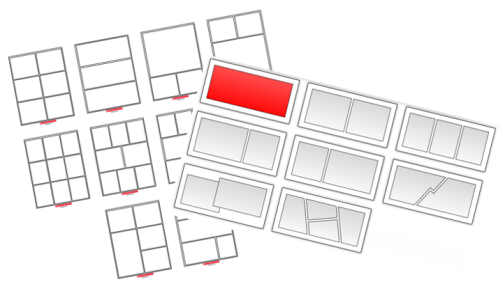
The Rapid E-Learning Blog - layouts for comic book style elearning

If you’re looking for layout ideas, the first place to look is at comic books. You could attend a comic book convention, but you’ll probably have to wear a goofy costume. A better solution is to go to one of those comic creation sites and see what types of layouts they offer. Here are a couple of good sites:

You can also create your own layouts with existing clip art. Here’s an example I shared in this blog post on using Clip Art to create your elearning template. This also lets you build a layout that has that hand-drawn look.
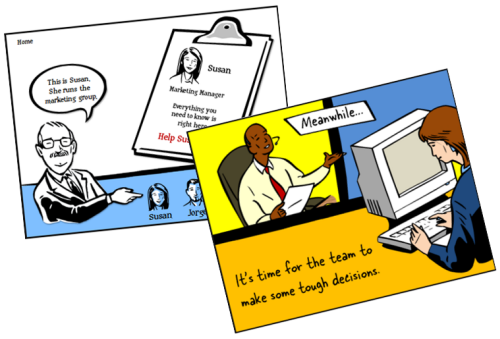
The Rapid E-Learning Blog - build your own comic style elearning using PowerPoint clip art

For this demo, we’ll use a few simple layouts. I created them as shapes in PowerPoint. As you can see below, creating the layout’s pretty simple. Feel free to create as many layouts as you want.

Keep in mind that too many choices can be overwhelming. Instead of building 200 possible layouts, stick with 5-10 common layouts.
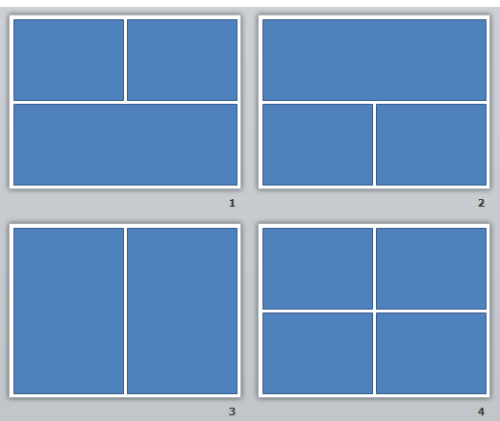
The Rapid E-Learning Blog - comic style elearning layouts built in PowerPoint

Another consideration with layouts is determining how you’ll present the content. Review the two elearning examples above and notice how the layouts follow a consistent pattern. For example, you may have one type of layout for information, another for decision-making, and another for feedback.

Deciding how to use the layouts will help you best determine which types of layouts you need.

One last point, the more panels you add to the layouts, the less space you get. If you have too many panels the content make look cluttered and seem confusing. I’d err on the side of fewer panels.

Option 1: Create Master Slide Panels & Layouts

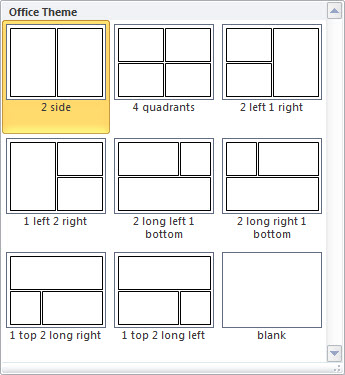
Use PowerPoint’s master slides to create the layouts. You can have as many masters as you like so the best bet is to create all of the possible layouts that you’d use in a single file. And then when you’re ready to go, select a layout for the slide and add your content.
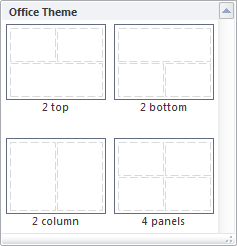
The Rapid E-Learning Blog - build as many layouts in PowerPoint master template as you like

Two ways to work with the master layouts:

  • Create the entire panel look on the slide master. Then apply it to a slide and add content within the panel.
  • Create watermarked panels on the master slide and use them as guides to control placement of your content. The benefit to this is that you have the general layout mapped, but you’re not confined by the panels if your content doesn’t fit perfectly.
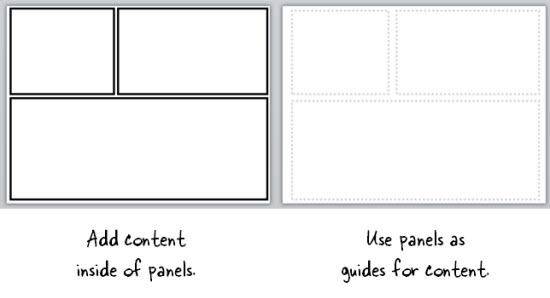
The Rapid E-Learning Blog - create two types of layouts

A few tips when working with these types of layouts:

  • Use thick lines and determine how colorful you want the panels to be. Think loud and in your face.
  • Not all of your content will fit perfectly in the panels. That’s OK. Build your content on the panel and get it to fit the best you can. Then copy and paste it as an image. Use the crop feature to perfectly crop it to the panel.
  • Tutorial: this tutorial walks through the template and shows a few production tips.

Option 2: Create Custom-Sized Slides for Each Panel

Instead of building the layouts on the master template, build them on the slides. This gives you more control over the panels because you have direct access to them since they’re not buried in the masters.

Build a master PowerPoint file that has all of the layouts you’d use. Then start with that file when you want to build a comic-inspired course. Make sure to save it with a different name. Duplicate the layouts you want and then add your content.

How to add content to the panels:

  • Instead of creating your panel shapes on the master slide, create them on the slide. This lets you manipulate the shape at the slide level. Add content on top of the panel shape.
  • Create panel shapes with thick lines and no fill color. Then place them on top of the content. The thick lines will cover up anything that doesn’t fit perfectly.
  • Fill the panel shapes with an image. I like this approach because the panels and content will always align perfectly. The only thing that changes is the fill image for the shape.

Bonus tips:

Option 3: Create a Master Panel Image

This is probably the easiest way to create a comic layout. Instead of messing with a bunch of images and trying to get everything laid out perfectly, just create a series of layout images that you place on top of your content.

Essentially, you have one image of the entire page. Then you cut a hole out of the page for each panel. All of the content sits underneath the page image and can only peak through the holes. This guarantees that everything is perfectly aligned inside the panel.

I like this approach because you can move each object in the panel and the overlaid master image masks any overflow to create the illusion of panels.

Extra tips:

  • Add your page images to the master slides so that you have a layout. This will act as a general guide. Your slide for each layout you provide should consist of a master slide with the same page layout and the page layout image on the actual slide that acts as the cover.
  • Be sure to use the selection pane in PowerPoint (starting with PowerPoint 2007). Hide the page image and add your content using the master as a guide. Then unhide the page layout on the slide when you’re ready to publish. Make sure the cover image is always on top in the selection pane.
  • Tutorial: How to create layout mask images to use as panel covers.

To help you out, I created a starter PowerPoint template pack. You can download it in the elearning community. It includes folders for each type of template. You can use them as they are or build your own.
The Rapid E-Learning Blog - example of the free PowerPoint template demo

Comic strip layouts are popular and a nice way to make your courses look a bit different. The trick is to determine the type of layout you want and how to get the content into the panels with the least amount of work.

There are many ways to layout the comic panels. Once you decide the type of layout you want, then you need to determine how you will get the content into the panels.

Events

Free E-Learning Resources

Want to learn more? Check out these articles and free resources in the community.

Here’s a great job board for e-learning, instructional design, and training jobs

Participate in the weekly e-learning challenges to sharpen your skills

Get your free PowerPoint templates and free graphics & stock images.

Lots of cool e-learning examples to check out and find inspiration.

Getting Started? This e-learning 101 series and the free e-books will help.


The Rapid E-Learning Blog - 3 PowerPoint tutorials

I know it’s hard to believe, but apparently, there are many people who don’t like PowerPoint. Obviously, there are a lot of bad presentations created with PowerPoint, but it seems to me the blame rests on the shoulders of the presenter and not the tool. Besides, PowerPoint’s a versatile tool that’s used for more than bad presentations.

Personally, I think PowerPoint’s one of the single best multimedia applications. The secret is to look at PowerPoint in a different way. And once you do that you’ll see that it offers an assortment of capabilities.

I just returned from the Training 2012 Conference in Atlanta where I presented on some PowerPoint tips and tricks. For those of you who couldn’t attend, I’ve included links to PowerPoint resources that I’ve shared in previous sessions.

The Rapid E-Learning Blog - free PowerPoint resources and tutorials.

Recently, I was sharing how PowerPoint makes a good image editor. After the session, someone asked about this video where you learn to create a stickout effect that lets the image stick outside the box. It’s a basic cropping technique that allows you to open up the page and add more visual interest to the screen. The person wanted to know how to do that in PowerPoint.

The Rapid E-Learning Blog - the stickout cropping technique

I like this question for a few reasons. It lets me demonstrate how PowerPoint can be used to edit images. And it helps teach more about the features and capabilities of PowerPoint in general. Even if you don’t use PowerPoint to do this on a regular basis, practicing this technique is an excellent way to learn more about PowerPoint’s features.

So let’s look at a few ways to create the “stickout” effect in PowerPoint.

PowerPoint Tutorial 1

The Rapid E-Learning Blog - edit images in PowerPoint tutorial

Click here to view tutorial 1.

PowerPoint 2010 has a background removal feature. However, if you’re using older versions of PowerPoint you can still get the stickout effect. This tutorial shows how.

PowerPoint Tutorial 2

The Rapid E-Learning Blog - edit images in PowerPoint tutorial

Click here to view tutorial 2.

In this tutorial you learn to use PowerPoint 2010’s background removal feature to create the stickout effect.

PowerPoint Tutorial 3

The Rapid E-Learning Blog - edit images in PowerPoint tutorial

Click here to view tutorial3.

This tutorial combines the background removal feature with a duplicate image. Learning to work with layers and multiple images is definitely going to open possibilities when editing images in PowerPoint.

Consolidated PowerPoint Tutorials

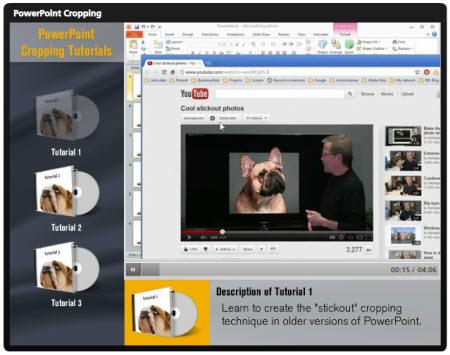
I know some of you can’t access the YouTube tutorials at work, so I downloaded the video files and used them to test a drag and drop video player idea in Articulate Storyline. You drag the DVD icon to the orange box and it loads the video. The cool thing is that it only took a few minutes to build the functionality.

The Rapid E-Learning Blog - PowerPoint tutorial videos in Articulate Storyline drag and drop elearning

Click here to view the three PowerPoint tutorials.

You may never need to use this specific image editing technique in PowerPoint, but going through these tutorials will help you learn more about PowerPoint’s features and develop a greater appreciation for the application’s capabilities.

Events

Free E-Learning Resources

Want to learn more? Check out these articles and free resources in the community.

Here’s a great job board for e-learning, instructional design, and training jobs

Participate in the weekly e-learning challenges to sharpen your skills

Get your free PowerPoint templates and free graphics & stock images.

Lots of cool e-learning examples to check out and find inspiration.

Getting Started? This e-learning 101 series and the free e-books will help.