Here’s an easy way to add some visual impact to your elearning courses. Start with an image and then recolor it. There are all sorts of ways that you can use a colored image in your courses. For example, the colors can match your organization’s brand.
In the example below, you see the original image with three different colors applied. Each color could represent a different section of the same course. Another idea is to color the images based on the emotion or feeling that you want them to convey. They don’t need to be as dramatic as the images below. The color shift can be subtle.
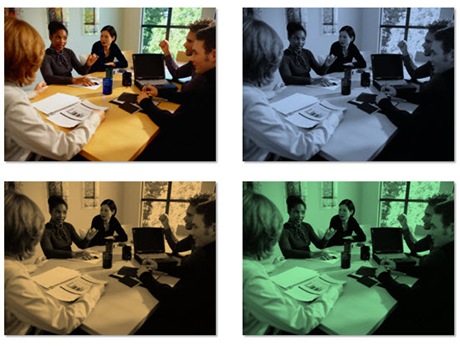
Most graphic editors have an easy way to recolor your images. If you have PowerPoint 2007, you can do this in just a few mouse clicks using the recolor feature. You can even use colors that are part of the color themes. So when you change a theme, all of the colored images are changed as well.
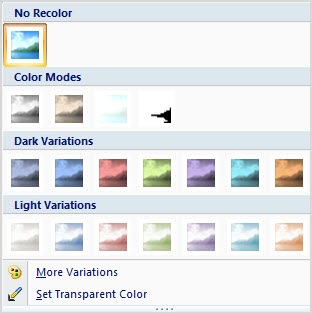
Photos are great because they have a depth and richness that’s not easy to manufacture in clip art or vector images. In addition, they can convey information without using words. Coloring the image allows you to leverage the rich texture of the image to create some visual interest.
Compare the original image with the two examples I made below it. The original has so much going on that it’s not easy to control where the learner is looking. By coloring it, you tone that down a bit and gain some control.
You also have a lot of options in how you can use the colored image. In the first demo, I use it as a title screen. I’m able to mute the brightness of the original and still capture the essence of the how the image relates to the content. The second image uses a rectangle with a gradient fill that matches the overlay color. Then I made the top part of the gradient transparent. The good thing is that I was able to do all of that right inside PowerPoint. Obviously, these are both simple examples, but they give you a sense of what you can do.

When we shoot our own photos they typically don’t look as nice as those done by professionals. There are usually some lighting imperfections or color shifts. The light source will cause your images to color a certain way. For example, tungsten lights are yellow; fluorescent lights are green; and daylight is blue. So when you shoot your own photos without any real lighting considerations you’ll end up with images that are a little off because of the original light source.
Using the coloring technique, you can cover up imperfections in lighting and still use the photos. It’s a great way to bring "real" people into your courses and not worry about being a professional photographer.
You’re also not limited to using the entire photo. In the example below, I used a “cutout person” and then colored her.

You can also do the opposite, where you color the background image and insert the cutout person on top, as I did in the example below. It just all depends on where you want the learner to focus.

Applying a color to your image is relatively easy to do yet it opens the door to all sorts of creative uses. For example, in a recent blog post on using your PowerPoint slide notes I customized an image to look like a subject matter expert. Does this add value as an instructional design consideration? No. However, it can make the way you present your information a little more visually interesting. And this does contribute to your instructional design.

The only limitation with this technique is your creativity. How would you apply this idea to your elearning courses? Feel free to share your thoughts by clicking on the comments link.
If you liked this post, you might also like these:
Events
Free E-Learning Resources









0
comments