This probably the best, and the most fantastic post i have ever seen, can’t wait to dig deep inside your other blogs.
Here’s an Easy Way to Update an Old Course Without the Source Files
February 12th, 2019
“Help, I need to update my course, but I don’t have the source file. All I have is a link!”
This is a common issue. Here’s a solution that may work for you and it’s generally easy to do.
In a previous posts, we looked at how to copy text from old Flash courses and how to transcribe them using into new slides.
How to Convert the Course to HTML5
The secret to all of this is screen capturing your old e-learning courses. You can do what I am going to show with a number of tools. For example, Storyline has a screen capture feature where you can bring in one screen at a time. That works fine for smaller courses.
For this demo, I am going to use Screen2Gif because it works well for this demo that has a lot of slides, it’s easy to use, and it’s free.
View the detailed tutorial on YouTube.
Below are the basic steps. The video above has more detail. Essentially, we’re going to capture the old course screens, bring them into PowerPoint as images (because we can do a simple batch import), and then we’ll import the PowerPoint slides into Storyline.
Once inside of Storyline you can add interactive elements and additional content.
Basic Steps for Converting the Old Course
- Determine the original course slide resolution. Don’t include the player; just the slide. Most courses are usually 4:3 or 16:9.
- Create a PowerPoint file at the same resolution as the course images.
- Create a Storyline file at the same resolution as the PowerPoint file.
- Go through the course using a screen capture application. This will capture all of your course screens. If you have interactions, you’ll go through those as well. You want a copy of every possible screen. Just click on everything clickable. I’d even go through the quizzes, just so you have the screens. You can use that content later.
- Review the screens you captured and get rid of duplicates.
- Save the separate frames captured as image files.
- Batch insert the screen capture images using the album feature in PowerPoint. I like to force them to fit the slide. That way I don’t need to do any adjustments. Things should be aligned.
- Import the PowerPoint slides into Storyline.
- From there, it’s a matter or making some edits and adding interactions, quizzes, and whatever else the course requires.
- For example, you could take the screen for a tabs interaction and combine them into one slide with layers for each tab. Then add hotspot triggers to the layers.
Example: Course Converted to HTML5
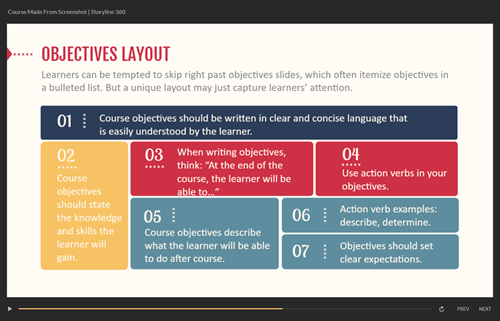
I created an example course using the steps I outlined above. For the demo, I copied the old course screens and created new slides Storyline. Then I published in HTML5. It only took about 10 minutes and considering the time spend, looks pretty decent.
It’s definitely a good solution for a lot of the old compliance training that needs to go from Flash to HTML5, or if you need to update a course and don’t have the source files.
Click here to view the example HTML5 course.
Obviously, the best solution is to rebuild the course from scratch. That works fine if you have a handful of courses. But if you have dozens (or hundreds) that need to be converted to HTML5, then this is a viable solution for many of those courses.
Events
- Everyday. Check out the weekly training webinars to learn more about Rise, Storyline, and instructional design.
Free E-Learning Resources
 |
 |
 |
|
Want to learn more? Check out these articles and free resources in the community. |
Here’s a great job board for e-learning, instructional design, and training jobs |
Participate in the weekly e-learning challenges to sharpen your skills |
 |
 |
 |
|
Get your free PowerPoint templates and free graphics & stock images. |
Lots of cool e-learning examples to check out and find inspiration. |
Getting Started? This e-learning 101 series and the free e-books will help. |
2 responses to “Here’s an Easy Way to Update an Old Course Without the Source Files”
Good step! Pleased to fill color to your ideas.


0
comments