


Thank you so much for yet another great tutorial and tip. You have changed the way I use and view PowerPoint forever. You’re like an ambassador for it. I love your blog, and I follow it. I don’t say thank you enough, but please know that there are many like me who get really excited when you have something new to say and share!
How to Use PowerPoint to Create Custom Stock Images
May 21st, 2013
Many of the blog’s readers are forced to work with limited resources especially when it comes to building the assets for their elearning courses. As many of you have discovered, when working with limited resources we have to MacGyver much of our production.
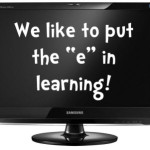
In a recent post on how to create templates for online training, I used the image below. While the image is simple, it is a combination of three graphics and all of the editing was done in PowerPoint.
Today I’ll show you how to use PowerPoint to modify your stock images.
Free Stock Images from Microsoft Office
Microsoft Online has all sorts of great stock images. In fact, many of the for-pay services provide images through the Microsoft site. They’re not the high-quality choices you’d find on their own sites. But I’ve found that for most of the elearning courses I design, the free images work fine.

Of course you can use any image for the tips I am going to show below, but if you’re using PowerPoint and you have limited resources, then taking advantage of the free resources that Microsoft provides is a no-brainer.
How to Modify Free Stock Images
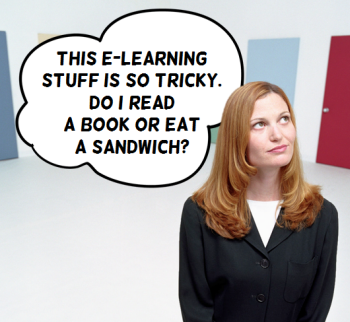
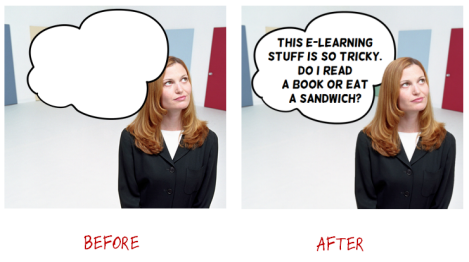
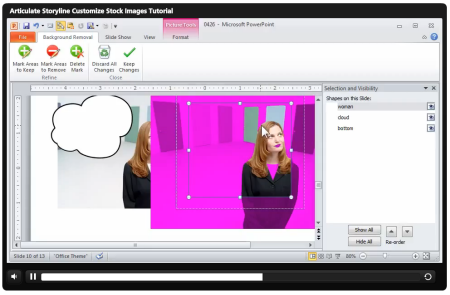
In the example below, I have an image of a woman thinking. I wanted to add a thought bubble to the image. But to add a bit more depth, I wanted the thought bubble to be slightly behind the woman.
Here’s how I created the image using PowerPoint:
- The final image is layered. I duplicated the woman thinking image. One sits on top and one on the bottom. In between the two images is the thought cloud graphic.
- To get the thought cloud behind the woman’s head requires that we remove the background of the top woman image. Use PowerPoint’s remove background feature to isolate the woman. Don’t worry about it being perfect. There’s a duplicate image on the bottom that will hide the imperfections.
- Add the thought bubble and text. And then place the thought bubble behind the top image and above the bottom image.
Tutorial: Use PowerPoint for Basic Graphic Design
Here’s a tutorial that walks through the steps that I outlined above.
Click here to view the tutorial.
As you can see, PowerPoint’s valuable for more than presentations and rapid elearning courses. It’s a great tool to meet some of your basic graphic design needs, too.
How are you using PowerPoint to create your own images? Share your thoughts here.
Events
- Everyday. Check out the weekly training webinars to learn more about Rise, Storyline, and instructional design.
Free E-Learning Resources
 |
 |
 |
|
Want to learn more? Check out these articles and free resources in the community. |
Here’s a great job board for e-learning, instructional design, and training jobs |
Participate in the weekly e-learning challenges to sharpen your skills |
 |
 |
 |
|
Get your free PowerPoint templates and free graphics & stock images. |
Lots of cool e-learning examples to check out and find inspiration. |
Getting Started? This e-learning 101 series and the free e-books will help. |
You might also like:
15 responses to “How to Use PowerPoint to Create Custom Stock Images”
Tom, I’ve learned so much from your tutorials about image manipulation.
Microsoft’s free images are my main resource for eLearning courses. It’s amazing what even simple cropping and flipping can do to provide a better fit on screen. And PPT’s color correction tool is great for making silhouettes, line drawings, and other simple graphics blend in with the course template.
Thanks again for all the great tips!
Tom – once you opened the door to using PPT in this way, I have had so much fun! Recently, we did a module and internal marketing for a new system launch. I used photos of employees, removed backgrounds and created my own, used the “cutout” artistic effect in PPT and made the whole thing a comic. Thanks for always keeping our creative juices flowing!
I’ve used graphical images to create an illusion of animation through power point. If you un group an image, you can shift and move parts of the image. Doing so by a small measure repeatedly until the final placement, you end of with multiple images which you can stack one on top of the other. Using PowerPoints Custom Animation function, you can have the images disappear one at a time using very small time intervals and it gives the viewer a perceived look of movement or animation.
It is time consuming, so it must have value to what you’re creating not just to “look cool.”
We put a ‘photo list’ together for our topics during development and planning, which are very specific for our in-house training curriculum. We then use these photos for backgrounds in the PowerPoint slides and use staff pictures for illustrating the concepts we are presenting in the module. We also insert home-made video of our staff on-site acting out key concepts for the training as well. It isn’t a full blown professional result but, the authenticity of “real” staff involved in the training scenarios in “real” local conditions are a great help in effectively delivering the message and in many ways make it “better” than something staged in a studio.
This was a fantastic tutorial! I learn so many awesome tricks from you. Thank you!!!
Tom, thanks for the tips. I had written off the remove background function as too inaccurate and clunky, but after viewing your tutorial, I understand it’s useful for simple applications — and a timesaver. 🙂
I use PPT to do the following:
1) create LOST or TIPS style buttons using the 3-D formatting options
2) Create a fake PLAY ( arrow ) button on an image that is LINKED to a video when the embed image doesn’t really say or show what may motivate a user
3) Create infographics
4) Create mini feature bits from a database or a question answer section that is more appealing.
5) build sharp, fast easy promo’s for library resources to post on Social Media such as Facebook and Pinterest
Great post! I try to tell people that I use Power Point to graphics design and I typically get strange looks. You can do so much in Power Point.
We started creating 2 minute tech tip videos for staff so they can see what you can do to create amazing graphics without being a graphic design genius.
JUST GREAT!
My 10 year old daughter loves using all your tips and tricks in her PowerPoints for school.
This is so cool!!! I love eLearning Heros and Articulate Storyline :o)
Great tips! I have never really thought about using PowerPoint to generate custom images. I will be using this in the future!
This was a very helpful tutorial as I usually have to use advanced software to edit graphics and this way I will be able to do it in PowerPoint! Thanks all for the tips


0
comments