


[…] However, if you need to do screenshots and don’t want to spend any money, then odds are that one of these solutions above will work for you. How are you using screenshots in your elearning courses? Share your comments here. […]

Screenshots and elearning go hand-in-hand. I use them for a lot of my software training. I also use them almost daily for project reviews. It’s easy to create a quick screen grab and then add a few notes. I also use screenshots when I run across a template or idea that I may want to use in a future elearning course. Just grab an image and save it in my ideas folder for later.
If you do a search you’ll find that there are a ton of screenshot products on the market—both free and paid. The free ones are hit and miss. Most look like they were built in 1995 and many are bundle with adware or possible malware. I’d stick with a paid tool because they don’t cost that much. But what do you do if you don’t have the money for a paid tool and you don’t want to download risky free product?
The good thing is that if you need to do screenshots, most likely you already have the tools to do so. Here are three easy ways to do screenshots and they won’t cost you a bit. Below is a quick description and then I added a tutorial that shows how they work.
The Old Fashioned Way
Years ago when you wanted a screenshot you pressed the PRINT SCREEN button. This took a snap shot of your screen and loaded it on the clipboard. Then you pasted the screenshot into something like MS Paint and made your edits. The print screen option still works today (unless you have it mapped to another application).
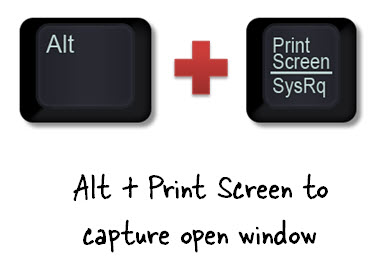
- Print Screen: captures your entire desktop and loads the image on the clipboard. Paste the image into a different application to make edits.
- ALT+Print Screen: captures your active window.
You can learn more about using Print Screen here.
Windows Snipping Tool
I’ve been using the Snipping Tool since the days of the tablet PCs. Starting with Microsoft Vista it’s available to all Windows users. It’s located in the Accessories folder. I have it pinned to my task bar for quick access.
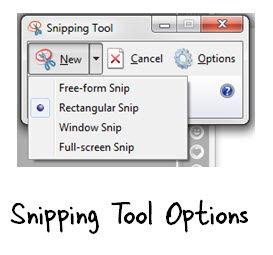
With the Snipping Tool you can capture freeform (like a scissor cut out), rectangle, window, or full screen. After snipping part of a screen you can highlight and annotate the image. When you’re done save it to your favorite image format.
Here’s more info on the Snipping Tool.
PowerPoint 2010
Starting with PowerPoint 2010, Microsoft included a feature that allows you to quickly grab a shot of any open window or do a screen clip of anything on your desktop. This is perfect for creating quick interactive software simulations. Grab a series of screenshots, place them on some slides, and then add hyperlinks to simulate the software like I did in this quick demo.
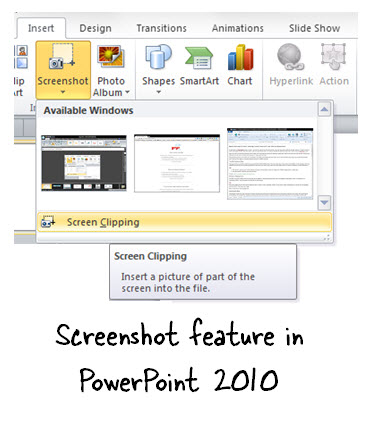
Another nice benefit of using PowerPoint is that you can annotate or embellish the screenshots and then save them as single images. Because of the freeform authoring in PowerPoint, creating custom graphics is super simple. By the way, Articulate Storyline also has a similar feature.
You can learn more about PowerPoint’s screenshot feature here.
Quick Tutorials on Creating Screenshots
Here are three tutorials I built in Storyline where I walk through all three screenshot applications. You can check them out below.
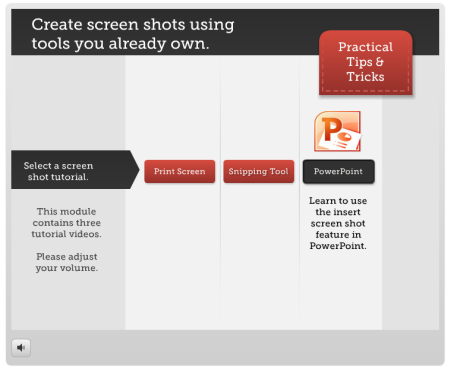
Click here to view the screenshot tutorials.
If you want more robust screenshot features, then you can find all sorts of free and for-pay applications.
However, if you need to do screenshots and don’t want to spend any money, then odds are that one of these solutions above will work for you.
Events
- Everyday. Check out the weekly training webinars to learn more about Rise, Storyline, and instructional design.
Free E-Learning Resources
 |
 |
 |
|
Want to learn more? Check out these articles and free resources in the community. |
Here’s a great job board for e-learning, instructional design, and training jobs |
Participate in the weekly e-learning challenges to sharpen your skills |
 |
 |
 |
|
Get your free PowerPoint templates and free graphics & stock images. |
Lots of cool e-learning examples to check out and find inspiration. |
Getting Started? This e-learning 101 series and the free e-books will help. |
You might also like:
34 responses to “Need Screenshots for Your E-Learning? Here Are 3 Tools That You Already Own.”
[…] Traduzione autorizzata tratta dal post originale di Tom Kuhlmann sul “Rapid E-Learning Blog”. Il post originale è disponibile qui […]
Leggi la traduzione autorizzata in italiano del post qui:
[…] Go here to see the original: Need Screenshots for Your E-Learning? Here Are 3 Tools That You Already Own. » The Rapid eLearning … […]
Thank you for bringing me from the old fashion way to these rather interesting alternatives!
🙂
Belen
I use a free cropping tool called IrfanView. It allows you to crop pictures (taken with the Print Screen function) and save as jpegs if necessary or copy and paste into your document. There are many useful variations you can do with screen shots in this program. There is a safe download for it at CNET (just remember to uncheck the “install Google Toolbar” option during the download).
Another FREE screenshot tip is for anyone with the Office Suite, including OneNote (since 2007). If OneNote is installed, you can type the “Windows” key, plus the “S” key. It will gray your screen from anywhere – the web, in any application, your desktop, etc. Then simply highlight any area on the screen to take a screenshot of any portion, copy to the clipboard and then paste (control + V) anywhere!
Nice article. Another free/paid app is called Screenpresso. Been using it for a couple of years and really like all its’ features.
It can even capture scrollable pages and also captures video. Take a look. It’s unbelievable.
Thank you for the Windows Snipping Tool note. I use SnagIt all the time, and I love it. But the Snipping Tool is a great option when I’m on a PC where it’s not available. Also, my husband is a business teacher and the Snipping tool is a great option for him to show his students.
Missing from the this post are instructions how to make screenshots using Mac OSX. Fortunately it’s quick, easy, and no additional softeware is required. The entire Mac screen or a used defined portion can be captured. Here’s how to do it:
Entire screen: Simultaneously press SHIFT-COMMAND-3. You’ll hear a camera shutter sound, and the entire screen will be saved to the Mac desktop. The file will be named “Screen Shot” along with both a date and time stamp.
User defined screen print area: Simultaneously press SHIFT-COMMAND-4. The cursor will change to a crosshair along with two (2) changing numbers, which correspond to the position of the cursor on the screen. Drag the cursor to select the area you wish to capture. When you release the track pad or mouse button, again you’ll hear the camera shutter sound. The file will be named “Screen Shot” along with both a date and time stamp.
Mac OSX screen captures can be modified with graphics program if needed. The default file format is Portable Network Graphics Image (PNG) and will open (by default) in Preview).
These are great tips and tools – thank you so much for always sharing these great things with us all!!
My company provides us with SnagIt, which will do all of this plus allow you to capture scrolling images – which is helpful for capturing websites.
A problem that I come across frequently is the need to do a screenshot of a contextual menu on the computer. I have been using a “free for educators” version of Screenprint32 for years, because it allows that function. However, there was talk it would not be supported for Windows 7, and it took a long time for it to be supported. I lucked out this time and was able to download it at http://screenprint32.en.softonic.com/download, but what other “sort of free” or “free for educators” software is there with that capability, in case my luck runs out?
By the way, I also use and LOVE Snagit, but it doesn’t have that capability that I can find.
Ideas would be greatly appreciated.
[…] these solutions above will work for you. How are you using screenshots in your elearning courses? Share your comments here. […]
Hi Tom,
I own & use Snagit, but I often use a free (open source) app called Greenshot, which can be downloaded from sourceforge.net
It isn’t fancy, but it does a great job for simply grabbing screenshots & annotating them.
Thanks for the suggestions. I didn’t realise what the Snipping Tool was used for (just ignored it), so good to know what it is and does.
Eran
There are several free Firefox add-ons for capturing an entire webpage: Upload Screenshot (http://www.uploadscreenshot.com/) and FireShot (http://screenshot-program.com/fireshot/) are two that I’ve used. My favorite was Screen Capture Elite (http://www.grizzlyape.com/addons/screen-capture-elite/), but it hasn’t kept up with Mozilla’s rapid release cycle.
Ah! Did not know about the PP option or Windows Snipping. I also use Snag It a lot, but this is a last faster for simple screen shots!
thanks for all the tips on creating screenshots.
Another option which I have found really useful,and if you own an ipad – what ever screen you have open on your ipad, you can capture with the internal camera. It creates a clear image of the web page or app. Its also good as you can enlarge the area to get a closer view. Ive used it for showing different applications on the ipad, ibooks, storyline resources. Great for demonstrating mobile applications for learning.
the images are saved in your photos library which you can either email to yourself OR connect the ipad to your computer and copy the album of screenshots.
Kate
Jing from Techsmith (same company as Snagit)http://www.techsmith.com/jing-features.html is a very nice capture tool in a free to use version; can capture and annotate shots plus create screencasts up to 5 minutes long. Available for both Windows and Macs.
[…] Translator Start translating Stop translating Close Close and show original page Select Need Screenshots for Your E-Learning? Here Are 3 Tools That You Already Own. Screenshots and elearning go hand-in-hand. I use them for a lot of my software training. I also use […]
Thank you for the details. It is very useful.
Don’t forget that the Free Adobe Acrobat Reader 9/X has a snapshot tool also for PDFs.
This is for Heather Voran, above:
SnagIt *can* capture context menus. You just have to turn on the “Cursor” option (the tooltip says “Include cursor in caption”).
If your screen grab includes a pointer or a hand you don’t want, it’s very easy to get rid of those artifacts as long as they’re away from the menu’s text.
SnagIt is a fantastic product, especially for the price. It has handled scrolling captures for a while now, and I understand the latest version supports video too.
I also use the Snipping Tool for the same reasons Tom mentioned.
And thanks to Tom for teaching me how to use PowerPoint to create images! You are a great resource for us all!
Powerpoint 2010 has added a lot of functions for dealing with pictures. After you insert the picture, check out the functionality of the Picture tab.
The “Remove Background” command used to require another tool to remove the background when you wanted to put a picture on a non-white PowerPoint slide.
I also use SnagIt and the free OneNote tool that, as stated above, can be accessed by pressing Window Key+S and dragging to grab any area on the screen, or right-clicking the OneNote icon in the systray area and selecting “Create Screen Clipping.”
Heather Voran asked about a free tool that takes screenshots of “contextual menus.” Heather, if by this you mean a screenshot of an opened menu, the OneNote screenshot tool does this. SnagIt can also do this if you turn on the Timer Setup.
Snagit is a powerfull tool too.
[…] on http://www.articulate.com Share this:TwitterFacebookLinkedInEmailTumblrDiggStumbleUponRedditPinterestLike this:LikeBe the […]
Thx so much! Amazingly generous and skilled. Love reading it.
[…] Start with a screenshot of your inspiring website. Here’s a post that shows you how to use some tools you probably already own take your screenshots. […]
[…] Need Screenshots for Your E-Learning? Here Are 3 Tools That You Already Own. […]
Hi guys,
Snipping tool can capture contextual menus:
1. open snipping tool
2. press ESC (to send snipping tool to the background)
3. locate required contextual menu
4. press Ctrl + PrtScn (this will revive your snipping tool)
Cheers


0
comments