


As ever, Tom, you provide us with such usable tools! As I venture out into the world of (gulps) self-employment, I suspect that your blog is going to become my quick reference guide.
Thanks.
The Rapid E-Learning Blog
Practical, real-world tips for
e-learning success.
Word of Mouth: The Articulate Blog
The inside scoop for Articulate news and product updates.
Community Blogs
Get the scoop directly from
e-learning's heroes.
I’ve gotten a lot of emails asking for a quick way to build puzzle animations. Usually the requests are to build them with no additional software or advanced graphics skills. They also added the words famous to all of us in the rapid elearning world…no time and no budget.
Building a puzzle animation is simple and only takes a few minutes. I built a quick demo of how this could be done just using PowerPoint. Click on the link to see the published version and then learn how I did it by reading the rest of the post.
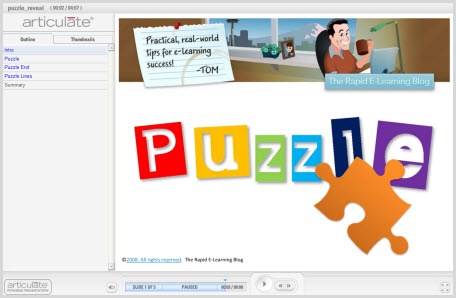
Click here to view the puzzle demo.
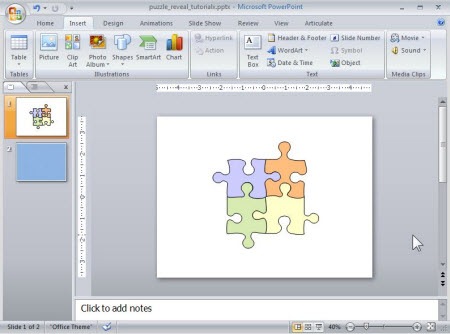
When building animations, the key is to trick the mind into thinking that what it sees is what it sees. In this case, we want it to look like puzzle pieces are added to the screen to build an image.
Instead of building individual pieces and adding them to the screen, what we really do is hide the complete image underneath the entire puzzle. As we remove the puzzle pieces, part of the image is revealed. This creates the illusion that we’re building a puzzle, piece by piece.
To create this effect, you’ll need a clip art image of a puzzle that can be ungrouped and modified in PowerPoint. A quick search of PowerPoint’s clip art will give you one.
Here’s a tutorial to show you how I built it.
Click here to view the puzzle tutorial (9 min).
That’s it. Pretty simple, huh? In essence you’re just creating a hole that peeks into the layer beneath. So you’re really not limited to just the puzzle shapes. You can use it to create the illusion of images that are cut or sized to the screen area. So instead of actually editing the image, you just modify the “hole” that you place on top of it.
This is a quick and simple way to create a puzzle without having to do a lot of editing of your graphics. If you have some tips or tricks, feel free to share them in the comments section. Also, if you have some questions about other tips and tricks like this, feel free to send them my way. I’ll see about doing some simple tutorials.
 |
 |
 |
|
Want to learn more? Check out these articles and free resources in the community. |
Here’s a great job board for e-learning, instructional design, and training jobs |
Participate in the weekly e-learning challenges to sharpen your skills |
 |
 |
 |
|
Get your free PowerPoint templates and free graphics & stock images. |
Lots of cool e-learning examples to check out and find inspiration. |
Getting Started? This e-learning 101 series and the free e-books will help. |
As ever, Tom, you provide us with such usable tools! As I venture out into the world of (gulps) self-employment, I suspect that your blog is going to become my quick reference guide.
Thanks.
Great Post.
I couple questions about the sample puzzle you posted that are a little off topic.
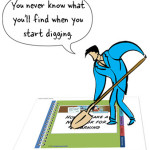
The hands that are displayed in the first slide – I’m assuming that it’s just a stock photo of hands and you added animation to make it look like the hands are placing the title and etc?
How did you make the second slide pause at increments before the slide had completely been covered?
Tom,
This is great! Very creative. I’d like to try this with a calendar to display important dates. I’m assuming I would use the same steps -right?
Could have used this three days ago when I created a WordPress Screencast 🙁 I was going to use the puzzle motif, but went with plain step1, step2 graphics instead.
Very nice. Since I’m a Photoshop man, I didn’t think of using ppt for the puzzle pieces. Very nice indeed.
Awesome idea and demo. Thanks – loved the tips too.
Excellent advice Tom! Thanks a lot for this useful tip!
How do you come up with such a great ideas? I wich I could have all the time to learn this cool stuff from Power Point.
The more I learn the more I like Power Point! 🙂
I didn’t get how you laid out the puzzle pieces on Slide 2 (the background slide) from Build a Puzzle Animation. May I have a copy of the PowerPoint so that I can see how this was done?
Tom,
Once again, terrific post. The nice thing is that these clip art puzzle pieces can be imported into photoshop and edited in any way. They can also be edited simply in ppt. I was interested in creating a more square look to the outside of the pieces and this could easily be done.
thanks!
I am new to elearning design, and am a department of 1. Thank you so very much for your tips! It is very encouraging to have information that will help me develop training on a zero budget, but that looks more professional.
Reeeeallly Appreciate it,
I have been puzzled about how to simply build a puzzle in PowerPoint and you have presented it simply and completely. This elearning stuff really works. I now know how to do it.
Thanks
Oooops, you did it again! Great activity and will apply to current course dev. project. Would ask for luck, but your instructions are all that is needed. Thanks for keeping us smart.
Great work Tom, am always looking forward to your newsletters
Very cool. Thanks, I learn so much from you!
Very nice explanation.Love it and I will go in again to see it. It a very good idea. thank you.And if you need to test anything less call in I will be your student in this. Thank you
This was so useful. It has opened up so many possibilities for me. Thankyou so much. I learn something new every time a newsletter pops up in my email. As a one person eLearning designer in a large organisation, your information is invaluable.
Thank you Tom, that tutorial was very useful! Simple steps -> nice result. Some times the solution is right in front of our eyes, but we can’t see it.
Very interesting Tom!!
Thanks Tom for your ideas – very useful.
I am new to the Articulate world…and from what I have seen so far it is great 🙂
What screen capturing software did you use to create this tutorial? Captivate? Camtasia?
I noticed your html file was player.html which, I think, is Articulate.
Did you import a screen capture into Articulate?
Thanks again!
Great work as usual!I’ve been following you for a long time from Argentina and found your tips really useful
Thanks again for your help
YOur posts continue to amaze. It is a great way to learn. THanks so much and keep em comin’.
-Abby
Thank you Tom. It’s nice to finally find a true Instructional Design eLearn site and not a graphics site pretending to be instructional design!
Finally, someone else who designs with the learner in mind!!
I love your tips – I’ve been in L&D for over 10 years and am new to writing eLearns. Your blog is a godsend!
Jen
Great post, Tom.
Tom, thanks for this – excellent, clear instruction as usual. Lisa, could you tell me how you got the square edges, though?
Thanks
Marg
[…] out their tutorial on how to build a puzzle animation in just a few steps puzzle image […]
Tom, I’d not thought of building a puzzle but I’ve used the same technique for other purposes. In most of my work, when I’m adding text, photos, or some other element to a slide I frequently fade it in. The problem was how to fade in various sections of something not native to powerpoint, say a PDF page. I’ve used the same technique you used. Paste the PDF into the blank screen, cover it with a number of boxes that match the background (one box for each item I want to fade in) then use the fade out for the covering box. Works great!
[…] Build a Puzzle Animation in Just a Few Simple Steps […]
You amaze me!!! Thanks for sharing!
Great stuff Tom! your tips and posts really help so much. It opens up new possibilities in basic tools! Thanks a lot!
Oh thank you!!!!!!!!!
[…] Build a Puzzle Animation in Just a Few Simple Steps walks though the process of building a puzzle sequence that reveals information as the learner advances. There’s a tutorial as well. […]
Thank you Tom for your detailed tutorials. I have really learned a lot from your blog, and I’m looking forward to many more in the future. (I especially liked to hear the little dog barking at the end of the tutorial.)
Thanks alot you gave alot of ideas to do =D
i’ve been searching for ages x.x
Thank you so much for this, you completely saved my presentation!
Good morning Tom,
I have been looking for info on creating a puzzle. I found your blog of Sept 9th 2008. The link does not seem to be working: http://www.articulate.com/community/blogdemo/Puzzle_tutorial/Player.html
Is there a new link you could point me to please? Love your blog, always sharing it with my design team.
Best regards,
Toye Halpin
hi,
i went thru the steps you have mentioned for creating a puzzle, it is really great but i was enable to view the puzzle demo.
thanks
Great idea and explanation. How do you get the puzzle clip art? I can no longer find it on the free Microsoft clipart.
Thanks
Great Post Tom. Any way of using the drag and drop functionality to enable the user to be able to move pieces together with the final correct piece placement acting as a “correct response?”
thanks a lot. very useful!

Subscribe to get the latest tips plus this free 63-page e-book.
Learn more about the Insider’s Guide to Becoming a Rapid E-Learning Pro. The Rapid E-Learning Blog shares practical tips & tricks to help you become a rapid elearning pro.
It is hosted by
Tom Kuhlmann who has over 20 years of hands-on experience in the training industry and currently runs the community at Articulate.

© 2026 Articulate Global, LLC | Terms | Privacy | Cookie Preferences
![]()
0
comments