The Rapid Elearning Blog

Archive for the ‘Articulate 360’ Category


technical support & troubleshooting tips

I’m really proud of the e-learning heroes community. It’s active and filled with so many helpful people. I’m always amazed at how willing they are to answer questions and how quick they are to respond. It’s a testament to the outstanding people in our industry who are eager to share and help (which is probably why they’re in our industry in the first place).

Many e-learning developers are small teams of one or two people, so I see the community as an extension of the team. It’s like having a helpmate in the cubicle next door.

Today, I’d like to offer some time-saving tips that will help you troubleshoot your projects when asking for help. This way you get the right help and get it in a timely manner.

Become Fluent with the Software

It all starts with what you know. The more you know about the software and how to use the features, the better you’re able to find solutions or troubleshoot your courses. At a minimum, watch the tutorials. They do a good job going through the basic features and many of them have downloads with practice activities. In fact, many of the questions I see asked in the community are answered in the basic tutorials.

Articulate 360 subscribers have access to Articulate 360 Training. Every month we do a getting started series for Storyline and Rise. Those are great to learn the basics.

Use a Descriptive Question Title
troubleshooting tips e-learning

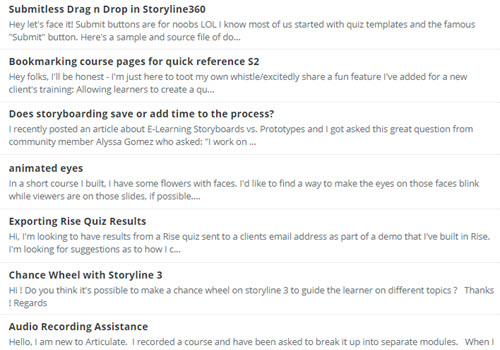
Most people scan the titles to figure out where they can best help. If your title is “Help with course, please,” it requires the person to click on the link. However, if the title is more descriptive, it is easier to discern what help is required.

“Variables don’t change when I click the button,” provides enough information for the person who’s looking to help.

Name Your Timeline Objects and Layers

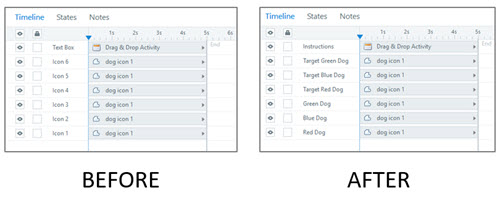
It really slows things down when every slide is filled with the generic default titles. When I help with the files, I start by titling the objects and layers so that I can follow what’s happening. My guess is most people who want to help don’t have the time to do that.
troubleshooting tip title objects

You’ll get faster help if your file makes sense and is easy to parse.

It takes a little extra effort to name objects and layers; but it pays off in the long run when it comes to troubleshooting your course. This is especially true for the person in the community who’s trying to make heads or tails out of your slides.

Share What Version You Use

I am part of a swimming pool forum. They ask that all members have a signature file that includes pool size, type of pool, equipment used, etc. This ends up in every post and eliminates a lot of back-and-forth questions between people looking for and giving help.

It’s a good idea to do something similar when asking for help in the community especially since there are different versions of software which have various updates and different features. Share what version you have, type of PC or Mac, etc.

Keep it Simple

Ever have someone send you a video to watch and it’s 15 minutes long? Do you watch it? Or there’s that one friend on Facebook who’s never learned to create a paragraph break so you just see this massive block of text. I have the same friend and I just skip over what he writes. Who has time to read a book?

Two quick tips here:

  • Be liberal with paragraph spacing so it’s easier to scan and read. And use bullet or number lists.
  • Keep your question to a point or two. If you ask for too much, chances are that people will skip over what you ask. It’s not that they don’t want to help, it’s just that it’s either too hard to parse or too much to work on at one time.

Show What’s Happening

I find it’s easier to do a quick screencast and share it than it is to type a lot of text. This allows a person to see what you’re doing and what’s happening. If you’re using Articulate 360, take advantage of Peek. You can record a screencast which is automatically uploaded to Articulate 360 and generates a URL for you to share.

peek for screencasting

If you don’t use Articulate 360 yet, there are all sorts of other screencasting options that are free or low-cost. In fact, the newer versions of PowerPoint have a built-in screen recorder. Once the video is on the slide, just right-click and save the media as .mp4.

In either case, you can eliminate a lot of going back and forth in the chat by showing what you have and what’s happening. With that in mind, keep it simple and get to the point quickly.

Share a File or Demo

Without seeing the file, it’s often tough to diagnose the issue. Usually the first response to a question is whether you can share a file (or published version of the course) so that we can see what’s happening. So why not share a source file to start?

Here are a few tips that help when sharing files:

  • There’s no need to share the entire course, especially if it’s a 400 MB download. Try to isolate the issue and get rid of slides that aren’t required.
  • Tell people where they should look, especially if there’s more than one slide.
  • Save the file you share as a copy. If the content is proprietary, you can still share the source file. Make a duplicate and either remove the content or replace it with gibberish.

Keep in mind, community members are all over the world and in different time zones. The more you share upfront, the easier it is to get help and a quick answer.

Focus on What You Want and Not Trying to Fix What You Have

It’s easy to get pulled into fixing an issue that is better resolved with an alternative approach. If the desired outcome isn’t clear we end up on a rabbit trail fixing something that had an easier solution. That’s why I usually ask people what they’re trying to do before I start helping to solve the issue they have.

When you ask for help, clarify what you’re trying to do. Sometimes you end up with some good production tips.

It’s Volunteer Time

Keep in mind that e-learning heroes is a community of your peers. Many of them share source files, record tutorials, and show demos. What they offer is offered for free and on their own time.

Be respectful of their time. In fact some of these tips will make it easier for them to help you.

Share the Solution

If you get help and it works, let us know in the forum thread. That helps the next person.

Bonus Tip

Make a goal to pay it forward. I try to answer five questions a day. I find it fulfilling to know I’m helping someone. I also find there’s a lot I don’t know so I end up learning things either by testing ideas or seeing the responses from some really smart people in the community. A side benefit is that it builds your reputation and credentials in our industry.

Events

Free E-Learning Resources

Want to learn more? Check out these articles and free resources in the community.

Here’s a great job board for e-learning, instructional design, and training jobs

Participate in the weekly e-learning challenges to sharpen your skills

Get your free PowerPoint templates and free graphics & stock images.

Lots of cool e-learning examples to check out and find inspiration.

Getting Started? This e-learning 101 series and the free e-books will help.


e-learning templates made simple

E-learning templates are a great way to save time. This is especially true for those of us who work with repetitive content and courses. And it’s even more true for those of us who aren’t graphic designers since the e-learning templates provide nice looking visual design.

However, working with templates can be a challenge. Sometimes they present too many choices (which can debilitate). Another challenge is that to modify templates often requires a more involved understanding of the authoring tools. This isn’t easy for the person just getting started.

Here are a few ideas to help simplify working with templates.

E-Learning Templates Are the Second Step

Figure out what you need before you build first. A big time waster is not knowing what you want in the course but building it, anyway. Then realizing it’s not what you want, you tear down and rebuild. Or worse, you move forward with a bad idea and let it dictate the rest of what you’re doing because of the time already invested.

I like the weekly e-learning challenges to play around with ideas and to see what others do. The challenges help develop fluency with the software and build awareness around ideas that can be implemented before you work on a project.

ACTION ITEM

Let the Content Determine the Right Template

Templates are great, but don’t let the template dictate your content. This is one of the biggest issues with templates. We like a template because it has sixty cool layouts and then we force our content to the template. Or we think we have to use all sixty layouts so we have similar types of content but it all looks different throughout the course because we mix and match the layouts.

ACTION ITEM

  • Review your templates and the various layout options. Then determine when you use them and why. Even if you have a lot of great layouts, it’s a good idea to reduce the layouts you actually use. This provides visual consistency; and repetition is key to good visual communication.

Keep E-Learning Templates Simple

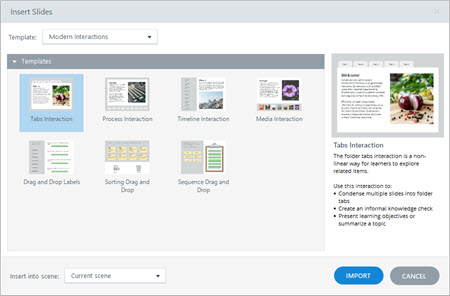
Templates don’t always need to be big all inclusive files with dozens of layouts. It helps to have single purpose templates like just one tabs interaction. The more single purpose the template is, the better you can use it. It’s also easier to customize one slide to match your course than it is to customize an entire template.

e-learning templates

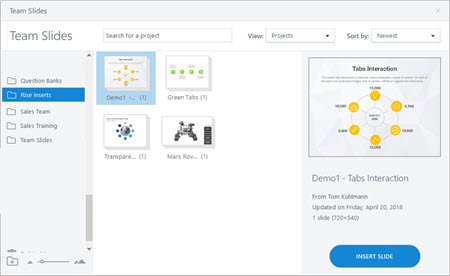
One of the most under used features in Storyline is saving the files as templates. This makes the slides available for the next course. You can insert a single slide(s) or the entire file. The new teams feature in Storyline 360 makes it even better because the slides can be shared with the team and easily inserted in other courses.

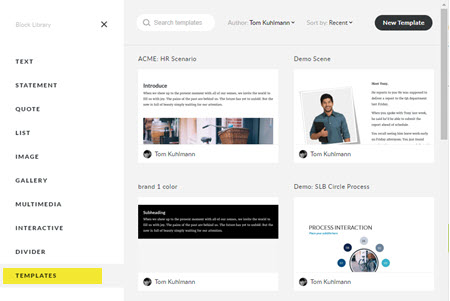
In Rise, you can build lessons and save them as templates. Once inserted, they can be modified to meet the course objectives. And they don’t need to be big lessons, you may just want to customize some blocks for easy re-use.  This is especially helpful if you want to use a multiple colors or change the text sizes.

rise e-learning templates

ACTION ITEM

  • Create single slide templates in Storyline and save them as templates. If you’re on a team account, share them with your team.
  • Learn to create and save templates in Rise. I like to create branded blocks where I add different colors and text sizes.

Learn to Edit the E-Learning Templates

Inevitably you’ll need to modify the template. There are some things you should learn about the software so that when you need to change the template it doesn’t take forever (otherwise you lose the time-saving benefit of the template).

ACTION ITEM

Templates are a real time-saver. But to really save time with them, plan ahead so you’re content is prepped; and then learn to use the authoring software used to build e-elearning courses.

Events

Free E-Learning Resources

Want to learn more? Check out these articles and free resources in the community.

Here’s a great job board for e-learning, instructional design, and training jobs

Participate in the weekly e-learning challenges to sharpen your skills

Get your free PowerPoint templates and free graphics & stock images.

Lots of cool e-learning examples to check out and find inspiration.

Getting Started? This e-learning 101 series and the free e-books will help.


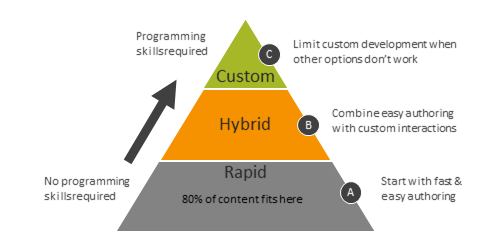
Years ago I developed a hierarchy for course design. I used it to help manage my team and allocate our limited resources.

Rapid E-Learning Ruled

Back then, most e-learning was custom-built in Flash. Those courses took more time, required special skills, and cost a lot more to produce. However, with Articulate Presenter and PowerPoint we could build about 80% of what we needed. It was fast and easy. So our default was Articulate Presenter unless we could justify why it didn’t meet our needs.


PowerPoint Meets Flash

PowerPoint had its limits. But when we needed custom interactivity, we‘d build just those pieces in Flash and insert them into our PowerPoint-based courses. That meant we got fast development and custom interactivity: a win-win.

Save Resources for Expensive Development

There were courses where PowerPoint or a hybrid approach just didn’t work. As a final option we custom built our courses in Flash. Because this was the most expensive and time-consuming option, we tried to limit this and do most of our custom development using the hybrid approach.

It made no sense, to custom build Flash when we could do the same thing faster and less expensive with PowerPoint. So we always started with rapid e-learning and only moved to more expensive development when we could justify doing so.

Today, we have a similar challenge. Let‘s revisit the hierarchy of course design for a new generation of rapid e-learning designers.

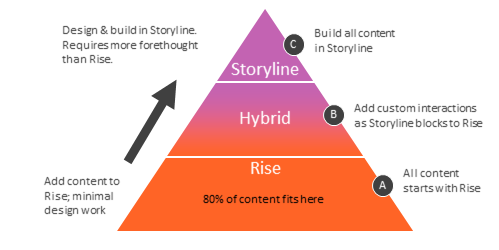
The Updated E-Learning Course Design Hierarchy

Both Rise and Storyline are part of Articulate 360. Often, I‘ll get questions about when to use Rise and when to use Storyline. To answer the question, I lean on the same strategic approach I used years ago.

Operate at the Speed of Business

A large part of e-learning content exists because of regulatory and compliance requirements. Those courses are more explainer content and less interactive. Thus, it makes sense to use the easiest tool and quickest production process possible.

And this tool is Rise. It‘s super easy to use and getting courses (especially simple ones) out the door is a breeze. On top of that, whatever you build can be saved as a template, saving even more time. And as far as interactive content, there are a number of interactive choices that come with Rise (and those get updated frequently). Rise is also fully responsive which is perfect for today’s mobile workforce.


Hybrid Development is a Win-Win

The reality is that not all content is explainer content and often there needs to be more custom interactivity than what you get out of the box in Rise. That’s OK.

When Rise doesn’t provide the content type you need, use Storyline. Build single slide interactions and then insert them into your Rise courses with the Storyline block.

With this approach, you get easy authoring for the majority of the content in Rise and custom interactivity when you need it in Storyline. It‘s a good balance between speed of production and providing the appropriate level of interactivity. That’s a win-win.

Manage Resources for Custom Interactivity

There are times when working directly in Storyline makes more sense than working in Rise. For example, if you need to build complex interactions, adaptive learning paths, variable-based navigation, or complex interactive scenarios then it makes sense to build them in Storyline. Although, Rise also offers an interactive scenario block, so that is still a better starting option. Storyline gives you a lot more flexibility because you start with a blank screen and build from there.

This doesn’t mean working with Storyline is complicated. It‘s still easy to learn. It means that for simple content, Rise is usually a better solution.

Want a tabs interaction? In Rise you select the tabs interaction block and add your content. You‘re done. Building the same thing in Storyline requires time to think about what it will look like and how it will function. Then the construction begins by adding the objects, layers, and triggers. It‘s easy enough to do, but just a bit more time-consuming to do it. And time is money.

So when people ask which tool to use, I suggest using the hierarchy. All things should start with Rise. If you can’t build it with Rise, explain why. If you need custom interactions, build the core content in Rise (you have a lot of options with the various blocks) and add Storyline interactions when necessary. And if your course requirements are more complex and they can’t be met with Rise, then by all means, use Storyline.

The main thing is you‘re managing your limited resources.  If you spend a week on something in Storyline when you could have built it in one day with Rise, you‘re not being a good steward of your resources. And when you need more time for custom work, you won’t have it because you spent it on simple content.

That’s where the content creation hierarchy comes in handy. It‘s all about managing resources and delivering a viable product on time and within budget.

Events

Free E-Learning Resources

Want to learn more? Check out these articles and free resources in the community.

Here’s a great job board for e-learning, instructional design, and training jobs

Participate in the weekly e-learning challenges to sharpen your skills

Get your free PowerPoint templates and free graphics & stock images.

Lots of cool e-learning examples to check out and find inspiration.

Getting Started? This e-learning 101 series and the free e-books will help.


PowerPoint graphics

In a previous post, I shared how I built an interactive scenario in Rise. I’ve gotten lots of emails asking how I built the graphics like the headers and the flashcard interactions for the interactive scenario. So in today’s post, I’m going to show you a simple way to build graphics for your Rise e-learning courses.

PowerPoint graphics headers for Rise blocks

PowerPoint graphics flashcard interaction

Understanding the Image Blocks in Rise

Rise offers a number of blocks that support inserted images (such as image, gallery, and some of the interactions). Most them work perfectly in one of two aspect ratios:

  • 1:1 (square)
  • 16:9 (rectangle)

There are a few blocks that have text overlay where the image is scaled. Those are mostly decorative images so we won’t worry about them.

Understanding PowerPoint Slides

PowerPoint is easy-to-use screen and with some practice, you can build almost any type of visual. Because of this, I build my simple graphics in PowerPoint and save the slides as images.

In PowerPoint, we need to do two things: set slide size and then whatever we build we export as an image.

  • Go to Design>Slide Size and modify the slide size.
  • To save the slide as an image, go to Save As and choose an image format. You can save a single slide or all slides. I usually save in PNG format.

Create PowerPoint Graphics to Use in Rise

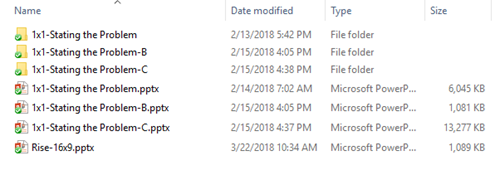
Since there are two aspect ratios, I create two PowerPoint files for my Rise graphics. One is 1:1 and the other is 16:9. You can see the PowerPoint files I created for the scenario demo.

PowerPoint graphics example of file

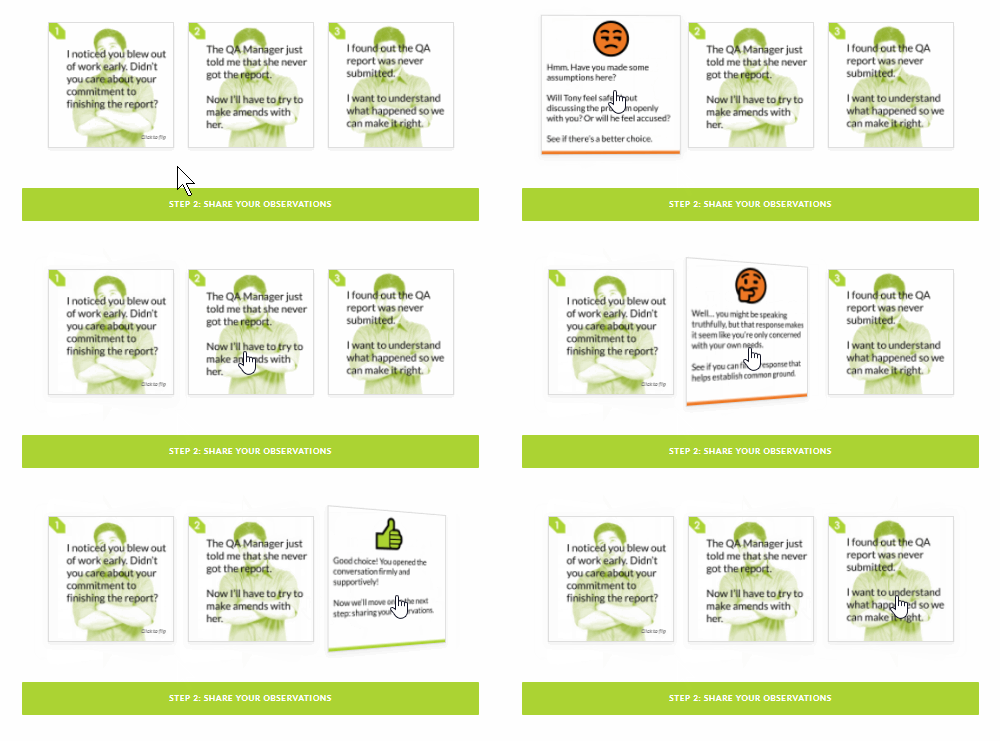
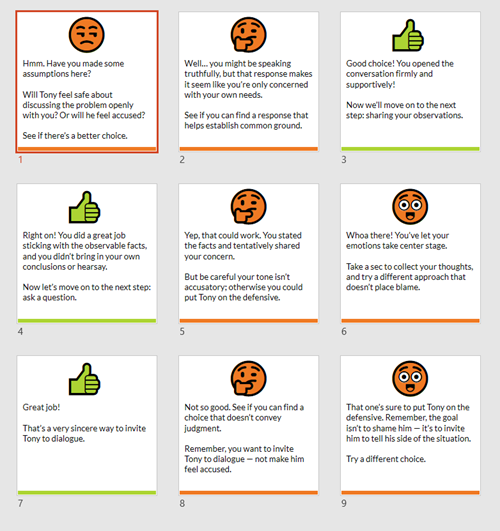
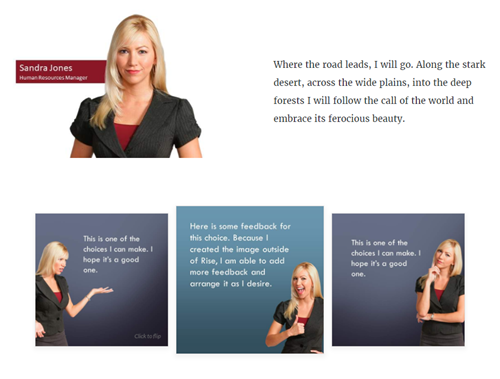
PowerPoint is a freeform slide. I can build virtually anything I need quickly. In the interactive scenario, I created 1:1 images for the flashcards. One side of the flashcard has the question text and the other has the feedback.

I used the various image editing features in PowerPoint to colorize the graphics. I also used the emjoi features to create some simple feedback graphics. While it’s easy enough to build these graphics with other tools I just find PowerPoint to be easy and fast. However you’re not confined to PowerPoint, you can use the tool of your choice.

PowerPoint graphics flashcard questions

PowerPoint graphics flashcard answers

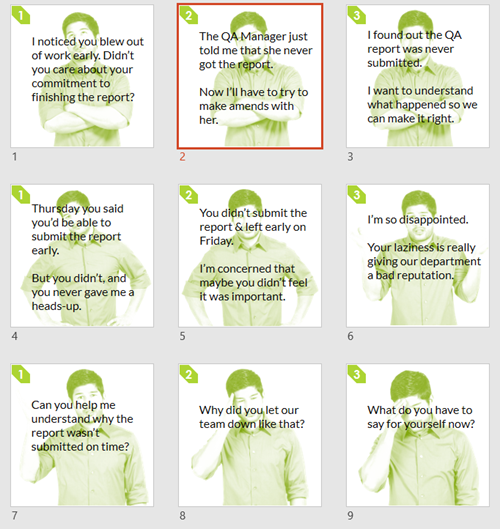
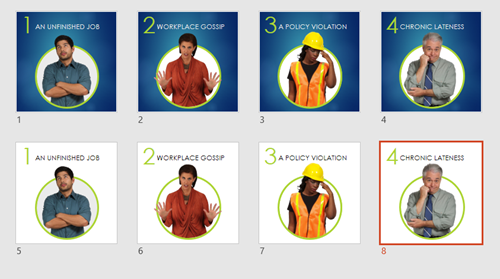
The images above are relatively simple. The images below required a bit more work. I had to build it so the character extends out of the frame. You can see that I created a couple of versions. I opted for the lighter version because it made the Rise screen seem more open with more white space.

PowerPoint graphics header image

When you’re all done building your slides, save the slides as images rather than a .pptx file. Then you’ll have a folder of images that work with your Rise courses.

Bonus PowerPoint Graphics Tip

With Articulate 360, you get Studio 360 that includes Presenter and works with PowerPoint. That means you have access to all of the Content Library characters and templates. So if you want the same Content Library characters in Rise, use PowerPoint slides to build the graphics like I did above.

Here’s another example I mocked up for the blog post using the same techniques.

PowerPoint graphics interactive scenario 2

So there you have it. In the first, post we looked at how to build the interactive scenario in Rise. And in this one, we reviewed how to use PowerPoint to quickly build the graphics you need.

Events

Free E-Learning Resources

Want to learn more? Check out these articles and free resources in the community.

Here’s a great job board for e-learning, instructional design, and training jobs

Participate in the weekly e-learning challenges to sharpen your skills

Get your free PowerPoint templates and free graphics & stock images.

Lots of cool e-learning examples to check out and find inspiration.

Getting Started? This e-learning 101 series and the free e-books will help.


interactive scenarios

What happens when you convert an old PowerPoint course into a Rise course?

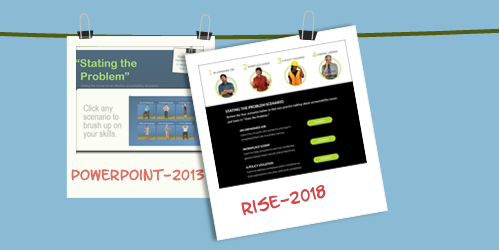
The other day I found an older interactive scenario that was built in PowerPoint. I wanted to see what it would take to rebuild something similar in Rise. This isn’t an uncommon situation for those who are trying to convert and update older courses with new technology.

Today, I’ll show what I did to convert the course and a few production tips that helped me.

The Original Interactive Scenario

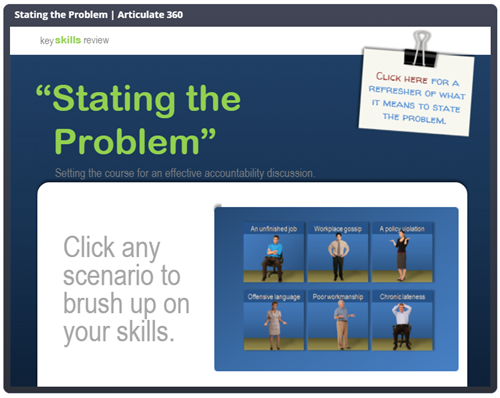
Back in the day, this was a pretty cool example of what you could do with PowerPoint to create interactive scenarios. By design, PowerPoint is a linear presentation tool. However, with some creativity, one can create interactive content. And that’s exactly what Jeanette did.

interactive scenario demo 1

Click here to view the interactive scenario.

With that said, PowerPoint’s not the best authoring tool if you want to create interactive content. Once you add the interactive capabilities the slide count goes up quite a bit and it becomes a mess to manage. I highlighted this in the post on why PowerPoint isn’t the right tool for interactive e-learning.

The New & Improved Interactive Scenario

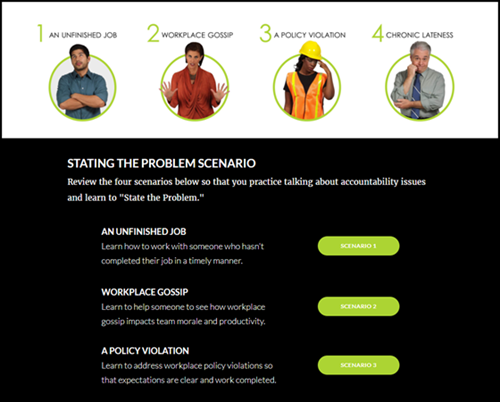
We looked at different types of authoring tools in this post. PowerPoint and Rise offer two different types of authoring. PowerPoint is freeform with a blank screen that allows placement of objects. Whereas, Rise is form-based where you assemble content blocks and build the course that way. Freeform gives you more freedom in where you place content, but a tool like Rise offers a better mobile experience because it’s fully responsive. And as you see, it’s a lot easier to work with, as well.

interactive scenario demo 2

Click here to view the interactive scenario.

Production Tips to Build the Interactive Scenario

I had three goals with this conversion:

  • How long would it take to move content from PowerPoint to Rise?
  • What are some production considerations?
  • How to work around constraints?

Design the Interaction

The first thing is to determine how you want to design the interaction. When it comes to interactive scenarios, I always follow my 3C model of challenge, choice, and consequence. If I can click on something, then I can make it part of a 3C interaction.

In this case, I used the Flashcards block as a way to show choices and consequences. The user is presented with a challenge and clicks on a card to get feedback. Since I’m not grading it, I can keep the other options available so that the learner can see what is shared if they had clicked something else. This gives them more control over the learning experience.

  • Mission: identify the different interactive blocks that allow for 3C type interactivity. For starters, there are tabs and accordions. But those are obvious choices. Look for other interactive elements.

Build a Branched Scenario

Branched scenarios are possible in Rise with some considerations. Here are a few production tips:

  • Build your branched interaction with the Button Stack block. The button stack lets you jumps from lesson to lesson.
  • Don’t let them see what’s under the hood. Turn off the Sidebar view so that users don’t see the menu and how the course jumps around between lessons.

interactive scenario tip 1

  • Create a faux navigational cul-de-sac. Since Rise is designed to follow a lesson-to-lesson flow I want to prevent the learner from advancing past the end of a scenario or the button stack. To do so, I added a lot of padding on the bottom and an extra Spacer block as a buffer.

interactive scenario tip 2

  • Create duplicate menus to deal with revisits. The introductory lesson has some initial content and below it are the choices to view the scenarios. When they complete a scenario and come back to the other choices, I didn’t want all of that introductory content visible. I just want them to go to a list of other buttons. So I made a duplicate menu lesson with just the button menu. That’s where they end up after they complete a lesson. They never go back to the original introductory lesson.

interactive scenario tip 3

  • Control how much they see. This makes the content smaller to consume. You don’t need to show everything at once. Keep people from scrolling by adding an interactive Continue button. This holds all the content below it until the learner clicks on the button. In a sense, they are affirming that they are ready and when they click, they get more info.

interactive scenario tip 4

  • Play around with the imagery. Rise courses don’t need to look the same. You can insert images in all sorts of ways. An image doesn’t need to be a picture. It could be a white box that fills in an area to create more white space. Be creative in how you use the blocks. Also, don’t stick with the defaults. Play around with filling the blocks with color. The key is to learn to see them in a different way.

interactive scenario tip 5

How long did it take?

Once I planned how to build the interaction, it only took about 15 minutes to copy and paste the content from PowerPoint to Rise.  I used different images, so I had to create those. And I had to play around with ideas to see what worked best. All-in-all it took about 2 hours to build the module as it is.

The nice thing is that once I build an interactive lesson, I can save it as a template an re-use it again. And to add additional modules is just a matter of duplicating a single lesson. To do so in PowerPoint would require another 20+ slides per module.

As you can see, working with Rise is so much easier than working with PowerPoint.

Events

Free E-Learning Resources

Want to learn more? Check out these articles and free resources in the community.

Here’s a great job board for e-learning, instructional design, and training jobs

Participate in the weekly e-learning challenges to sharpen your skills

Get your free PowerPoint templates and free graphics & stock images.

Lots of cool e-learning examples to check out and find inspiration.

Getting Started? This e-learning 101 series and the free e-books will help.


interactive video

This is part two of the series on working with 3D models and interactive video. In the previous post, we looked at how to create a video using 3D models in PowerPoint. Today, we’ll discover how to use them to create interactive videos in Storyline. And then of course, once you have an interaction you can also insert it into a Rise course, which is what I did in this Rise lesson.

Create the Interactive Videos in PowerPoint using 3D Models

If you want to create a different kind of interactive video, you can apply what you learn here. The process is similar. For this demo, make sure you understand how the video is created and how it plays all the way through because we’re going to add a trigger to pause it before it completes.

For this demo, I created a video where the object rotates in and then rotates back out. It was built using a three-slide PowerPoint file and exported as a video.

Tutorial: how to create a three-slide video using 3D models in PowerPoint.

A Teardown of the 3D Model Interactive Videos

There are a few nuanced steps in this process. Let’s review what happens and then we can look at how to create it in Storyline:

Interactive video in Storyline using 3D models in PowerPoint

  • User clicks on the side tab which shows a layer.
  • The layer plays the video we created in PowerPoint.
  • Since the 3D object in the video rotates in and out, we set the video to pause when the object is rotated in.
  • Then we add a trigger to resume the timeline (with a hotspot or button) which continues to play the video and shows the object rotate out as the video completes.
  • The completion of the media (the video) triggers the layer to hide which takes us back to the base slide with the side tabs.

Create the Interactive Videos in Storyline

The video I create in PowerPoint is the exact same aspect ratio as the Storyline file. For the most part, 16×9 is fine. But if you change the aspect ratio of your .story file make sure you do the same on the PowerPoint slide.

  • Go to slide 1 in PowerPoint and save it as a .PNG image. This image will be what the user sees on the base slide in Storyline and perfectly aligns with the videos that will be on the layers.
  • In the Storyline slide, insert the slide image from PowerPoint.
  • Create the appropriate number of layers based on how many interactive elements you have.
  • On each layer add the appropriate video. Each video should play automatically. I also recommend putting a hotspot over the video so the user can’t click on the video to start/stop it.
  • On the video layer, add a trigger to pause the video when it reaches either a certain time or cue point. I like to add cue points so I can nudge them without modifying the trigger. The video should pause at the apex of the object rotation.
  • Add a trigger to unpause the video. It could be a simple button or perhaps a hotspot.
  • Add a trigger to hide the layer when the media completes. This should take you back to the base slide.

Click here to view the tutorial on creating an interactive video.

That’s basically it. Of course, there’s a lot more you can do to decorate the layer or add additional content. It just depends on your needs. Practice the technique first and once you have it set, see what you can do.

If you do create something, please share it with us so we can see it.

Events

Free E-Learning Resources

Want to learn more? Check out these articles and free resources in the community.

Here’s a great job board for e-learning, instructional design, and training jobs

Participate in the weekly e-learning challenges to sharpen your skills

Get your free PowerPoint templates and free graphics & stock images.

Lots of cool e-learning examples to check out and find inspiration.

Getting Started? This e-learning 101 series and the free e-books will help.


3D models in PowerPoint

I shared a cool 3D interaction in a recent workshop demo and have had lots of people ask how I built it. You can check out the interaction in this Rise demo.

Creating the interaction is a two-step process:

  • The first step is creating a video of the 3D model as it rotates in and out.
  • The second step is to insert the video and add interactive elements in Storyline.
  • In the case of the Mars Rover module, there’s a third step because inserted the interactive Storyline module into Rise. This is pretty cool because it allows for really simple and fast authoring in Rise, and then when I need custom interactions, I just build them in Storyline. It’s a win-win.

Here’s a previous post where I detailed more of the construction of the Rise demo. For today’s post, I’ll show you how to create the 3D video you’ll use for a Storyline interaction. The tutorial below shows how to create the video using 3D models in PowerPoint.

Click here to view the tutorial on YouTube.

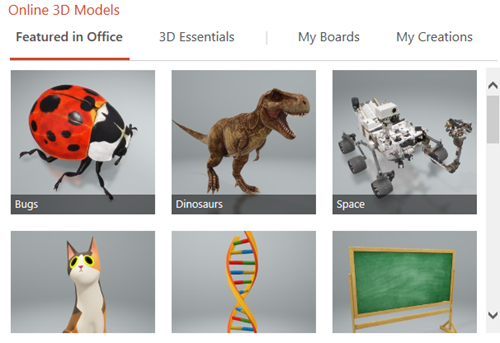
Insert 3D Models in PowerPoint

PowerPoint comes with a number of 3D models. It also supports inserting models shared by the community. You can also build your own 3D models and insert them using standard 3D formats

3D models in PowerPoint

Most likely you’ll want to insert your own 3D object. So it’s nice that PowerPoint supports the common 3D file formats. Here are the supported 3D formats for PowerPoint:

  • .FBX
  • .OBJ
  • .3MF
  • .PLY
  • .STL
  • .GLB

How to insert the 3D model in PowerPoint:

  • Create a slide and then select a 3D object.
  • Insert it just like you would a shape or picture.
  • Position the object on the screen.
  • Duplicate the slide (we’ll need this for the video).

Create the 3D Animation in PowerPoint

The first slide is the starting point from which the 3D object rotates. The second slide is the rotation point. You’ll need to rotate the object so that the position changes from slide 1 to slide 2. You can also move and scale it.

3D models in PowerPoint


  • Reposition the object by either scaling, rotating, or moving it on the slide.
  • Go to slide transitions and select a morph transition for slide 2.
  • Preview the slideshow.

3D models PowerPoint

On preview, you’ll see how the 3D object uses the morph transition to change positions. Pretty slick, huh?

Fine-tune Slide Transitions for 3D models in PowerPoint

That’s the essence of the 3D animation. Now it’s a matter of fine-tuning the animation by playing with the slide timings.

When all is done, the PowerPoint slides will be saved as a video file. That means the animations and transitions need to be automated.

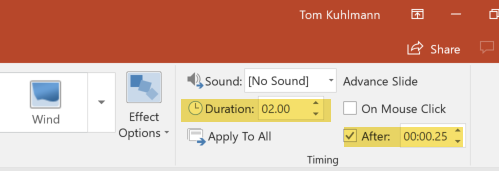
3D models in PowerPoint 3D PowerPoint morph transition timing

  • In the Transitions tab, go to Advance Slide and select to advance after X time. That means the slide will automatically advance at a certain time and doesn’t require you to do anything to trigger the slide movement.
  • Slide 1 is just the starting point so it needs to advance as quickly as possible. I usually set it to advance after .25 seconds.
  • Slide 2 will trigger the morph animation. On slide 2 you can change the speed of the 3D animation by changing the slide duration.
  • Slide 3 (optional) is great if you want to create the sense that the object rotated in and out like the Mars Rover demo.

Save the PowerPoint file as a Video

When all is done, save the PowerPoint file as a video. You have two options: .MP4 and .WMV.

The MP4 format works well but I did find that when I use it with Storyline, the last part of the .MP4 always seems jumpy. It probably has to do with how the .MP4 is encoded by PowerPoint. So if I am using the video to build an interactive file, I save it as a .WMV. Then I let Storyline do the conversion. That resolves any issues you may experience.

That’s basically it for the 3D model video in PowerPoint. You create the two or three slides and save as video. Once you have the video, you can insert it into Storyline or anywhere else you use video. To make it an interactive video like I did with the 3D rover, you’ll need to tune in next week where I show how to create an interactive video in Storyline.

Events

Free E-Learning Resources

Want to learn more? Check out these articles and free resources in the community.

Here’s a great job board for e-learning, instructional design, and training jobs

Participate in the weekly e-learning challenges to sharpen your skills

Get your free PowerPoint templates and free graphics & stock images.

Lots of cool e-learning examples to check out and find inspiration.

Getting Started? This e-learning 101 series and the free e-books will help.


At a bookstore, you’ll see all sorts of books covering all sorts of content. But one thing you’ll notice is that while they may have different content and even look different they mostly share a similar structure.

What’s in a Book?

What do books have in common?

  • Cover images
  • Title Page
  • Author Information
  • Table Contents
  • Version
  • Chapters
  • Index
  • Appendix

Despite the topic, at some point, the publisher assembles the book and puts it into a structure similar to what’s listed above.

What’s in an E-Learning Course?

E-learning courses are very similar to books. While they cover a range of topics, there are elements that are common to most courses. What are they?

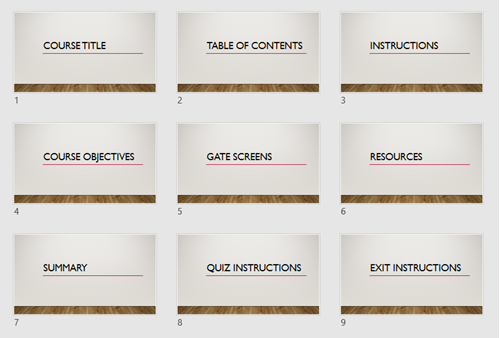
e-learning templates common structure

  • Course Title Screen
  • Table of Contents (as a menu)
  • Instructions Screen
  • Course Objectives Screen
  • Section Title Screen
  • Gate Screens
  • Resource Screen
  • Summary Screens
  • Quiz Instructions Screen
  • Exit Instruction Screens

Since you know those screens are in most courses, why not pre-build them and make them part of your starter template? It’s also a great way to work in the company brand without messing with the content screens.

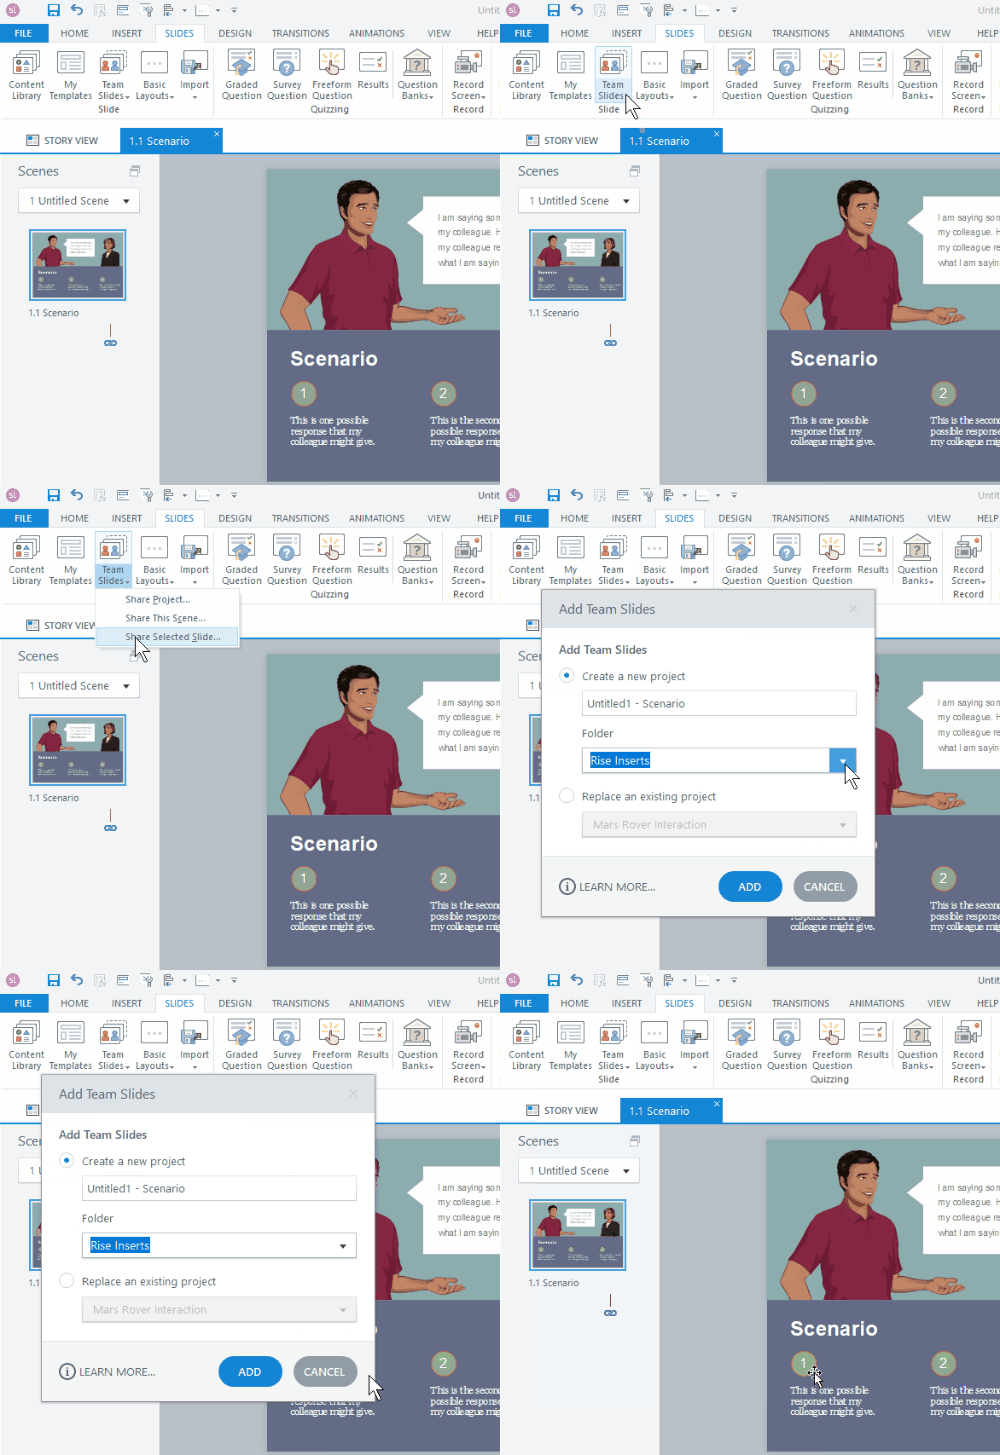
e-learning templates teams in Articulate 360

Also, if you’re using Articulate 360, you already have a bunch of templates that have a lot of that structure. So it’s a great starting point and big time-saver. And as an added bonus, if you’re using Articulate 360 Teams you can add those slides to your Teams account and everyone on your organization’s team can access those slides. This is a big time saver and lets you maintain the quality and consistency many organizations require.

What pre-built screens would you add to the list?

Events

Free E-Learning Resources

Want to learn more? Check out these articles and free resources in the community.

Here’s a great job board for e-learning, instructional design, and training jobs

Participate in the weekly e-learning challenges to sharpen your skills

Get your free PowerPoint templates and free graphics & stock images.

Lots of cool e-learning examples to check out and find inspiration.

Getting Started? This e-learning 101 series and the free e-books will help.


e-learning mars rover demo

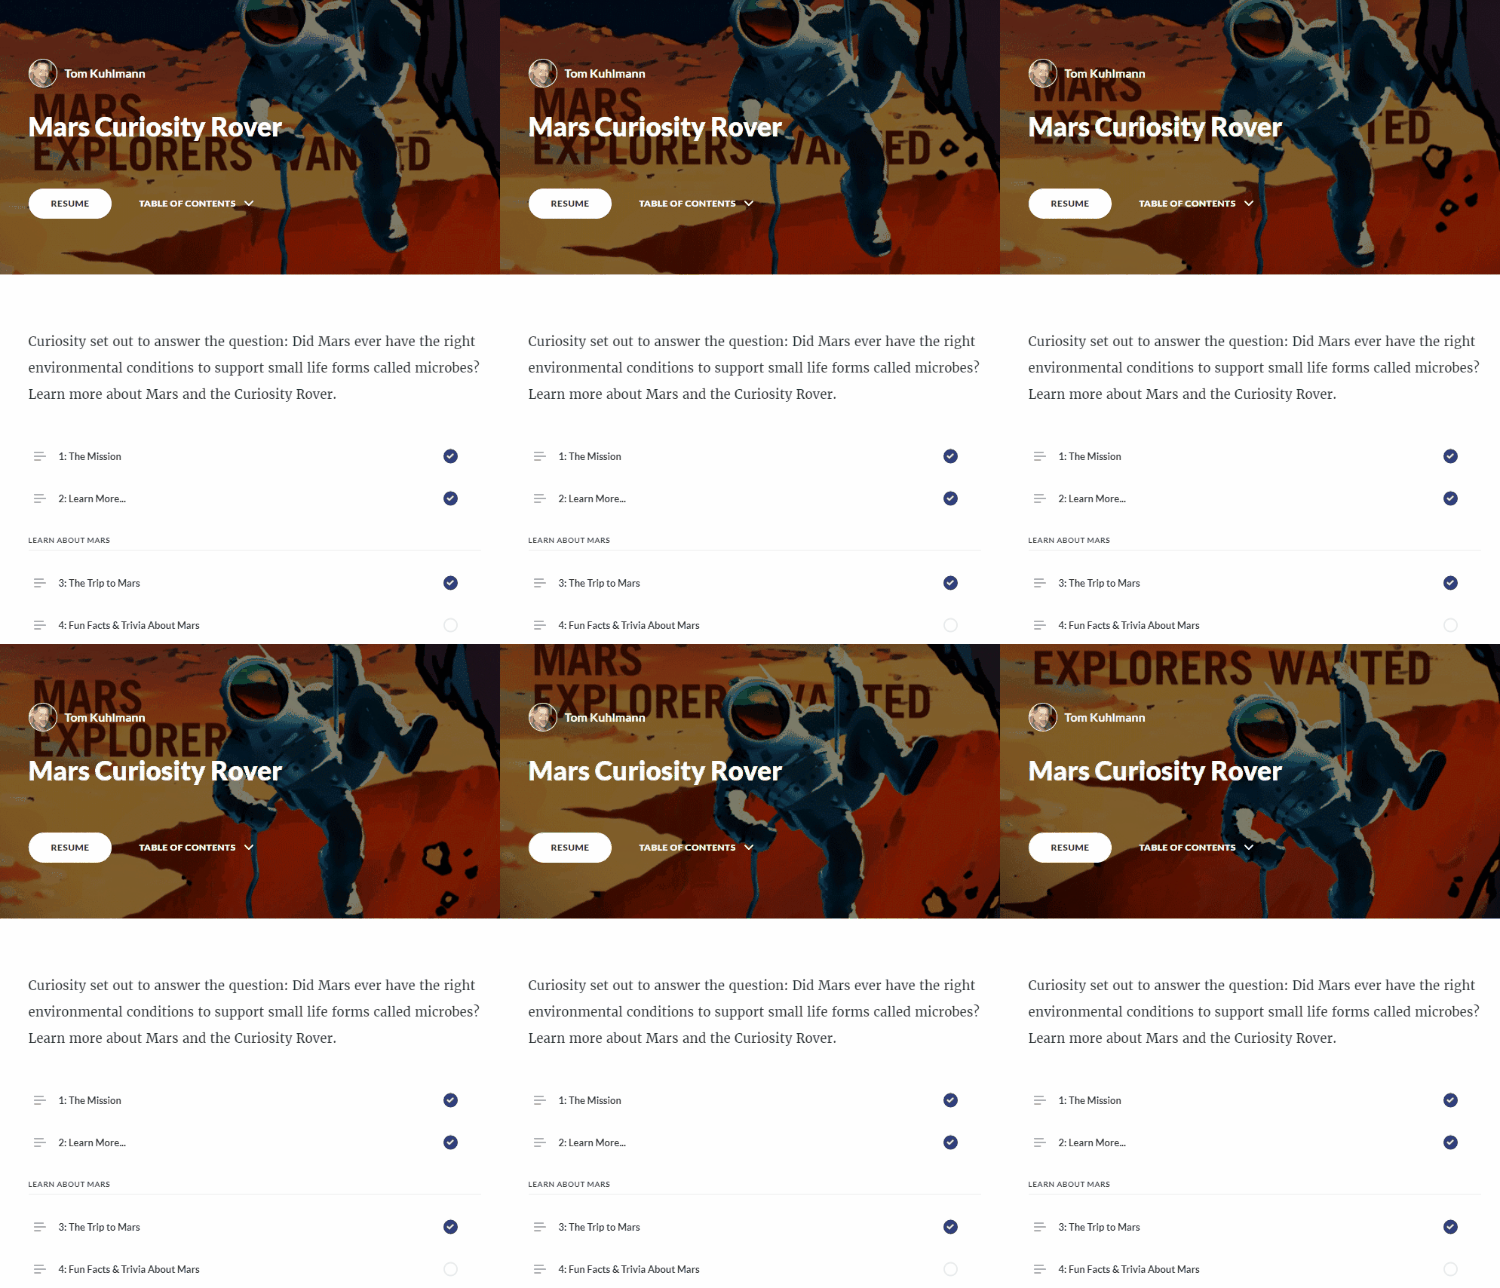
I created a demo course in Rise for a workshop. One of my goals with the demo was to show off different ways to add content and how the various blocks work and look in a real-ish project. This produced a lot of questions in the community on how I built it.  So I’ll try to answer them here.

First, I’ll have to admit that I didn’t really do all that much because Rise did all of the heavy-lifting. There is one custom piece in lesson 6 where I inserted a Storyline interaction. But for the most part, I just opened Rise and added my content. Then Rise did the rest.

Of course, some of the assets are colorful and eye-catching, but I didn’t create those. I used the information from the NASA site (which by the way is pretty darn cool). Check out what’s in the works for Mars 2020.

[If you haven’t worked with Rise, here’s a good overview video.]

Visual Design

Like I mentioned earlier, the actual assets in this demo module are from NASA, so they get all of the credit. However, I will add that when you create e-learning projects, it is important to have consistency in image quality and the assets used in your courses.

Just because you can add content easily into the Rise courses, doesn’t mean you need to. Like any e-learning module, you want to be intentional and avoid the Frankencourse.

One thing that does really catch your eye in this particular demo is the animated .gif cover screen. I think it looks cool and gives the module some personality. That’s a key first step in engaging learners. You’ll also notice animated .gifs in some of the other lessons.

Lesson 1: The Mission

For this lesson, I opted for a full-width image. I think it anchors the content well. This works best with higher resolution images. By not having margins, it kind of forces your eyes down the page.

I also added a hyperlink to the text body.

Lesson 2: Learn More…

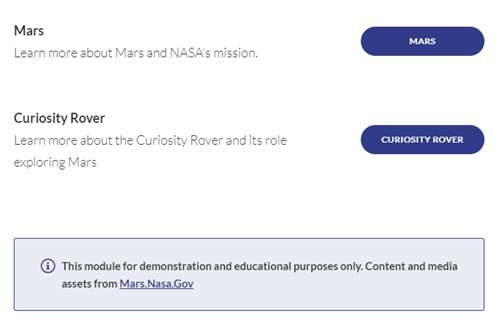
I wanted to show a way to create an easy branching structure to direct people to specific lessons. This feature could also be used for simple branched scenario interactions.

e-learning branching interaction

I also added a disclaimer using the Notes block. It’s a great way to draw attention to important points.

Lessons 1 and 2 are the pre-content. The lessons after those are broken into three distinct groups and you’ll notice I used Section Titles to show those groups.

Lesson 3: The Trip to Mars

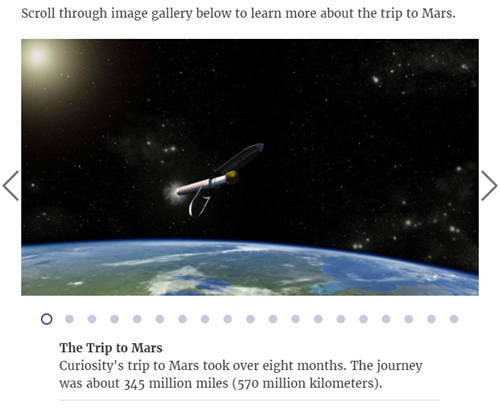
I leveraged the image carousel and the captions to provide more information about the trip to Mars. This content could be presented in a number of ways, but I like to give the user a way to touch the screen and this is a good interaction type for that. I also increased the size of the caption text.

e-learning image carousel interaction

Lesson 4: Fun Facts & Trivia about Mars

This lesson includes a lot of features. There’s a clickable image gallery. Again, the animated .gifs look nice and pull you in. Click on the thumbnail to zoom in and see the entire image.

I attached some additional content and you can download a PDF.

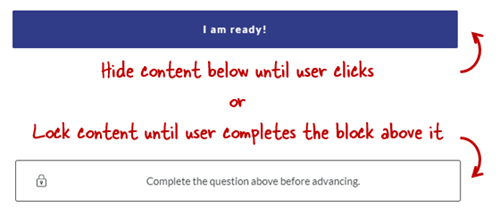
The Mars Trivia section includes a couple of dividers. One just holds back information until the user is ready and clicks. And the other forces the user to complete the interaction before advancing.

e-learning lock navigation

The trivia section includes two different types of knowledge checks: traditional quiz question and one that requires watching a video before answering.

Lesson 5: Did You Know?

There are a few different ways to insert videos into a Rise lesson. This is the pre-built lesson block which is full width and contains no additional content.

If you want to add additional content like text to the video block, you’ll need to create a custom block and insert the video that way. That’s what I did in lesson 8.

Lesson 6: Explore the Rover

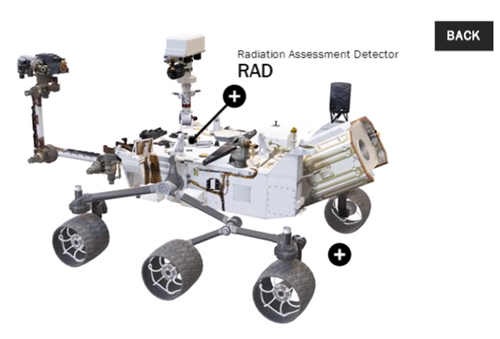
This is the lesson that generated the most questions (and will require an additional blog post and tutorial). One of my favorite features is the Storyline block in Rise. In this lesson, I create a single slide interaction in Storyline, the 3D Rover, and inserted it into Rise.

For the Storyline module, I created a transparent player and got rid of the player features so it sits in the block and looks like it’s part of the Rise lesson and not something inserted into it.

e-learning interactive Mars Rover

This block gives me the best of both worlds: fast and easy production in Rise coupled with custom interactivity from Storyline. I’ll do a more detailed write up on how I created the 3D Storyline interaction in an upcoming post.

Lesson 7: Access Mars – Virtual Reality

This only works in the Chrome browser.

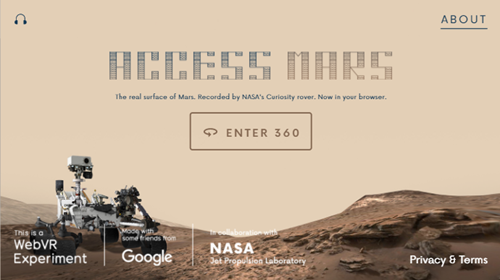
This is a webpage inserted into Storyline as a web object. And then the Storyline slide is inserted into Rise. It lets you navigate Mars in virtual reality.

e-learning Mars rover virtual reality 360

For course developers, this means you can insert all sorts of interactive web content into your Rise courses using web objects and the Storyline block.

Pretty cool, huh?

Lesson 8: Rover POV – Five Years on Mars

This is a different way to insert a video. In lesson 5, I inserted the video as a video block. In this lesson, I inserted it using custom blocks. The advantage of the custom blocks is being able to combine more blocks with additional content, interactions, and knowledge checks.

Lesson 9: 3D Ride Along with Rover

This is yet another way to insert a video. In this case, the video comes from YouTube and it’s also 360 so you can move around the screen. This really opens up what you can do with your videos, especially as the 360 video production is becoming more affordable. Look at how inexpensive the cameras are currently.

e-learning insert Youtube Mars rover 360

I did notice that the 3D doesn’t work on my smartphone iPhone 6 (it did work on my Android Pixel 2XL), which is something to keep in mind when adding media content to your courses: be sure to test different devices.

Lessons 10: Free Posters

Just another image gallery. Secretly I just wanted to point to the free posters. They’re pretty cool. I did use an animated .gif for the title image.

Again, those animated .gifs just add a lot of pop to the course content.

Lessons 11-13: Inserted Web Sites

Adding resource links is pretty common. These lessons are are the URL/embed blocks. As you can see Rise pulls in the metadata from the site to make the link more interesting. You can turn that off if you want.

e-learning Mars training program ASU

So there you have it, a really quick run through of the Rise Rover demo module. From the Rise perspective, it’s super easy to build. It’s just a matter of collecting your content, determining the lesson structure, and then dropping it in. Just don’t tell your boss how easy it is.

What I think really wowed people was how nice the content looks. Part of that is the way Rise handles lessons and makes everything nice and clean. And the other part is that I had great assets from which to work.

I’ll do a followup post on the 3D rover interaction in Storyline. Let me know if you have any more questions about this module and go check out all of that great content on the Mars site.

Events

Free E-Learning Resources

Want to learn more? Check out these articles and free resources in the community.

Here’s a great job board for e-learning, instructional design, and training jobs

Participate in the weekly e-learning challenges to sharpen your skills

Get your free PowerPoint templates and free graphics & stock images.

Lots of cool e-learning examples to check out and find inspiration.

Getting Started? This e-learning 101 series and the free e-books will help.


kickstart e-learning career

I once had a manager who told me everything I report to him should be presented as five things on a notecard. He didn’t want all of the detail or nitty gritty. He just wanted a quick overview of the five most essentials points.

I get a lot of emails from people who want to transition from their current jobs into e-learning development. They want to know what they need to do (or know) to get moving in that direction. So here are my five things if you want to start a career in e-learning.

Learn About Learning

Sure, a formal instructional design degree helps, maybe. But today it’s not as critical, assuming you can prove that you really know what you learned. There are all sorts of ways to learn:

  • Go to school and get a degree. Another less costly way is to get a certificate (especially if you already have a formal degree). Certificate programs take less time, seem to be more project-focused, and are a bit more pragmatic when it comes to applying what you’re learning. Here’s a list of programs recommended by the community.
  • Read and learn on your own. There are plenty of good books and I’ve written about the few I’d start with. We also have a great e-learning 101 series to learn more. You can sign up here and get it delivered via email. We also offer a ton of free e-books that cover a broad range of e-learning topics.

Build These Types of Courses

You’ll need practical experience. There are all sorts of things you can do to get it. Volunteer to build courses for NGOs, churches, hospitals, or anywhere else that has limited funds and would welcome some free training.

You don’t want to build the same course over and over again. Instead get experience building diverse modules and types of training. Here’s a good list to get started:

  • Assessments. Create a few different types of assessments. The default, blocky type quizzes are fine, but the more custom you can make them, the better.
  • Scenarios. They are always popular and they show how to build situational training that closely mirrors real-world interactions.
  • Interactions. There are three main ways to interact with the screen: click, hover, and drag. Build some modules that demonstrate your skills creating different types of interactions. Lean more on dragging than clicking.
  • Software Training. Most organizations do some sort of software training. Show your skills with screencasts and software simulations.
  • Make it interesting. Most e-learning isn’t very good and usually very boring. Convert one of those types of courses into something interesting. Make it look good and make it interactive.

Learn to Use E-Learning Software

Your success hinges less on your academic credentials and more on demonstrable skills and fluency with e-learning software. There’s a lot of e-learning software out there. You can’t learn everything. I’ll give my plug for the Articulate tools for two main reasons:

  • Do a job search and most organizations are looking for Articulate course developers. You can’t go wrong getting the skills that potential employers desire.
  • All of the demo modules I mentioned above can be quickly built in both Storyline and Rise. You’ll be able to build a professional portfolio using those tools especially if you take advantage of the community resources and the Content Library that comes with Articulate 360.

Build an E-Learning Portfolio

Whenever I hire an instructional designer, I’m more inclined to review their portfolio rather than a resume that documents their experience and education. An instructional design degree is great but to me, the proof is in the pudding. And without a portfolio how can you SHOW your work and skills?

The portfolio highlights your skills and experience.

  • Keep it short. Find a few interesting (and interactive) parts of the course and show those. Or build some modules from the weekly e-learning challenges. They’re short and relatively easy to build. And perfect for a portfolio project.
  • Looks matter more than instructional design. It is a visual medium so make your visuals strong. Stay away from defaults and add some custom elements. Add some novel interactivity to catch their attention.
  • Identify common types of courses (as noted above) and build some modules for your portfolio. This will give you a diversity of projects and showcase different skills.

Learn More About These Topics

There’s a lot that goes into building an effective e-learning course. Here are some additional topics and skills you’ll need to understand to be a good course designer. You don’t need to be a pro at everything but you should be able to speak to them when needed.

There’s obviously a lot more you need to know to be successful transitioning into an e-learning job. What are the five things you’d recommend to that person? Feel free to share them in the comments.

Events

Free E-Learning Resources

Want to learn more? Check out these articles and free resources in the community.

Here’s a great job board for e-learning, instructional design, and training jobs

Participate in the weekly e-learning challenges to sharpen your skills

Get your free PowerPoint templates and free graphics & stock images.

Lots of cool e-learning examples to check out and find inspiration.

Getting Started? This e-learning 101 series and the free e-books will help.


gamified e-learning

The other day I got one of those marketing emails that I tend to delete without looking over. However, this one featured some ideas on gamification. And what got me most interested was looking at their examples. As we all know, gamification is a hot topic and it’s always neat to see how different groups build the gamified elements in their courses.

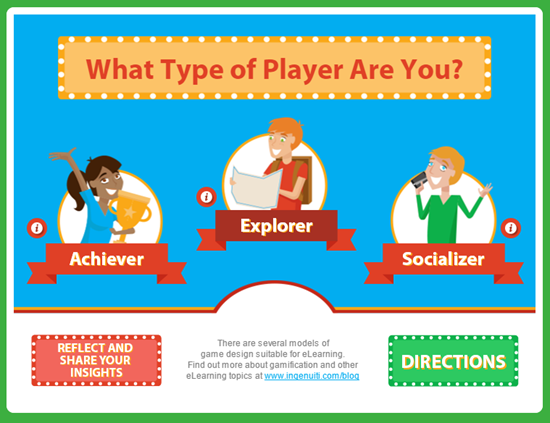
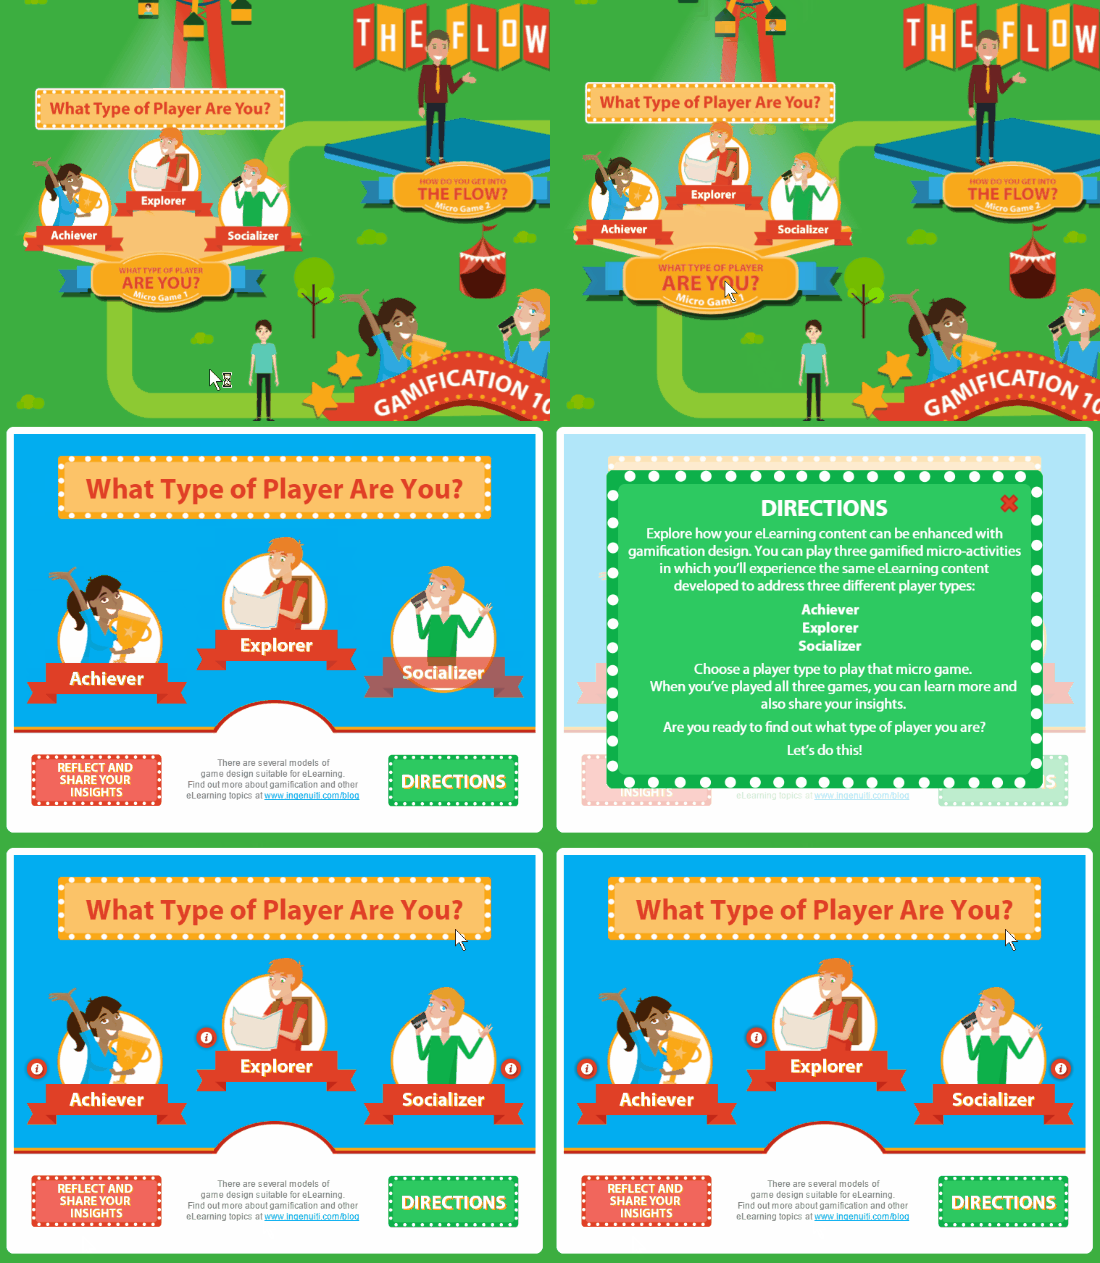
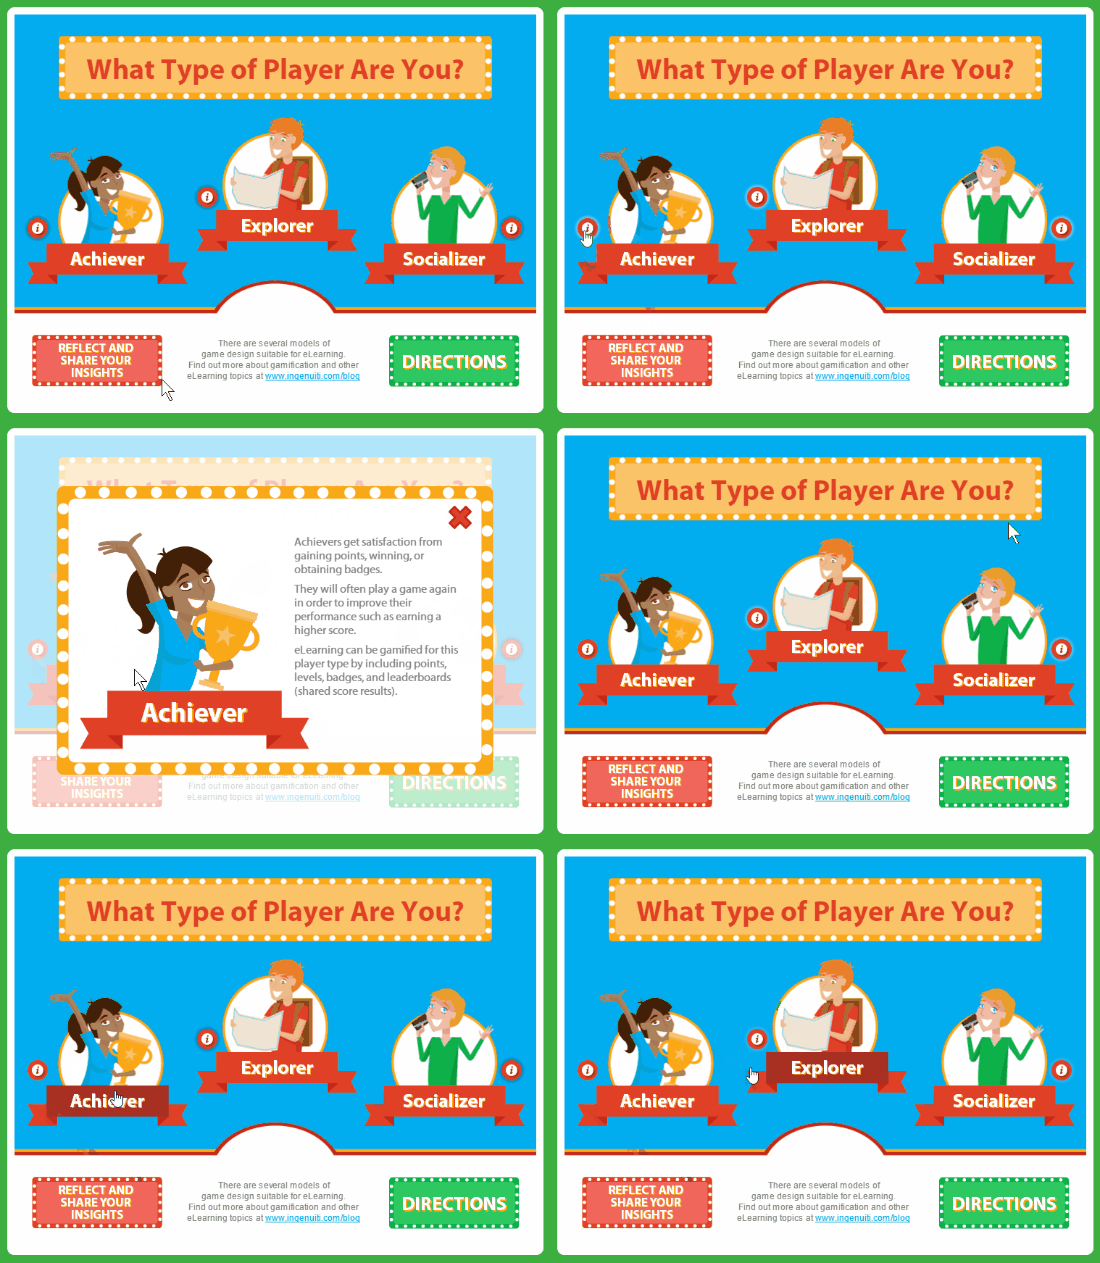
Ingenuiti put together a portfolio page with three different gamified examples. They use three micro games to teach and demonstrate some core gamification concepts.

I reviewed their modules and want to highlight a few production tips that not only work for gamified e-learning courses, but are just as useful in other contexts. For today’s post, I’ll focus on the first micro game.

Here’s a link to the video tutorial series.

Gamification Micro Game #1

gamified e-learning example

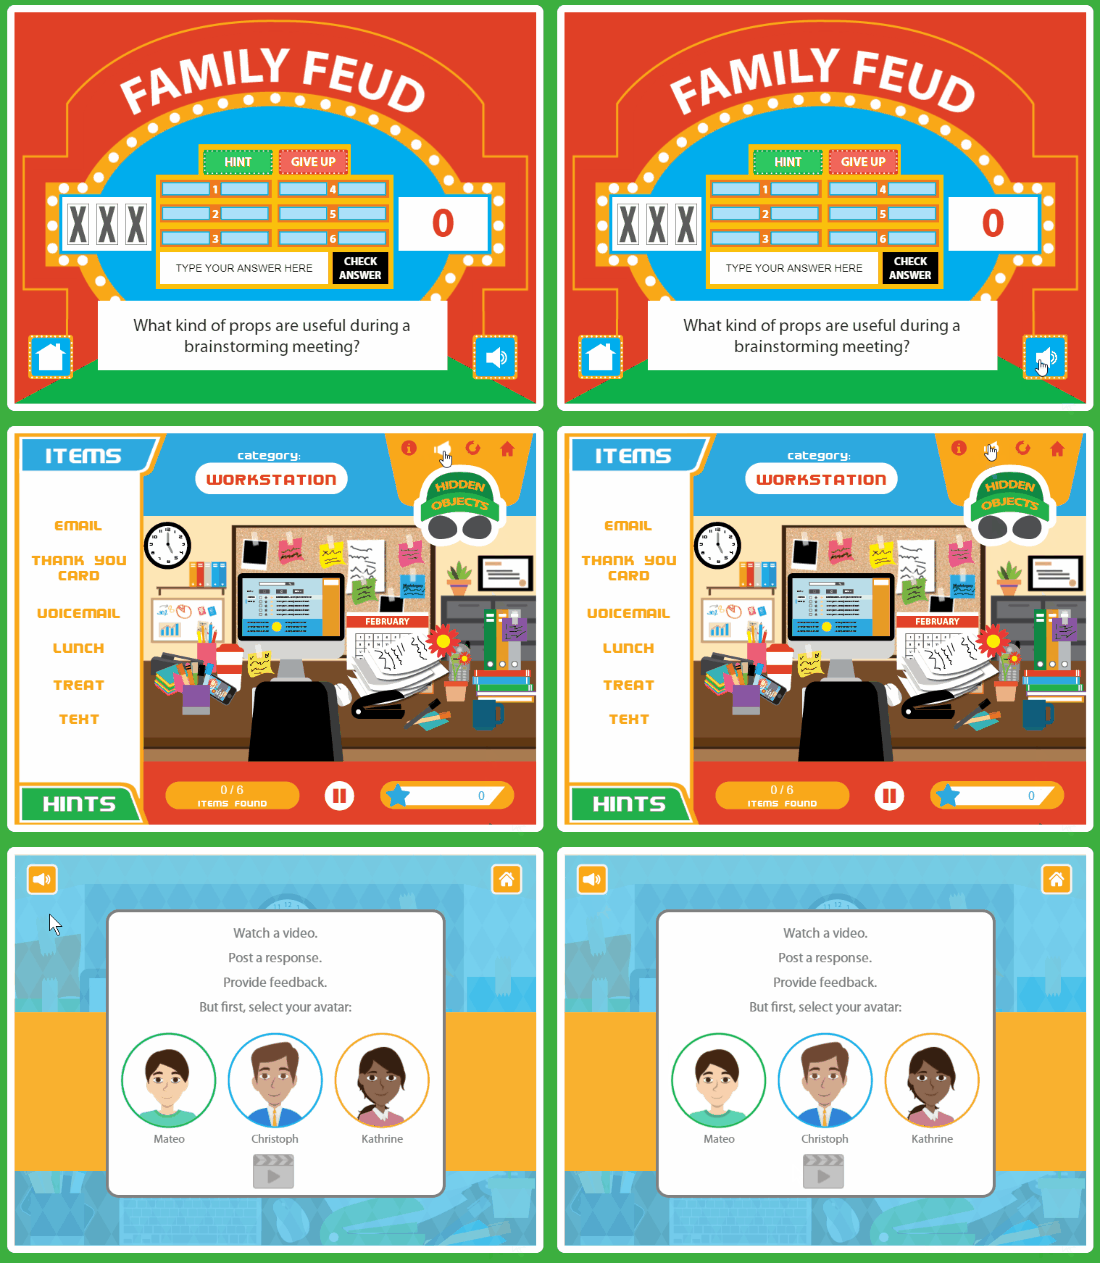
The first micro game focuses on three types of learning activities:

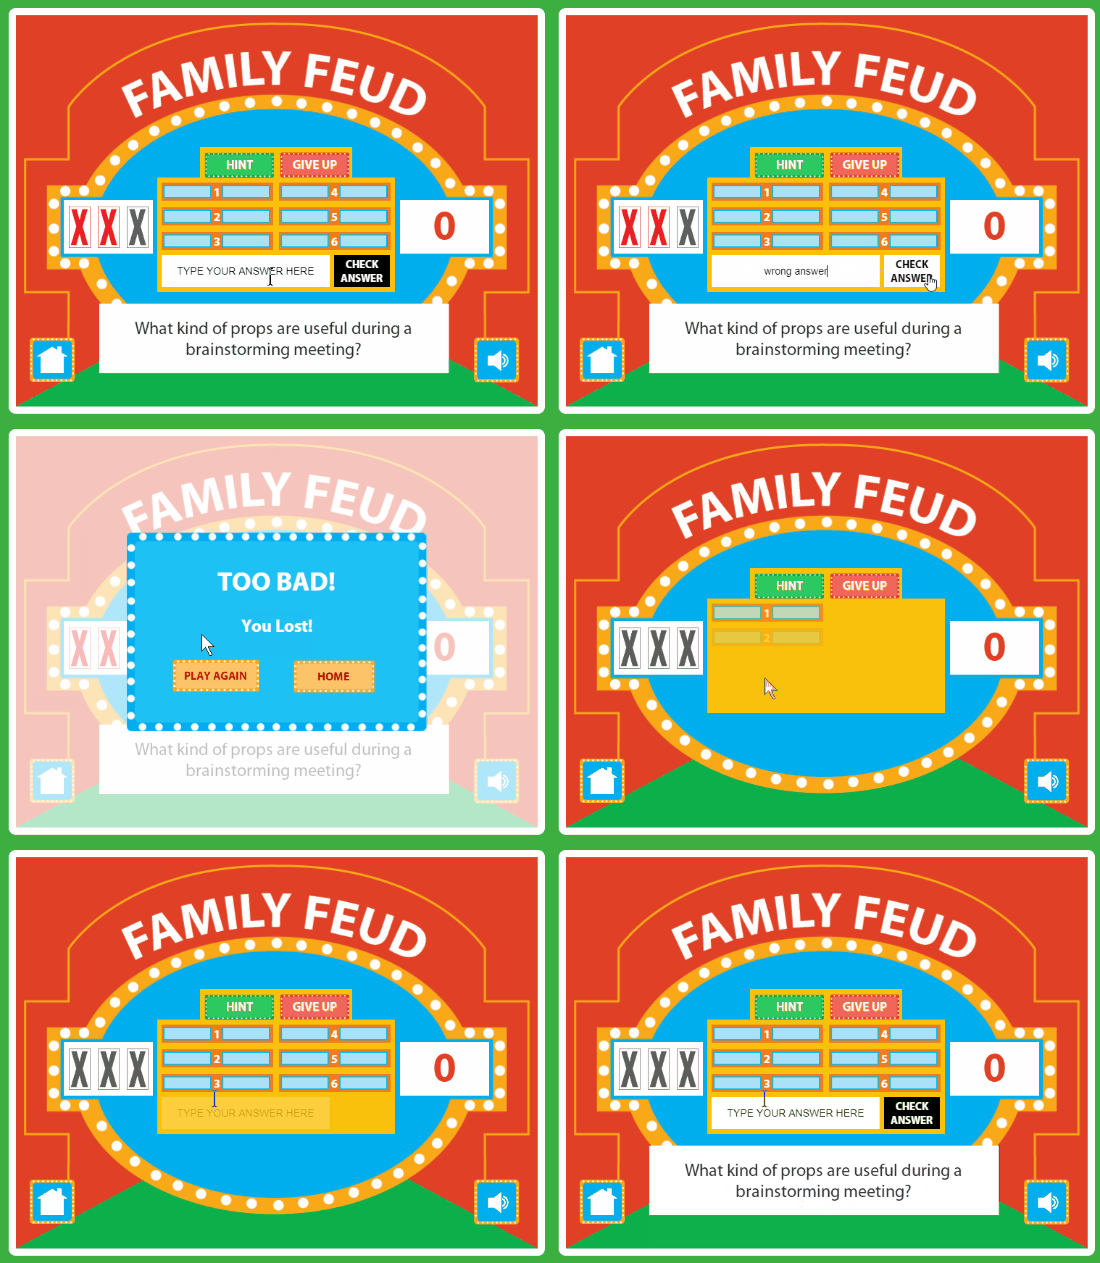
  • Simple Game: challenge the learners understanding in a common game format. It’s a great way to rehearse and recall information and do it in a fun way that is familiar to most people.
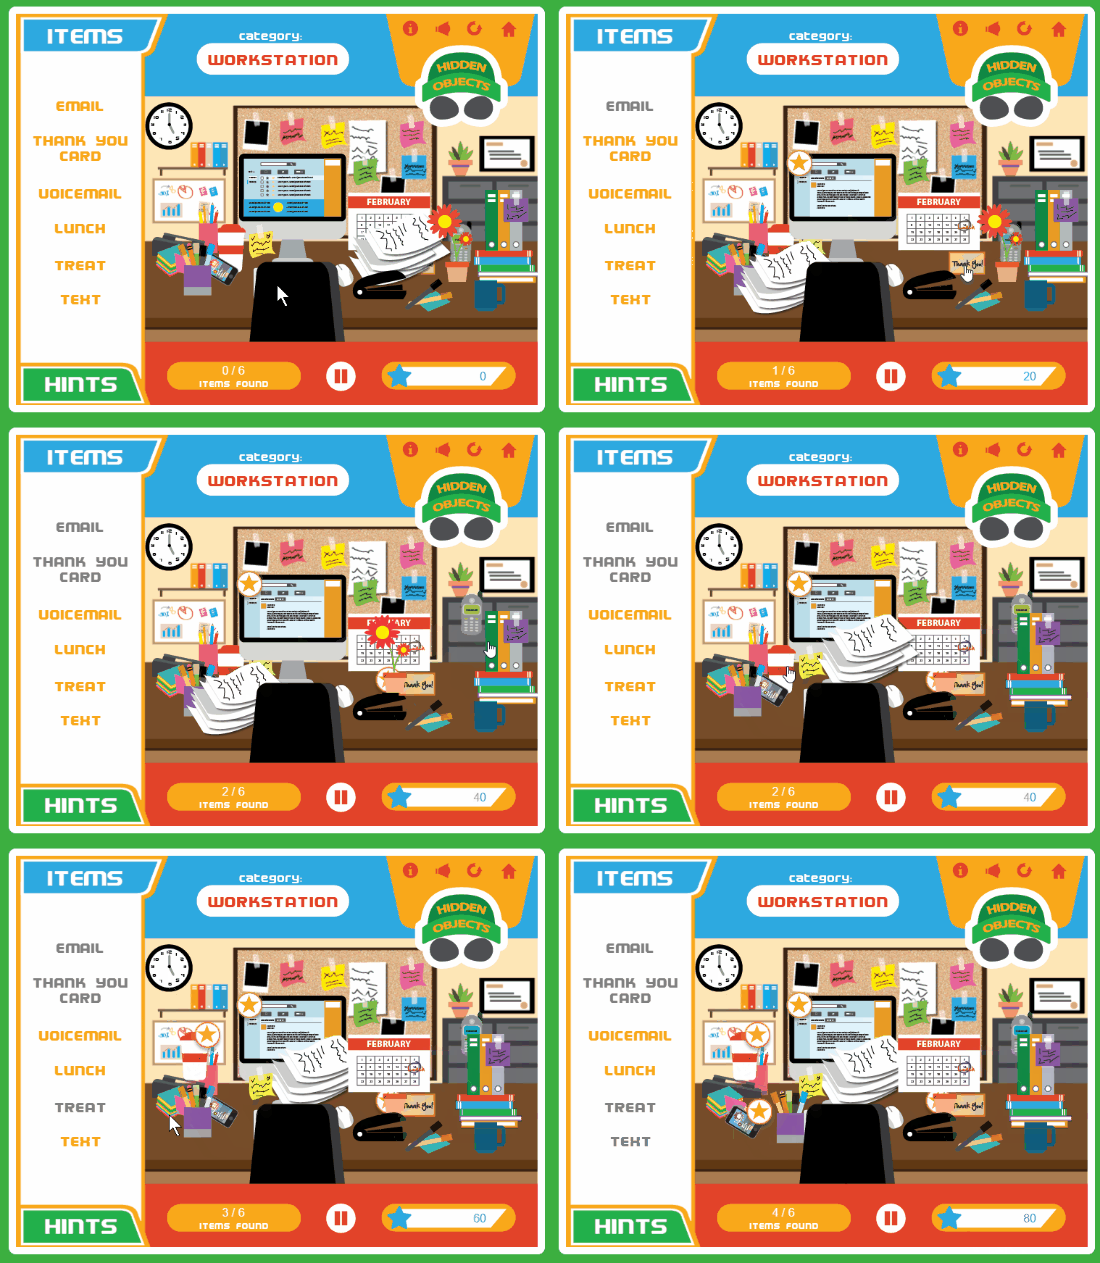
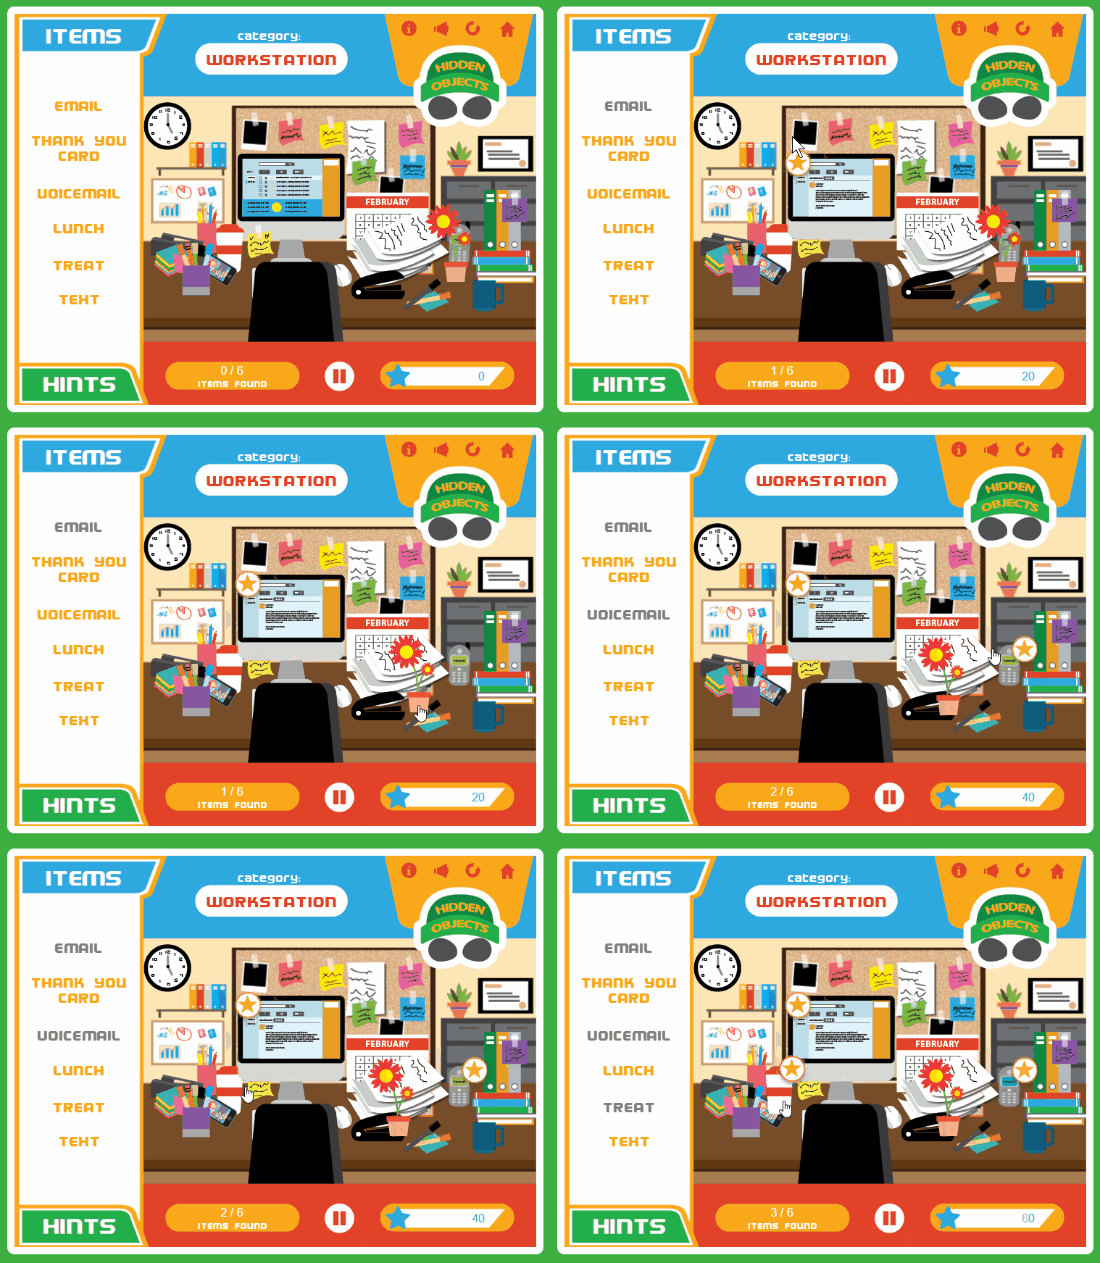
  • Explore Activity: have the learner explore the environment and collect information or rewards. I always consider exploration to be one of the core building blocks for interactive learning. Given the right context, exploration is a great way to engage and inspire critical thinking.
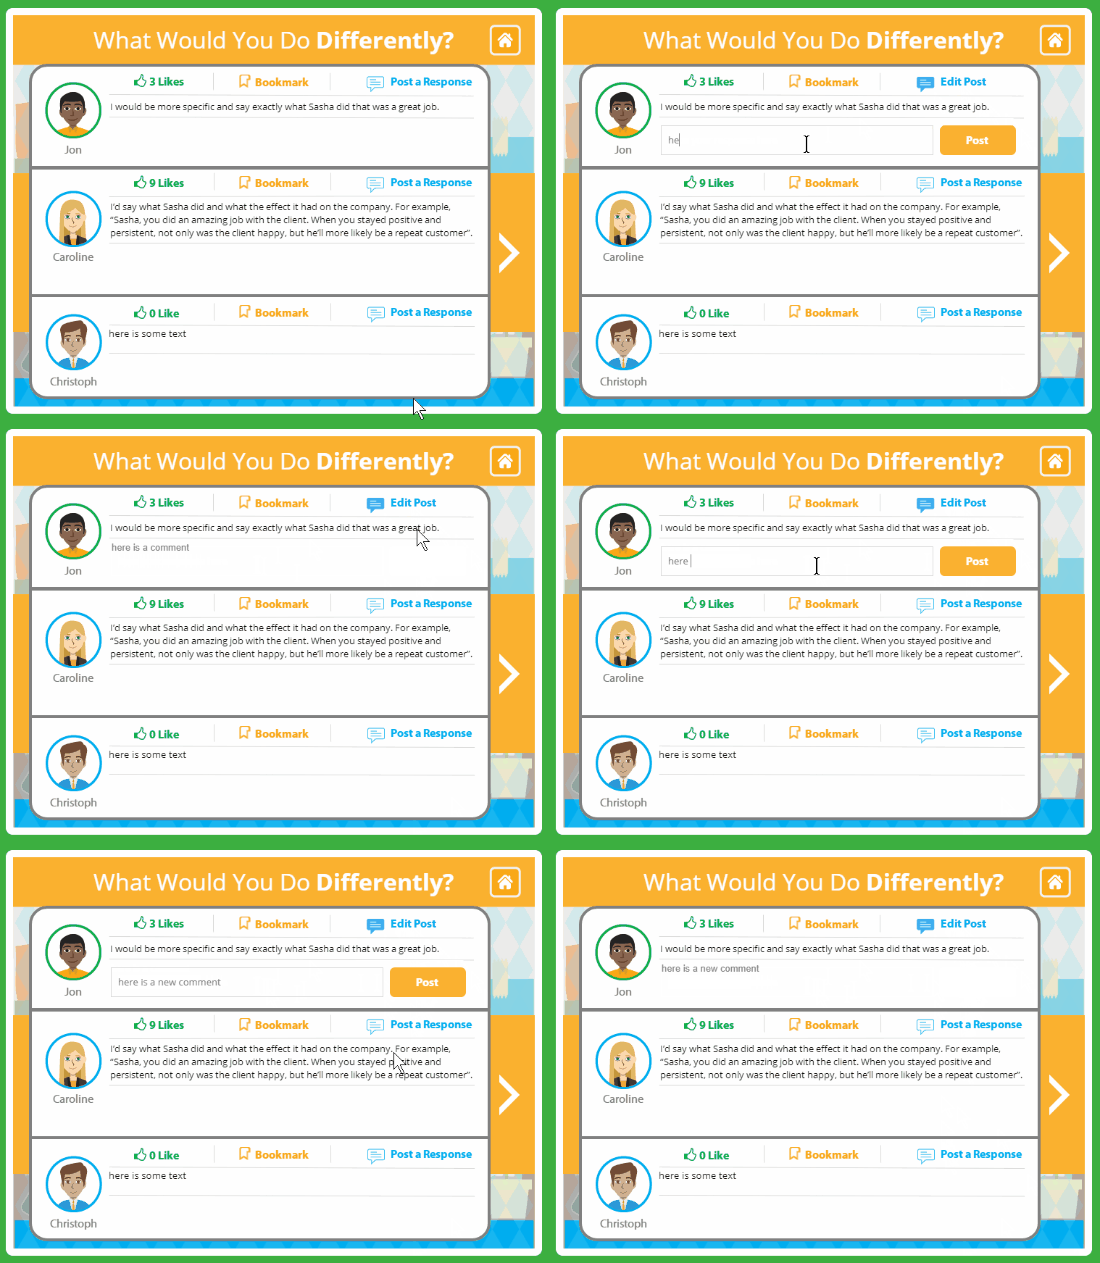
  • Simple Scenario: the learner observes an interaction, reflects on it, and then offers constructive input. Mimicking real-world type interactions is a good way to reinforce the learning experience. They do some clever things with the commenting, liking, and bookmarking.

There’s a lot going on in their modules. I isolated a few things that they did so that I can show some production tips and nuances of the software. Keep in mind, there’s always a few ways to do the same thing in software. So if you have different or even better ideas, feel free to share them in the comments.

Here are some videos that offer some real quick tutorials on how you can create similar effects and interactions in your own e-learning courses. I’m using Storyline because it’s easy to use, but you’re free to use the software of your choice, especially if you have plenty of time on your hands and not rushed to get things done. 🙂

E-Learning Tip #1: Gate Screens

gamification example gate screen

Many courses have starter pages with simple instructions. Also, it’s also a good idea to stop progress in the course when changing directions on types of interactivity or navigation. It helps set expectations and orients the user. I call those gate screens.

E-Learning Tip #2: Custom Markers with Animated Content Boxes

gamified e-learning example custom markers

In their demo, they used the marker feature but turned off the marker labels and had their own content appear. Also, after clicking the marker, the pulsing stops. When clicking the marker, the background fades and the content box animates in and out (upon leaving).

E-Learning Tip #3: Turn Audio On/Off

In a few places, they have running background audio which can be turned on or off. Normally, one oculd use the player volume control, but since the player isn’t present, custom controls need to be enabled.

E-Learning Tip #4: Simulated Posting of Chat Response

gamified e-learning example simulated conversation and text chat

I really like the way they build this mini scenario and the simulated chat. Have the user post a response to a chat. You notice that you can post and edit comments. As you do that, the other comments are disabled.

E-Learning Tip #6: Free Dragging Objects

gamified e-learning example free dragging interaction

This exploration activity let’s the user drag objects and move them. Normally, dragging objects are associated with drag and drop activities. However, these are free moving objects with no specific interaction to them. They just let the user move objects freely out of the way to see what’s underneath.

E-Learning Tip #7: Changing State of Selected Objects

gamified e-learning example selected states

When a correct choice is made, the object displays a star to indicate it’s been selected correctly. You’ll also notice that the side panel indicates which objects are selected and which remain.

E-Learning Tip #8: Play Again Option

gamified e-learning example retry interaction

Let the user quit or play the game again. This resets the interaction to the initial state.

These are a few of the cool things the Ingenuiti developers did in their module. Whether you’re building a gamified e-learning course or something else, these production tips should come in handy.

Events

Free E-Learning Resources

Want to learn more? Check out these articles and free resources in the community.

Here’s a great job board for e-learning, instructional design, and training jobs

Participate in the weekly e-learning challenges to sharpen your skills

Get your free PowerPoint templates and free graphics & stock images.

Lots of cool e-learning examples to check out and find inspiration.

Getting Started? This e-learning 101 series and the free e-books will help.


closed captions

We’ve discussed closed captions in a previous post. We looked at how to create them with free software or online tools. And we also explored how to build closed captions using a single text variable.

Today, we’ll look at how the closed captions feature works in Articulate Storyline 360. You’ll find it a lot easier to use. Here are three video tutorials that go into more detail regarding the steps below.

TUTORIALS

How to Create & Edit Closed Caption Text

Here’s how to add captions to audio narration or videos in your course. You can do it right inside of the authoring tool.

  • Insert the video (or audio) file.
  • From the toolbar, select Add Captions.
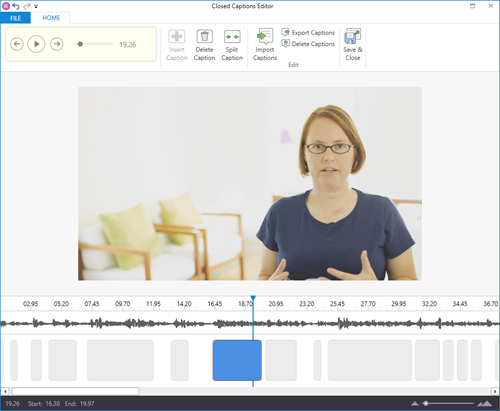
  • Storyline opens a caption editor where it analyzes the audio track and creates several placeholder caption boxes for you to insert text.
  • Select a caption box and start typing. Hit the return key to restart the caption box until you’re done. Hit the tab key to move to the next box.
  • Easy as that.

closed captions editor

TUTORIAL: Learn about creating and editing closed captions in Storyline 360.

Editing your captions is fairly straightforward. When you open the Closed Captions Editor, you see a timeline with the audio track and caption boxes.

  • You can extend or decrease the time of the caption.
  • Edit text.
  • Click and move the caption boxes.
  • Export the closed captions as a .VTT file, which is standard.

How to Import Closed Caption Text

Many people like to create their closed caption text in separate applications, export the .VTT (or another format), and import the text file into the authoring tool. That makes sense, especially if you have really long audio or video tracks.

Personally, I like to use Youtube to create my captions for long videos. I upload the video to Youtube and make sure it’s not public. Then, I take my text script and paste it into the field. Youtube does the rest. When it’s done, I can download a .VTT file to use in my e-learning course.

Here’s how it works in Storyline 360.

  • Insert a video or audio file into the slide.
  • Click on the video and in the ribbon, select Import to access your .VTT file.
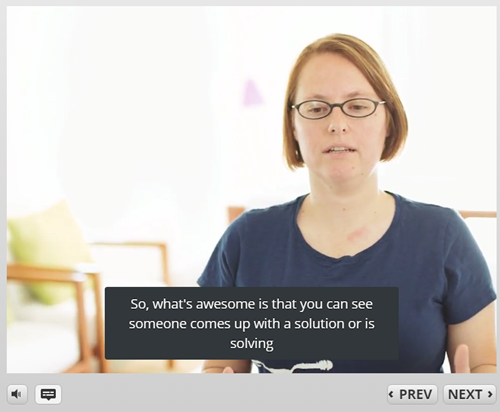
  • Preview the slide and select the Captions button on the player.

closed captions example

TUTORIAL: Learn about importing closed captions.

How to Create a Closed Captions Button

By default, the course player has a captions button. To view captions during the course, click the captions button. That works great if you have the player and captions button enabled. However, some people prefer to diminish the player and want their own captions button on the slide to control when the captions display.

Here’s how to create a custom captions button:

  • Insert a button.
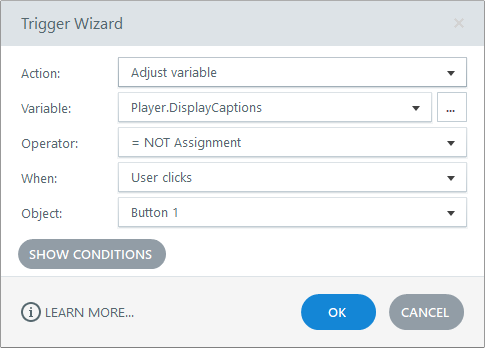
  • Add a trigger to the button to adjust the Player.Display.Captions variable.
  • The variable is like a True/False variable that can be either one or the other when clicked. Set the operator to =NOT Assignment.
  • When the button is clicked it toggles the variable value to what is not assigned to. Thus, clicking the button turns the captions or off.

closed captions variable

TUTORIAL: Learn about creating a custom closed captions button.

And that’s how you add closed captions to your e-learning courses. Pretty simple, huh?

Events

Free E-Learning Resources

Want to learn more? Check out these articles and free resources in the community.

Here’s a great job board for e-learning, instructional design, and training jobs

Participate in the weekly e-learning challenges to sharpen your skills

Get your free PowerPoint templates and free graphics & stock images.

Lots of cool e-learning examples to check out and find inspiration.

Getting Started? This e-learning 101 series and the free e-books will help.