The Rapid Elearning Blog

Archive for the ‘Articulate Storyline’ Category


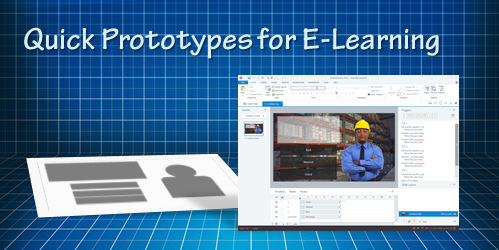
e-learning prototypes

Many e-learning developers spend too much time building courses that are almost complete before they solicit feedback about the course. This could be a waste of resources because by that time, they’ve invested a lot of resources and it’s a real challenge to get things changed that late in the game, especially if the changes are significant.

A better solution is to quickly prototype the course, get some feedback and make adjustments. This is even more critical if you have a lot of interactive content. The good thing is that this is really easy to do in Storyline (or event PowerPoint).

Here are a few tips on how to approach the prototyping.

E-Learning Prototype: Start Backwards

What is the objective of the course and what does the client expect the learner to do? Slapping a bunch of information together over a series of screens is probably not going to meet your objectives. 

It’s all about the action, boss.

It doesn’t take much effort to prototype a bullet point screen. That’s not where you want to put your effort when you prototype. Instead, focus on the actions and prototype the activities that let the learners practice and demonstrate understanding.

What do they need to do and what interaction can you build that allows them to do that?

E-Learning Prototype: Build Something that Works

One of the many things I like about Storyline is how easy it is to prototype all sorts of interactions. In fact, someone told me that she was in a meeting with a potential client who shared their course requirements and what they hoped to get out of the course.

While the potential client was talking, the e-learning developer opened Storyline and built a quick mock-up of how the course could work with some simple interactions and decision-making scenarios. The client intended to send her away to build something to pitch later. Instead, the e-learning developer showed her the interactive prototype right there in the meeting and got the job on the spot. All because she was able to focus on the desired activity and build a working model. 

E-Learning Prototype: Don’t Worry About Looks

At our workshops, we like to present a few challenge activities. This lets people workout ideas and build quick interactive modules. However, there are always a few attendees who end up spending all their time on the visual design and never end up building a working interactive prototype.

It’s an easy trap to fall into because we tend to lean on the visuals first. They help us think about the project. However, it’s a trap that wastes time. Don’t worry about the way the module looks, worry about the functionality and the desired output. 

Of course, you do want it to be visually organized. If not, the customer will still focus on the way it looks. But you don’t need to make it visually rich. A good cheat though, is to start with the content library templates and then work from there.

To sum it all up, building quick prototypes is a better option for course development than building almost complete courses and then soliciting feedback, especially since you’ll probably have to make a bunch of changes anyway.

How do you build your prototypes? Do you start with a storyboard? Or do you jump right into the software and start building?

Events

Free E-Learning Resources

Want to learn more? Check out these articles and free resources in the community.

Here’s a great job board for e-learning, instructional design, and training jobs

Participate in the weekly e-learning challenges to sharpen your skills

Get your free PowerPoint templates and free graphics & stock images.

Lots of cool e-learning examples to check out and find inspiration.

Getting Started? This e-learning 101 series and the free e-books will help.


gamified e-learning

The other day I got one of those marketing emails that I tend to delete without looking over. However, this one featured some ideas on gamification. And what got me most interested was looking at their examples. As we all know, gamification is a hot topic and it’s always neat to see how different groups build the gamified elements in their courses.

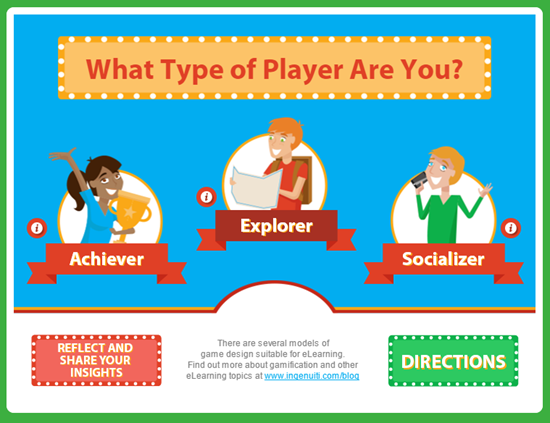
Ingenuiti put together a portfolio page with three different gamified examples. They use three micro games to teach and demonstrate some core gamification concepts.

I reviewed their modules and want to highlight a few production tips that not only work for gamified e-learning courses, but are just as useful in other contexts. For today’s post, I’ll focus on the first micro game.

Here’s a link to the video tutorial series.

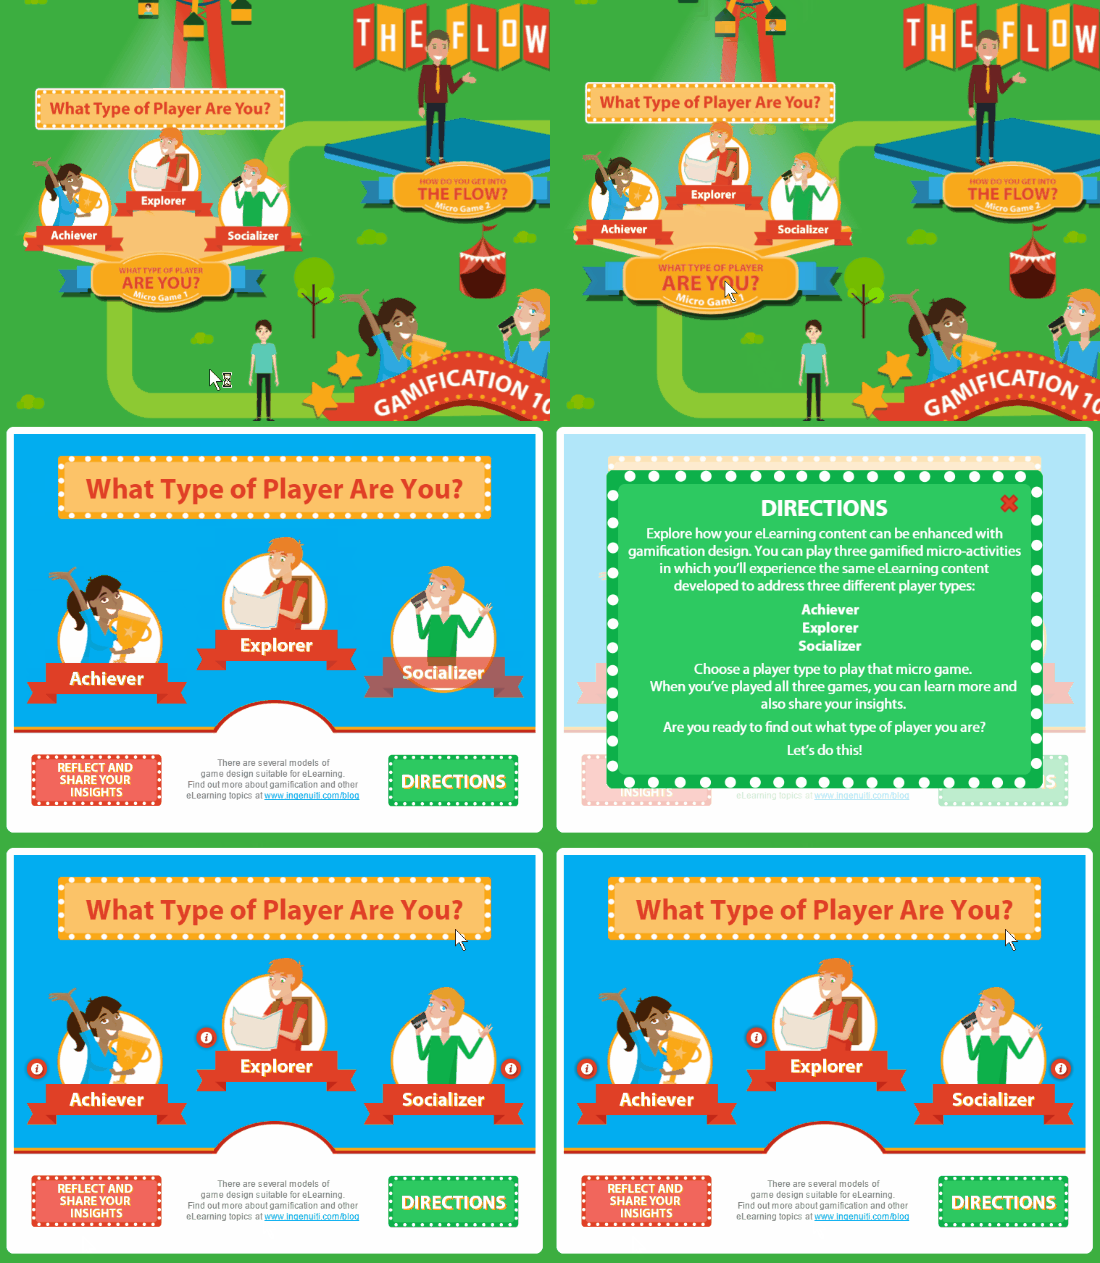
Gamification Micro Game #1

gamified e-learning example

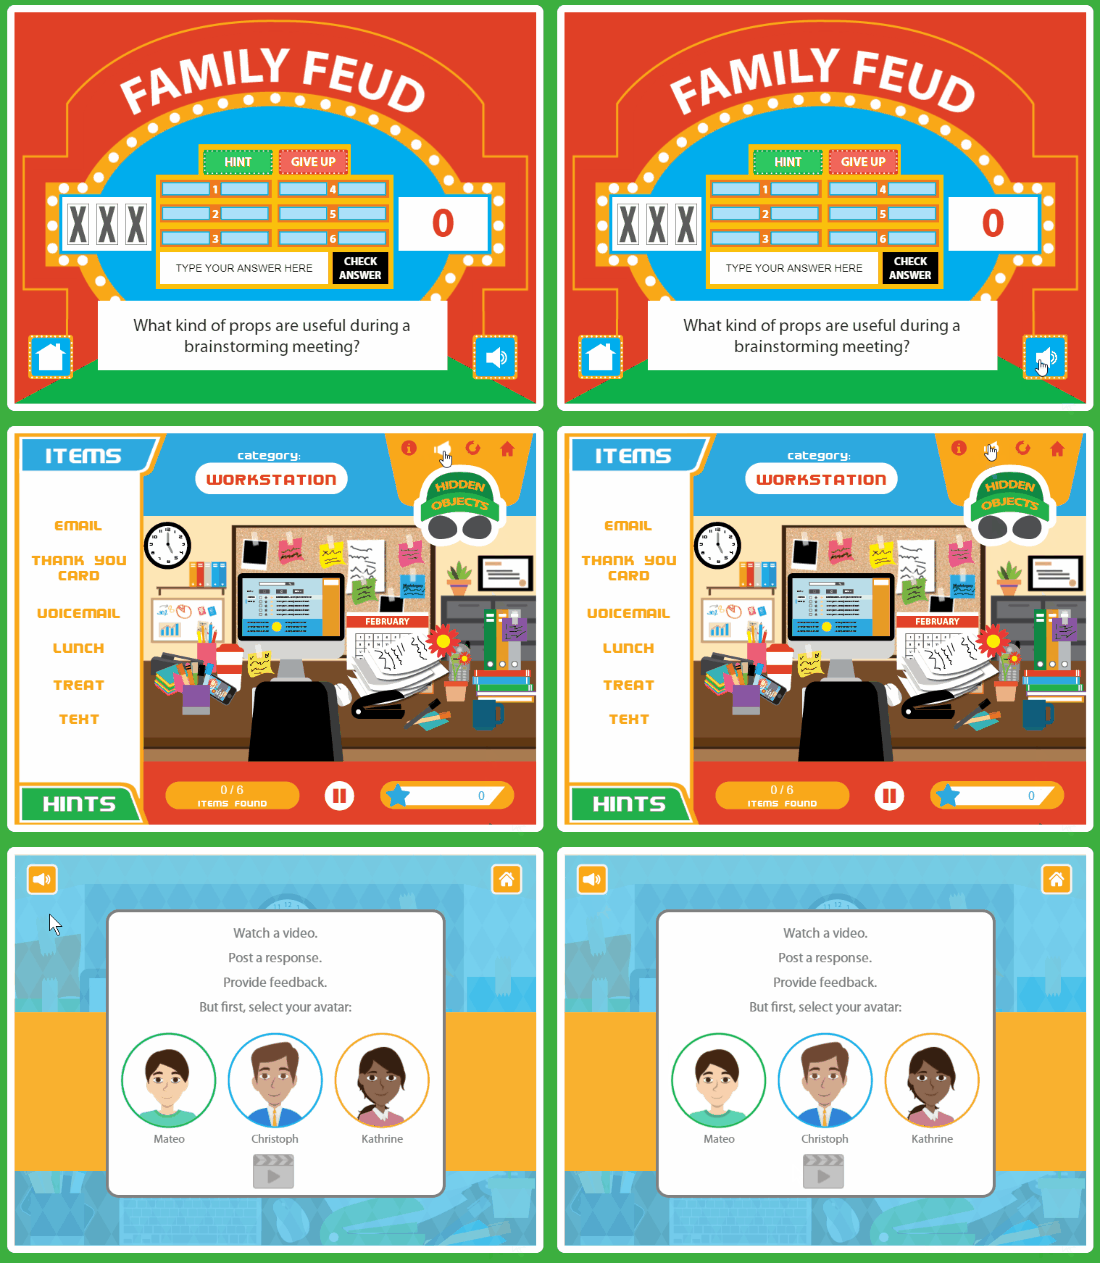
The first micro game focuses on three types of learning activities:

  • Simple Game: challenge the learners understanding in a common game format. It’s a great way to rehearse and recall information and do it in a fun way that is familiar to most people.
  • Explore Activity: have the learner explore the environment and collect information or rewards. I always consider exploration to be one of the core building blocks for interactive learning. Given the right context, exploration is a great way to engage and inspire critical thinking.
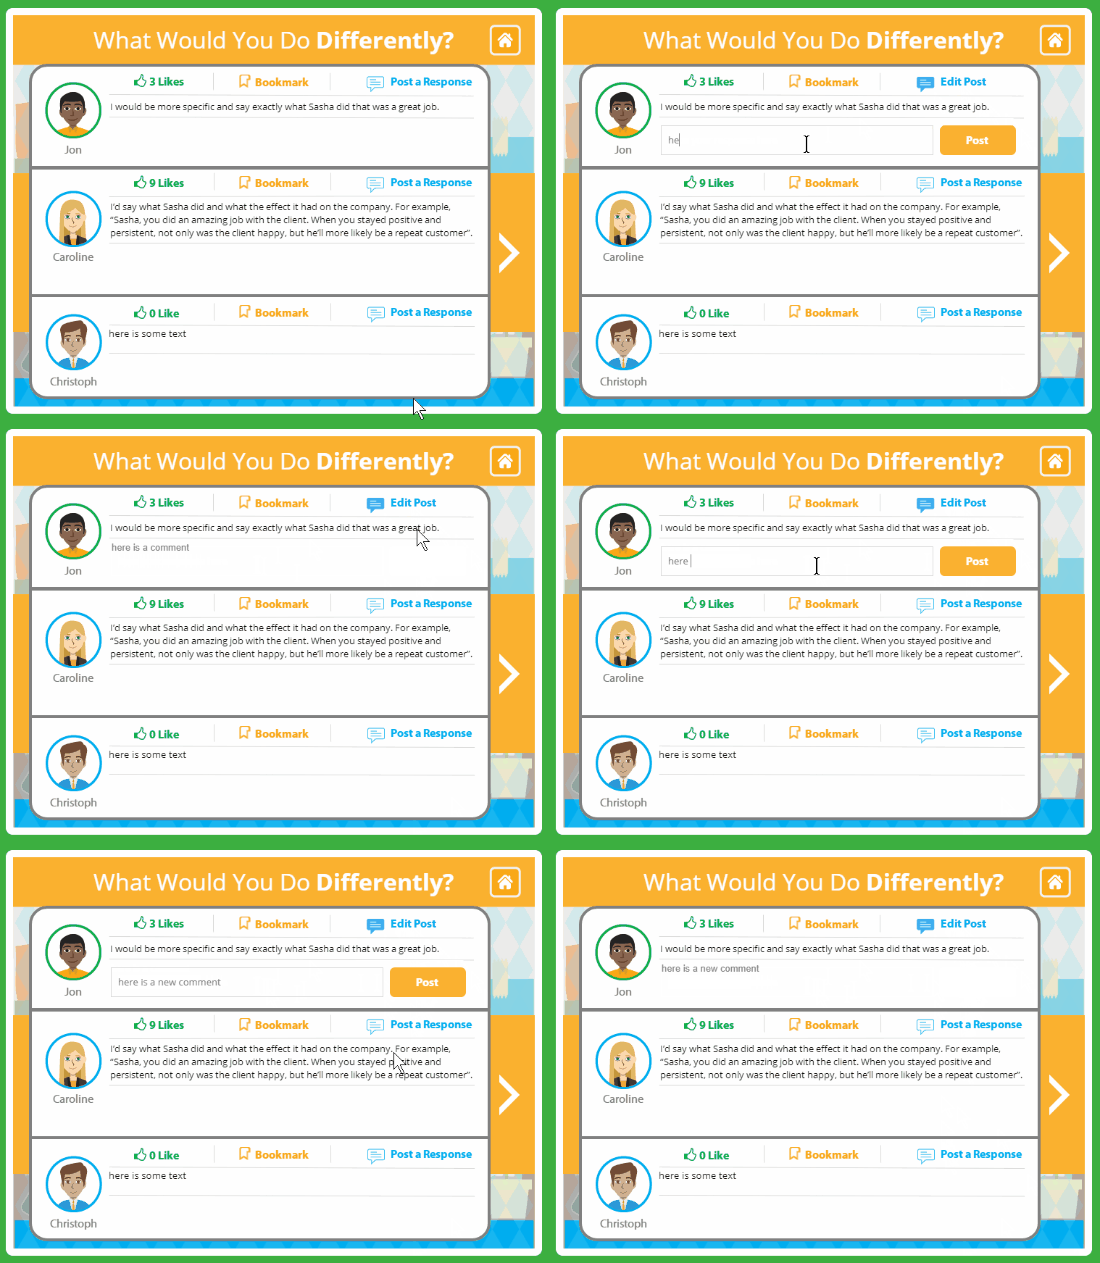
  • Simple Scenario: the learner observes an interaction, reflects on it, and then offers constructive input. Mimicking real-world type interactions is a good way to reinforce the learning experience. They do some clever things with the commenting, liking, and bookmarking.

There’s a lot going on in their modules. I isolated a few things that they did so that I can show some production tips and nuances of the software. Keep in mind, there’s always a few ways to do the same thing in software. So if you have different or even better ideas, feel free to share them in the comments.

Here are some videos that offer some real quick tutorials on how you can create similar effects and interactions in your own e-learning courses. I’m using Storyline because it’s easy to use, but you’re free to use the software of your choice, especially if you have plenty of time on your hands and not rushed to get things done. 🙂

E-Learning Tip #1: Gate Screens

gamification example gate screen

Many courses have starter pages with simple instructions. Also, it’s also a good idea to stop progress in the course when changing directions on types of interactivity or navigation. It helps set expectations and orients the user. I call those gate screens.

E-Learning Tip #2: Custom Markers with Animated Content Boxes

gamified e-learning example custom markers

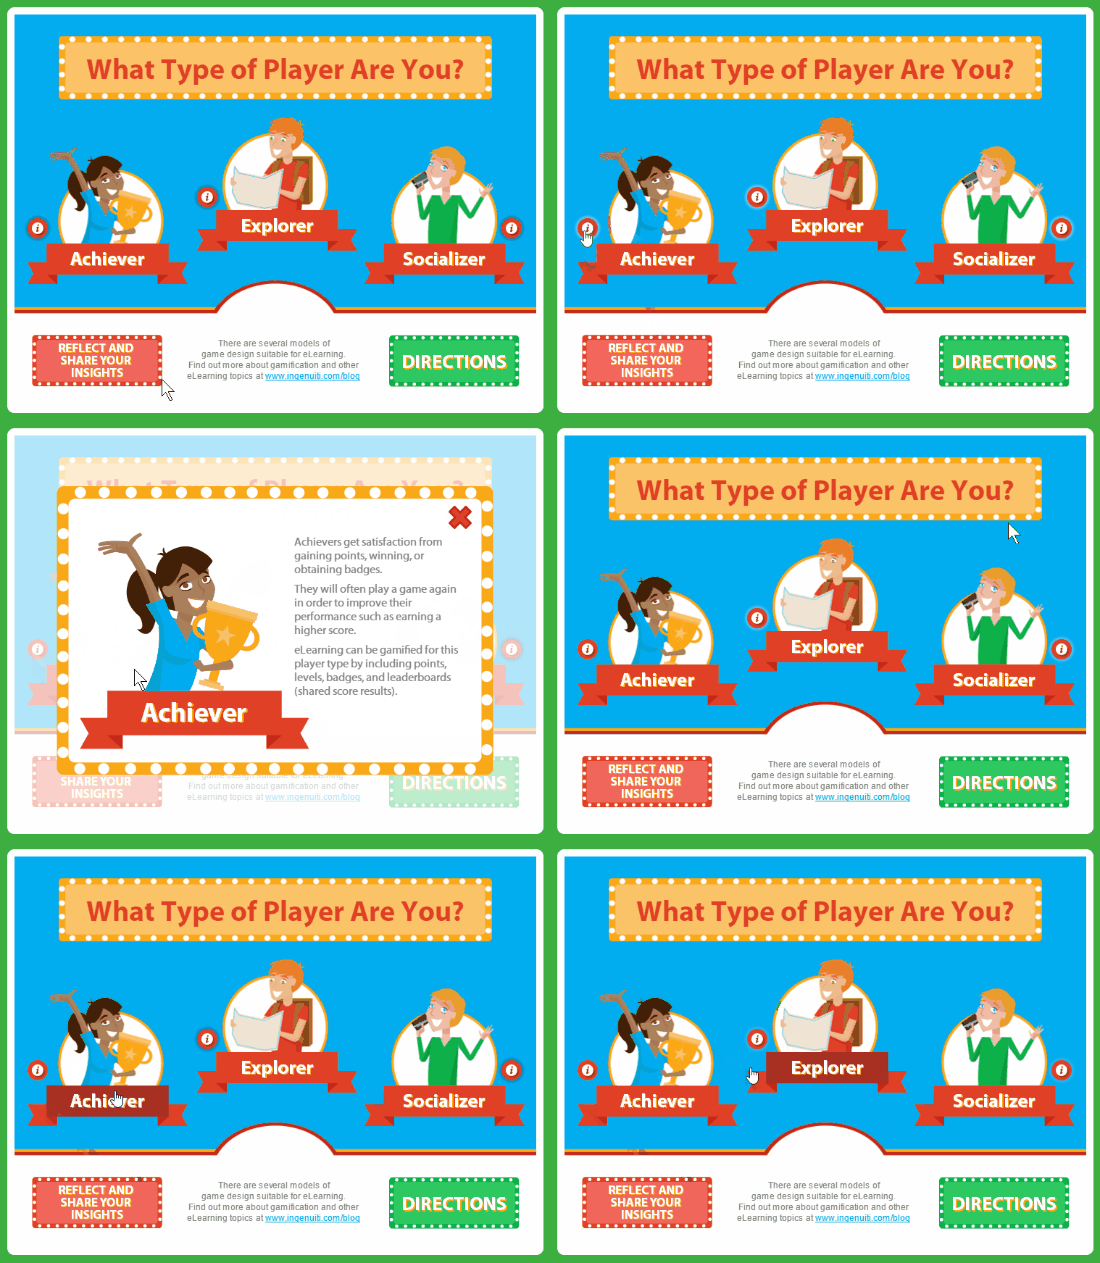
In their demo, they used the marker feature but turned off the marker labels and had their own content appear. Also, after clicking the marker, the pulsing stops. When clicking the marker, the background fades and the content box animates in and out (upon leaving).

E-Learning Tip #3: Turn Audio On/Off

In a few places, they have running background audio which can be turned on or off. Normally, one oculd use the player volume control, but since the player isn’t present, custom controls need to be enabled.

E-Learning Tip #4: Simulated Posting of Chat Response

gamified e-learning example simulated conversation and text chat

I really like the way they build this mini scenario and the simulated chat. Have the user post a response to a chat. You notice that you can post and edit comments. As you do that, the other comments are disabled.

E-Learning Tip #6: Free Dragging Objects

gamified e-learning example free dragging interaction

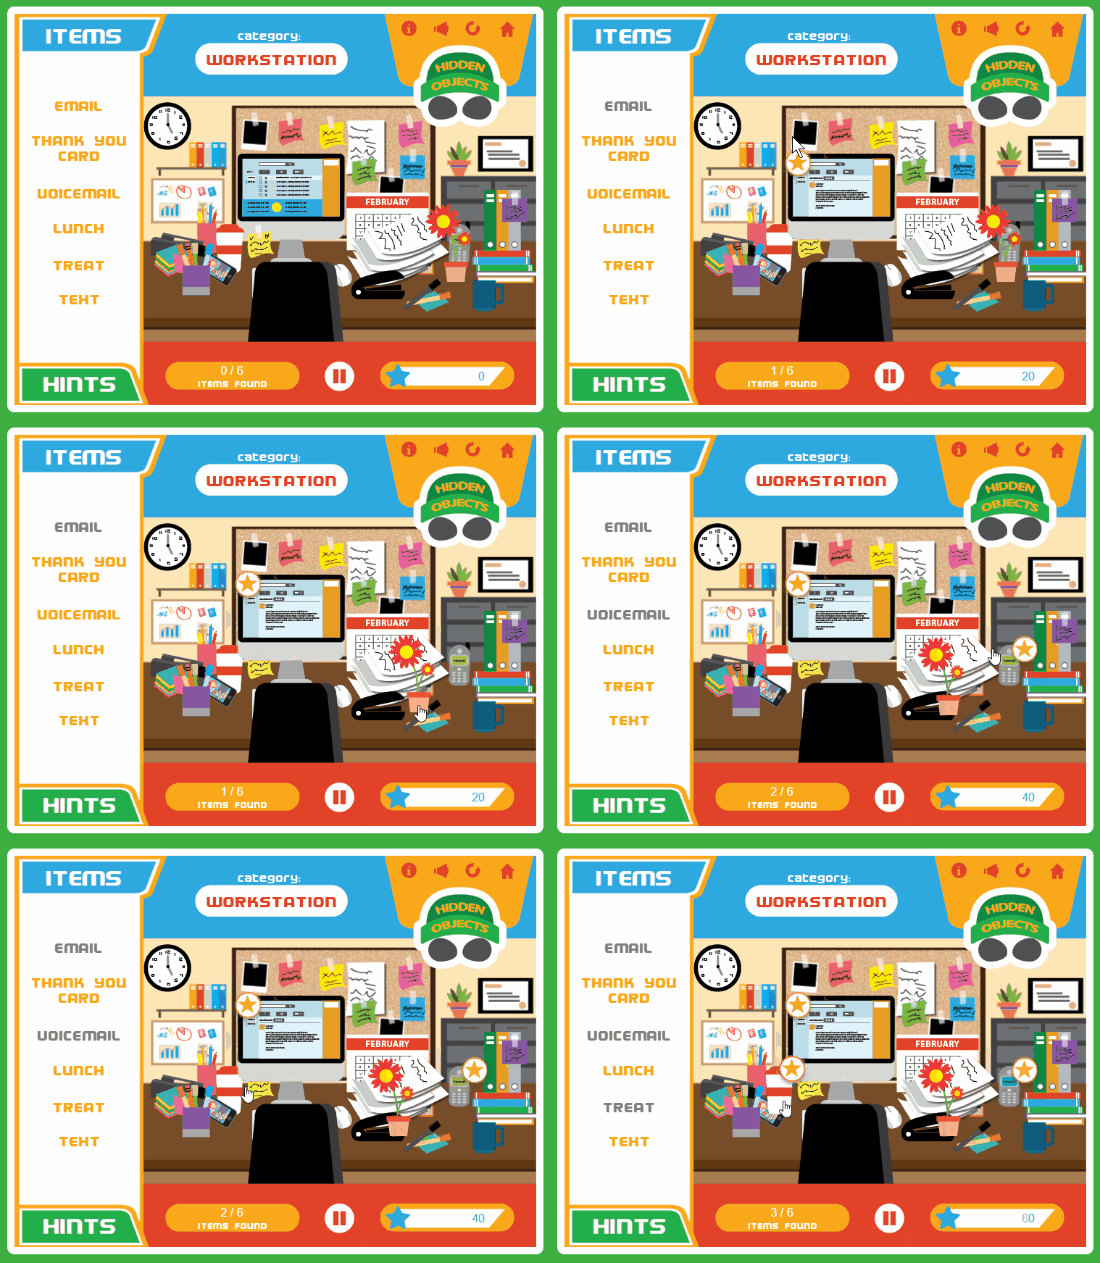
This exploration activity let’s the user drag objects and move them. Normally, dragging objects are associated with drag and drop activities. However, these are free moving objects with no specific interaction to them. They just let the user move objects freely out of the way to see what’s underneath.

E-Learning Tip #7: Changing State of Selected Objects

gamified e-learning example selected states

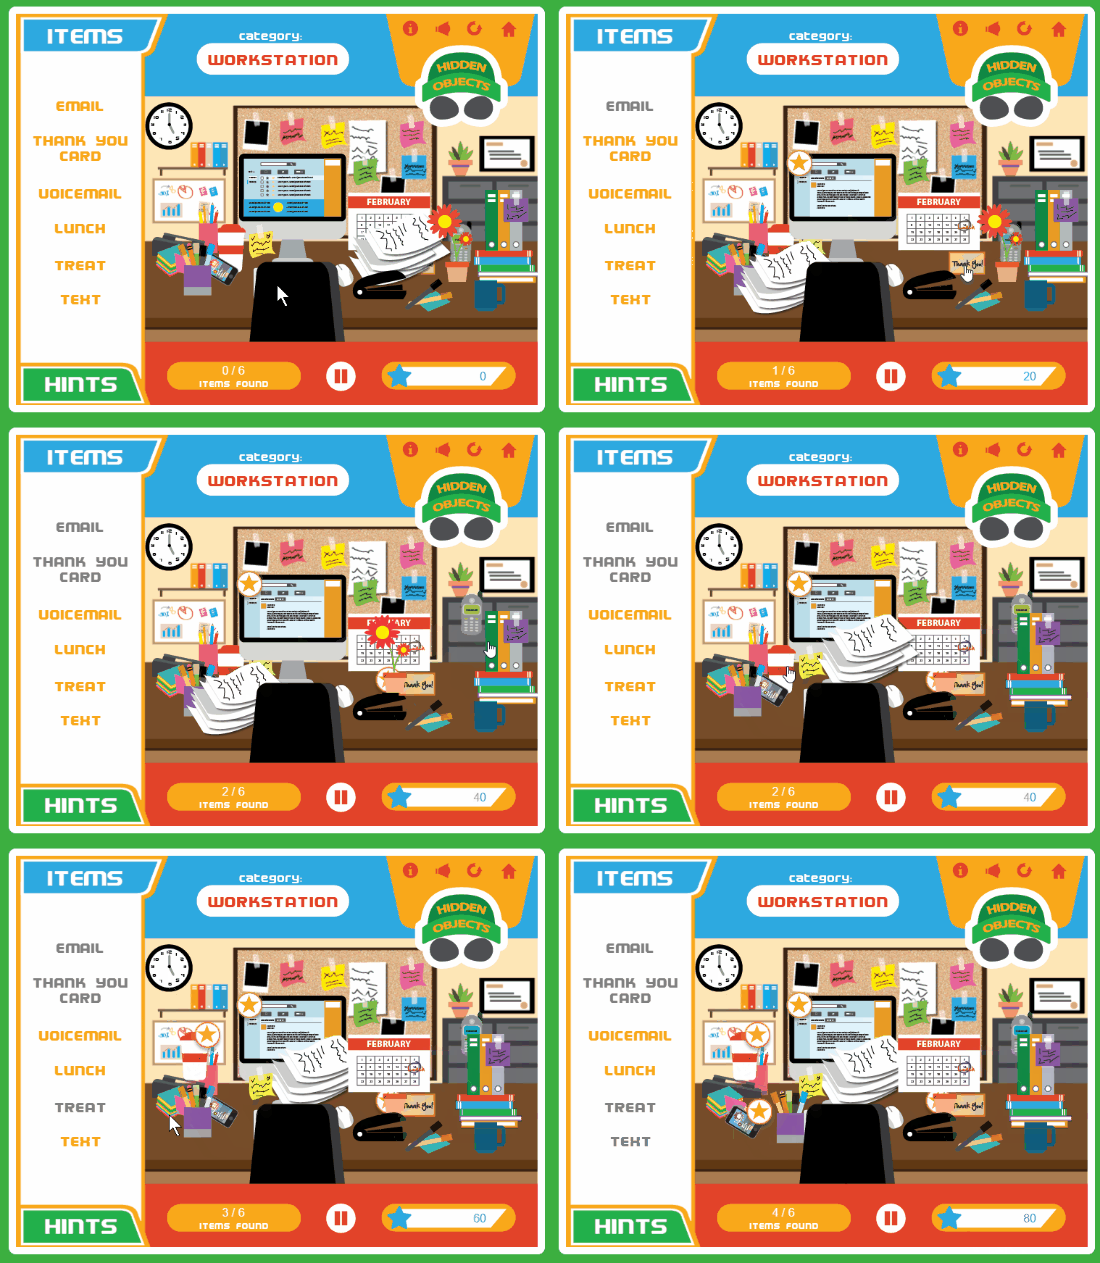
When a correct choice is made, the object displays a star to indicate it’s been selected correctly. You’ll also notice that the side panel indicates which objects are selected and which remain.

E-Learning Tip #8: Play Again Option

gamified e-learning example retry interaction

Let the user quit or play the game again. This resets the interaction to the initial state.

These are a few of the cool things the Ingenuiti developers did in their module. Whether you’re building a gamified e-learning course or something else, these production tips should come in handy.

Events

Free E-Learning Resources

Want to learn more? Check out these articles and free resources in the community.

Here’s a great job board for e-learning, instructional design, and training jobs

Participate in the weekly e-learning challenges to sharpen your skills

Get your free PowerPoint templates and free graphics & stock images.

Lots of cool e-learning examples to check out and find inspiration.

Getting Started? This e-learning 101 series and the free e-books will help.


share your e-learning courses header

This is a tip I stumbled upon this week and thought I’d share it because one of the most frequent questions I get from people trying to manage a work portfolio is how to easily share e-learning courses.

Let’s quickly review some of the options that we’ve mentioned in the past:

Today, we’ll look at another option. It’s not free, but it’s inexpensive and comes with other benefits.

Share Your E-Learning Courses with pCloud

I won’t bore you with all the details and benefits regarding pCloud because you can learn that on your own. To keep it simple, it’s a cloud-based storage service similar to Google Drive and Dropbox. What I like that’s different is that it works like a virtual drive so I don’t need to have all of the files on my computers like I do with Dropbox.

Examples of E-Learning Courses 

Anyway, I was testing out their public folder and loaded a few published Storyline courses to see if they work and guess what, they do. Here are three demos:

As you can see, the courses play fine. Thus making it a simple solution for those who want to easily share their courses.

Steps to Share Your E-Learning Courses

Here are a few general steps to share your courses using pCloud.

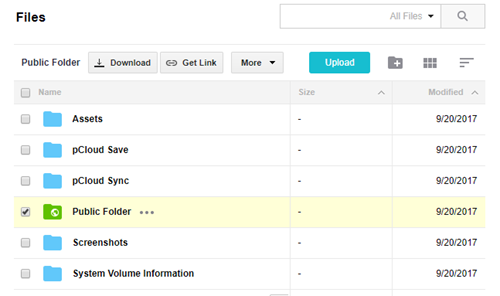
share your e-learning courses public folder

  • Create a folder inside of your Public Folder to share courses.
  • Copy your published course to that folder. pCloud looks like a drive on your computer so you just need to move the files to the pCloud drive.
  • The files are uploaded to pCloud.
  • Go to your my.pCloud.com site and access the folder where you saved your published course.

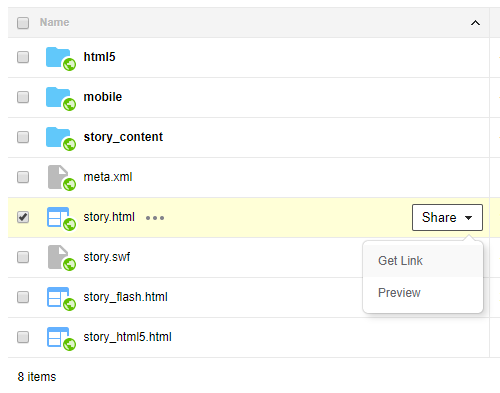
share your e-learning courses link

  • Locate the story.html and click on Share>Get Link. That creates a link to the HTML file which loads the course. You don’t want to share the HTML file itself because the user will only be able to see the HTML file and not see the course load and play.
  • Here’s a quick video tutorial that walks through the steps.

I did notice that when accessing the files from the mobile app, you can only share the file and not a link, so it looks like you can only use the share link from the desktop app.

I find pCloud to be a good solution for my online storage needs, especially since I don’t need to have all of the files on my computers like I do if I want to access them in Dropbox. I also like the upload folder option for people who want to share their files at workshops.

If you’ve tried pCloud to share your courses, I’d love to hear about your experience. Share your thoughts in the comments.

Events

Free E-Learning Resources

Want to learn more? Check out these articles and free resources in the community.

Here’s a great job board for e-learning, instructional design, and training jobs

Participate in the weekly e-learning challenges to sharpen your skills

Get your free PowerPoint templates and free graphics & stock images.

Lots of cool e-learning examples to check out and find inspiration.

Getting Started? This e-learning 101 series and the free e-books will help.


closed captions

We’ve discussed closed captions in a previous post. We looked at how to create them with free software or online tools. And we also explored how to build closed captions using a single text variable.

Today, we’ll look at how the closed captions feature works in Articulate Storyline 360. You’ll find it a lot easier to use. Here are three video tutorials that go into more detail regarding the steps below.

TUTORIALS

How to Create & Edit Closed Caption Text

Here’s how to add captions to audio narration or videos in your course. You can do it right inside of the authoring tool.

  • Insert the video (or audio) file.
  • From the toolbar, select Add Captions.
  • Storyline opens a caption editor where it analyzes the audio track and creates several placeholder caption boxes for you to insert text.
  • Select a caption box and start typing. Hit the return key to restart the caption box until you’re done. Hit the tab key to move to the next box.
  • Easy as that.

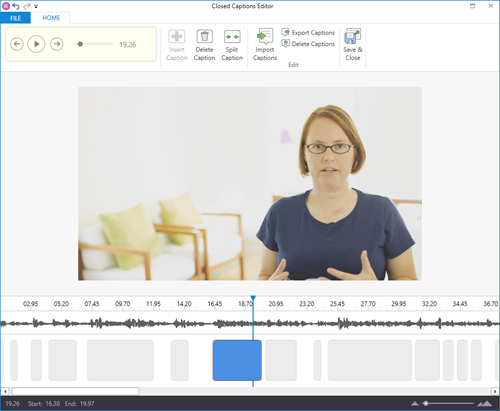
closed captions editor

TUTORIAL: Learn about creating and editing closed captions in Storyline 360.

Editing your captions is fairly straightforward. When you open the Closed Captions Editor, you see a timeline with the audio track and caption boxes.

  • You can extend or decrease the time of the caption.
  • Edit text.
  • Click and move the caption boxes.
  • Export the closed captions as a .VTT file, which is standard.

How to Import Closed Caption Text

Many people like to create their closed caption text in separate applications, export the .VTT (or another format), and import the text file into the authoring tool. That makes sense, especially if you have really long audio or video tracks.

Personally, I like to use Youtube to create my captions for long videos. I upload the video to Youtube and make sure it’s not public. Then, I take my text script and paste it into the field. Youtube does the rest. When it’s done, I can download a .VTT file to use in my e-learning course.

Here’s how it works in Storyline 360.

  • Insert a video or audio file into the slide.
  • Click on the video and in the ribbon, select Import to access your .VTT file.
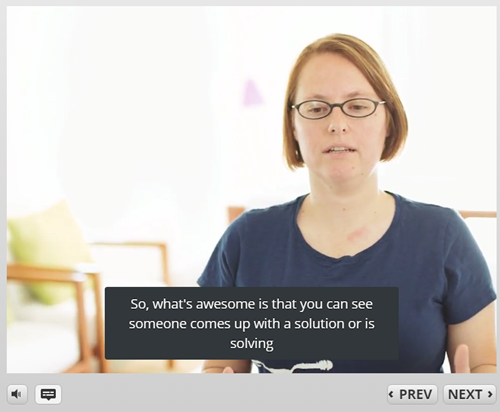
  • Preview the slide and select the Captions button on the player.

closed captions example

TUTORIAL: Learn about importing closed captions.

How to Create a Closed Captions Button

By default, the course player has a captions button. To view captions during the course, click the captions button. That works great if you have the player and captions button enabled. However, some people prefer to diminish the player and want their own captions button on the slide to control when the captions display.

Here’s how to create a custom captions button:

  • Insert a button.
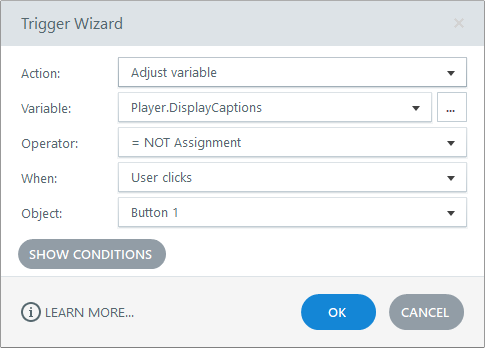
  • Add a trigger to the button to adjust the Player.Display.Captions variable.
  • The variable is like a True/False variable that can be either one or the other when clicked. Set the operator to =NOT Assignment.
  • When the button is clicked it toggles the variable value to what is not assigned to. Thus, clicking the button turns the captions or off.

closed captions variable

TUTORIAL: Learn about creating a custom closed captions button.

And that’s how you add closed captions to your e-learning courses. Pretty simple, huh?

Events

Free E-Learning Resources

Want to learn more? Check out these articles and free resources in the community.

Here’s a great job board for e-learning, instructional design, and training jobs

Participate in the weekly e-learning challenges to sharpen your skills

Get your free PowerPoint templates and free graphics & stock images.

Lots of cool e-learning examples to check out and find inspiration.

Getting Started? This e-learning 101 series and the free e-books will help.


drag and drop interaction essentials

There are three main ways to interact with the course: click, mouseover, and drag. While click-based interactions are the most prominent, a good drag and drop interaction is usually more engaging. In fact, anytime I feature a drag-based interaction in a blog post, I’m always asked how it was created.

Drag and drops are engaging, they let the user “touch the screen” or lean into the course a bit, and they’re novel because they’re not used as often as the other types. With that said, here is everything you need to know about drag & drop interactions from previous posts:

essentials of drag and drop interaction

So there you have it, everything you need to know to get started building effective and engaging drag and drop interactions for e-learning. And if you want to learn to build them, check out these tutorials and take part in these drag and drop challenge activities: challenge #16 and challenge #21.

Is there anything you’d suggest when building drag and drop interactions?

Events

Free E-Learning Resources

Want to learn more? Check out these articles and free resources in the community.

Here’s a great job board for e-learning, instructional design, and training jobs

Participate in the weekly e-learning challenges to sharpen your skills

Get your free PowerPoint templates and free graphics & stock images.

Lots of cool e-learning examples to check out and find inspiration.

Getting Started? This e-learning 101 series and the free e-books will help.


simple-tips

Here are two simple tips to help save time and frustration as you work through the day. One shows how to autosave files so you don’t need to worry about losing your work. And the other lets you see which tabs and extensions in Chrome are eating up all your RAM and processing power.

How to Autosave Your Files

The first thing I learned when working with multimedia was to save my work and save all the time. It’s inevitable that an application freezes or the system shuts down and work is lost. At all the workshops I always state how important it is to save work. And with all that said, I don’t know how many times I’ve lost work not following my own advice.

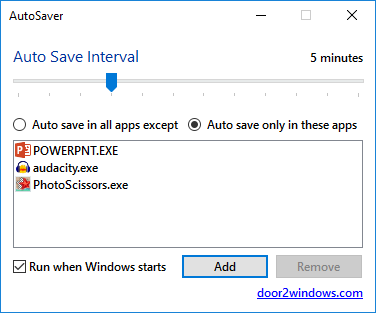
AutoSaver is a free application that autosaves files. This is super handy if you forget to save your work as you go. You can download it here. Basically, you select your apps and then at what frequency you want to save. Or you can set it to autosave every app with some exceptions. Pretty simple.

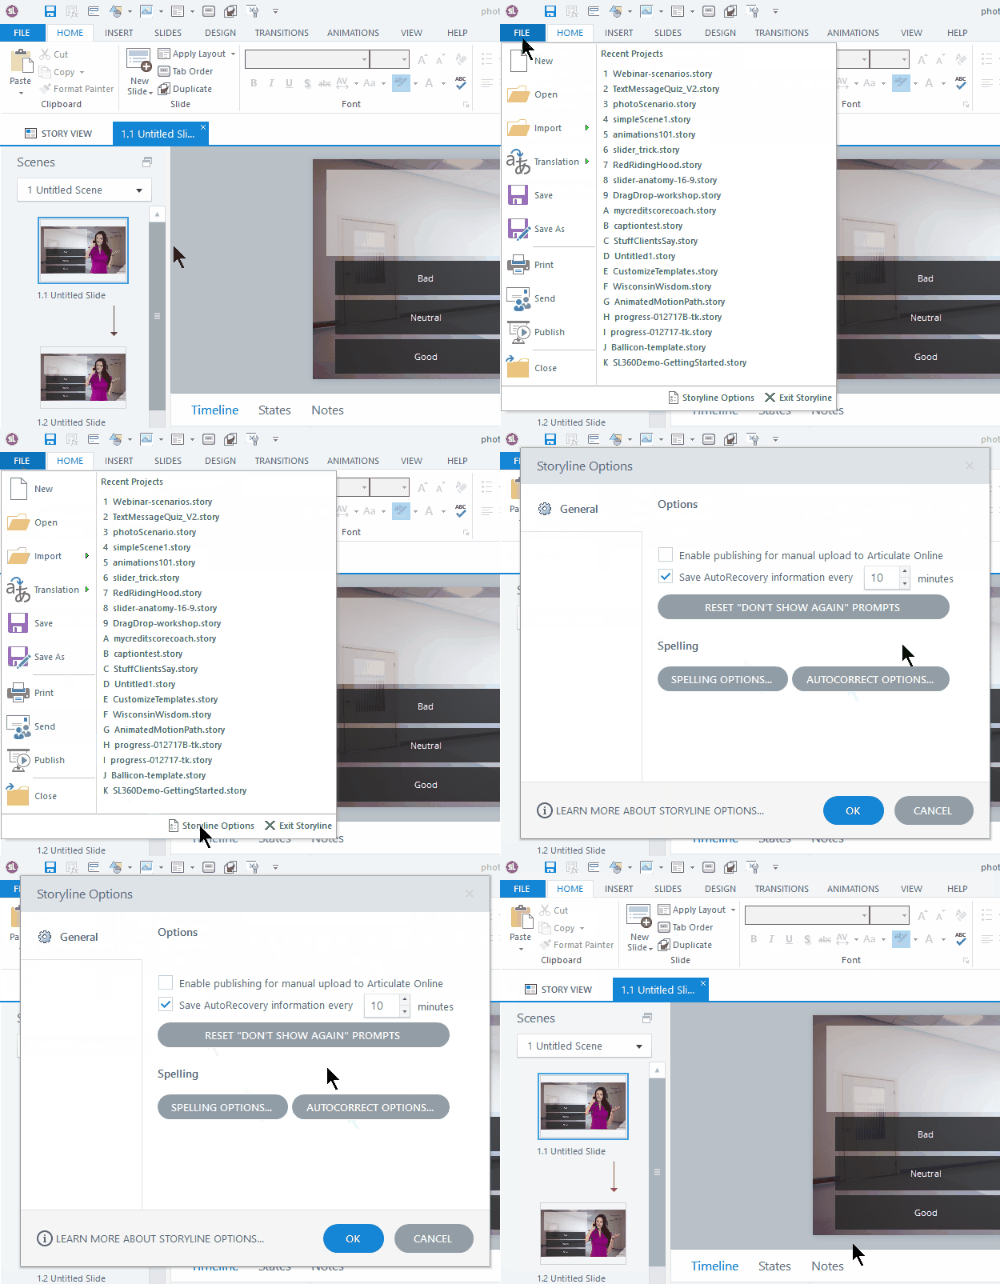
Of course, if you use Storyline, you don’t really need this because there’s an AutoRecovery feature built into Articulate Storyline.

auto recover Storyline

What’s Consuming Your RAM?

Often I find my system gets a bit sluggish and when I look at my task manager I see that my browser is consuming most of the memory in my system. That’s because I have all sorts of extensions added to my browser.

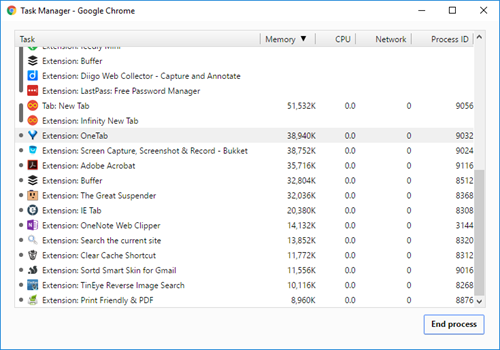
Ever wonder which tabs or extensions are consuming the most of your memory? Well, if you use Chrome, just hit SHIFT+ESC and you’ll see. This displays a list of extensions and tabs. I was surprised to see an extension I rarely use, eating up the bulk of my memory, so I just deleted it.

chrome-task-manager

I don’t know about you, but the AutoSaver has saved helped me quite a few times. And cleaning up memory can help speed up your computer. What simple tips or hacks like this do you use to save time?

Events

Free E-Learning Resources

Want to learn more? Check out these articles and free resources in the community.

Here’s a great job board for e-learning, instructional design, and training jobs

Participate in the weekly e-learning challenges to sharpen your skills

Get your free PowerPoint templates and free graphics & stock images.

Lots of cool e-learning examples to check out and find inspiration.

Getting Started? This e-learning 101 series and the free e-books will help.


hotspot drag drop interactions

In an earlier post, we looked at three ways to use hotspots in your e-learning courses. In most cases, hotspots are used as invisible buttons for interactive e-learning. But today we’ll look at ways to use the hotspot feature in your drag and drop interactions where the hotspot isn’t a button.

Drag and Drop Basics

Generally, there are two main components to drag and drop interactions:

  • an object that is dragged
  • a target to accept the dragged object

I covered this in more detail when we looked at how to create drag and drop interactions.

Use the Hotspot as a Catch-all Target

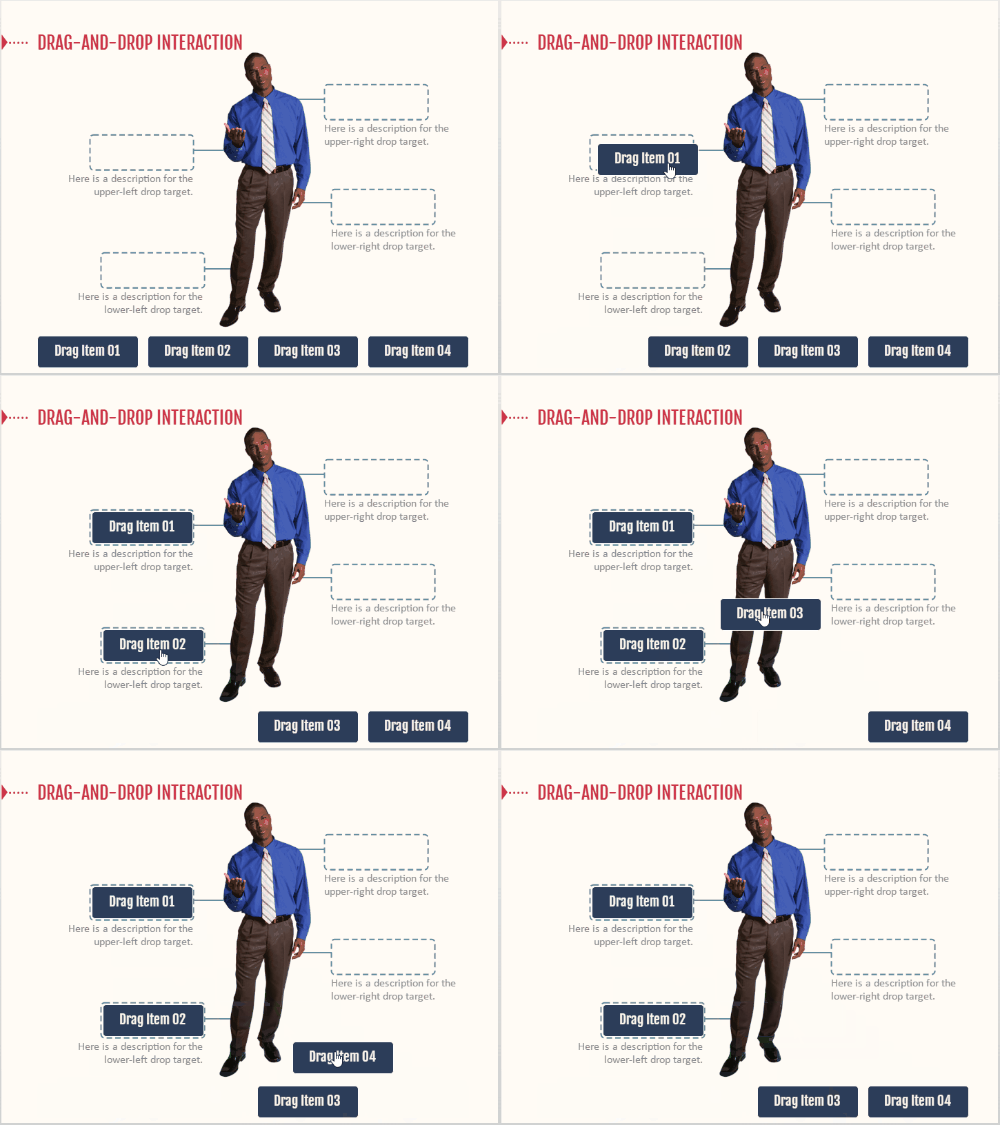
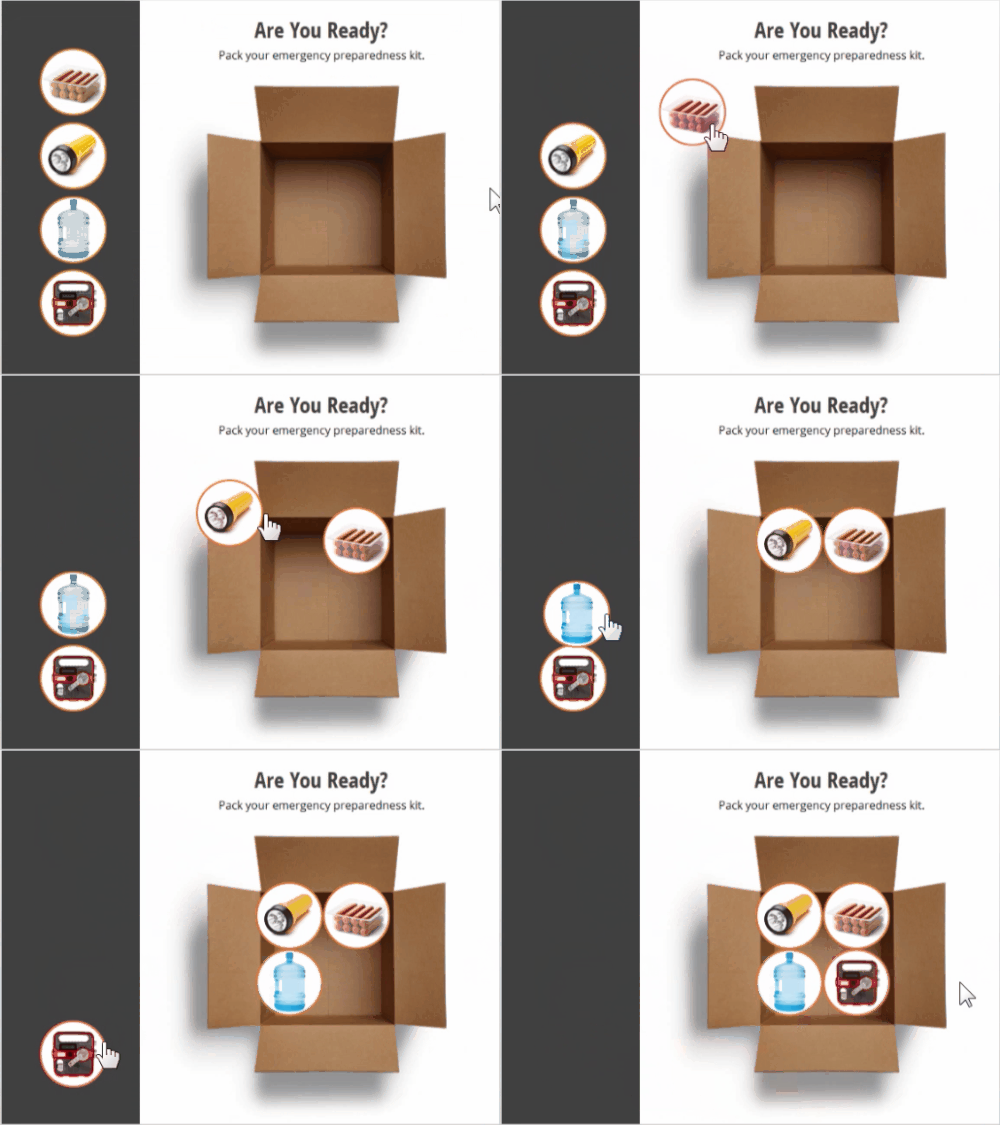
Usually, there’s an obvious correct or incorrect target for drag and drop interactions. But what happens when the object is dropped outside of one of the target choices? In most cases, the object gets kicked back to the starting point as in the image below.

Dropped object snaps back to starting point when dropped outside of the target.

drag and drop

In the above example, the dragged object can only be dropped on one of the targets. If it’s dropped outside of the target, it bounces back to the starting point. This is usually the default setting and most common in drag and drop interactions.

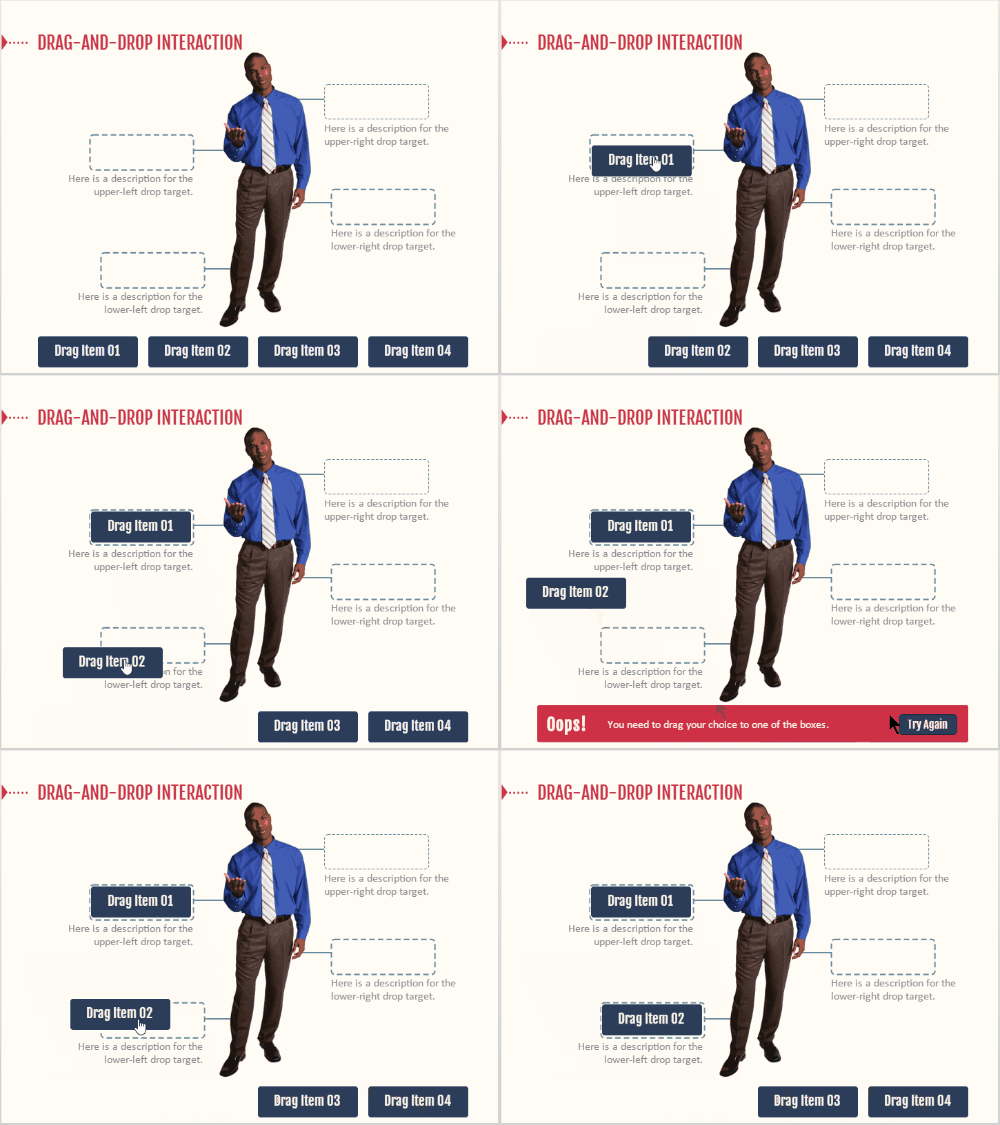
Dropped object triggers an “oops” layer when dropped outside of the target on the catch-all hotspot.

However, the hotspot feature can serve as a catch-all target to provide feedback when objects are dragged and dropped outside of the desired target. When an object is dropped on the catch-all target it triggers the appropriate feedback. In the example below, the catch-all target triggers an “oops, try again” layer.

dragdrop-2

If you create a catch-all hotspot there are two things to do:

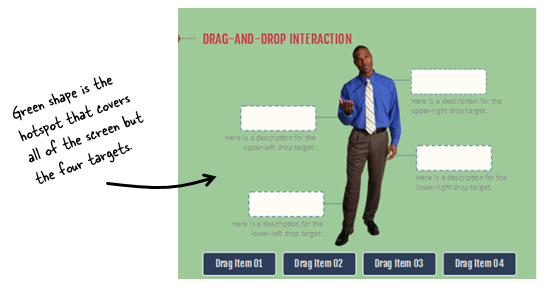
  • Put the hotspot underneath all of the other targets. Otherwise, it covers the drop targets and the interaction won’t work.
  • Determine how the dropped object responds. By default the object snaps to the center of the target; and since the target covers the entire screen, it looked weird sitting on top of the guy who’s in the center of the screen. In the example above I let it remain where it was dropped.

drag and drop interaction

Use the Hotspot to Expand and Control the Drop Target

Another great use of the hotspot feature is to better manage the drop target area. Since the hotspot is transparent it can sit on top of other object and be sort of a surrogate drop target. Instead of dropping on what looks like the target, they’re actually dropping on the target hotspot.

By doing this, you can determine where the dropped object is displayed. Here are before and after examples.

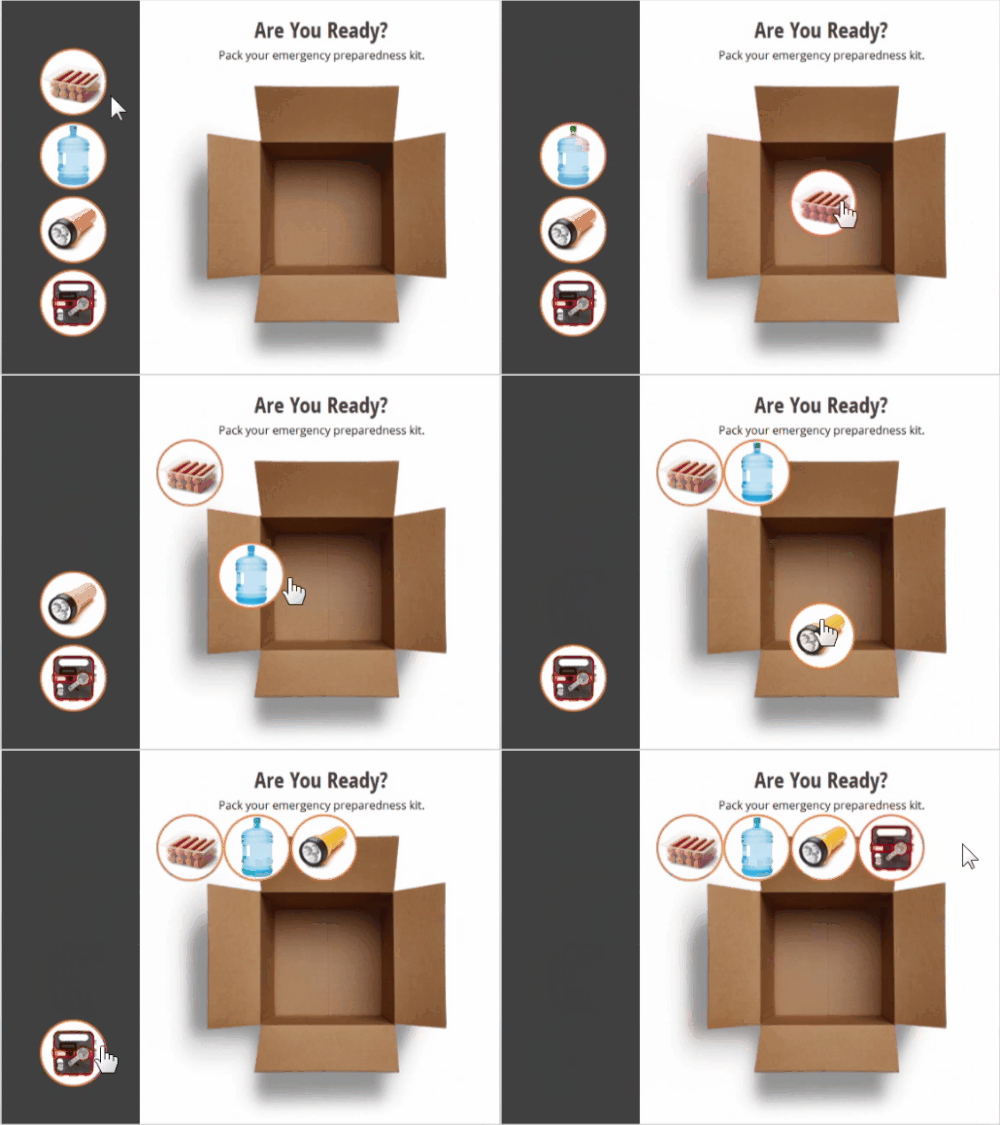
Dropped objects align based on the target image and display outside of the box.

drag and drop interaction target free

The objects are dragged to the box. By making the box image the drop target and tiling the objects, you can see that the objects actually align at the top of the box image.

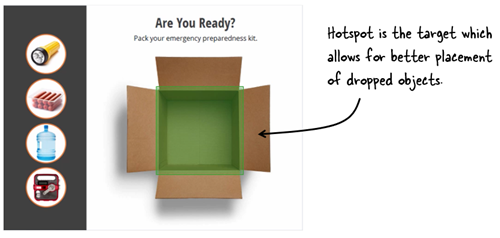
Dropped objects align based on the hotspot target and align inside of the box.

drag and drop interaction drop target hotspot

In the example above, the box image isn’t the drop target. Instead, there’s a hotspot placed on top of the box image and centered over the opened box. This allows control of the alignment of the dropped objects to create the desired visual effect.

drag and drop interaction hotspot target

The hotspot is a great feature for creating interactive content. Most of the times it’s used as an invisible button. However, because it’s an easy-to-see green box (for production) and invisible to the end user, it’s a great feature to create large, catch-all targets. And it also works well for controlling how the dropped objects align and display.

Events

Free E-Learning Resources

Want to learn more? Check out these articles and free resources in the community.

Here’s a great job board for e-learning, instructional design, and training jobs

Participate in the weekly e-learning challenges to sharpen your skills

Get your free PowerPoint templates and free graphics & stock images.

Lots of cool e-learning examples to check out and find inspiration.

Getting Started? This e-learning 101 series and the free e-books will help.


gamified e-learning gamification

I hear a lot of people ask about gamifying their e-learning courses. And the examples they show are usually simple games modeled after shows like Jeopardy or Wheel of Fortune. Those are fine and have their places in e-learning, especially for quick knowledge checks. But they’re not the same as gamification.

In today’s post, I’ll share a few simple things to help get your brain muscles going.

What Do You Need to Know?

When it comes to building the courses in an authoring tool, you basically need to know how to use variables. Variables allow you to track and evaluate the user to provide relevant feedback, scoring, tokens, and all the other things that make up gamified e-learning courses. And once you know how to work with variables, you can build all sorts of things.

gamified e-learning

Here are some resources to learn more about variables:

Learn More About Gamification

You can do a search and read all sorts about gamification especially now that it’s also a buzzword. Essentially you are taking game concepts and applying them to a non-game context. As you play games, ask what about the game is compelling and what similar element could work in your next e-learning course.

I think the greater challenge in building gamified courses is less in constructing the mechanics and more in building a narrative that integrates gaming psychology. Building things in the authoring tools is relatively easy compared to understanding what to build.

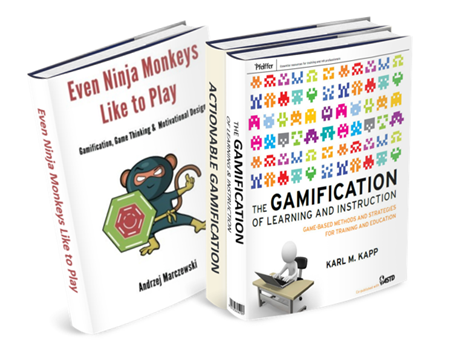
Here are three good books on gamification.

gamification books

The links to Amazon books may produce a slight commission.

What Can You Build in Your E-Learning Course?

When it comes to authoring the courses outside of a management system where you can track multiple users and build things like leaderboards, you’re confined to simple game elements such as:

  • Timers
  • Personalization
  • Progress meters
  • Tokens
  • Rewards management
  • Scoring
  • Autonomous navigation

You can make some very compelling courses that instructive and engaging. However, there’s a lot more to gamification than these simple elements above. How do you motivate learners and create the right tension between boredom and failure? Make sure you invest the right resources and develop a good strategy. Otherwise, your gamified course will transform from game to gimmick.

If you’re not quite sure where to get started, check out some of the cool examples in the community. They’ll give an idea of some of what you can do with the authoring tools. Here are three nice examples:

gamification example 1

Click here to view gamified e-learning course.

gamification-example-2

Click here to view gamified e-learning course.

gamification example 3

Click here to view gamified e-learning course.

And there’s nothing wrong with starting simple. If all you need is a Jeopardy-style quiz, then download this free file. It’s a great way to work with a context you know. But make a commitment to learn more about variables and start to add some of those gaming elements above to your courses.

Have you built any gamified e-learning? If so, share a link in the comments.

Events

Free E-Learning Resources

Want to learn more? Check out these articles and free resources in the community.

Here’s a great job board for e-learning, instructional design, and training jobs

Participate in the weekly e-learning challenges to sharpen your skills

Get your free PowerPoint templates and free graphics & stock images.

Lots of cool e-learning examples to check out and find inspiration.

Getting Started? This e-learning 101 series and the free e-books will help.


hotspot

Hotspots are commonly used in e-learning course design. They’re invisible, yet functional. Today, we’ll explore some common use cases for the hotspot in your online training.

Invisible Button Hotspots

The most common use for the hotspot is the invisible button. Essentially it allows the developer to add an interactive choice on top of another object. This can really speed up production. For example, the image below starts with a single image of a world map. By adding separate hotspots over each continent there’s no need to create separate images with links. This really comes in handy when you start with a single image and don’t have the means to break it into smaller components.

hotspot interaction

Example Screen Space with Interactive Hotspots

The hotspot can also be used as a means to expand real estate via a mouseover interaction. A click interaction requires a click to activate and then an additional click to deactivate. Whereas a mouseover interaction is a bit smoother. Mouseover the hotspot to reveal content, mouse away to have it disappear.

mouseover hotspot

In the example above, I added access to additional content using a mouseover hotspot. This is content that doesn’t need to be persistent but does need to be available. The mouseover or hover interaction assigned to the hotspot is a great way to expand screen real estate with fluid precision.

Invisible Barrier Hotspot

The two examples above are pretty common and what you’d normally expect for hotspots since the hotspot is usually defined as an invisible button or interaction. However, the hotspot is also good as a barrier to avoid interactions. Think of it like plastic wrap over a piece of cake. You can see the cake, but you can’t touch it because the wrap is covering it.

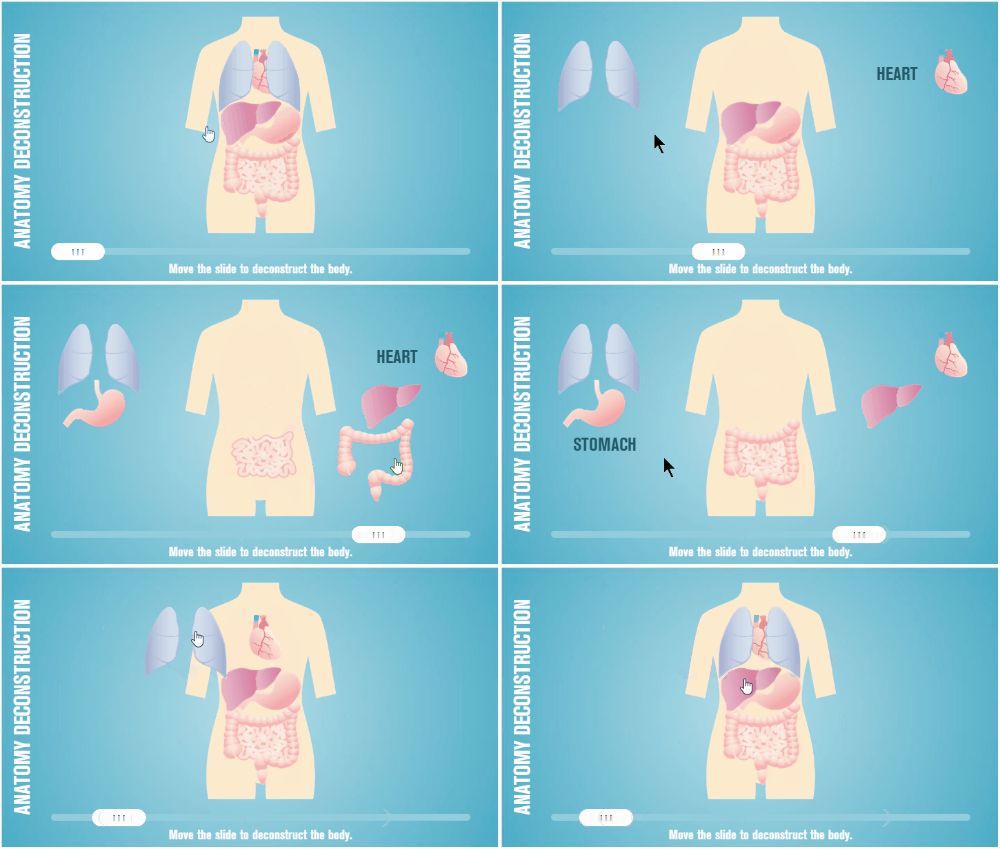
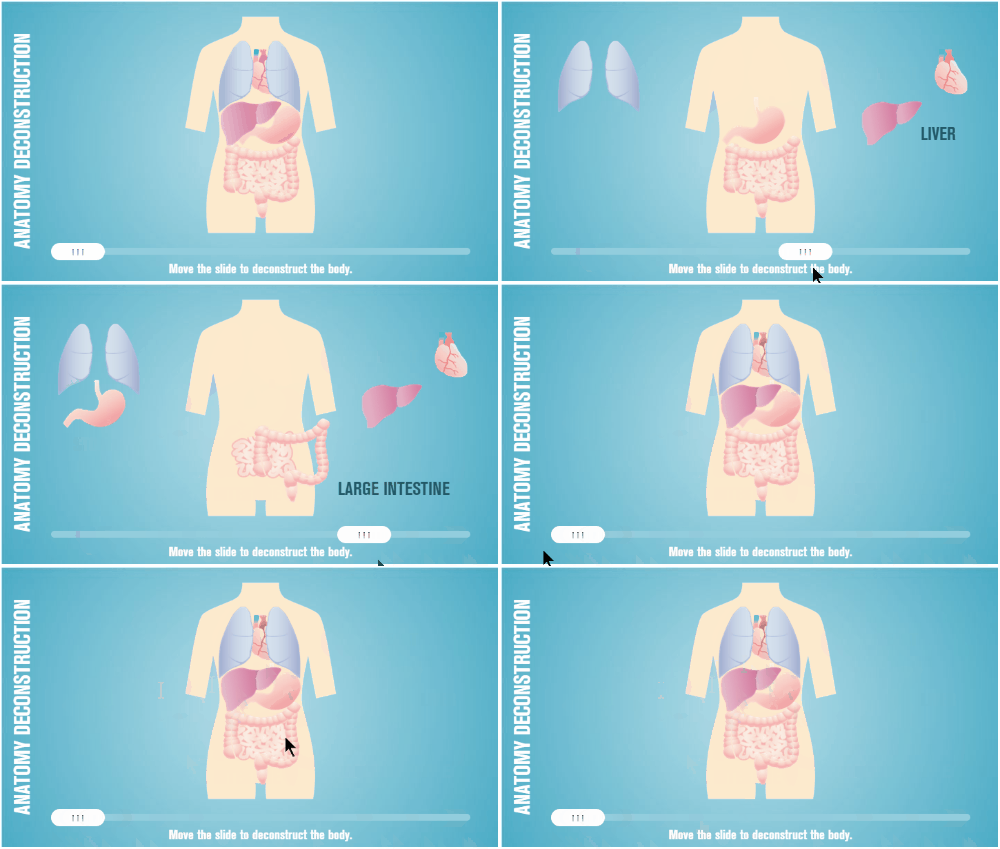
Here’s a recent example where I used the hotspot as a barrier. In this anatomy interaction, each part of the digestive system is actually a slider connected to the main slider. It’s a great effect to move the pieces in and out of the body using a single slider. However, I only want the user to interact with the main slider, so I placed a hotspot over the body image and the other sliders. The hotspot serves as a barrier and prevents the user from interacting with what’s underneath.

Check out the two examples below to see the difference.

Example with No Hotspot Barrier

no hotspot barrier

Click here to view the demo of no hotspot barrier.

The first demo above has no hotspot barrier which means any of the other sliders are active. Grab one of the body parts and see what happens. It’s not as elegant.

Example with a Hotspot Barrier

hotspot barrier

Click here to view the demo of hotspot barrier.

The second interaction has a hotspot barrier over the body parts which prevents the user from interacting with anything other than the main slider. This makes for a much better user experience and a more elegant interaction.

So there you have it. You can use hotspots to trigger all sorts of interactions or you can use them as a persistent invisible barrier that prevents an interaction.

Events

Free E-Learning Resources

Want to learn more? Check out these articles and free resources in the community.

Here’s a great job board for e-learning, instructional design, and training jobs

Participate in the weekly e-learning challenges to sharpen your skills

Get your free PowerPoint templates and free graphics & stock images.

Lots of cool e-learning examples to check out and find inspiration.

Getting Started? This e-learning 101 series and the free e-books will help.


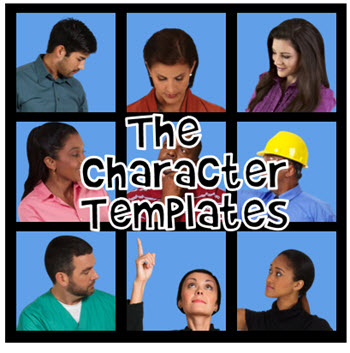
character templates for e-learning

Looking for just the right images is one of the most time-consuming activities we have when building our courses. It’s easy to get distracted and waste a lot of time. It’s gotten a lot easier over the years now that the software comes with professional templates and thousands of character poses.

As I build courses, I often use the same characters and a few common poses. Which means I don’t need to always search through all of the poses available. And I suspect many of you do the same. So today, I’m going to show you a simple tip to help speed up your production. It’s all based on assembling your own character templates. I walk through the steps below, but the video provides more detailed instructions.

Click here to view the video.

Create E-Learning Character Sets

Even if you have hundreds of characters, odds are you use the same handful over and over again. Here’s how to create some simple pre-built character sets that make it easy to use characters and repeat poses.

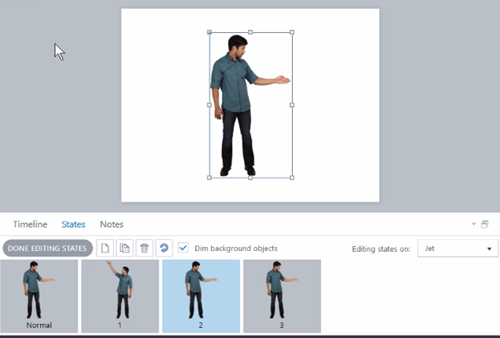
e-learning characters sets

  • Select a character and insert it on the slide.
  • Create multiple states of the character. This trick works if you only insert a handful of frequently used or common poses. Otherwise, it defeats the purpose of the template.
  • Name the slide the same as the character or descriptive of the type of poses. For example, you may insert only sign-holding poses. In that case, the slide could be titled, Brandon-Holding-Signs.

Create E-Learning Character Set Templates

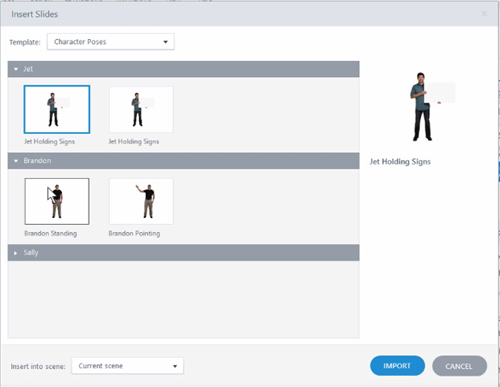
e-learning characters templates using sets

  • Once you have a slide with the character, save it as a template. This creates a template you can insert into your course. That’s it. Whenever you want to use that character, insert the slide and then copy and paste the character where you need it. Then set the initial state.
  • Ideally, you maintain one character template so it’s easier to manage. In that case, import the new character slide into the main character template file. And keep adding to it as you create custom character sets. This way it’s much easier to view and manage.
  • Bonus tip: you can do the same thing for custom interactions by saving them in a single interaction template.

Save Time Using E-Learning Characters

Now that you have some pre-built character poses, you’ll save some time in your production. When you need one of those characters, insert it from the template and then copy and paste the character into your slide.

The character will always include those starting states. You can set an initial state and use triggers to dynamically change it if you like. Another benefit is sharing the template with your team.

And you’re not limited to just the characters that come with the software. You can also do this with your own characters and the photos you take. Or you can do it for background images. Perhaps you want a template of production images, inside a warehouse, or the cubicle farm in the office. The process is the same.

The software already comes with characters so searching and inserting characters is easy enough. This tip works great if you use a few common poses and don’t want to spend time searching. Set up the templates and you have a good starting point.

Assuming that you want to create some character templates like this, what groups would you create? Talking poses? Sign holders?

Events

Free E-Learning Resources

Want to learn more? Check out these articles and free resources in the community.

Here’s a great job board for e-learning, instructional design, and training jobs

Participate in the weekly e-learning challenges to sharpen your skills

Get your free PowerPoint templates and free graphics & stock images.

Lots of cool e-learning examples to check out and find inspiration.

Getting Started? This e-learning 101 series and the free e-books will help.


free microlearning template

Earlier I shared this free microlearning template. It is easy to use and edit. However, I did receive some questions on how it was created and how to add additional cards. So in today’s post I’ll share a few tips so you can make your own template and edit the one I shared.

Here’s a series of video tutorials that show how to create the simple, yet powerful microlearning template. Check out the last tutorial on how to quickly edit the text. It’s a neat way to leverage the translation feature to do the heavy lifting.

How to Create the Animated Card

We want the card to animate onto the screen and pause. And we want to click on the card to see the other side (of the card, not the spirit world).

Click here to view the tutorial.

  • The first step is to create a card.
  • Add an entrance and exit animation.
  • Add a selected state to the card to create the click and reveal feature.
  • Add a trigger to the card that pauses the timeline when the entrance animation completes.

When you preview, the card should animate in and pause. You can click on the card to select or deselect it.

How to Edit the Normal & Selected States

We want the selected state to have an animated object that comes on and off the screen when the card is selected and deselected.

Click here to view the tutorial.

  • Select the card and double click inside the state you want to edit.
  • Add placeholder text in the normal state.
  • Add a shape to the selected state and add placeholder text to the shape.
  • Add entrance and exit animations to the shape in the selected state.

When you preview and click on the card, it will trigger the entrance animation of the selected state. And when you click on it again, it should trigger the exit animation.

How to Bring a Card On & Off the Screen

When the card animates on the screen it will pause. This allows us to “flip the card” by clicking on the card. When we’re done looking at the card, we want it to exit the screen and trigger a new card.

Click here to view the tutorial.

  • Create a button with a trigger to resume the timeline.
  • Duplicate the card and position it on the timeline after the first card. Repeat as necessary.

When you preview the microlearning interaction, the card enters and pauses. Clicking the button causes the timeline to resume which triggers the exit animation of the first card and the entrance animation of the next card.

How to Edit the Content on the Cards

Clicking into the states of the various cards can be tedious. Here’s an easy way to edit the text for each card.

Click here to view the tutorial.

  • Go to File>Translate>Export to export the text from the course.
  • Edit the text in the document and save it.
  • Go to File>Translate>Import to import the text into the cards.
  • Preview the microlearning interaction to verify that the text alignment is correct.

Importing the text should work well and as long as you don’t add too many characters you shouldn’t have to do any editing.

Here’s another free microlearning template for you to deconstruct and see how it was built.

Events

Free E-Learning Resources

Want to learn more? Check out these articles and free resources in the community.

Here’s a great job board for e-learning, instructional design, and training jobs

Participate in the weekly e-learning challenges to sharpen your skills

Get your free PowerPoint templates and free graphics & stock images.

Lots of cool e-learning examples to check out and find inspiration.

Getting Started? This e-learning 101 series and the free e-books will help.


Free Microlearning Template

January 17th, 2017

free microlearning template

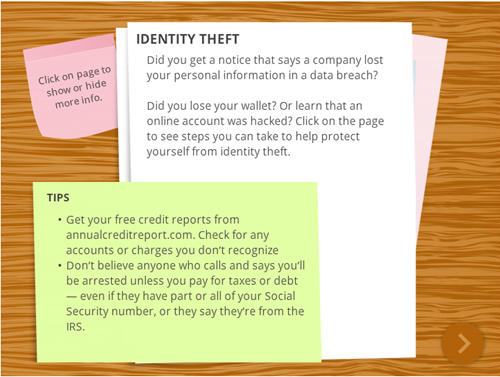
Here’s a free microlearning template I created for a workshop on interactive e-learning. The template uses the popular overhead desktop theme. I’m using the interaction as a simple microlearning module. But it could also be a quick knowledge check like this one. It just depends on how you want to use it for your own course.

Example of Free Microlearning Template

Here’s an example of the template in action.

free microlearning template

Click here to see the microlearning example.

How to Edit the Free Microlearning Template

What makes this microlearning template work is that it’s really easy to use and modify. The construction is really simple.

  • Create a card with selected states.
  • Add an entrance and exit animation to the card.
  • Create a trigger to pause the timeline when the card’s entrance animation completes.
  • Create a button to resume the timeline.

Want more cards? Just duplicate them and the triggers are duplicated, as well. You can create as many cards as you like. All you need to do is stagger them on the timeline.

Bonus tip:

  • The template starts with a single card. Since I don’t know how many cards will be in the final module, I created a cue point on the timeline. Look at the free file to see what is triggered by the cue point. If you add a bunch of cards, just drag the cue point to the end and all if its triggers move with it.
  • Here’s a tutorial post that shows how to create and edit your own microlearning interaction.

Events

Free E-Learning Resources

Want to learn more? Check out these articles and free resources in the community.

Here’s a great job board for e-learning, instructional design, and training jobs

Participate in the weekly e-learning challenges to sharpen your skills

Get your free PowerPoint templates and free graphics & stock images.

Lots of cool e-learning examples to check out and find inspiration.

Getting Started? This e-learning 101 series and the free e-books will help.