The Rapid Elearning Blog

Archive for the ‘E-learning’ Category


e-learning tips

One of the e-learning tips I give at workshops is to be intentional about your e-learning course design and production. Many course developers start with the default settings and then make changes later. However, that could impact the course and cost time and money.

So today, I’m sharing three things you should do before you start working on your e-learning course.

E-Learning Tip: Determine Your Course Size

It’s important to determine your course size before you start working on the slide. If you do some work and then change it later, you may skew things on the slides and have to do a lot of adjustments. Also, popular screen sizes today aren’t what they were a few years ago. Computer screens are wider, more pixel dense, and a lot of course developers like to step away from the default player.

e-learning course size settings e-learning tips

Here are a few considerations:

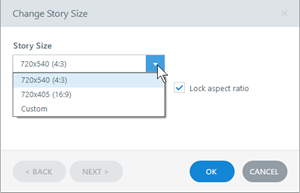
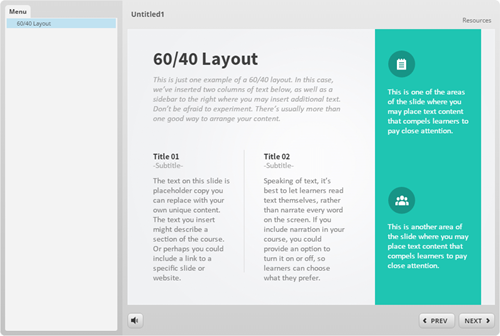
  • By default the course size is a 4:3 aspect ratio set at 720×540 pixels. This is a good aspect ratio and the course can be set to scale with the browser, so pixel width isn’t as big of an issue.  The image below shows the 4:3 aspect ratio with a sidebar menu.

e-learning tips 4x3 aspect ratio

  • You may want to go with 16×9 since most screens are widescreen. And that looks nice on mobile devices in landscape mode. Although newer phones are going to 18:9. The image below shows the 16:9 aspect ratio with a sidebar menu.

e-learning tips 16x9 aspect ration

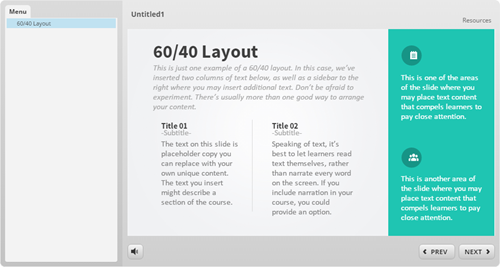
  • Are you using a sidebar menu? If yes, I like the 4:3 aspect ratio. The more squared slide fits nicely with the sidebar. However, if you go with a 16×9 aspect ratio, having the sidebar makes the course look wide. In that case, get rid of the menu, or set it as a drop down from the top. And that’s what I show in the image below. You can see the menu drop down on the player. It’s there, but doesn’t consume screen space.

e-learning tips drop down menu

E-Learning Tip: Determine the Color Scheme & Create Theme Colors

Before you start working on your course make sure to determine the colors you are going to use. There are a few ways to get the right colors for the course:

  • Company brand: many companies have branded colors. Even if you don’t have the official colors, you can go to the website and do a color pick of the main colors used.
  • Single color: find one color and use a color schemer to create other colors.
  • Color picker: I like to pick colors from images inserted on the screen. Or I’ll use the main company color from a logo or official image and then build out my color scheme from there. Here’s a link the color picker I like to use.

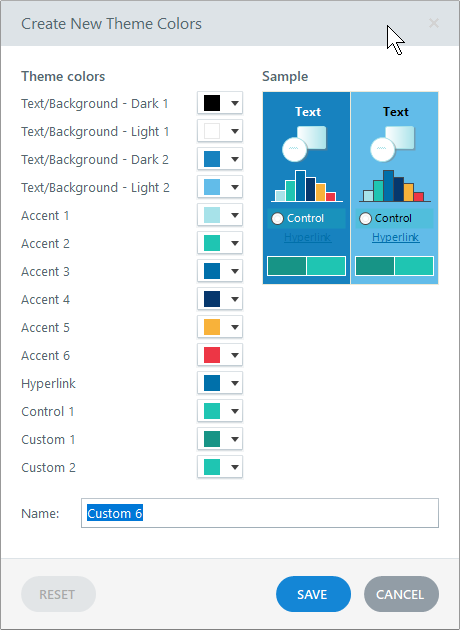
Once you have determined the colors, build a color theme and only use the theme colors in your course. Generally, you have black and white and the six accent colors. There’s no pre-defined use for the accent colors. Basically you get six options. I’d use them consistently, though. For example, accent 1 is the main color. Accent 2 may be the secondary or complimentary color. And you don’t need to have six colors. Some people just use two.

theme colors e-learning tips

If you stick with theme colors you can always change themes and all of the theme colors will change with it. If you don’t, then you have to go through the course slide-by-slide to make color corrections.

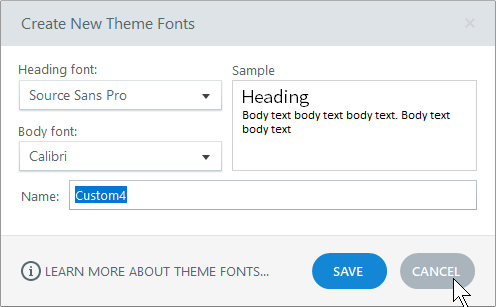
E-Learning Tip: Determine the Font Pairs & Create Theme Fonts

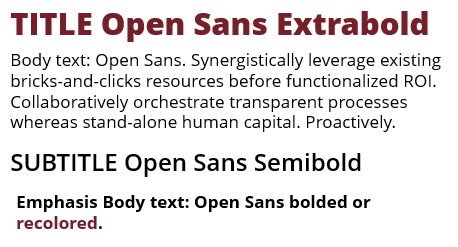
Same as the theme colors, determine your font pair prior to building your course. And then create theme fonts. You’ll have a title font and body font.

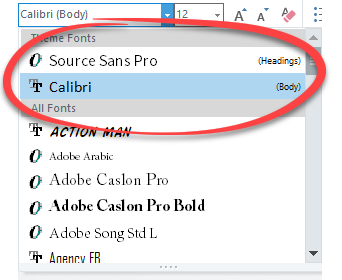
When you insert text on the screen, stick with the theme fonts only. Don’t go digging through the font list to find that one cool font. I’ll state it again, when you insert text on the screen, stick with the theme fonts only.

theme fonts e-learning tips

If you need to make changes to your fonts, all you need to do is apply a new theme and the text that uses theme fonts changes in the entire course and on the master slides. However, if you insert text from the font dropdown list, you’ll need to change those fonts individually. That’s why you want to stick with theme fonts.

theme font selection e-learning tips

So there you go, three e-learning tips before you start building your e-learning courses:

  • determine the size of the course
  • create theme colors
  • create theme fonts

Doing those three things up front will save you lots of production time while building your e-learning course.

Events

Free E-Learning Resources

Want to learn more? Check out these articles and free resources in the community.

Here’s a great job board for e-learning, instructional design, and training jobs

Participate in the weekly e-learning challenges to sharpen your skills

Get your free PowerPoint templates and free graphics & stock images.

Lots of cool e-learning examples to check out and find inspiration.

Getting Started? This e-learning 101 series and the free e-books will help.


e-learning tools

Over the weekend, I was supposed to paint the house but was watching TV instead. My wife asked why I wasn’t painting and I told her I couldn’t because I lost the paint lid opener and couldn’t open the paint can. She handed me a screwdriver.

“No dice,” I said. “That’s for screws. I can only use a paint lid opener.”

Ridiculous, right?

E-Learning Tools from a Different Perspective

Here’s the deal, e-learning vendors make products and those products have a purpose. However, the products often do more than they’re designed to do. It’s just a matter of looking at the tools from a different perspective. I always tell people to look at the e-learning applications as a means to create multimedia content and not just to create e-learning courses.

For example, Articulate’s Quizmaker obviously is great for building quizzes. That’s why it’s called Quizmaker. However, if you step away from its title, the features allow it to create simple decision-making scenarios or pop-up videos. All of these are more than the quizzes promised by the software’s title.

The same with PowerPoint. It’s a great tool for presentations…and illustrations…and video production…and much more. In fact, years ago, I used to use PowerPoint to create posters that I’d print on large format printers. You just have to step away from PowerPoint as a presentation tool and see it as a means to create multimedia. And once you do that, you’ll get more out of the investment you’ve made in the software.

Here are few tips to help you get there:

  • Learn to use the tools. The more fluent you are, the more you’ll be able to leverage the features. We always promote the weekly e-learning challenges so that you can learn to see and use the tools in different ways. They’re also intended to push you a bit out of what you may do at work, especially since most work projects are the same ones over and over and over.
  • Understand the features and then think outside the box on how to use them. For example, years ago I came up with a simple formula for building interactive scenarios: the 3Cs…challenge, choice, and consequences. If there’s a place in the software where I can interact and expose content, there’s a place to create an interactive scenario. Common click and reveal interactions like tabs, accordions, markers, etc. become simple interactive scenarios. Are they labeled as interactive scenario features? No. But that’s what you can create with them.
  • Look at what other people build with the same tools. There are all sorts of great examples in the community, in the weekly round-ups, and in the challenge activities. Review what they did, deconstruct them, and try to build the same.
  • Find ideas outside of e-learning. Looks for any type of interactive content and ask if you can do the same with your software. You may not always be able to replicate what you find, but often you can and worst case, you still build something neat and learn a few new production tips that will help on your next e-learning project.

What do you do with your software that it wasn’t designed to do?

Events

Free E-Learning Resources

Want to learn more? Check out these articles and free resources in the community.

Here’s a great job board for e-learning, instructional design, and training jobs

Participate in the weekly e-learning challenges to sharpen your skills

Get your free PowerPoint templates and free graphics & stock images.

Lots of cool e-learning examples to check out and find inspiration.

Getting Started? This e-learning 101 series and the free e-books will help.


e-learning font style favorite font

I build a lot of templates and shareable files, so I often use system fonts. I do this so I don’t need to worry about fonts not being installed on the other person’s computer. Most of the time I stick with Open Sans. It’s a nice clean font family that has plenty of options. And it’s one people usually have.

When it comes to working with fonts, I’m not a designer, so I like to keep it simple. I usually look for a title, body, and maybe an extra one for emphasis. So I may have a style guide that looks like this:

e-learning font style guide

However, sometimes system fonts can get a little boring. And besides, we all have certain fonts that we really like, that is until they’re overused…like papyrus. Here are (were) some of my favorite go-to fonts. They’re ones I actually know the names of and can locate on my computer.

  • I like Skippy Sharp for handwriting. But it has gotten a bit old and a lot of people use it now. They need to make a Skippier Sharper font.
  • I use Action Man for comic style modules. But I may go back to the retro Comic Sans which is like the Stranger Things of fonts.
  • I like the slab fonts for headlines. Rockwell is a nice one. But again, it’s starting to get overused.
  • I used to like Pacifico, until others found it, too. Now my fonts aren’t making me special. I’m an iPhone 7 in an iPhone X world.
  • Franklin Gothic is a nice clean font family. As is Helvetica and the many knockoffs.

Today, I was thinking about how many of us have our favorite fonts that we like to use. In fact, if I see a project from someone on our team, I can usually guess who build it by the fonts used in the module.

When I’m in a pinch, I always know I can go with Rockwell for a title, the Open Sans family for body/emphasis, and Skippy Sharp for an accent.

So I was wondering what you use:

  • What’s your favorite title font?
  • What’s your favorite font combination?
  • What’s your favorite handwritten font?
  • What do you do to add emphasis to the text? Do you use a new font, bold, or recolor?

Feel free to share what you use in the comments.

Events

Free E-Learning Resources

Want to learn more? Check out these articles and free resources in the community.

Here’s a great job board for e-learning, instructional design, and training jobs

Participate in the weekly e-learning challenges to sharpen your skills

Get your free PowerPoint templates and free graphics & stock images.

Lots of cool e-learning examples to check out and find inspiration.

Getting Started? This e-learning 101 series and the free e-books will help.


kickstart e-learning career

I once had a manager who told me everything I report to him should be presented as five things on a notecard. He didn’t want all of the detail or nitty gritty. He just wanted a quick overview of the five most essentials points.

I get a lot of emails from people who want to transition from their current jobs into e-learning development. They want to know what they need to do (or know) to get moving in that direction. So here are my five things if you want to start a career in e-learning.

Learn About Learning

Sure, a formal instructional design degree helps, maybe. But today it’s not as critical, assuming you can prove that you really know what you learned. There are all sorts of ways to learn:

  • Go to school and get a degree. Another less costly way is to get a certificate (especially if you already have a formal degree). Certificate programs take less time, seem to be more project-focused, and are a bit more pragmatic when it comes to applying what you’re learning. Here’s a list of programs recommended by the community.
  • Read and learn on your own. There are plenty of good books and I’ve written about the few I’d start with. We also have a great e-learning 101 series to learn more. You can sign up here and get it delivered via email. We also offer a ton of free e-books that cover a broad range of e-learning topics.

Build These Types of Courses

You’ll need practical experience. There are all sorts of things you can do to get it. Volunteer to build courses for NGOs, churches, hospitals, or anywhere else that has limited funds and would welcome some free training.

You don’t want to build the same course over and over again. Instead get experience building diverse modules and types of training. Here’s a good list to get started:

  • Assessments. Create a few different types of assessments. The default, blocky type quizzes are fine, but the more custom you can make them, the better.
  • Scenarios. They are always popular and they show how to build situational training that closely mirrors real-world interactions.
  • Interactions. There are three main ways to interact with the screen: click, hover, and drag. Build some modules that demonstrate your skills creating different types of interactions. Lean more on dragging than clicking.
  • Software Training. Most organizations do some sort of software training. Show your skills with screencasts and software simulations.
  • Make it interesting. Most e-learning isn’t very good and usually very boring. Convert one of those types of courses into something interesting. Make it look good and make it interactive.

Learn to Use E-Learning Software

Your success hinges less on your academic credentials and more on demonstrable skills and fluency with e-learning software. There’s a lot of e-learning software out there. You can’t learn everything. I’ll give my plug for the Articulate tools for two main reasons:

  • Do a job search and most organizations are looking for Articulate course developers. You can’t go wrong getting the skills that potential employers desire.
  • All of the demo modules I mentioned above can be quickly built in both Storyline and Rise. You’ll be able to build a professional portfolio using those tools especially if you take advantage of the community resources and the Content Library that comes with Articulate 360.

Build an E-Learning Portfolio

Whenever I hire an instructional designer, I’m more inclined to review their portfolio rather than a resume that documents their experience and education. An instructional design degree is great but to me, the proof is in the pudding. And without a portfolio how can you SHOW your work and skills?

The portfolio highlights your skills and experience.

  • Keep it short. Find a few interesting (and interactive) parts of the course and show those. Or build some modules from the weekly e-learning challenges. They’re short and relatively easy to build. And perfect for a portfolio project.
  • Looks matter more than instructional design. It is a visual medium so make your visuals strong. Stay away from defaults and add some custom elements. Add some novel interactivity to catch their attention.
  • Identify common types of courses (as noted above) and build some modules for your portfolio. This will give you a diversity of projects and showcase different skills.

Learn More About These Topics

There’s a lot that goes into building an effective e-learning course. Here are some additional topics and skills you’ll need to understand to be a good course designer. You don’t need to be a pro at everything but you should be able to speak to them when needed.

There’s obviously a lot more you need to know to be successful transitioning into an e-learning job. What are the five things you’d recommend to that person? Feel free to share them in the comments.

Events

Free E-Learning Resources

Want to learn more? Check out these articles and free resources in the community.

Here’s a great job board for e-learning, instructional design, and training jobs

Participate in the weekly e-learning challenges to sharpen your skills

Get your free PowerPoint templates and free graphics & stock images.

Lots of cool e-learning examples to check out and find inspiration.

Getting Started? This e-learning 101 series and the free e-books will help.


e-learning prototypes

Many e-learning developers spend too much time building courses that are almost complete before they solicit feedback about the course. This could be a waste of resources because by that time, they’ve invested a lot of resources and it’s a real challenge to get things changed that late in the game, especially if the changes are significant.

A better solution is to quickly prototype the course, get some feedback and make adjustments. This is even more critical if you have a lot of interactive content. The good thing is that this is really easy to do in Storyline (or event PowerPoint).

Here are a few tips on how to approach the prototyping.

E-Learning Prototype: Start Backwards

What is the objective of the course and what does the client expect the learner to do? Slapping a bunch of information together over a series of screens is probably not going to meet your objectives. 

It’s all about the action, boss.

It doesn’t take much effort to prototype a bullet point screen. That’s not where you want to put your effort when you prototype. Instead, focus on the actions and prototype the activities that let the learners practice and demonstrate understanding.

What do they need to do and what interaction can you build that allows them to do that?

E-Learning Prototype: Build Something that Works

One of the many things I like about Storyline is how easy it is to prototype all sorts of interactions. In fact, someone told me that she was in a meeting with a potential client who shared their course requirements and what they hoped to get out of the course.

While the potential client was talking, the e-learning developer opened Storyline and built a quick mock-up of how the course could work with some simple interactions and decision-making scenarios. The client intended to send her away to build something to pitch later. Instead, the e-learning developer showed her the interactive prototype right there in the meeting and got the job on the spot. All because she was able to focus on the desired activity and build a working model. 

E-Learning Prototype: Don’t Worry About Looks

At our workshops, we like to present a few challenge activities. This lets people workout ideas and build quick interactive modules. However, there are always a few attendees who end up spending all their time on the visual design and never end up building a working interactive prototype.

It’s an easy trap to fall into because we tend to lean on the visuals first. They help us think about the project. However, it’s a trap that wastes time. Don’t worry about the way the module looks, worry about the functionality and the desired output. 

Of course, you do want it to be visually organized. If not, the customer will still focus on the way it looks. But you don’t need to make it visually rich. A good cheat though, is to start with the content library templates and then work from there.

To sum it all up, building quick prototypes is a better option for course development than building almost complete courses and then soliciting feedback, especially since you’ll probably have to make a bunch of changes anyway.

How do you build your prototypes? Do you start with a storyboard? Or do you jump right into the software and start building?

Events

Free E-Learning Resources

Want to learn more? Check out these articles and free resources in the community.

Here’s a great job board for e-learning, instructional design, and training jobs

Participate in the weekly e-learning challenges to sharpen your skills

Get your free PowerPoint templates and free graphics & stock images.

Lots of cool e-learning examples to check out and find inspiration.

Getting Started? This e-learning 101 series and the free e-books will help.


e-learning porfolio

I get questions all the time about work portfolios. One of the most frequent questions is “What types of courses need to be in the portfolio?”

Why Have an E-Learning Portfolio?

The portfolio is your proof of skills. It shows that you have more than a resume list of education and experience. It documents some of your projects and also shows your specific skills.

The challenge for many is that the work we do is proprietary and we can’t show what we know. That’s OK. If that’s the case, you want to create a few sample modules that demonstrate your skills and get the attention of the person reviewing your portfolio. And let’s face it, some of the projects that we get stuck on at work aren’t things we want to show anyway.

Here’s What Should be in Your E-Learning Portfolio

Here are the five things you need to showcase in your e-learning portfolio.

  • Assessments. Quizzes are the most common element in e-learning courses. Create a few different types of assessments. The default, blocky-type quizzes are fine, but you want to show more than copy and paste skills. Make the quizzes look different and modify the default settings. The more custom you can make them, the better.
  • Scenarios. Interactive scenarios are always popular. They’re more fun than click-and-read content and they show how to build situational training that closely mirrors real-world interactions.
  • Interactions. No one wants to look at 60 slides of the same content. Instead showcase mini interactions, or pull some of the interactions out of the 60 slide course. There are three main ways to interact with the screen: click, hover, and drag. Build some modules that demonstrate your skills creating different types of interactions. Lean more on dragging than clicking because it’s novel and people like to move things on the screen.
  • Software Training. Most organizations do some sort of software training. Show your skills building software training. Add a short screencast video as well as an interactive software simulation.
  • Make it interesting. Most e-learning isn’t very good and usually very boring. Convert one of those types of courses into something interesting. Make it look good and make it interactive. Show a before and after version of your course/module.

Here’s a bonus tip: people are drawn to the visual design more so than they are to the instructional design. You want your portfolio to look good.

If you’re trying to figure out how to build those demos or what types to do, check out the weekly e-learning challenges. There’s a lot of variety and plenty of ideas. Any one of them would make a good module to include in your portfolio.

Do you have an e-learning portfolio? If so, what type of content do you have in yours?

Events

Free E-Learning Resources

Want to learn more? Check out these articles and free resources in the community.

Here’s a great job board for e-learning, instructional design, and training jobs

Participate in the weekly e-learning challenges to sharpen your skills

Get your free PowerPoint templates and free graphics & stock images.

Lots of cool e-learning examples to check out and find inspiration.

Getting Started? This e-learning 101 series and the free e-books will help.


e-learning checklist

On a recent flight, I watched the flight crew go through a pre-flight checklist. This is a series of things that need to happen prior to taking off. While watching them I wondered what we’d consider being part of an e-learning pre-flight checklist. 

  • Information vs Performance. I like to put courses in one of two buckets: performance or information. Performance-based courses seek to change behaviors and have people learn and do something new or different. Information-based courses are more about awareness of certification. Knowing which bucket to place the course,, helps me know what type of resources to commit to it.
  • What are the objectives of the course? Some objectives are to change performance or teach new skills. And some objectives are more like certification and awareness. Knowing the objectives helps you determine the proper metrics to evaluate success.
  • Who is the final approver of the project? This is one of the first questions I ask. It’s important to know who the final decision-maker is. Often you’ll work on a course and then right before launch someone higher up in the food chain gets involved and wants to make changes. Find out who this person is before you get too involved in the project and be sure to keep them in the loop throughout. And most of all, make sure you get approval at various milestones in the project. As David likes to say, “When things go right, the managers take credit. But when things go wrong, it’s all on the trainers.”
  • Is there a budget? I’ve worked for larger organizations with large projects and rarely did we get a budget to build the courses. I was always told I was the budget. It’s a good idea to initiate the conversation about having a budget. Perhaps you start small and say you need $500-$1000. Even if you don’t need the money, it’s a good idea to build the expectation that you need a budget to go with your training project.
  • What expectations does the client have? This goes back up to understanding the type of course that is being commissioned and determining the objectives. Often, the client has a default position that their goals or problems are solved by training. This isn’t a good starting point. It’s important to do some performance consulting to better understand the client’s needs and if training will help. Doing that sets clear expectations.
  • What expectations do the learners have? Let’s face it, the bulk of most e-learning courses are compliance training or annual updates with little impact on the person’s day-to-day responsibilities. Thus, for many, the expectations are very low. We can’t always control the content and client objectives, but there are things we can do to make the experience better and more interactive.
  • What do you know about the audience? Ideally, the course is designed in a real-world context. To do that requires an understanding of the audience’s real world.
  • What resources are available? The most important resource is access to the subject matter experts. Other resources are existing content, technology, media, and the numerous assets required to build good courses. Of course, with services like Content Library, some of that is mitigated and not as big of an issue as in the past.
  • How will you evaluate it? If you define clear objectives you can define metrics to determine if they’ve been met. Thus one part of the evaluation is having measurable objectives. The other part is knowing how you’ll collect and process them. That’s not as easy and probably why most organizations don’t bother evaluating their training properly.
  • What’s the implementation plan? Once the course is loaded into the learning management system, what’s next? How do the learners know there’s a course for them to take? How do managers know? What marketing strategies do you have for the course launch?
  • Does it need to be mobile? Personally, this is somewhat moot. Modern e-learning courses work on mobile devices. However, there are some considerations when it comes to mobile and how you construct the course. Ideally, you use something like Rise where all of the design considerations are already made. If you use Storyline, you’ll need to think about the interface and how things are laid out and how they work on the smaller screens.

This isn’t an exhaustive list, but it’s a good start. What would you add to your e-learning pre-flight checklist? Share your thoughts in the comments.

Events

Free E-Learning Resources

Want to learn more? Check out these articles and free resources in the community.

Here’s a great job board for e-learning, instructional design, and training jobs

Participate in the weekly e-learning challenges to sharpen your skills

Get your free PowerPoint templates and free graphics & stock images.

Lots of cool e-learning examples to check out and find inspiration.

Getting Started? This e-learning 101 series and the free e-books will help.


share your e-learning courses header

This is a tip I stumbled upon this week and thought I’d share it because one of the most frequent questions I get from people trying to manage a work portfolio is how to easily share e-learning courses.

Let’s quickly review some of the options that we’ve mentioned in the past:

Today, we’ll look at another option. It’s not free, but it’s inexpensive and comes with other benefits.

Share Your E-Learning Courses with pCloud

I won’t bore you with all the details and benefits regarding pCloud because you can learn that on your own. To keep it simple, it’s a cloud-based storage service similar to Google Drive and Dropbox. What I like that’s different is that it works like a virtual drive so I don’t need to have all of the files on my computers like I do with Dropbox.

Examples of E-Learning Courses 

Anyway, I was testing out their public folder and loaded a few published Storyline courses to see if they work and guess what, they do. Here are three demos:

As you can see, the courses play fine. Thus making it a simple solution for those who want to easily share their courses.

Steps to Share Your E-Learning Courses

Here are a few general steps to share your courses using pCloud.

share your e-learning courses public folder

  • Create a folder inside of your Public Folder to share courses.
  • Copy your published course to that folder. pCloud looks like a drive on your computer so you just need to move the files to the pCloud drive.
  • The files are uploaded to pCloud.
  • Go to your my.pCloud.com site and access the folder where you saved your published course.

share your e-learning courses link

  • Locate the story.html and click on Share>Get Link. That creates a link to the HTML file which loads the course. You don’t want to share the HTML file itself because the user will only be able to see the HTML file and not see the course load and play.
  • Here’s a quick video tutorial that walks through the steps.

I did notice that when accessing the files from the mobile app, you can only share the file and not a link, so it looks like you can only use the share link from the desktop app.

I find pCloud to be a good solution for my online storage needs, especially since I don’t need to have all of the files on my computers like I do if I want to access them in Dropbox. I also like the upload folder option for people who want to share their files at workshops.

If you’ve tried pCloud to share your courses, I’d love to hear about your experience. Share your thoughts in the comments.

Events

Free E-Learning Resources

Want to learn more? Check out these articles and free resources in the community.

Here’s a great job board for e-learning, instructional design, and training jobs

Participate in the weekly e-learning challenges to sharpen your skills

Get your free PowerPoint templates and free graphics & stock images.

Lots of cool e-learning examples to check out and find inspiration.

Getting Started? This e-learning 101 series and the free e-books will help.


closed captions

We’ve discussed closed captions in a previous post. We looked at how to create them with free software or online tools. And we also explored how to build closed captions using a single text variable.

Today, we’ll look at how the closed captions feature works in Articulate Storyline 360. You’ll find it a lot easier to use. Here are three video tutorials that go into more detail regarding the steps below.

TUTORIALS

How to Create & Edit Closed Caption Text

Here’s how to add captions to audio narration or videos in your course. You can do it right inside of the authoring tool.

  • Insert the video (or audio) file.
  • From the toolbar, select Add Captions.
  • Storyline opens a caption editor where it analyzes the audio track and creates several placeholder caption boxes for you to insert text.
  • Select a caption box and start typing. Hit the return key to restart the caption box until you’re done. Hit the tab key to move to the next box.
  • Easy as that.

closed captions editor

TUTORIAL: Learn about creating and editing closed captions in Storyline 360.

Editing your captions is fairly straightforward. When you open the Closed Captions Editor, you see a timeline with the audio track and caption boxes.

  • You can extend or decrease the time of the caption.
  • Edit text.
  • Click and move the caption boxes.
  • Export the closed captions as a .VTT file, which is standard.

How to Import Closed Caption Text

Many people like to create their closed caption text in separate applications, export the .VTT (or another format), and import the text file into the authoring tool. That makes sense, especially if you have really long audio or video tracks.

Personally, I like to use Youtube to create my captions for long videos. I upload the video to Youtube and make sure it’s not public. Then, I take my text script and paste it into the field. Youtube does the rest. When it’s done, I can download a .VTT file to use in my e-learning course.

Here’s how it works in Storyline 360.

  • Insert a video or audio file into the slide.
  • Click on the video and in the ribbon, select Import to access your .VTT file.
  • Preview the slide and select the Captions button on the player.

closed captions example

TUTORIAL: Learn about importing closed captions.

How to Create a Closed Captions Button

By default, the course player has a captions button. To view captions during the course, click the captions button. That works great if you have the player and captions button enabled. However, some people prefer to diminish the player and want their own captions button on the slide to control when the captions display.

Here’s how to create a custom captions button:

  • Insert a button.
  • Add a trigger to the button to adjust the Player.Display.Captions variable.
  • The variable is like a True/False variable that can be either one or the other when clicked. Set the operator to =NOT Assignment.
  • When the button is clicked it toggles the variable value to what is not assigned to. Thus, clicking the button turns the captions or off.

closed captions variable

TUTORIAL: Learn about creating a custom closed captions button.

And that’s how you add closed captions to your e-learning courses. Pretty simple, huh?

Events

Free E-Learning Resources

Want to learn more? Check out these articles and free resources in the community.

Here’s a great job board for e-learning, instructional design, and training jobs

Participate in the weekly e-learning challenges to sharpen your skills

Get your free PowerPoint templates and free graphics & stock images.

Lots of cool e-learning examples to check out and find inspiration.

Getting Started? This e-learning 101 series and the free e-books will help.


e-learning experts

In the past, I’ve referenced a number of instructional designers who are active in the community where they share all sorts of free downloads, examples, and answer questions.

Today, I’d like to focus on a few instructional designers and course developers who tend to share more advanced course development tips. They go through the nuances of the software, share hacks, and how to leverage JavaScript when using Storyline.

These are peers worth following.

Melissa Milloway

Melissa is a passionate learner and actively shares what she learns (often while she learns).  She’s also been a presenter at a few of our Articulate Roadshows.

e-learning developers mel milloway

Here’s a good series she did on getting started with xAPI and Storyline.

Kevin Thorn

Years ago Kevin won an Articulate Guru award. From there here’s built quite a presence in the e-learning industry. Many of you probably know him from his iconic Nugget head character.

e-learning developers kevin thorn

If you want to learn how he comes up with ideas and builds his courses, check out his recent series on constructing a gamified module.

Zsolt Olah

Zsolt is a like a zsolt of lightning especially when it comes to talking gamification and how to engage learners. He has all sorts of really neat ideas and hacks to help you learn more. One of the most original and creative people in the industry.

e-learning developers zsolt olah

Check out this example of alternatives to multiple choice questions. Pretty cool.

Nick Shelton

Nick shares all sorts of cool tips and tricks with his unique brand of humor. His site has lots of good tutorial videos and advanced tips.

e-learning developers nick shelton

Check out this example of how to add Cool Overlay Effects in Articulate Storyline with Basic After Effects & JavaScript.

Matthew Bibby

Matthew’s nickname should be the “E-learning Thunder from Down Under.” He presents really organized and detailed tutorials and tips in his blog.

e-learning developers matthew bibby

Look at this post on how to use Google Fonts with a variable.

David Charney

David always shares clever tips and examples. I recall sitting at the airport on my way to London and spending a couple of hours trying to deconstruct one of his demos for the weekly challenges.

e-learning developers david charney

Here’s a video where he shares a way to mask content using the scroll panel feature. And of course, his review of the original Storyline 0.

Owen Holt

Owen does a great job showing how to use JavaScript with Storyline. He’s presented at the Austin Roadshow. He’s also got some popular tutorials.

e-learning developers owen holt

Here’s one he recently shared that’s gotten lots of play: how to add a print button to the course player [video].

Ron Price

Ron is CLO for Yukon where he manages and conducts a lot of Articulate training. Ron is also a fixture in our Articulate Live webinars where he shares all sorts of cool tips and tricks.

e-learning expert

If you’re an Articulate 360 subscriber you don’t want to miss those Friday Quick Tips & Tricks sessions. Here’s a recent tutorial Ron posted where he answered a training question: Why Does My Custom Menu Lose Track of My Progress?

To the ones above, thanks for what you do to support the community and industry. I know that there are a lot more really talented developers worth mentioning. Feel free to give them props in the comments section below.

Events

Free E-Learning Resources

Want to learn more? Check out these articles and free resources in the community.

Here’s a great job board for e-learning, instructional design, and training jobs

Participate in the weekly e-learning challenges to sharpen your skills

Get your free PowerPoint templates and free graphics & stock images.

Lots of cool e-learning examples to check out and find inspiration.

Getting Started? This e-learning 101 series and the free e-books will help.


subject matter experts

Subject matter experts play a key role in the success of your e-learning courses. The challenge is learning to use their skills and knowledge in a way that works best. Today’s post is a curated list of free resources with essential tips and tricks so that you are successful building your courses.

Free Downloads

Here is a list of free downloads available to you.

Rapid E-Learning Blog Resources

Here is a list of relevant blog posts.

E-Learning Heroes Community Resources

Here is a list of community discussions, tips, and resources.

Events

Free E-Learning Resources

Want to learn more? Check out these articles and free resources in the community.

Here’s a great job board for e-learning, instructional design, and training jobs

Participate in the weekly e-learning challenges to sharpen your skills

Get your free PowerPoint templates and free graphics & stock images.

Lots of cool e-learning examples to check out and find inspiration.

Getting Started? This e-learning 101 series and the free e-books will help.


screencast tips

Screencast tutorials are some of the most common forms of online training. This makes sense since a large part of e-learning is predicated on learning new software. One challenge is creating effective and engaging screencasts. So today, we’ll look at a few simple production tips to help you get started.

Screencast Tip: Establish Context Quickly

It helps to know what you’re learning and why. At the beginning of the screencast, introduce what you’re going to teach and why (or what the outcome should be). Many screencasts aren’t clear about what the value of the screencast is. They either jump into instruction with no context, or they spend too much time on non-essential content.

Screencast Tip: Get to the Point Quickly

The other day I was reviewing a product video for some new gadget. The video was about seven minutes long. I wanted to know how the gadget worked and what features it had but the guy in the video spent the first three minutes talking about a bunch of nonsense that had nothing to do with the video topic. As Archie Bunker used to say, “Get to the point, Edith.”

Screencast Tip: Don’t Focus on Features

Many of the screencasts I view go through a feature list. They spend way too much time on the user interface and the features buried within it. You don’t need to explain everything in the software or everything you can do with it. And not all features are created equal. Some are used all the time and some rarely. Skip the feature-by-feature dissertation. Focus on the key features and the ones most critical to the user’s objectives.

Screencast Tip: Focus on Action

What are people supposed to do with the software? Make a list of required actions or responsibilities. Then build your screencasts around actionable objectives and how to meet them. Give them real-life challenges and how the software meets them. For example, if I were teaching someone how to use a spreadsheet, instead of showing them how to to use specific features, I’d start with a real-world challenge: “You need to create a report using this data.” And then from there, I’d go through the process of instruction and focus on the features relevant to the objective.

Screencast Tip: Don’t Stop at One

People need multiple opportunities to practice. Many screencasts and the associated activities are built on a single action. This is fine. However, use the activities to reinforce a previous lesson as you introduce new skills. Give them opportunities to review and repeat the previous process.

The more practice, the more fluent they’ll be. This is really key with software training where you build on skills from previous training videos.

Screencast Tip: Keep it Short

Shorter videos are better. Stay focused and get to the point, as I noted above. It’s better to have a series of shorter videos than to have a single long one that forces the user to scrub through looking for relevant info. Try to stay focused on a single objective.

Screencast Tip: Provide Post-Screencast Resources

Because the screencast videos will be shorter and tied to specific actions there may be some learning gaps or other things the person wants to know. It’s always a good idea to curate a list of additional resources for the viewer to access after they’ve completed the screencast video.

Screencast Tip: Don’t Make a Screencast

Screencasts take time and some require multiple edits. And if the content changes (like a new interface or features) then they need to be redone. Often it’s easier to show a static screen and use labels to highlight specific areas. These are also easier to update when the subject matter is still in flux. And it helps you avoid long videos when they just need simple information.

I like this interactive screenshot prototype that David built a while ago. It looks good and it’s easy to build. It’s also available as a free download.

Here are some additional resources for those who want to create screencasts:

What tips do you have to share?

Events

Free E-Learning Resources

Want to learn more? Check out these articles and free resources in the community.

Here’s a great job board for e-learning, instructional design, and training jobs

Participate in the weekly e-learning challenges to sharpen your skills

Get your free PowerPoint templates and free graphics & stock images.

Lots of cool e-learning examples to check out and find inspiration.

Getting Started? This e-learning 101 series and the free e-books will help.