The Rapid Elearning Blog

Archive for the ‘E-learning’ Category


closed captions in Storyline

[UPDATE: This tutorial is specific to Storyline2. Storyline 360/3 both have closed captioning as a feature.]

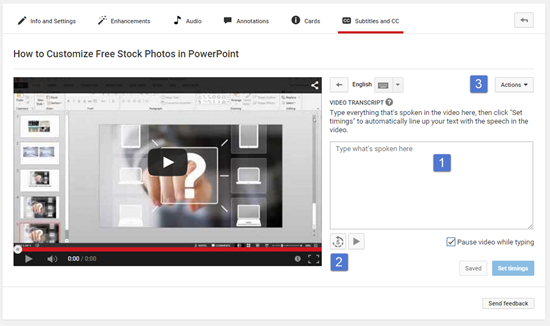
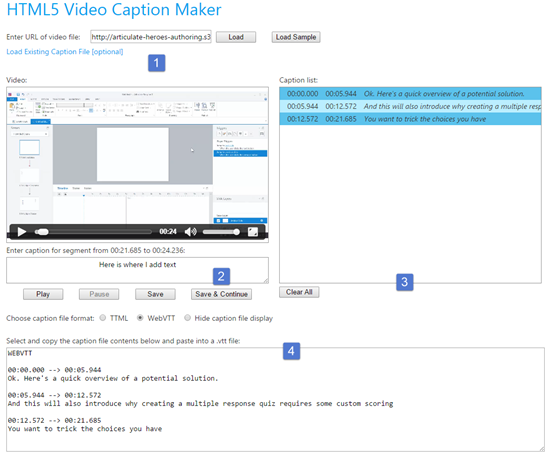
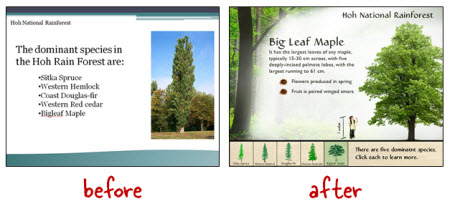
In a previous post we learned how to create closed captions text for your online courses. Now we’ll learn to use that text in Articulate Storyline.

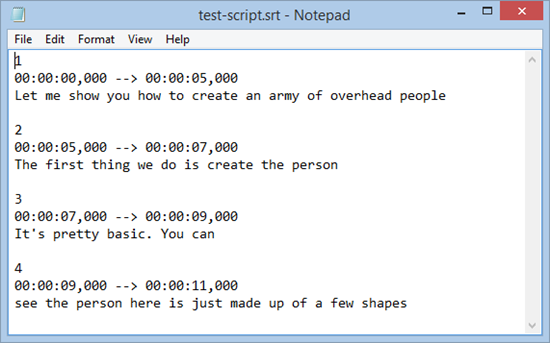
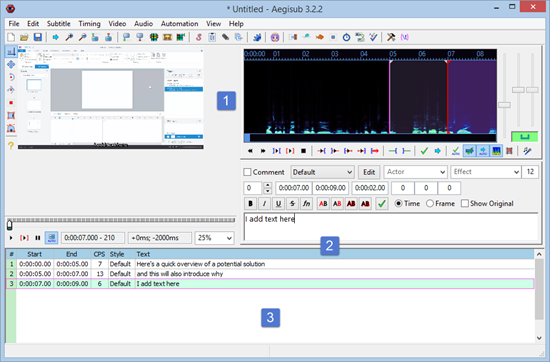
Before we get started, let’s do a quick review of your closed captions source file. Regardless of the application you used to create the closed captions file, you’ll end up with the timing and the text for the captions. It should look similar to the image below.

closed caption storyline SRT

Display Closed Captions in Storyline

Displaying the closed captions in Storyline 2 is a very straightforward process. All we need is a single text variable that is triggered to change to new text based on the timeline.

Here’s a video where I explain how easy it is to create the closed captions in Storyline 2.

Click here to view the closed captions YouTube tutorial.

Here are the basic steps to create the captions in Storyline 2:

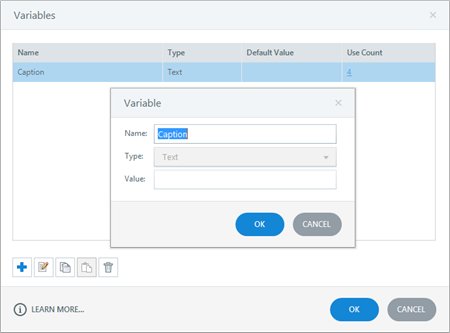
  • Create a text variable titled “Caption.”

closed captions Storyline variable

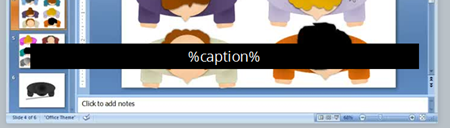
  • Insert a text reference of the “Caption” variable so that the caption is visible on the slide. The caption displays the variable which will change at different points on the timeline.

closed captions Storyline text reference

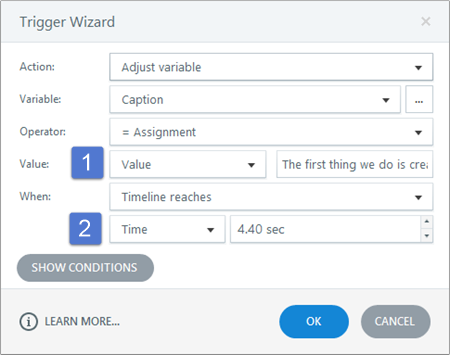
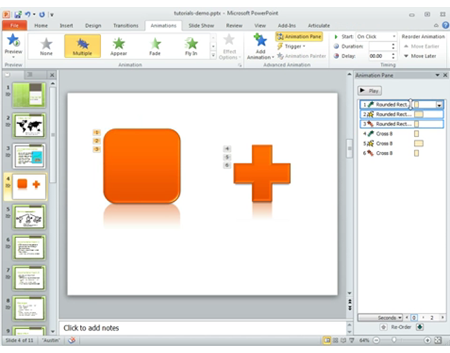
  • Add a trigger to the slide that changes the value of the “Caption” variable at a specific time. The value and specific time come from the SRT file. The value is the text and the time is the starting time for each line. Storyline 1 doesn’t have the timeline trigger. The workaround is to add simple shapes (and move them offscreen) to represent the timing. And then trigger to the start of those shapes on the timeline).

closed captions Storyline trigger

  • Copy and paste the trigger and then add the new values and timing by copying the text from the .SRT files.

closed captions Storyline copy and paste trigger

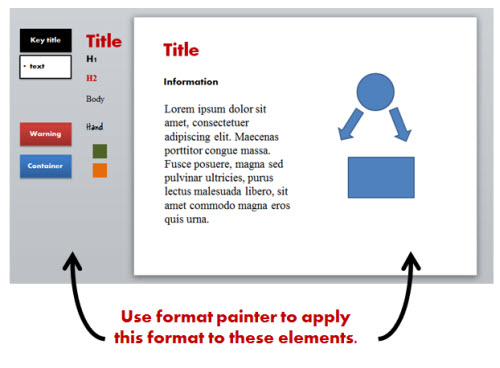
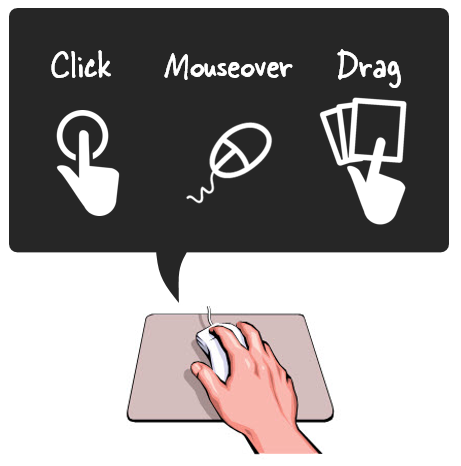
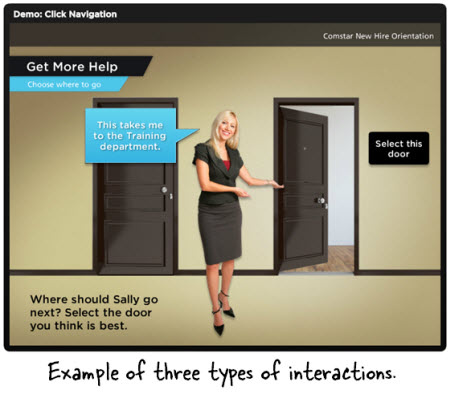
As you can see, adding closed captions and syncing them to the timeline is pretty easy. Here are a few general tips when working with closed captions:

  • Show or hide the closed captions by adding a button that sets a variable to turn captions on and off.
  • Use a legible text, none of those fancy curly ones. A clean san serif font like Open Sans works well.
  • Come up with a format that is consistent. Because the screen content is constantly changing you want to ensure enough contrast so that people can read the captions. I prefer a semi-transparent black box with white or yellow text.
  • Create a uniform size. The text box that contains the closed captions is dynamic and will change based on the characters (that’s the nature of text variables). That means the font size may increase or decrease based on the character count. Do a test and create a box that accommodates the most text you’ll have at any given time. Then set the font size to that and it should look right as the character count changes.

That’s about it. With a single variable and one trigger you can quickly create as many captions as you need when using Articulate Storyline to build your online training.

Events

Free E-Learning Resources

Want to learn more? Check out these articles and free resources in the community.

Here’s a great job board for e-learning, instructional design, and training jobs

Participate in the weekly e-learning challenges to sharpen your skills

Get your free PowerPoint templates and free graphics & stock images.

Lots of cool e-learning examples to check out and find inspiration.

Getting Started? This e-learning 101 series and the free e-books will help.


free closed captioning software for online training and elearning

In this post we’ll explore a few simple ways to create free closed captioning text for your online training courses. We’ll work off of the assumption that you want closed captioning to sync with your audio narration or an inserted video on your slides.

What is Closed Captioning Text?

Generally speaking, closed captioning text accompanies the audio or video narration in your online training courses. It’s used to help those who are deaf and can’t hear the audio follow along with the course’s narration. However, some people prefer to turn off all audio and read the text (or perhaps they don’t have speakers or headphones) so it’s not just an issue of accessibility.

Alternatives to Closed Captioning?

There are different ways to make the course transcript available to the end user. A common approach is to display a full transcript. It gets added to slide and allows the learner to disregard the audio and just read the transcript.

Many of the elearning applications like Articulate Storyline have a transcript or notes feature that allows for this. The transcript can be part of the player or the course designer could add a transcript feature to the actual slide. The image below shows the transcript on the side in the player.

closed captioning transcript in player

This approach works great since most people can read faster than the narrator talks. This is also a viable solution if the slide is mostly static and there isn’t a lot of synced animations or content going on and off the screen. However, it’s not ideal if you want the transcript to sync with the flow of the narration.

How to Create Free Closed Captioning

Let’s say you do want closed captioning in your online training and you want the text synchronized to the audio narration. There are two key components: the first is that you’ll need to create a closed captioning file that has timing and text notations; and the next is using that file to create the actual captions in your elearning software.

Today, I’ll show how to create the free closed captioning file and in a follow up post, I’ll show how to use it in Articulate Storyline. If you have a different authoring application, you’ll have to learn more from that vendor. But in a general sense the steps are probably similar.

The image below shows a simple closed captioning file. You can see that each caption is indicated by a number and a time range.

closed captioning for online training and elearning .SRT file format

For example, line 2 runs from 5 seconds to 7 seconds with “The first thing we do is create the person…” text onscreen. At the 7 second mark, line 3 is displayed.

There are all sorts of file formats for closed captioning text. You can learn more in this article and at the YouTube site. I like to keep things simple, so we’ll focus on the .SRT files and how to get them. By the way, you can open .SRT files in notepad for easy viewing or editing.

Here are a few ways to create the free closed captioning for your online training courses.

YouTube for Free Closed Captioning

YouTube creates closed captioning when you upload a video. After it’s uploaded it will extract the text and create the timing of the captions. Here’s a great video tutorial that shows how to create free closed captioning in YouTube.

closed captioning for online training via youtube

Here’s a quick overview of creating free closed captioning of your own transcript:

  • Listen to the video and insert the text.
  • You can always rewind 5 seconds to repeat it.
  • Once complete, select “Actions” and download the file in .SRT format.

Microsoft’s Free Closed Captioning Text Maker

Note: No longer available.

Microsoft offers a simple HTML5-based free closed captioning text maker. It’s on one of their experimental sites so I’m not sure how long it’ll be around; it may end up like Jimmy Hoffa and the screen beans. However, while it’s available, it’s easy enough to use and a good alternative if you have a video link and don’t want to upload your video to YouTube.

free HTML5 closed captioning text

Here are the basic steps to create free closed captioning text:

  • Add a video URL.
  • Play the video and add your text.
  • Caption list displays closed captioning details.
  • Select the WebVTT format. It’s not .SRT, but it’s the same info. You can copy and paste into a text document.

Aegisub Free Closed Captioning Creator

Aegisub is free software to create or modify subtitles and free closed captioning text. It’s a lot more feature-rich than the first two options. And because of that it has a little learning curve.

However, I’m no expert and I was able to insert a video and type in my text with no problems and without a lot of messing around. Most of those features are outside of what we want anyway. We just want a file that gives us the timing and text for the closed captioning so we can add it to our online training courses.

free closed captioning for online training

Adding your closed captioning text is generally straightforward:

  • Insert a video and play it.
  • Add text and press “Enter.”
  • The caption timing displays at the bottom. To export, go to “File” and export and save as .SRT which you can open in Notepad.

So there you have it—three solutions to get free closed captioning for your online training. All of the solutions will generate a file that includes the timing of the closed captions and the text that displays. Once you have those you can use them in your online training software to display the closed captions.

I’ll show how to add closed captions to an Articulate Storyline course in a follow up post.

Events

Free E-Learning Resources

Want to learn more? Check out these articles and free resources in the community.

Here’s a great job board for e-learning, instructional design, and training jobs

Participate in the weekly e-learning challenges to sharpen your skills

Get your free PowerPoint templates and free graphics & stock images.

Lots of cool e-learning examples to check out and find inspiration.

Getting Started? This e-learning 101 series and the free e-books will help.


Articulate Rapid E-learning Blog - pre-assessment scenario

Organizations operate at the speed of business and don’t like to waste time or money. That’s especially true when it comes to pulling people away from their daily tasks. And this is something that happens every time a person is asked to complete an e-learning course. So it’s important to create the most cost-effective process possible and still meet the organization’s goals.

One way to make e-learning courses cost-effective is by sorting your learners and then pushing them to a successful learning path. Some who take the courses are more experienced and don’t need the same course that the new person does. And the new person probably needs a lot more context and content.

Understand Your Learners Before Building a Pre-Assessment Scenario

People come to the courses with varying levels of experience, skills, and understanding. In an ideal world, you can craft an adaptive learning process where everyone gets a unique learning experience, but that’s usually not an option. Most of the time, you have to create one course that meets the needs of everyone.

  • Experienced learners already have a lot of contexts. And often the e-learning courses act more like a certification process than new learning experience. So, in that sense, let them prove what they know and move on to completion.
  • New learners are new and don’t have a record of accomplishment of experience. Often, they don’t know what they don’t know. Some may know more than others. And some may think they already know the content.

Let Learners Test Out Instead of Using a Pre-Assessment Scenario

A common option is to let learners test out by successfully completing a pre-test. Present an assessment upfront. If they pass it, they go to the end and are done. If they don’t pass it, they go to the beginning and take the course. This is a viable model and works great for simple compliance training where an annual course completion certificate is the main objective.

Articulate Rapid E-Learning Blog - pre-assessment scenarios let you test out

However, many of those pre-assessment tests are very basic and what do they really prove? They may prove the person knows the content, but it doesn’t mean that they know how to apply it. Or it may prove that they’re good guessers. In either case, they generally don’t prove understanding, especially in a performance environment.

Create a Pre-Assessment Scenario

Functionally a pre-assessment scenario is the same as a pre-test. The goal is to sort the learners and move the experienced and novice learners down different paths. However, the core difference is that the assessment scenario attempts to assess deeper understanding of the content and its proper application.

Pre-tests typically ask a series of multiple-choice questions. And again, this is fine for a simple end-of-year certification. However, if the course is more performance-based, then the scenario allows you to stage an event that lets the learner demonstrate that they can meet the performance requirements by successfully navigating the pre-assessment scenario.

Articulate Rapid E-Learning Blog - pre-assessment scenario flow

A couple of additional benefits is that a pre-assessment scenario helps remind the experienced person of what they need to do and for the new person it helps expose deficient understanding and the types of situations they may encounter in the real world. The pre-assessment scenarios also help cement the objectives for the course. When a person isn’t successful, they’re more apt to pay attention to the course content since they’ve already been proven to lack some of the expected understanding.

A few production tips:

  • Keep it short. Instead of big, long scenarios which take more time to produce, create a series of quick hit scenarios.
  • This is a pre-assessment. So don’t feel obligated to do much to set up or support the assessment with resource content. If they can demonstrate their understanding, they can pass the pre-assessment. If they can’t, well, that’s why you created the course.
  • Create templates. You can create interactive scenario templates and reuse them for quicker production.

Pre-tests are a great way to efficiently and effectively move learners through the training process. However, they are limited in what they can assess. Switching to a real-world pre-assessment scenario provides a better way to assess understanding and application of the training content. It also lets those who don’t pass understand why they need to take the course.

Events

Free E-Learning Resources

Want to learn more? Check out these articles and free resources in the community.

Here’s a great job board for e-learning, instructional design, and training jobs

Participate in the weekly e-learning challenges to sharpen your skills

Get your free PowerPoint templates and free graphics & stock images.

Lots of cool e-learning examples to check out and find inspiration.

Getting Started? This e-learning 101 series and the free e-books will help.


build effective e-learning with this free e-book

I’m not sure you noticed but we just updated the Insider’s Guide to Becoming a Rapid E-Learning Pro. The first edition of the free e-book was released in 2007, and as you can imagine a lot has changed in our industry. This new addition addresses some of those changes and offers more practical tips and tricks.

How Has E-Learning Changed?

In 2007, most of the options for creating interactive elearning required Flash. If you wanted to build courses, you were required to either learn Flash or hire a Flash programmer. That meant a lot of organizations were shut out of building their own elearning courses.

But along came the PowerPoint-to-Flash products. They enabled people to create their content in PowerPoint and convert it to the Flash. Essentially, each slide was converted to a Flash movie. Thus the non-programmer was empowered to create Flash-based courses at a fraction of the cost. They weren’t perfect, but they definitely were viable. I imagine that many of you seasoned elearning developers cut your teeth in a PowerPoint-based product.

PowerPoint e-learning and free e-book

These tools didn’t get their start in 2007. Articulate Presenter was around well before eHelp (one of the leading companies) was purchased by Macromedia that was purchased by Adobe. In fact, eHelp licensed Articulate Presenter for their own RoboPresenter product. So while all of this happened in the early 2000’s, rapid elearning and PowerPoint-based authoring didn’t really start to take off until around 2008 or so.

Today things are different. PowerPoint’s not as important to elearning because there are more advanced elearning applications like Storyline that let you do all sorts of things with PowerPoint ease and a host of form-based tools (like Engage) that only require copy and paste editing.

And we won’t even get started on the state of Flash. While it’s still viable, I don’t know many people working with it anymore and I think it’s been almost four years since someone’s asked me a Flash question.

As you can see, the industry has changed over the past seven years and the free e-book, Insider’s Guide to Becoming a Rapid E-Learning Pro, has been updated to reflect that change.

What’s New in the Free E-Book?

When I wrote the first e-book I wanted to help people who were just transitioning to the elearning industry. Many of them had limited experience and were mostly working by themselves (or on small teams) and with limited resources. Today, things are a bit different.

free e-book for e-learning developers

The industry continues to grow. That means there’s an ongoing influx of new elearning developers mixed with the first generation of rapid elearning pros, who’ve mostly moved past PowerPoint-based authoring. The free e-book reflects this transition. Here are some of the key topics I’ve updated:

  • Tips and tricks on managing your success. Building a course is one thing, being successful doing it is another.
  • Learn to be a proactive partner to the organization. Don’t be an order-taker; learn to understand the organization’s needs and help them meet their objectives.
  • Understand the types of tools on the market. Many organizations make the mistake of creating a checklist of features to compare tools. But they disregard the types of tools on the market. The e-book discusses the pros and cons of the different types of products without looking at any one specific vendor.
  • Create interactive elearning courses. In 2007, if you were working with PowerPoint, your options were limited. Today, that’s not the case.
  • Save time and money by creating reusable content. One of my favorite features in Storyline is being able to build an interaction and then saving it as a template. This speeds up my production time and after a few projects, I end up with a tool chest of reusable content. You’ll learn a bit more on creating reusable content.

How Do You Get the Free E-Book?

free e-book for e-learning

Getting the free e-book is super easy. If you’re a current blog subscriber, the e-book is linked at the bottom of each post. That means all you need to do is scroll down and click on the download link. If you’re not a blog subscriber, you can get the free e-book here.

Download the free e-book and let me know what you think.

Events

Free E-Learning Resources

Want to learn more? Check out these articles and free resources in the community.

Here’s a great job board for e-learning, instructional design, and training jobs

Participate in the weekly e-learning challenges to sharpen your skills

Get your free PowerPoint templates and free graphics & stock images.

Lots of cool e-learning examples to check out and find inspiration.

Getting Started? This e-learning 101 series and the free e-books will help.


Top PowerPoint Tips

December 9th, 2014

Articulate Rapid E-Learning Blog - top PowerPoint tips

PowerPoint is probably the single best multimedia application available because of its versatility. You can create presentations, rapid elearning courses, illustrations, videos, mobile learning and even books for publishing.

PowerPoint also offers ease of entry. That means someone with no experience can open the application and get started. And the person with lots of experience is given all sorts of capability.

The main challenge with PowerPoint is that many people don’t fully understand the features and usually do very basic work with PowerPoint. And of course a lot of the negativity surrounding PowerPoint comes not from the tool, but instead from sitting through tedious PowerPoint-driven lectures and presentations.

I was asked recently about my favorite PowerPoint tips and tricks. I have a lot that I like, but here are a few of the ones I use quite a bit and find the most valuable.

PowerPoint Tip 1: Step Away from the PowerPoint Template

Templates are good, especially for new developers and those who want to save time. However, your project should guide the template and not the opposite. Unfortunately most people tend to start with the default PowerPoint templates and layouts. So everything has a distinct PowerPoint look.

Articulate Rapid E-Learning Blog - top PowerPoint tips avoid template

My advice? Put the bullet points down and step away from the template. Start with a blank screen and be intentional about what you build. If you do build a template, build it specific to your project’s needs.

PowerPoint Tip 2: Control Layers with the Selection Pane

The selection pane displays the objects on the slide. Here is what you can do with the selection pane:

  • Name objects
  • Change the stacking order
  • Show and hide objects

Articulate Rapid E-Learning Blog - top PowerPoint tips use selection pane

PowerPoint Tip 3: Combine Shapes to Create Custom Shapes

Starting with PowerPoint 2010 you can combine shapes to create custom shapes. Most of the time I use this feature to create custom callouts. I also use it to punch out parts of a shape I don’t need. Combine that with the edit points feature and you can create any shape you want. You can also use the fragment feature to convert text and wingding type into vector images which we looked at earlier. This is perfect for creating your own icons.

Articulate Rapid E-Learning Blog - top PowerPoint tips combine shapes

PowerPoint Tip 4: Layering Objects to Create Custom Graphics

We can stack objects in PowerPoint and control them with the selection pane. We can also make objects transparent. That means we can stack transparent objects to create custom images. Group the objects, right click, and save as an image file. I usually save as .png to retain transparency.

Articulate Rapid E-Learning Blog - top PowerPoint tips create custom graphics

PowerPoint Tip 5: Customizing Clip Art & Vector Graphics

I have a ton of posts on this, which you can find below. Essentially most clip art in PowerPoint is .wmf or .emf. That means they are comprised of grouped vector shapes which can be ungrouped and modified and then regrouped.

Articulate Rapid E-Learning Blog - top PowerPoint tips combine clip art

Unfortunately, Microsoft is dumping the Office.com and clip art site. So I’m not sure how much longer you’ll have to work with these types of files without buying your own. But in the meantime, take advantage of the free resources and create your own graphics.

PowerPoint Tip 7: Apply Custom Formatting with the Format Painter

The format painter is an underutilized feature in PowerPoint. Essentially any object’s formatting can be applied to another. I use it create quick styles for the objects in my courses. Then I can apply that to the other objects on the slide.

Articulate Rapid E-Learning Blog - top PowerPoint tips use format painter

This comes in handy when you get one of those junky PowerPoint files from a subject matter expert where there’s no rhyme or reason to the visual design. Create a quick style guide and then use the format painter to apply it.

PowerPoint Tip 8: Apply Animations to Multiple Objects Using the Animation Painter

The animation painter is very similar to the format painter. The only difference is that instead of applying an object’s format you apply the object’s animations. This comes in really handy if you have an object with multiple animations and need to duplicate those animations to other objects. In the past, you had the tedious process of rebuilding the animations onto each object. Today, that can be done in seconds using the animation painter.

Here’s a quick video that shows how it works.

Articulate Rapid E-Learning Blog - top PowerPoint tips use animation painter

Click here to view the YouTube video.

PowerPoint Tip 9: Save PowerPoint Presentations as Video

This is one of my favorite features because anything you build in PowerPoint with animations, narration, and multiple slides can be saved as a single video file.

Here’s a PowerPoint presentation that was saved as an .mp4 video and then inserted into the Storyline player. Try to create something similar with a video editing application. Trust me, it’s not that easy (especially without more advanced skills). But it’s really easy to do in PowerPoint.

Articulate Rapid E-Learning Blog - top PowerPoint tips save as video

Click here to play video.

In PowerPoint 2010 files are saved as .wmv and need to be converted to .mp4. I like to use Handbrake because they have pre-determined settings. In PowerPoint 2013 you can save as .mp4 so that saves a few steps.

The videos you create can be combined with your other elearning development. Here’s a good example where the sidebar video was created in PowerPoint and then inserted into a rapid elearning course.

Articulate Rapid E-Learning Blog - top PowerPoint tips example of video

Click here to view the PowerPoint video demo.

PowerPoint Tip 10: Remove Image Backgrounds

One of the most common reasons elearning developers use image editors like Paint.net and Photoshop Elements is to remove backgrounds from stock images. And they work fine for that. But you can do the same thing in PowerPoint starting with PowerPoint 2010.

Articulate Rapid E-Learning Blog - top PowerPoint tips remove backgrounds

It’s real easy to do. Double-click on your image and select remove background. Then determine what you want to keep and what you want to remove. Easy as that.

Bonus tip: Use PowerPoint to Create Interactive E-Learning Courses

PowerPoint is a tool most people have and as you can see, is a very capable application. Combine that with Articulate Studio and you have a very easy way to create interactive elearning.

What you build in PowerPoint is converted to Flash or HTML5 to meet your elearning needs. While applications like Storyline add more interactive capabilities, PowerPoint is still an easy entry point for the person just getting started with elearning design.

Articulate Rapid E-Learning Blog - top PowerPoint tips elearning examples

Here are some simple examples of PowerPoint-based interactions:

Other PowerPoint Tips & Tricks

There are literally hundreds of PowerPoint tips and tutorials in the blog. Here are some links from previous posts:

So those are some of my favorite PowerPoint tips. If you could add one tip, what would it be?

Events

Free E-Learning Resources

Want to learn more? Check out these articles and free resources in the community.

Here’s a great job board for e-learning, instructional design, and training jobs

Participate in the weekly e-learning challenges to sharpen your skills

Get your free PowerPoint templates and free graphics & stock images.

Lots of cool e-learning examples to check out and find inspiration.

Getting Started? This e-learning 101 series and the free e-books will help.


PowerPoint custom shapes

In today’s post we’ll look at a few ways to create custom shapes in PowerPoint.

I’ve shown this tip a few times in the past such as how to create custom callouts and chat bubbles. In PowerPoint 2010, you had to find the features I am showing today and then create your own ribbon tab to display them. But in PowerPoint 2013, they added the features to the format toolbar and included a new option to fragment the shapes.

How to Create Custom Shapes in PowerPoint

Here’s a quick tutorial that walks through the process of creating custom shapes. We’ll build a simple callout but you’ll learn how the feature works. Once you understand it, you can modify any shape and basically create whatever you want. This makes PowerPoint a great illustration tool.

Click here to view the tutorial.

How to Convert Text into Custom Shapes in PowerPoint

A side benefit of creating custom shapes is that when you include a text box in the process and use fragment you can convert the text into a vector shape that you can fill and size to meet your needs. I like to pull elements out of the various type faces.

This is also great if you want to create your own icons in PowerPoint. There are all sorts of facefonts, wingdings, and dingbat fonts you can use to do this. Make sure you have commercial right, though. Not all fonts are available for commercial use.

Click here to view the tutorial.

Events

Free E-Learning Resources

Want to learn more? Check out these articles and free resources in the community.

Here’s a great job board for e-learning, instructional design, and training jobs

Participate in the weekly e-learning challenges to sharpen your skills

Get your free PowerPoint templates and free graphics & stock images.

Lots of cool e-learning examples to check out and find inspiration.

Getting Started? This e-learning 101 series and the free e-books will help.


Articulate Rapid E-Learning Blog - free stick images

If you do a search online you’ll find all sorts of free assets like free stock images, icons, fonts and other media that work perfectly for your elearning courses. But often you find that free isn’t really free. Instead, free is free with strings attached.

One of my pet peeves is people who give away free assets and then only allow them to be used for personal use. I guess there’s a big demand for free stock images and free fonts for family use. While it’s the asset creator’s prerogative to attach strings, personally I find it kind of lame. Either it’s free or not. Why work to get eyes on your product and then create that sort of friction? However, if that’s the stipulation then we need to stick by it and respect the desires of the content authors. Mostly likely those resources won’t work for your project.

Another issue is that the free content comes with attribution requirements. That’s much better than free for personal use only. But it still creates some friction because the attribution requirement may conflict with your project.

How to give proper credit to the creator of the assets and still maintain a professional looking course is a challenge. Here are a few ways to attribute content to the asset creator.

Add Attribution Credits to the Image or Slide

  • Credits on the image. This is the easiest, but doesn’t always look good.
  • Credits as a caption. This is also easy and easy to template. It also creates consistency, but still can be a bit distracting.

Articulate Rapid E-Learning Blog - add attribution links to the image

The two options above are fine for school projects, but don’t look very professional. They also only allow for text descriptions and URLs. But no hyperlink to the creator’s site.

  • Mouseover credits as the person moves the mouse over the image the credits appear. They can be over the image or as a caption box and you can link to the site.
  • Add credits and links at the bottom of the screen. This works but may look a bit busy and not many clients want to see a bunch of outside content in their course screens.

Articulate Rapid E-Learning Blog - add attribution links to the screen

Add Attribution Credits to the Course Player Tabs

  • Use the player’s resource tab. Change the resource tab to read “credits” and then add links to the sites. This is really easy and looks nice.

Articulate Rapid E-Learning Blog - add attribution links to the resource tab

  • Use Engage to create an “About” player tab. Add information about the organization and course developers. An additional section could be attribution for free resources with a link back.
  • Lightbox slides on player tabs. Create a custom slide and insert it using the lightbox feature. This lets you make it look any way you want and add any type of information and links back to the site.

Articulate Rapid E-Learning Blog - add attribution links as a lightbox slide

Personally I like the resource tab and lightbox options. The resource tab is simple and the lightbox means I can make the credit page look anyway I want. Icons8 allows this for their free content. You can find it in their licensing. And I’m sure most of the others would, too.

If you’re not sure, ask the source of the free content. I’ve found that often they’re happy that people are getting use out of the free assets and appreciate that I’ve even bothered asking. Often they’ve given me permission to use their assets. It doesn’t hurt to ask.

Here’s a published version of the different ways to attribute the free resources if you want to see them in action.

Articulate Rapid E-Learning Blog - add attribution links example course

Click here to view the attribution demo course.

What do you do when you get free assets that require attribution? How have you attributed free content in your elearning courses?

Events

Free E-Learning Resources

Want to learn more? Check out these articles and free resources in the community.

Here’s a great job board for e-learning, instructional design, and training jobs

Participate in the weekly e-learning challenges to sharpen your skills

Get your free PowerPoint templates and free graphics & stock images.

Lots of cool e-learning examples to check out and find inspiration.

Getting Started? This e-learning 101 series and the free e-books will help.


Articulate Rapid E-Learning Blog - first step when building interactive elearning courses

On past projects, many of my customers would ask for interactive elearning courses. When I asked them how they defined interactive elearning courses they’d usually list things like fancy mouseovers, drag-and-drop interactions, and a host of other ways to interact with the screen. They rarely described making decisions or using the content.

Many times we dismiss this type of interactivity as novel and superfluous. I’ve heard other presenters deride those things as a waste of time and not being much more than lipstick on a pig.

Hey, there’s nothing wrong with a good looking pig. What’s the alternative?

Seriously, I can understand their perspective but I don’t agree with their derision. In fact, that type of interactivity is an important part of building effective and interactive elearning courses.

Interactive E-Learning Courses: Create an Immersive Experience

A key component while building interactive elearning courses is to craft an immersive experience. You start by creating a visually engaging context. If I’m teaching you about the Hoh Rain Forest, I want to bring you INTO the Hoh Rain Forest.

Articulate Rapid E-Learning Blog - before adn after example of visually immersive interactive elearning courses


We discussed that a bit when we looked at how to tap into your visual voice and planning your visual design. Learn to create a visually engaging and immersive look.

Interactive E-Learning Courses: Touch the Screen

The next step is getting the learners to touch the screen. A visually immersive course pulls them in a little. Touching the screen pulls them in a lot more. The reason is because you are engaging their senses and having them actively involved with the course.

Articulate Rapid E-Learning Blog - three ways to touch the screen when building interactive elearning courses.

A lot of people deride onscreen interactions like dragging and clicking as novel and perhaps even distracting. However, it’s a key part of interactive elearning. A goal is to get the learners to interact with the screen. At this point, it’s not about the cognitive processing. Instead, it’s all about pulling them in. And a great way to do so, is by getting them to do something on the screen.

In a previous post we discussed the building blocks of interactivity and identified three key ways to “touch the screen.” They are clicking, mouseovers, and dragging. Here’s a simple example of the three types applied to the same interaction.

Articulate Rapid E-Learning Blog - examples of interactive elearning courses

  • Click version of the office selection scene.
  • Hover version of the office selection scene.
  • Drag version of the office selection scene.

As you can see in the demos above, the types of interactions are somewhat interchangeable. Some make more sense than others depending on the context. However, the main point is to figure out how you’ll get your learners to touch the screen. How can you get them to interact with the screen elements? The more you can do this, the more you keep them engaged as they go through the course.

Here’s a cool example I like to show at workshops. It’s an interaction from a travel website and not an elearning course. However, imagine if this site wasn’t interactive. The travel agency could have met its goal with a list of travel choices from which to choose and then compile recommendations for you.

Articulate Rapid E-Learning Blog - travel site that is similar to many interactive elearning courses

Click here to view the interactive web site.

But they decided against that. Instead they get you to explore the site and “touch the screen” in various ways. There are places to click, mouseover, and drag. It’s fun and engaging, and definitely a lot more memorable than a dropdown list. And it helps the agency meet their objective of getting you to select a vacation.

Those who deride the superfluous interactions are correct if all you do is add novelty to your course. The interactions get old fast. And while visual design and onscreen interactivity plays a role in engaging the learners, it’s not the main way to engage the learners. All of those things need to be in concert with a great learning experience and coupled with the course’s content and learning objectives.

However, if you neglect crafting an immersive experience you miss the opportunity to really engage your learners and building effective and interactive elearning courses.

What are some ways you’ve used onscreen interactions to immerse learners in your elearning courses?

Events

Free E-Learning Resources

Want to learn more? Check out these articles and free resources in the community.

Here’s a great job board for e-learning, instructional design, and training jobs

Participate in the weekly e-learning challenges to sharpen your skills

Get your free PowerPoint templates and free graphics & stock images.

Lots of cool e-learning examples to check out and find inspiration.

Getting Started? This e-learning 101 series and the free e-books will help.


Articulate Rapid E-Learning Blog - what do you love and hate about e-learning

The infographic below shows the results of a recent survey we conducted on what people love and hate about elearning and online courses. I’ve included a few of my thoughts.

The E-Learning Industry is Hot!

The industry is growing like crazy. This is good because often the training people are the first to get cut when companies restructure. However, many of the emerging technologies and devices (like mobile apps) are centered on learning. Instead of training being the first group on the chopping block, today it plays a key role in the evolution of online courses and learning moving forward.

E-learning is still relatively new and many organizations are still making the move to online courses. The authoring tools offer plenty of capability, but the next step in the process is making all of these online courses effective. That’s where you come in.

What About Those That Take the Online Courses?

I routinely ask my friends and neighbors what types of online courses they take at work and how they feel about it. Usually the feelings are mixed. They tend to find the online courses boring, but prefer them over going to a class.

The survey shows that most people want relevant content and almost as many prefer decision-making scenarios. One value of elearning is its flexibility to the organization and the learner. However, too often we focus on pushing content out efficiently and lose sight of the other benefits of elearning. However, online courses can be so much more than a bunch of screens of information. What can you do to change that?

What Do YOU Love and Hate About E-Learning?

Share one thing you really like about elearning and one thing you don’t like. Here are a couple of my thoughts.

What I like:

I like that I am part of an evolving industry. Things are changing fast. When I first started we were using overhead transparencies and 35mm slides. Today, not only do the online course creators have more options, but so do those who participate. Virtually everyone carries a small production studio with them at all times via their smart phones and tablets. It’ll be cool to see more of those capabilities integrated with learning and the online courses created.

What I don’t like:

The thing I don’t like about elearning is that the organizations that purchase the software don’t commit adequate resources to help their staff build better online courses. Many of the people I meet stumble into elearning from a more traditional training background. Thus they need more than the software to get up to speed. They also often don’t get a budget or resources to create the appropriate assets like graphics and other media. This just sets them up for failure and perpetuates a lot of the negative feelings people already have about online courses.

That’s what I love and hate. What about you?

love-e-elarning

Click to learn more.

Events

Free E-Learning Resources

Want to learn more? Check out these articles and free resources in the community.

Here’s a great job board for e-learning, instructional design, and training jobs

Participate in the weekly e-learning challenges to sharpen your skills

Get your free PowerPoint templates and free graphics & stock images.

Lots of cool e-learning examples to check out and find inspiration.

Getting Started? This e-learning 101 series and the free e-books will help.


Articulate Rapid E-Learning Blog - how to create illustrated characters in PowerPoint

PowerPoint is a versatile application. You can use it for all sorts of things from presentations to online training programs. In previous posts I’ve shown you how to customize clip art and create your own graphics.

Today’s tip comes courtesy of blog reader, Daniel Albarrán. He sent me an email stating that once he understood the versatility of PowerPoint it opened his eyes to all sorts of possibilities—one of them being the ability to create illustrated characters.

How to Create Illustrated Characters in PowerPoint

Here are some of the graphics he created in PowerPoint.

Articulate Rapid E-Learning Blog - examples of illustrated characters created in PowerPoint

Articulate Rapid E-Learning Blog - more examples of illustrated characters created in PowerPoint

As you can see, PowerPoint’s a capable application. Pretty cool, huh?

Tips When Creating Illustrated Characters in PowerPoint

Want to create your own illustrated characters? I created a couple of more tutorials with a few extra tips to add to what Daniel started. You can view the tutorials below.

Part 1: Working with PowerPoint’s curve shape.

Click here to watch the PowerPoint tutorial.

Part 2: Working with the custom shapes.

Click here to watch the PowerPoint tutorial.

Here’s a roundup of the PowerPoint tips:

  • Practice using the Curve tool so that you can control the curve and not create too many points. The fewer the points, the easier it is to edit.
  • Edit the shape. Right click on the shape to access the Edit Points feature. From there you can move the points and make adjustments and small tweaks.
  • Show & hide shapes using the Selection Pane.
  • Name the shapes in the Selection Pane for easier management of the image.
  • Use the Shape Union feature to merge the shapes. You can also group them if you want editing control in the future.
  • Right click to save the image. Select .png format to retain the transparency.
  • Don’t worry about being perfect. Also, the less detail the easier it is.
  • Practice, practice, practice. Once you get the hang of it, you’ll never want for the right image. Play around with the gradients and layered objects to create more texture and richness.

Articulate Rapid E-Learning Blog - an illustrated character created in PowerPoint

Here’s the character I created for the tutorials and the one Daniel shared with me. Feel free to look at how they were created.

Now it’s up to you. Do a practice character and see how it goes.

Events

Free E-Learning Resources

Want to learn more? Check out these articles and free resources in the community.

Here’s a great job board for e-learning, instructional design, and training jobs

Participate in the weekly e-learning challenges to sharpen your skills

Get your free PowerPoint templates and free graphics & stock images.

Lots of cool e-learning examples to check out and find inspiration.

Getting Started? This e-learning 101 series and the free e-books will help.


Articulate Rapid E-Learning Blog - offer bribe to avoid course because of bad course objectives

The key to success is having clear goals and then mapping out a way to meet those goals. Without the map, you’ll never know if you got where you intended to go. In a previous post we looked at how to build learning objectives. Today we’ll take it a step farther and look at a simple process that will help structure the objectives around measurable actions.

What’s the Purpose of the Course?

There are many courses that exist for reasons other than performance improvement. For example, a lot of annual compliance or things like sexual harassment training are usually more about the awareness of policies and less about actionable activities.

Articulate Rapid E-Learning Blog - course objectives come from understanding the type of course

On the other hand, there are many courses that do expect that upon completion the learner is able to do something specific. Perhaps they’ve learned a new procedure or how to apply a given policy in the work environment.

Understanding the type of course you build is important because it’ll help you craft the appropriate types of objectives, measure their success, and help you manage your resources.

Ask These Questions to Create Your Course Objectives

Once you understand why you’re building the course you can focus on who is going to take it, why, and what expectations exist after the course. One way to begin is by answering the questions below.

  • Who is the learner
  • Why is this important to him?
  • In what situation would he use this information?
  • What is the course objective?
  • How does he prove that he’s met the objective?

I create a simple table to look over the answers. Here’s an example based on my experience working for some large organizations.

Articulate Rapid E-Learning Blog - blank table to build course objectives

As part of our ethics training, there was a course on how to deal with bribes. This course was important because we had a number of international sites and many of our sales and procurement staff had to deal with bribery as part of the business culture. Even though we only had a handful of international staff, everyone who took the ethics training had to take the bribery course, regardless of getting bribed.

For the international staff the bribery course was performance-based. We had specific behavioral expectations. For all of our other staff, the objective wasn’t centered on their performance. Instead the objective was to build awareness of the company’s policies on bribery which fit into the larger context of being an ethical organization.

Here’s an example of how this I could have completed the table for this course and the tow different audiences.

Articulate Rapid E-Learning Blog - example of completed table to identify course objectives

Click on the image to see a larger version.

You’ll notice that I broke out the two types of learners and their course objectives. For those who encounter bribes, we focus on the performance aspect. As we build the course, we want to create the types of situations they encounter and have then make the decisions that are in line with the organization’s policies.

For the IT analyst who is never bribed, we create a scaled down course. There’s no need for them to go through time-wasting situations not relevant to their job expectations. In their case, the objective is general awareness of the policy. Presenting the content in an engaging manner and having them certify their understanding is all we need.

A few key thoughts:

  • Build the course appropriate to the performance expectations of the learner. If none exist, then don’t force them through the same type of course for those who do have performance expectations. Taking a course costs time which is equal to money. And pulling someone from their work to go through irrelevant scenarios is a time-waster.
  • Don’t overstate the importance of the course. Subject matter experts have the tendency to do this. In this example, the temptation is to suggest that everyone needs to be able to make the appropriate decisions so they should all go through the same training. While it’s technically true if presented with a situation everyone should make the right decisions, but forcing people to take certain types of training because of some remote chance that they’ll be bribed is a waste of time.
  • Focus on how the learners will prove their understanding. Are they able to make the right decisions in certain situations? How do you know? If the person needs to make certain types of decisions in certain situations then make that the burden of proof. Create situations like they’ll encounter in the real world and have them demonstrate their understanding through the decisions they make. If they don’t encounter those situations, then the level of understanding centers on general awareness. Instead of a decision-making situation, you can focus on the principles that drive the policies. Perhaps a simple case study would do the trick.

I know that some people say the non-performance courses shouldn’t even be built. They should be job aids. Perhaps. But they do get built and often you’re not in a position to force that change. By understanding what the organization expects from the learner you’ll be able to craft good course objectives and determine the appropriate proof to ensure they’ve been met. If they have performance expectations focus on what you want them to do. If it’s about policy awareness, certify their understanding with a simple quiz.

How do you determine the course objectives in your training programs?

Events

Free E-Learning Resources

Want to learn more? Check out these articles and free resources in the community.

Here’s a great job board for e-learning, instructional design, and training jobs

Participate in the weekly e-learning challenges to sharpen your skills

Get your free PowerPoint templates and free graphics & stock images.

Lots of cool e-learning examples to check out and find inspiration.

Getting Started? This e-learning 101 series and the free e-books will help.


Articulate Rapid E-Learning Blog - create interactive stories with simple pictures and comic-book like panels

The other day I was doing a search for business meeting images and ran into this collage image. It kind of looks like a comic book layout. I played around with some ways to use this image in an elearning course.

Articulate Rapid E-Learning Blog - create an interactive story with this collage image

Here’s a quick demo of the image converted into an interactive slide. I just added some place holder content since the images are not contextual. But in your case, you’d create a collage where the images work together to tell a story.

Articulate Rapid E-Learning Blog - example of an interactive story to replace bullet points

Click here to view the interactive story demo.

Tips & Tricks for Creating an Interactive Story

Here are a few ideas on how you could approach this type of interaction:

  • Create a story. Many courses tend to be heavy on the information and light on relevant context. Rework your content and frame it like a mini story or scenario. In this case, it’s not about a long branched interaction. It’s more like a quick scenario where the course content is framed in a relevant context. People love stories so why not build a story around your information? Plus, the comic-book style layout is kind of popular.
  • Get rid of bullet points. A lot of elearning is linear and the screens are loaded with bullet points. Get rid of those bullet points! Why not use a panel for each bullet point? I’d use the large panel to represent the essential point of the slide. And the smaller panels would represent the bullet points or supporting information.
  • Feel free to take your own photos. You don’t need to be a pro to create your own stock photos. Besides many of the smart phones have those cool filters that convert your images and give them a pro feel. So outline a story and then storyboard the photos you’d need to support that story.
  • Create a few panel layouts so that you can rotate through your screens and make them visually a bit different. This post on comic book layouts will help come up with some ideas.

This is a simple technique but and an easy way to convert bullet point slides into something a bit more visually engaging. And with a little effort you can frame the information into something more story-like and interactive. It’s a step away from a content dump and a step into meaningful content.

What do you think? Would this work with any of your elearning courses?

Events

Free E-Learning Resources

Want to learn more? Check out these articles and free resources in the community.

Here’s a great job board for e-learning, instructional design, and training jobs

Participate in the weekly e-learning challenges to sharpen your skills

Get your free PowerPoint templates and free graphics & stock images.

Lots of cool e-learning examples to check out and find inspiration.

Getting Started? This e-learning 101 series and the free e-books will help.