The Rapid Elearning Blog

Archive for the ‘Production Tips’ Category


share courses

If you’re not using Rise.com or a learning management system to manage your e-learning courses, then you’ll need another way to upload courses to a web server to share. This is especially true if you’re maintaining a professional portfolio in one of those simple website builders like Wix where you can’t upload your published course files.

In an earlier post we looked at using Amazon S3 to share courses and today we’ll look at using Google Cloud.

  • With Google Cloud, you create an account and add a project.
  • From there you create a bucket to hold the content folder.
  • You upload files and folders (or published e-learning courses).
  • Then you add permission to access them. This generates the URL you can share with others.

Google gives you 5 GB free, and odds are you will never have to pay for the service unless you have a lot of content. And even then, it’ll only cost a few dollars a year at most.

Share Courses Tutorial

Here’s a quick tutorial that walks through how to create the Google Cloud account and get it all set up to share courses. If you have questions or need help with this, the Google Cloud site has lots of handy tutorials to help.

View the tutorial on YouTube.

Resources

Events

Free E-Learning Resources

Want to learn more? Check out these articles and free resources in the community.

Here’s a great job board for e-learning, instructional design, and training jobs

Participate in the weekly e-learning challenges to sharpen your skills

Get your free PowerPoint templates and free graphics & stock images.

Lots of cool e-learning examples to check out and find inspiration.

Getting Started? This e-learning 101 series and the free e-books will help.


share courses Amazon S3

Ideally you have an LMS or using a product like Rise.com to share your e-learning courses. However, there are many times you don’t need a formal management system. For example, you may maintain a professional portfolio where you share courses and work samples.

Amazon S3 is an easy way to do this. And it’s relatively simple : create the account, upload your files, create a URL, and let people access the content. The cost is nominal. Odds are you won’t pay anything and if you do, it’s only a few dollars a year.

Share Courses with Amazon S3 Tutorial

Here’s a quick tutorial that walks through how to create the account and get it all set up. I also show how to use Cloudberry Explorer (another free product) to manage uploading and creating the URL.

View the tutorial on YouTube.

Resources

Events

Free E-Learning Resources

Want to learn more? Check out these articles and free resources in the community.

Here’s a great job board for e-learning, instructional design, and training jobs

Participate in the weekly e-learning challenges to sharpen your skills

Get your free PowerPoint templates and free graphics & stock images.

Lots of cool e-learning examples to check out and find inspiration.

Getting Started? This e-learning 101 series and the free e-books will help.


How to View Old Flash Courses

February 15th, 2022

view swf flash files

The death of Flash has created a mess for many e-learning developers who have to look for things in older e-learning courses that were published in Flash.

I run into that a lot in the community and with some of my old demos on this blog. It sure is a pain. Not being able to see the file makes it a challenge to recall what was in it or to even know what to look for to update it and republish.

The good news is that I found this thread in the community recently where Sarah shared a link to a Flash player that may help you view old courses. Below is a quick tutorial on how to use it.

Click to view the tutorial.

There’s no guarantee that these links will work forever, I’d download them now, so you have a copy.

Hope that helps those who need to view older Flash courses.

Events

Free E-Learning Resources

Want to learn more? Check out these articles and free resources in the community.

Here’s a great job board for e-learning, instructional design, and training jobs

Participate in the weekly e-learning challenges to sharpen your skills

Get your free PowerPoint templates and free graphics & stock images.

Lots of cool e-learning examples to check out and find inspiration.

Getting Started? This e-learning 101 series and the free e-books will help.


extract image e-learning

When I create presentations for our webinars or workshops, I like to use the imagery from our e-learning community or the Articulate website. They’re on-brand and with the illustrations, we have a lot from which to choose. When I created training at previous organizations, I did something similar.

If you need to collect images from your company site to use in your training this tip should help.

Usually when I find an image, I right-click to save. However, this is a bit tedious.

website images

Here are two simple ways to see all the downloadable images and save them.

Image Extractor Extension

Use the image extractor extension in your browser. When you get to a page on your website, click the extension and it will isolate all the images. You can review what’s there and then download what you need.

free image extractor

Image Extractor Site

Another option is to use the Image Extractor site. Add a URL and it opens a browser via the server and extracts the images. It does an excellent job filtering images and removing tracking images. It also identifies the types of images and you can do a batch download.

image extractor

Here are a few considerations:

  • This is not intended to help you steal images and content from sites where you own no rights.
  • Be sure to properly credit sources.

There you go. Two simple ways to extract images from your website.

Events

Free E-Learning Resources

Want to learn more? Check out these articles and free resources in the community.

Here’s a great job board for e-learning, instructional design, and training jobs

Participate in the weekly e-learning challenges to sharpen your skills

Get your free PowerPoint templates and free graphics & stock images.

Lots of cool e-learning examples to check out and find inspiration.

Getting Started? This e-learning 101 series and the free e-books will help.


e-learning interactions

In a recent workshop on creating interactions, we looked at ways to take a single image and create interactive content. It’s a good practice activity because many of us aren’t graphic designers so it helps us see different ways to use stock imagery that doesn’t require a lot of editing. And it gets us to think about interactive content in ways we may not initially consider.

The general idea is to find a single image that you can use for an interaction. A few things I look for:

  • Visually interesting. I’m not a graphics designer and design fashion changes every few years. I try to find images that feel new and modern.
  • Content areas. Since I’m using a single image and it’s the unifying graphic, I look for places to add content. Sometimes it does require placing a box or some other container shape over the image, but I try to find open space in the image that works for content. In the three examples below, the computer has a good content area, the teens illustration has a middle section that is empty, and for the business collage I created a side panel.
  • Visual context. Try to find images that offer visual context so it fits the context of the course content. Generic things like offices and desks work great.

Here are three examples that we’ve covered in the past that demonstrate this idea of using a single image with some interactive elements.

Exploratory E-learning Interaction

zoom office e-learning interaction

Click here to view the demo interaction.

In this example, a single image provides some office-like context. This could be used as an exploratory interaction, when clicking on objects exposes additional content. Ask a question. Looks for clues to answer them.

Original post: Create an Interactive Course Using a Single Image includes free download.

Meet the Team E-Learning Interaction

meet team e-learning interaction

Click here to view the demo interaction.

The original example was used to highlight counting clicks with variables. However, the single image could be used to click on a character to glean more content such as a “meet the team” activity. The center area is a perfect place to display content.

Original post: E-Learning Tutorial – Easy Way to Make an Image Interactive

Business Collage E-Learning Interaction

business e-learning interaction

Click here to view the demo interaction.

I like these types of collage images because there are plenty of those types of images to be found. The original was built in PowerPoint. The demo above was rebuilt in Storyline. Here’s a download with both files if you want to deconstruct them.

Original post: Here’s a Simple Way to Convert Your Course to an Interactive Story

Hopefully, this gives you some inspiration. If you want a good starting point, do an image search for collages and you’ll find some interesting ideas.

Events

Free E-Learning Resources

Want to learn more? Check out these articles and free resources in the community.

Here’s a great job board for e-learning, instructional design, and training jobs

Participate in the weekly e-learning challenges to sharpen your skills

Get your free PowerPoint templates and free graphics & stock images.

Lots of cool e-learning examples to check out and find inspiration.

Getting Started? This e-learning 101 series and the free e-books will help.


e-learning save money

Online training is hot right now. And between video chat services like Zoom and course authoring tools like Articulate 360, there’s a lot of content creation.

Since creating the e-learning content is easy, there’s often an increased demand to create yet more online training. And with that demand is the need to manage resources, which for most training organizations is limited.

Any opportunity to save time (and money) is a good thing. Here are three ideas to help manage your e-learning resources. They help improve development time and decrease the costs to build courses.

Don’t Create an E-Learning Course

Organizations often think that their problems are solved through more training. Need better sales? Create a new training program. Have a new policy? Create a new training program? Want to change the world? Create a new training program.

See how that works?

There’s a cost to build the training and a cost for each person who must take it. If you can prevent the organization from creating training courses, do it.

The truth is training can help meet goals and solve problems. But it’s just one part of the solution. It’s important to help the organization better understand it’s needs and then guide them to the best solution. And sometimes, that means no training is required.

Use Kuhlmann’s E-Learning Hierarchy

I have a simple hierarchy model that that I started using years ago. All of the e-learning gets built with the fastest and easiest tool. And from there any deviation needs to be justified.

It doesn’t mean we don’t do other things. It just means we don’t do other things for the sake of novelty or because we can.

kuhlmann's e-learning hierachy

Look at Articulate 360. It comes with Rise 360 and Storyline 360. Rise 360 is formed based and extremely easy to use because most of the heavy lifting is done for you. Most e-learning content is on the explainer side of things. That type of content is easily assembled and delivered in Rise 360. Why spend extra time and resources on custom interactivity in Storyline 360?

There are times where custom interactivity is warranted. In that case, use Rise 360 and add custom interactions from Storyline 360. And then there are times where a form-based solution like Rise 360 isn’t the right tool and Storyline’s freeform authoring is the better choice.

Kuhlmann's e-learning hierarchy applied to Articulate 360

The hierarchy isn’t designed to NOT build good e-learning and avoid complex and custom courses. Instead, it’s designed to help manage the production process and your limited resources. The more you can do quickly for less, the more you have available when it’s really required.

Don’t Repurpose Existing Content

As noted above, most e-learning courses are explainer content and not performance-heavy. This is fine because the course is a lot like a book. You consume the content to get exposed to ideas and information, but the application (or interactivity) happens elsewhere, whether that’s personal reflection or activities in the real world.

Often the explainer content already exists in some other digital format in the organization. And what happens is the instructional designer converts that content into a “course.” Instead of repurposing the content, create a course that teaches how to find and use the information. This helps them learn to use the existing resources they may need, and they’ll always know where to locate them after the training event.

I like to set up mini real-world scenarios where the learner needs to make a decision. And the objective is to learn to locate and use the existing resources. Doing this makes the courses lighter and you don’t need to update them every time the source content is changed or modified.

You have limited resources. Hopefully, the steps above help think through how you’ll manage them.

Events

Free E-Learning Resources

Want to learn more? Check out these articles and free resources in the community.

Here’s a great job board for e-learning, instructional design, and training jobs

Participate in the weekly e-learning challenges to sharpen your skills

Get your free PowerPoint templates and free graphics & stock images.

Lots of cool e-learning examples to check out and find inspiration.

Getting Started? This e-learning 101 series and the free e-books will help.


closed aptions for e-learning

A guest post by Elizabeth Pawlicki, Training Program Manager, Articulate.

If you’re a Google Chrome 89+ user you now have access to Live Caption which is an accessibility feature that provides real-time captions for audio that plays through the browser.

This is a really excellent feature for audio that runs through your browser when viewing courses that have videos or narration, especially if the audio doesn’t have captions. Check it out below.

Initial Thoughts on Google Live Caption

I tested the Live Captions on a few different e-learning products that had audio including courses in Storyline 360, Rise 360, and Review 360. The captions worked well, surprisingly well, as you can see in the image below.

Google Live Caption demo closed captions

I also like that even if you turn off the audio, the captions work. As a user I am no longer constrained by whether or not the audio I am consuming has closed captions built-in to the product. The browser does the heavy lifting.

This is a big step forward for those who require captioned audio. I look forward to how this feature evolves going forward.

How to Access Google Live Caption

Google Live Caption closed captions

  • First, make sure you’re using Google Chrome 89 or higher.
  • Click the three dots on the top right.
  • Then go to Settings and select Advanced>Accessibility.
  • Click the toggle for Live Caption.

Once you have enabled Live Caption, you’ll see an option to toggle the captions on and off without going in and out of the settings.

Google Live Caption closed captions toggle

Key Considerations for Google Live Caption

  • This tip requires Google Chrome 89 or above. If you have learners who need captions and you can’t provide them in time, you at least have the option to recommend Chrome 89.
  • It’s a new feature so there are some limitations such as size, position, and language. However, I assume the feature will be enhanced and my guess is other browsers will play catch up.
  • From what I can tell the caption choices in Windows OS don’t seem to impact the captions displayed in the browser.

Google Live Caption is a step in the right direction and a great tool for those who need captions when they’re not provided.


Events

Free E-Learning Resources

Want to learn more? Check out these articles and free resources in the community.

Here’s a great job board for e-learning, instructional design, and training jobs

Participate in the weekly e-learning challenges to sharpen your skills

Get your free PowerPoint templates and free graphics & stock images.

Lots of cool e-learning examples to check out and find inspiration.

Getting Started? This e-learning 101 series and the free e-books will help.


test e-learning templates

Articulate 360’s Content Library comes with thousands of e-learning templates. Each template is made up of theme fonts and theme colors. Theme fonts and colors are an easy way to manage and update course files.

Here’s a common issue and easy solution when troubleshooting e-learning courses. Instead of using theme colors many developers do quick color picks or custom colors. This is fine until you need to make a change to the slide and the colors aren’t updating when you change the theme color.

Our template developers have a simple technique to check the theme colors and make sure that they’re used throughout the various template slides.

test theme colors e-learning template

Here are the steps:

  • Create a new color theme.
  • Make every color bright yellow.
  • Save the theme colors.
  • When you apply this theme, everything on the slide should use those colors.

Whenever you need to test a template to ensure it’s using the theme, apply that test theme color. Everything on the slide should be bright yellow. Whatever isn’t, is not using a theme color. That makes it easy to fix issues on the slides.

e-learning template theme color

The example above, when I apply the yellow test theme, all of the objects change except the purple circle because that’s not using a theme color.

Simple tip. Easy to do. And a big timesaver if you use theme colors, which you should.

Events

Free E-Learning Resources

Want to learn more? Check out these articles and free resources in the community.

Here’s a great job board for e-learning, instructional design, and training jobs

Participate in the weekly e-learning challenges to sharpen your skills

Get your free PowerPoint templates and free graphics & stock images.

Lots of cool e-learning examples to check out and find inspiration.

Getting Started? This e-learning 101 series and the free e-books will help.


how to theme colors

When someone first starts to build an e-learning course, one of the first things I recommend is determining the colors they’ll use. And from there, create a template and assign the theme colors.

The benefits to theme colors is that they allow consistent use of colors throughout the course; and if one needs to change, it can be changed once, and that change is applied wherever the color is used.

The next recommendation is to determine how to use theme colors. This is often confusing because, you get six theme colors and five derivatives per color. However, there’s no rhyme or reason in terms of how they should be used. They’re just six boxes that can be filled with colors. You can use those boxes anyway you like.

theme colors

But that’s not how you should use them.

I recommend that you define a theme color structure and then use them consistently. This way, every time you build a course the theme colors are set up the same and you can easily swap them out when needed.

How to Set Up Theme Colors

Here are a few ideas that may work:

  • You get six theme colors. But you don’t really need to use all six.
  • Define how you do want to use the colors, whether it’s six or four or two.

theme colors

  • Use theme colors consistently in all templates you create.
  • Courses usually have a main color and an accent color. If you only used two colors, you’d have twelve to use because of the iterations. That may be all you need.
  • Most courses have some positive and negative feedback color, usually green and red. Use two of the theme colors for positive and negative feedback.

Here is one way you could define your theme colors:

theme color recommendation

  • Accent 1: base color. Usually this is your core brand color.
  • Accent 2: accent color. Most brands have an accent color. If you don’t have one, you can use a color theme site to create one. I typically will select a complementary color of the base color.
  • Accent 3: open. Why create a color you don’t need?
  • Accent 4: open.
  • Accent 5: positive color. Green pulled from the base color’s palette. Use this for quiz feedback or icons to show a good decision.
  • Accent 6: negative color. Red pulled from the base color’s palette. Use this for quiz feedback or icons to show a wrong decision.

For the two open colors, I may look through my organization’s web site and marketing collateral and see if there are other secondary colors used that I could add to the palette. Most of the times, two colors are all I need.

If every course is built with consistent use of theme colors, they can be swapped in seconds. This is a critical part of building and re-using interactions and templates. It’s a little more work upfront (which should be done anyway). But in the long-term it offers some time-saving benefits.

Do you have a strategy when using theme colors?

Events

Free E-Learning Resources

Want to learn more? Check out these articles and free resources in the community.

Here’s a great job board for e-learning, instructional design, and training jobs

Participate in the weekly e-learning challenges to sharpen your skills

Get your free PowerPoint templates and free graphics & stock images.

Lots of cool e-learning examples to check out and find inspiration.

Getting Started? This e-learning 101 series and the free e-books will help.


accessible e-learning retrofit

A guest post by Elizabeth Pawlicki, Training Program Manager, Articulate.

Many e-learning designers are challenged because they don’t often build accessible e-learning courses. So, they’re not sure what accessibility means and how it impacts course design.

In a recent webinar, we discussed general ideas around accessible e-learning, common design challenges, and some ways to overcome them. One of the tips was to plan for accessibility from the start because it’s not a good idea to retrofit 508 or WCAG compliance into existing e-learning courses.

An attendee asked, “What’s wrong with retrofitting a course?”

Good question.

Understanding Accessible E-Learning

Imagine a city that already exists full of apartment buildings, skyscrapers, and transit systems. And then the city council implements a law that says there must be a half-acre of park every two square miles.

How will you accomplish that?

You either must tear down what you’ve already built or try to squeeze the bare minimum of acceptable “parkland” into your existing space. Since the parks weren’t an initial consideration, you do what you can to meet minimum guidelines, but you may not meet the aspirational goals of the intent of more parks.

And that’s often the case with e-learning courses that weren’t built with accessibility in mind. The retrofitted courses may appear to meet the minimum requirements but may not offer the best user experience; and they may not actually meet the requirements if all you did after-the-fact was apply accessible features to the original content.  And of course, all of that retrofitting costs a lot of extra time and money.

Challenges Retrofitting Accessible E-Learning

There’s a lot that goes into creating an e-learning course like consulting with subject matter experts, writing scripts, developing prototypes, presenting content to stakeholders, and iterating on the prototypes you have created. In the end, you have a published output that everyone has agreed upon.

When you try to retrofit a completed course, it may seem easy and straightforward. But once you begin to uncover how much needs to be undone, redone, and how many people could and should be involved in that process, you’ll find it’s more costly, time-consuming, and downright difficult. This is especially true when you consider the interactive nature of e-learning and how different users access the content.

Therefore, it’s important to consider accessibility as part of the initial production process so that you understand what’s required and build a course that meets everyone’s needs. If you start with accessibility in mind, you’re considering everyone. Everyone will feel included because they are.

Want to learn more:


Events

Free E-Learning Resources

Want to learn more? Check out these articles and free resources in the community.

Here’s a great job board for e-learning, instructional design, and training jobs

Participate in the weekly e-learning challenges to sharpen your skills

Get your free PowerPoint templates and free graphics & stock images.

Lots of cool e-learning examples to check out and find inspiration.

Getting Started? This e-learning 101 series and the free e-books will help.


3 ways to use theme colors for e-learning

One way to speed up production in your e-learning course design is to use themed slides. You can create robust and visually varied templates like the ones you get in Content Library. The templates are a combination of layouts and two themed elements: fonts and colors. However, you don’t need to have a complex template to leverage theme colors.

Theme colors allow you to pre-determine the colors you’ll use in your course’s slides. There are several benefits and reasons when using theme colors.

Make Easy Updates to Theme Colors for E-Learning

Here’s a common scenario: insert an image and then do a color pick of the image to pull a color to use for outlines or shapes in the course. Later someone suggest changing the color. The challenge is going through every slide and making changes where that color was used.

Use theme colors to quickly modify all the objects with that same theme color. This doesn’t require a lot of consistency in terms of how you use the colors. It just means that if you do a color pick, for example, you add that to one of the accent colors so you can apply that accent color through the course.

If you have red shapes and they need to be blue, if you used a theme color to fill the shape all you need to do is change the theme color.

theme colors for e-learning templates

Create a Loaded Palette of Theme Colors for E-Learning

You get six accent colors, and each has five derivatives. You don’t need to have a real strategy when using theme colors. You get six slots. Figure out what six colors you need in your course and then create a palette, so you always have those six available to you.

You can use the colors willy nilly with no consideration to any real structure. The key advantage is having a palette of desired colors on hand.

theme colors for e-learning templates to have a palette

Develop a Strategy for Theme Colors for E-Learning

Assuming you build a lot of templates and you re-use them, then it makes sense to be strategic about how you use the theme colors. You get six slots. Use them the same way every time you create a theme color. That makes it easy to create a new theme and re-use templates because you know that the theme colors are applied the same way to the same objects.

Determine how you want to use the color slots and then use them that way consistently. This allows you to quickly apply new color themes knowing that the entire template will change, and the colors will make universal changes to the entire course.

theme colors for e-learning templates for universal changes

Some people are very strategic an organized in how they use theme colors. And some just use them with no sense of structure. They just want a place to load some colors and have quick access. That’s fine, too.

What you want to avoid is using single colors outside the theme that can’t easily or quickly be updated later. Theme colors help prevent that and save time when building courses whether your strategic or just using a palette.

Events

Free E-Learning Resources

Want to learn more? Check out these articles and free resources in the community.

Here’s a great job board for e-learning, instructional design, and training jobs

Participate in the weekly e-learning challenges to sharpen your skills

Get your free PowerPoint templates and free graphics & stock images.

Lots of cool e-learning examples to check out and find inspiration.

Getting Started? This e-learning 101 series and the free e-books will help.


e-learning template

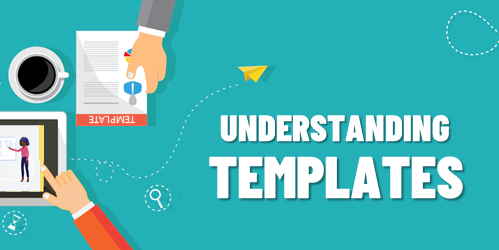
Templates offer a lot of value and power in your e-learning course design. They help keep things consistent, provide a good starting structure, and they make it easy to swap and replace theme elements.

The main benefit of a template is saving time. But templates come with constraints and when attempting to customize them you may be robbed of the time saved. This is something I see all the time when working with e-learning developers.

To keep things simple, I like to consider templates from two perspectives.

Option 1: The E-Learning Template is Plug and Play

Use a template where the layout and all its features are pre-determined. The goal here is to select a templated screen and expect to make minimal changes. The value of the template is that everything is there and all you need to do is add your content.

e-learning template

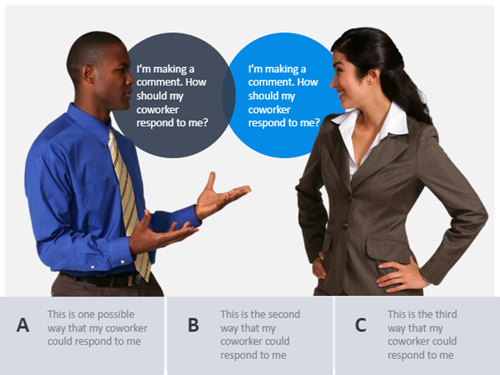
All you want is a slide with a specific look and swap out the placeholders for your course content. You don’t want to change layouts, redesign the slide, add new elements, or customize colors.

The core value is that the template is pre-designed and all you do is add content. This is great for quick authoring and for the person who has limited graphic design experience.

Option 2: The E-Learning Template is Customizable

Use a template where all the features are themed. This usually consists of layouts, colors, and fonts. The value of this type of template is that you can easily modify it by making universal changes to the theme elements. And those changes are applied across all the slides in the course.

e-learning template themes

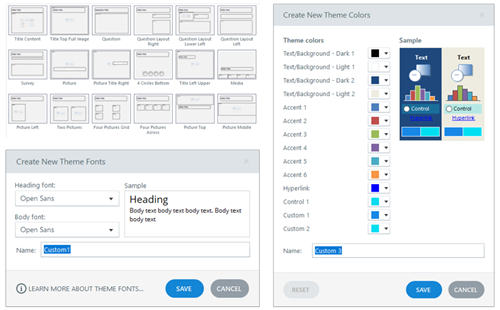
This second perspective requires a bit more forethought and restraint in using the features. For example, all the text and colors on the slide need to use theme text and colors. Also, all layouts need to be mapped to the same placeholders, otherwise, they’re not interchangeable.

Avoid the Mushy Middle

Think of these two perspectives as two ends of a spectrum. On one end you have the convenience of a pre-built screen that only requires content. Select it and add the content.

On the other is a screen that is built to be modified. It’s not tied to content but the theme elements.

e-learning template spectrum

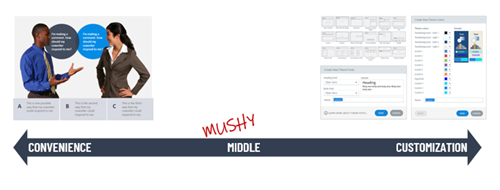
Realistically, you can do both by making a designed slide with themed elements. But…and this is a big but (cue Pee Wee Herman) most of the issues I see when people work with templates is that they want the convenience of plug and play and then they want to customize, too. Inevitably this leads to a lot of time wasted trying to make things work.

So, I usually recommend this: if you use a template you didn’t create, accept the fact that what you select is what you get and all you need to do is add your content. Don’t expect to import it and then begin to make too many edits. At that point you lose the power of what the template gives you.

Or…

Create your own templates. Design specific layouts and multiple versions of them. For example, if you build a tabs interaction, design a 3-tab, 4-tab, and 5-tab version. Don’t just design a 3-tab and expect to modify it.

When you build the slide template, only use theme elements.

  • That means you use create placeholder layouts and use them consistently on the various slides.
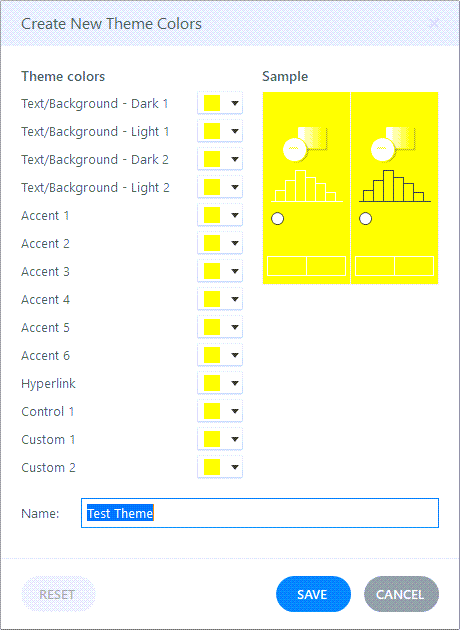
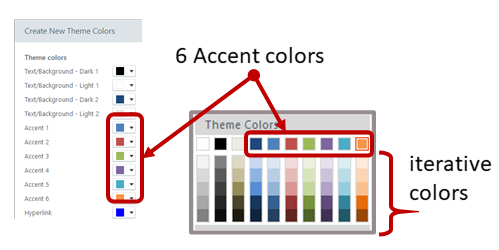
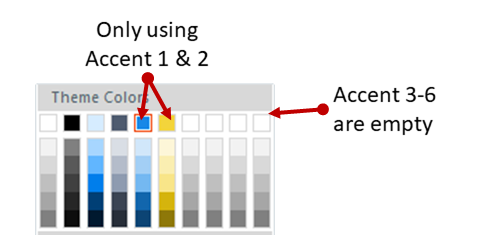
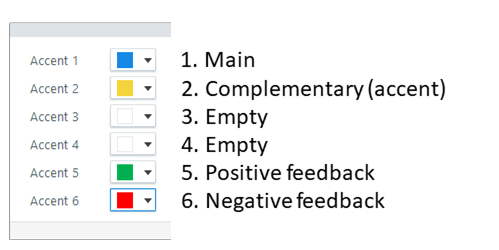
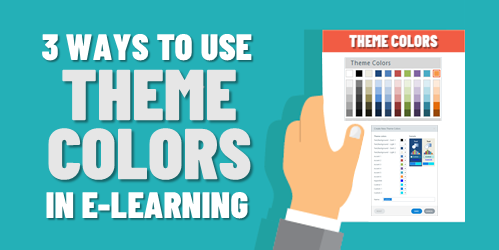
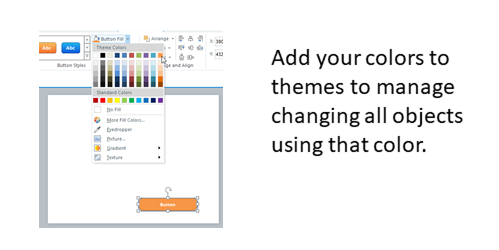
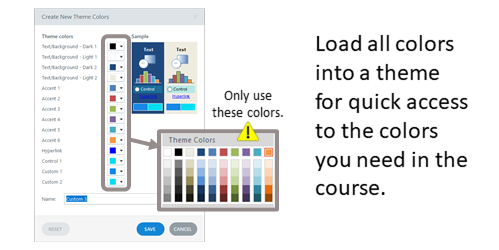
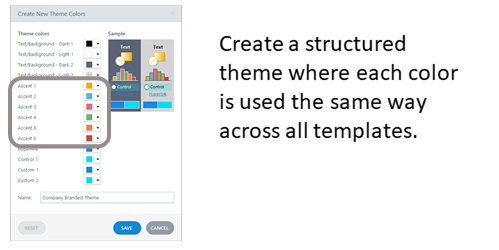
  • Determine your theme colors and only use colors from your theme. And use them consistently.
  • Set your theme fonts (usually a heading and body). And all text on the screen uses the theme font. You don’t insert that one cute curly font to make your course engaging. One, it isn’t engaging. And two, it’s not a theme font.
  • Before using a template like that, you determine a new theme font and color scheme. And then insert the slide and apply the new theme elements.

Notice how the first option is just plug and play and the second requires a lot more intention and more production? That’s the big consideration. The template should provide some time-saving guidance. If you need to make a bunch of tweaks or mess things up because you didn’t plan on the theme elements, have you really saved any time? Did the template offer real value?

There you have it: two perspectives on when to use a template. Use it as is for quick authoring with minimal changes. Or use templates where you can make universal changes to the themes and quickly create new looks.

Events

Free E-Learning Resources

Want to learn more? Check out these articles and free resources in the community.

Here’s a great job board for e-learning, instructional design, and training jobs

Participate in the weekly e-learning challenges to sharpen your skills

Get your free PowerPoint templates and free graphics & stock images.

Lots of cool e-learning examples to check out and find inspiration.

Getting Started? This e-learning 101 series and the free e-books will help.