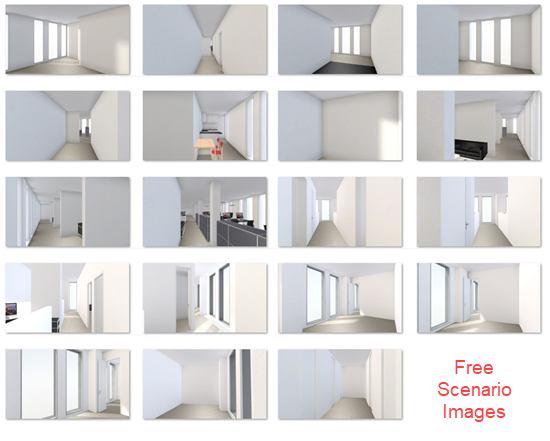
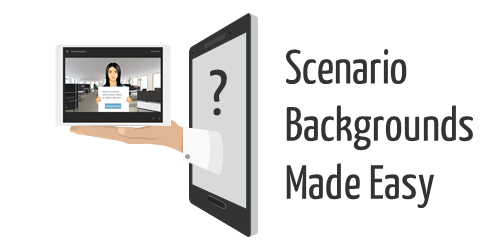
Here are some free images for interactive scenarios. They go with the other free images I shared earlier. I use them for practice files in our e-learning workshops where we learn to build interactive, branched scenarios. They’re perfect for your scenario-based training and free to use.
These images are focused on hallways and such and a bit more generic with the white walls.
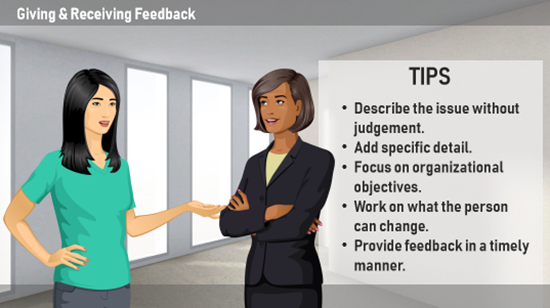
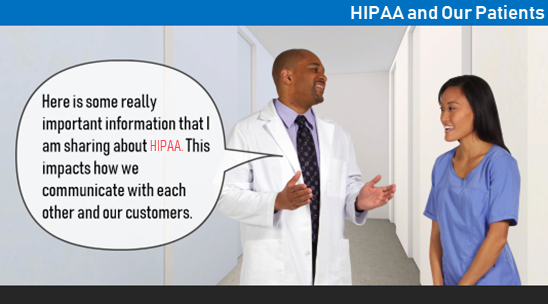
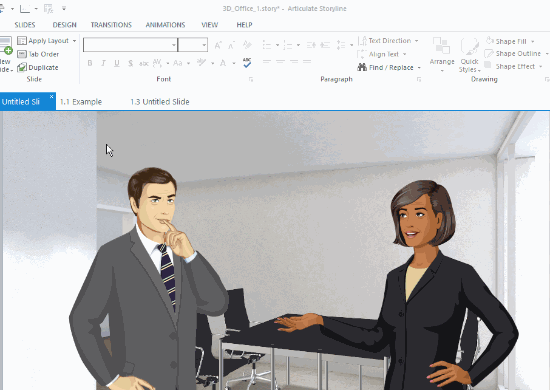
As you can see below, they’re perfect for staging conversations and scenarios and they work great with both the photographic and illustrated characters that come with Articulate 360.
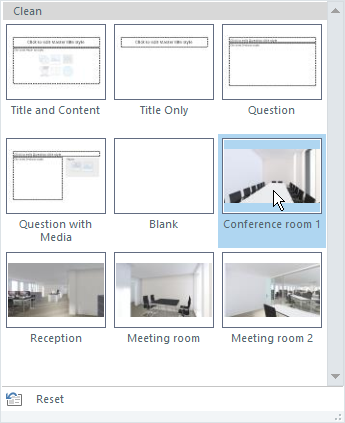
As noted in the previous post, one tip is to add all of the images to a single file and then you can dynamically switch the backgrounds as you need. Open the master slide and create a layout for each image. Save the file as a template and you’re all set. Here’s a tutorial that shows how to create templates for reusable interactive scenarios.
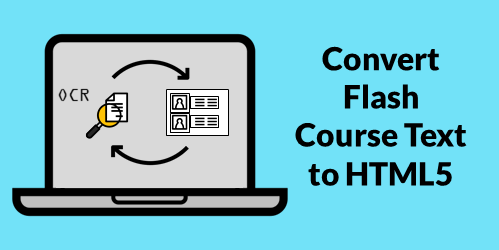
Many of you have to convert old Flash courses to HTML5. All you have is the published course but not the original source files. It’s easy enough to extract the media (like images and video) from the published output. But adding text from the old course isn’t as easy because most Flash courses don’t allow selecting text to copy and paste. And who wants to spend hours retyping the text?
Here are a couple of simple ways to copy the text from old Flash e-learning courses that you can add to updated HTML5 e-learning courses without having to retype everything. This works whether you’re using Storyline or Rise.
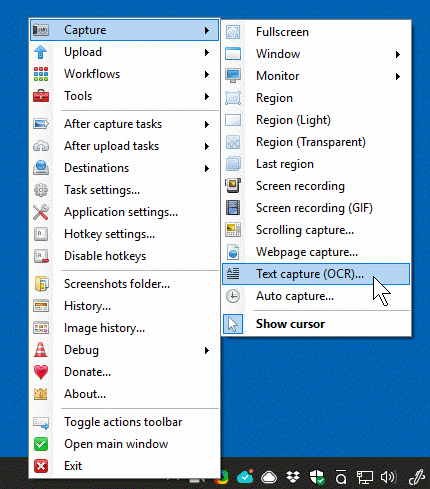
Use OneNote to Convert Text from Image for Flash to HTML5 Courses
Many of you have OneNote. It’s a great application included in the Microsoft Office products. OneNote has a screen capture feature and the option to copy text from the captured image.
Play the old Flash-based course and capture screens using OneNote’s screen clipping feature (or insert an image captured from some other application).
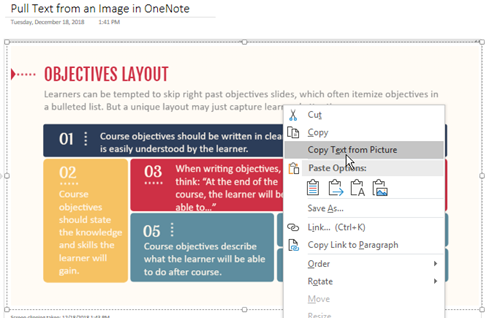
Right-click on the image to copy text from the picture.
Once you have the text copied, paste into your new slide.
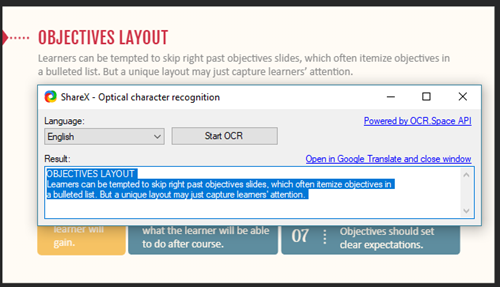
Use ShareX to Convert Text from Images for Flash to HTML5 Courses
ShareX is free and works great. I use it quite a bit to do screenshots for uploading to various image sites. It also has an OCR feature where it can pull text from an image that can be copied and pasted into a new slide.
Those are two free to low-cost options to quickly get the text from previous e-learning courses. Many of you already own OneNote, and if you don’t, you can always use the free ShareX application to do your screen grabs and OCR text conversion. Once you have the text, it’s easy enough to copy and paste it into your new course.
Obviously, this is still a bit tedious, but it is an easy way to get the text from your old e-learning courses when you no longer have the source files or original content.
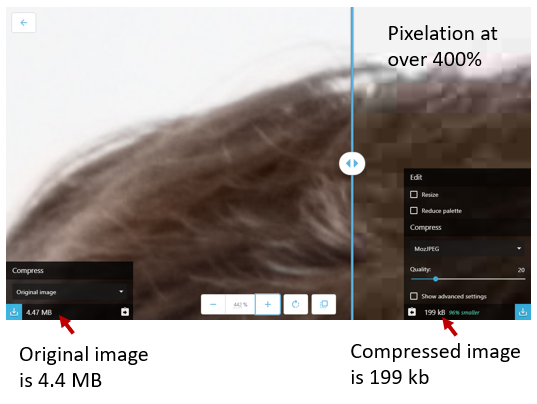
Squoosh.app is a free service from Google that compresses large images. What I like is being able to compare the before and after versions of images. It’s amazing to see how advanced the compression schemes are today. Some of the images I tested were compressed down over 90% and to the naked eye the degradation was negligible without zooming.
As you can see above, the image size goes from 4.4 MB to just under 200 KB. That’s amazing. And the image below shows that the image quality is virtually the same for the naked eye.
You can learn more about the app here. Play around with the app and all of the different settings to see what you can do. Here’s a quick tutorial to see how it works.
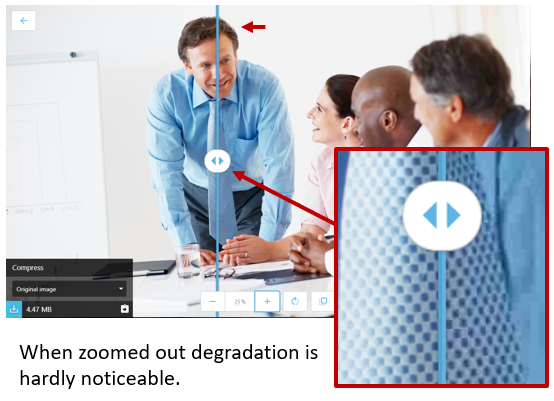
If you’re using Rise, you don’t really need to worry about compression. Rise will do the work for you. Here’s an example where I inserted the original image (4.4 MB) and the already compressed image (98 KB). In the published output, Rise compressed the original image to 100 KB and as you can see it looks great.
However, if you have a bunch of images to upload, having smaller images may speed up the time it takes to upload your files, especially if you have a slower network connection. Just something to keep in mind.
There’s a lot that goes into building interactive scenarios. Obviously content is king and critical to building a branched scenario that is both engaging and effective. One key part of the scenario construction is establishing context. The good thing is that a single image often suffices to establish the scenario context.
The free stock images I shared recently are perfect for building interactive scenarios and establishing visual context.
I’ve had a few questions on how to set up the slides using the scenario images, so I’ll show a couple of easy ways to use them.
Interactive Scenarios: Create Multiple Layouts
You can create as many layouts as you like in the master slide. Thus you can create a scenario slide with dozens of layouts and save it as a template. Anytime you want to build a scenario, start with the scenario template and it saves you from looking for the images and inserting them into the slides. Everything’s already there and ready to go.
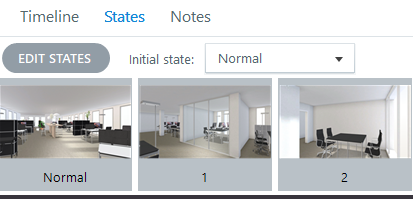
Another reusable option is to insert a background image and then establish a number of states for that image. You can set any state as the initial state and never have to access the other states. And if you want to be clever, you can use triggers to dynamically switch the background from one environment to another using a single image.
Here’s a quick tutorial that show how to set up the background states and dynamically change them with triggers.
Working from the master slide means that the background image can be applied universally to the layout and impact all of the slides that use the layout.
Working with image states on the slide level gives you more control over the background and how it’s used with triggers specific to that slide.
There’s no reason you couldn’t apply the image states to the layouts which would mean fewer layouts. The layouts can be swapped using triggers and variables.
Key Point: it’s easy to get lost in building complex scenarios which can consume a lot of production time. I always work from the perspective of keeping production simple and as reusable as possible. And with Storyline 360, you can share with your co-workers using the team slides feature.
Inserting the images into a file and saving it as a template will save you lots of time and means you won’t have to dig around looking for the images. They’ll always be right at your fingertips.
A while back I shared some free illustrated backgrounds that you can use for your branched scenario courses in e-learning. Those worked great for the classic illustrated characters.
I’ve been working on interactive scenarios for a few upcoming workshops and created some background images that we’ll use to build interactive branched scenarios. As you can see below, the backgrounds work well for the modern illustrated characters as well as with the photographic characters.
The free download includes the original images as well as a folder with images cropped to 16:9 so they fit perfectly in 16×9 slides.
Bonus Tip for Branched Scenario Images
One way to use the images, is to create a course file and insert all of the backgrounds on different layouts in the master slide. This way you can have one starter file for those interactive scenarios and then dynamically select the layout when creating new slides. Here’s a tutorial that shows how to create templates for reusable interactive scenarios.
Free Downloads
Here are links to download the backgrounds to use with your branched scenarios.
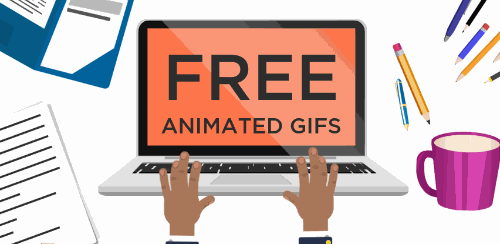
Some people asked how I created the animated .gifs similar to the ones I gave away for free in this recent blog post. So today I’ll share a simple way to create them.
Start with Animated .Gif Software
There are a number of tools to create animated .gifs. I’m going to focus on just one for this post.
ScreenToGif is free and you don’t need to install it. Just run the .EXE file. It’s a great product and I use it all the time for quick demos or some of the animations I use in the blog.
I’m not going to do an exhaustive overview, so I recommend downloading the app and playing with it a bit. It’s intuitive and easy to figure out. As a side note, if you do use it, I encourage supporting the developer.
Understanding the Cover Image .Gifs
Cover images are mostly decorative. And because of the responsive nature of the Rise courses, the cover image gets cropped based on the screen’s aspect ratio. That means what you see in portrait won’t look the same in landscape.
The key is keep the cover images simple. Animated .gifs can become very large files. The more visual information on the screen, the larger the file size. And if the file is too large, it’ll take too long to download and ruin the effect and experience.
Stick with fewer colors. Solid backgrounds are good because you don’t get that blocky color striping that you get with pictures.
We’ll look at two ways to create the cover image animated .gifs. One way is by recording something onscreen and the other is to import a video.
Record Screen to Create Animated .Gif
The easiest thing it to play a video and record the screen. Then do some basic editing. Since the animated .gif is decorative, you just need something simple. The key is not to have a massive file. The more you record, the larger the file.
Once you have a recording, figure out what you want and where to cut it. Again, I look for something simple that looks good looping. Subtle movements or repeating animations (like a spinning gear) work perfectly.
It does take some messing around. I usually do a basic edit and then save the file to see how large it is. Then I play around with more edits and image size to find the right balance between quality and file size.
You’ll have a lot more luck recording vector images that are solid versus photos. The less the screen has to change from one frame to the next, the better quality you’ll get and smaller file size.
For the .gifs where the quality doesn’t look as good, I set the cover images’s overlay color darker. This way the text really pops off the screen and the animation quality isn’t as much of an issue. That’s what I did in this example where there were so many colors it just didn’t look as good as I wanted.
Import a Video to Create Animated .Gif
ScreenToGif makes it really easy to import a video. It breaks down all the frames and from there it’s just a matter of editing it to what you want.
Just like above, play around with different settings to see what gives you the right balance between file size and quality. And keep in mind, they’re header images so subtle movement is fine. For this overhead desk video, I just focused on the pencil moving and cut out hundreds of frames.
You won’t get crisp images because the file size needs to be manageable. I try not to go over 1.5 MB. That’s why you have to play around with settings that strike the right balance.
You need to test different dimensions, but I generally keep the images somewhere between a 16:9 and 2:1 aspect ratio. There’s no golden rule. It’s mostly based on what you are showing. The image is going to crop based on the screen, anyway. I make different versions and modify the image size to see what I get for file size and quality.
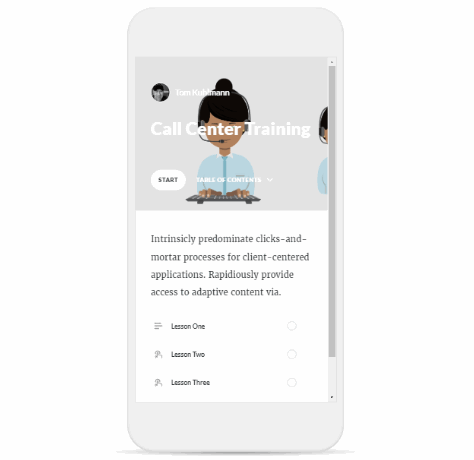
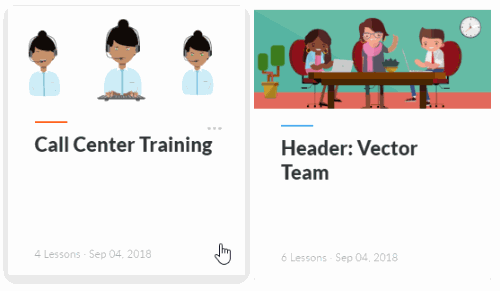
Solid and/or fewer colors is best. There are a lot of free or inexpensive ways to create simple vector-based animation videos. That’s what I did to create these two headers above which you can see in these two examples: Call Center and Team Meeting. I inserted some animated characters and published a video. Then I made the .gif from the video. Because I’m not building a big animated explainer video, this only took a few minutes to do and looks decent.
Animated .gifs add some flavor and visual novelty to your courses. And as you can see, they’re easy to create.
I did a workshop on simple ways to create animated .gifs for e-learning courses. In part of the workshop we play around with using them as header graphics for Rise courses.
Header graphics are mostly decorative so the trick is to get decent enough quality while keeping the file size down (which is a major challenge with animated .gifs). I created a number of .gifs from some generic videos and figured I’d share them here for those who may be interested in using them.
Examples of Headers Using Animated Gifs
Here are some nice example courses that use .gifs. I think the animations really work well because they add some visual novelty and interest.
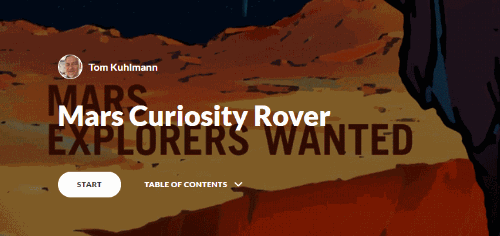
Mars Rover: animated astronaut that I captured from a video
Dog Care Basics: animated dog & cat; mostly static with a simple animation
Keep in mind that these were used for training activities, but I did keep the headers somewhat generic so that they may be used in other projects. Hopefully you can use them and get some ideas on how you could create your own.
I created a tutorial on YouTube so you can see the steps, which may be easier. You can upload the files via the browser.
Share Courses Online: Setting Up a Google Storage Account
You’ll need to sign up. Just follow the directions for adding your contact info.
You do need to provide a credit card number. However, the cost of storage is nominal and I believe Google gives you a 5 GB/month allowance for free. Odds are that anything you upload will be much smaller. Even if you do pay for storage, my guess is that it’ll only be a few dollars per year.
Once your account is established, you’ll create a bucket to hold your files. Inside the bucket, you can add other folders. All of that is covered in the video above.
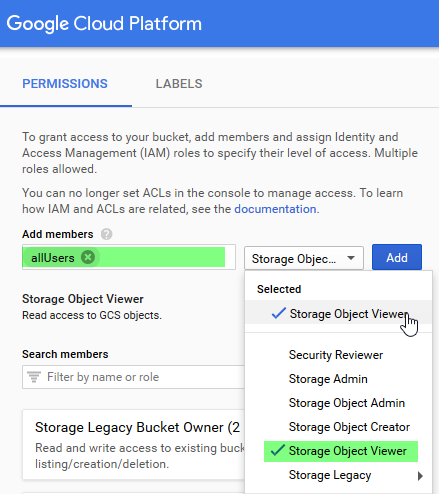
Share Courses Online: Make Your Google Storage Files Public
Set the permissions for the bucket to allow public access to view.
Go to the bucket in the browser. To the right, you’ll see three dots. Click that and select “edit access.”
Select “Add Principal” and type in “allUsers” under New Principal.
Give them a role to be a “storage object viewer.” This allows them access to the files to view.
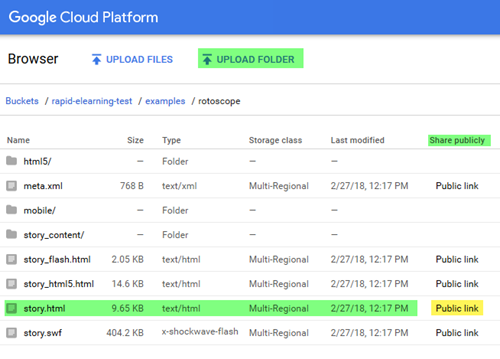
Share Courses Online: Add Content to Your Google Storage Account
Adding content is easy. There’s an option to upload files and/or folders.
Once you’ve added the course folder, to the right of the index.html (or whatever you click on for the course) you’ll see a “public link.”
Subject matter experts play a key role in the success of your e-learning courses. The challenge is learning to use their skills and knowledge in a way that works best. Today’s post is a curated list of free resources with essential tips and tricks so that you are successful building your courses.
Free Downloads
Here is a list of free downloads available to you.
There are tons of free dingbat fonts available for download. And they’re great to use for your training and e-learning courses. Here’s what you already know:
Great! But what about managing those fonts and quickly previewing the icons and images you can use? It’s a pain to review them one-by-one.
Here’s an easy way to manage all of those free fonts and preview the ones you want to use to create graphic and icon files for your courses and presentation.
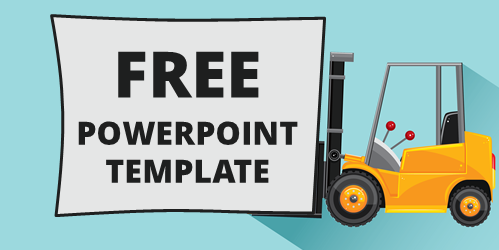
Free PowerPoint Template
You can download the PowerPoint template here. I made a simple video to show how to use it. Essentially you select the font characters and apply the dingbat font to see the correlation between the keystroke and what it produces.
Here are the basic steps:
Create a slide for the font characters. I like to create a single slide for each wingding font.
Select the characters (watch the video to see how you only select the letters you want to change).
Apply the wingding font to the selected characters.
This gives you a single screen with all of the characters and corresponding keystroke.
If you want to save the slide, type in the name of the font for quick reference.
Previously we looked at how to create free text-to-speech narration using a free application. The audio quality is decent enough for those who need the text-to-speech audio. Today we’ll look at a free (or inexpensive) way to create your text-to-speech narration that’s just as easy and hardly costs anything, if at all.
If you’re using Storyline, then you have access to text-to-speech as a feature inside the software. Here’s more information on how to use Storyline’s text-to-speech. If you want to create the audio outside of Storyline or for other purposes, this post will help.
Earlier I showed how to create an Amazon S3 account as a way to share your courses. The first 5 GB is free and after that, it’s very inexpensive. If you use a site like Wix for your e-learning portfolio, Amazon S3 is an easy way to add URL links to your courses since those sites don’t allow uploading course content.
Once you have an Amazon S3 account, you have access to Polly, a service where you can create free text-to-speech narration. And the voice quality is very good, much better than the default SAPI voices you get with your computer.
Here’s an example of a few narration files I downloaded from Polly.
As you can hear, the audio quality is decent and makes the robot voices tolerable. And odds are you won’t go past the initial free allocation.
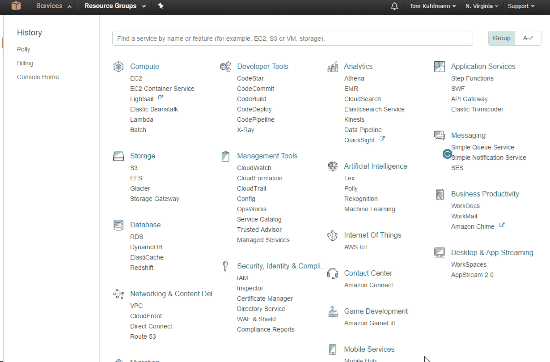
How to Create Free Text-to-Speech Narration in Amazon S3 Polly
Creating the narration is really simple. First, you’ll need an Amazon S3 account. Here’s a link that shows how to get one.
Don’t worry about the prices, they’re nominal. You get a cushion of free space and after that, you pay $4.00 per million characters. That’s about 23 hours of audio. To put it in perspective, if you narrated “A Christmas Carol” by Charles Dickens, it would cost about 66 cents.
Basic Steps
From the Amazon S3 console, select Polly.
Insert your narration script.
Select a language.
Select a voice.
Preview and download the audio file.
It’s all pretty simple. Once you have the audio file, you can do some post-production editing (if necessary) and then insert into your course. Easy as that.
Here are two really cool applications. The first is an easy way to create quick, disposable web pages using your email. And the other is a way to save web pages as PDF for later reference.
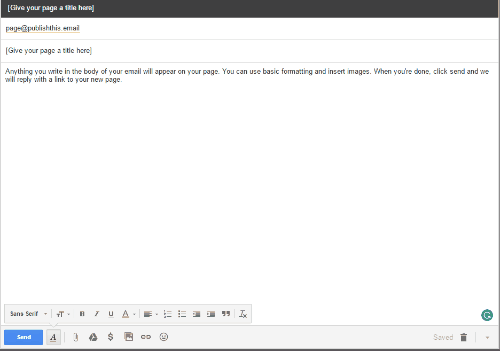
Create Free Web Pages
Publishthis.email lets you create quick and simple web pages. Basically, you put the content into an email, send it to a specified email address (which you can find on their site), and they send you a link back with a web page.
This a neat solution that comes in handy for a few things. I use it for workshops if I have a list of links and resources and want to quickly pull together a shareable link. It’s also a great way to put together a quick shareable portfolio. Add a few images and links and you’re all set.
Save Web Pages as PDF
Often people ask me how they can print off blog posts. Well here’s an easy way. Add the Print Friendly & PDF extension to your browser.
When you find a page you want to save, click on the extension and the page is loaded. You do have the option to clean out some of the content you don’t need or want to see.
For example, in the image below, I removed the header and gratuitous images to clean it all up for the PDF. And here’s the PDF version of the page I saved.
This is an easy way to save content for later access. Here are a couple of things to keep in mind, though:
honor the copyright of the author
don’t violate the spirit in which the content is available to you
Can you think of any use cases for a simple web page creation?


8
comments