The Rapid Elearning Blog

Archive for the ‘Production Tips’ Category


In an ideal world, you create an e-learning course, publish it, and put it online. And everything works perfectly.

The reality is that there are many variables between the technology and the individual users and how they access the courses. And these variables can create issues which make it a challenge to troubleshoot e-learning courses when problems arise.

In a previous post, we looked at the HTML5Test site as a way to check the browser and how it’s current support for HTML5 which is important to know when adding interactivity and multimedia to projects.

browser details

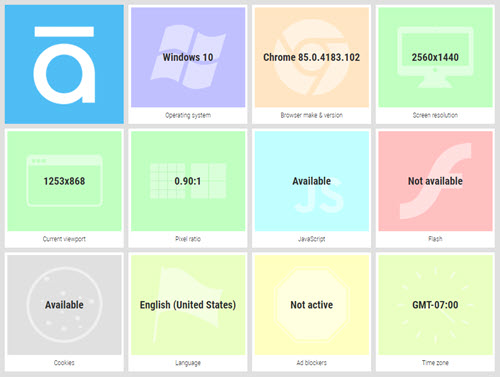
To go with that post, here’s another good site. It’s a simple site that allows you to collect information about the user’s computer, such as:

  • Which operating system are you using?
  • Which browser and version?
  • Screen size?
  • Browser window size?

All of the information above is key when trying to troubleshoot because many of the people who run into technical issues can’t easily find and share that information about their systems. So if you need to troubleshoot why a course isn’t working, send them the link above. It’ll capture info about their system and browser which they can easily share with you. That’ll save a few back and forth questions.

As a bonus, here’s a previous post where I share Ten Tips for Troubleshooting and Technical Support. One of them is to share your system info.

Events

Free E-Learning Resources

Want to learn more? Check out these articles and free resources in the community.

Here’s a great job board for e-learning, instructional design, and training jobs

Participate in the weekly e-learning challenges to sharpen your skills

Get your free PowerPoint templates and free graphics & stock images.

Lots of cool e-learning examples to check out and find inspiration.

Getting Started? This e-learning 101 series and the free e-books will help.


e-learning course

The other day, I had a service technician from Xfinity come by to troubleshoot an issue with my cable connection. While we were waiting for the cable box to reboot, I asked about how he gets trained and what types of training he has to take.

He does most of the same types of compliance training we all do. And then as expected, there’s also a lot of technical training. Part of his training is blended with some face-to-face, peer guidance, and online modules. Much of it is delivered via his mobile phone.

I’m in the e-learning community every day helping people troubleshoot their e-learning courses. Sometimes I help them think through what they need to do to build a certain type of interaction. Often, it’s a matter of troubleshooting how the course is constructed.

In the community, there’s usually some conversation about instructional design. One thing that is often missing (but will easily derail an e-learning project) is not understanding the environment in which a person takes the course. So we invest a lot in building it, but often not as much in how it’s delivered.

Like the Xfinity technician, people take courses on a variety of devices and in various environments. The learning environment needs to be a factor when developing and delivering online training.

How Much Bandwidth is Available?

What are the bandwidth limitations of the learner? We can be tricked into the comfort of our own bandwidth and think the experience may be the same for the end user. Or, all we do is publish on our local machines and never test the course on other networks.

derail elearning bottleneck

Build a test course that is made up of some videos, audio, and various interactions (with some animations, to boot). An easy way to build one is download all of the slides of a Content Library template, add some large videos, and then publish.

Test the course performance on the client network. How does it perform at different locations or on different devices? This may not be an issue, but what happens if you roll out the course and 10,000 people click the link at the same time?

What About the End User’s Access to Technology?

Years ago, I built a course for a client that wanted a lot of audio narration. It was for an internal training group so I just assumed they had the same computer set up that I had. Well, I was mistaken.

The courses were delivered to a number of remote locations in various production environments (of which I was not made aware). The computers had no speakers or headsets, which made the narration a bit pointless. Also, some sites had one computer for everyone to share. Even if they did have speakers, it didn’t matter because the training environment was too loud.

derail e-learning technology

If you can, meet with the learners and get to know where they work and how they’ll consume the content. Are they on a computer, tablet, or mobile device? Will they be able to hear the audio and watch the video? Are they in a separate room or in a production environment? Are they sitting in a vehicle?

Also, not all devices are created equal. What works on a desktop and laptop computer may not work on a smart phone. Be sure to test those things before building a course.

Same advice as above, create a media heavy test course and test it on multiple devices and in different environments. No one likes sitting around waiting for a course to download. If things in the course bog down, you may want to loosen the load: get rid of some media and make smaller, more digestible courses.

There’s obviously a lot that goes into building a great learning experience. But if the end user has technological or environmental constraints, all of your hard work is for naught.

Test. Test. Test.

Events

Free E-Learning Resources

Want to learn more? Check out these articles and free resources in the community.

Here’s a great job board for e-learning, instructional design, and training jobs

Participate in the weekly e-learning challenges to sharpen your skills

Get your free PowerPoint templates and free graphics & stock images.

Lots of cool e-learning examples to check out and find inspiration.

Getting Started? This e-learning 101 series and the free e-books will help.


convert Storyline PowerPoint

It never fails that after building an e-learning course in Storyline, someone asks if they can get a PowerPoint version of the course. There are many reasons for this request, such as using the content for face-to-face training, wanting a slide deck for subject matter experts, or creating a PDF handout out of the slides.

Today, we’ll look at a simple way to convert what you created in Storyline and make it a PowerPoint file.

PowerPoint and Storyline are Different Applications

Before we get started, let’s review a few key points when working with PowerPoint and Storyline.

  • PowerPoint and Storyline may look similar, but they are two different applications made by two different companies so they’re not interchangeable files.
  • PowerPoint is designed mostly for linear presentations. Storyline is designed for interactive e-learning.
  • PowerPoint has some interactive features and things one can do to hack a certain level of interactivity, but it doesn’t have a lot of sophistication with things such as mouseovers, drag/drops, variables, etc. Thus going from Storyline to PowerPoint is a bit challenging if the original Storyline content is interactive.
  • Storyline has an import PowerPoint feature to convert the PowerPoint slides to Storyline slides. PowerPoint doesn’t have an import Storyline feature.

The above seems obvious, but I bring this up because many people start with PowerPoint content, import it into Storyline, and then later want to export the Storyline content back into PowerPoint as if they are interchangeable applications and file types. They aren’t.

While there is no feature in PowerPoint to import Storyline, there are some simple things you can do to get your Storyline content into a PowerPoint file.

Tip #1: Start All Course Development in PowerPoint

My first tip assumes you know that you’ll need a PowerPoint version of the course.

If you know you need your content to be in both PowerPoint and Storyline, then plan your projects accordingly. PowerPoint doesn’t support all of the interactive features of Storyline, but in terms of what’s visible on the screen, it’s mostly the same: text, shapes, pictures, etc. With some planning, you can have your course content in both formats.

Here’s what I’d do:

  • Build all your content in PowerPoint first (with forethought as to what you want to be interactive and specific to Storyline).
  • Get final sign-off on the PowerPoint content since the content should be the same. The Storyline specific content is most likely more interactive.
  • Import the approved content into Storyline.
  • Make your interactive edits.
  • Publish your Storyline course.

Using this approach, you end up with a PowerPoint file and interactive Storyline file. If you need to make edits, it should be for interactive features only since you got sign-off on the content while it was in PowerPoint.

Of course, this approach does requires that you plan it all up front, which doesn’t always happen (or the client makes last minute changes). I’d tell the client upfront that this is the production process and that edits after sign-off are outside the scope of the project.

Tip #2: Publish to Word & Extract Screenshots

Let’s suppose you already built a course in Storyline and now you need a PowerPoint version of the course. Like I mentioned above, PowerPoint can’t support the layers and interactions, however, most of what’s in the course is a screen with content that’s made up of text, pictures, and shapes.

The following tip lets you capture all of the content that displays onscreen. It is not going to capture your state changes and other interactivity. But it works for most cases and captures all of the slides and layers.

Click here to view the tutorial on YouTube.

Below are the basic steps, but watch the tutorial above for more detail:

  • Once the course is complete, publish the Storyline course in Word. Select to publish layers and large images. This creates a Word doc with all of the slides and layers exposed.
  • By default, Storyline saves to an older version of Word with the .doc extension. This is so people with older versions can open the file.
  • Open the Word .doc and save as .docx. This will allow you to unzip the file and extract the images.
  • Unzip the .docx file to extract the images. I use 7zip (a free application).
  • Insert the images into a new PowerPoint album.
  • Save the file and you’re all done.

The output using this method is a series of PowerPoint slides with each Storyline slide and layer captured. From there you can make simple edits or save as a PowerPoint or PDF file. In any case, you have your Storyline content in PowerPoint format.

Events

Free E-Learning Resources

Want to learn more? Check out these articles and free resources in the community.

Here’s a great job board for e-learning, instructional design, and training jobs

Participate in the weekly e-learning challenges to sharpen your skills

Get your free PowerPoint templates and free graphics & stock images.

Lots of cool e-learning examples to check out and find inspiration.

Getting Started? This e-learning 101 series and the free e-books will help.


visual context e-learning

When it comes to the visual design of you course, there’s on thing you can do to add context. And it doesn’t require a graphics design degree.

Replace the bland default template with a single background image. Find the one image that best establishes the context of the course. Once you have an image, there are things you can do.

Here are a few simple tips.

Determine the Course Context

I like to focus on industry. And then within an industry you may have specific environments like meeting rooms and offices. A corporate business course will have a different image than one on training medical staff. What single image quickly establishes context?

e-learning course context

Keep the Design Simple

Images communicate a lot of information. You want context without a lot of distraction. This is especially true when the background image contains people. We tend to look towards the face. If you do find an image to be distracting, you could add a blur to it (or other design element). This shows the visual context but with the applied blur effect the person is drawn to the course content and not distracted by decorative elements in the image.

visual context e-learning course

You Need Placeholders for Course Content

If you’re using a single image, you need to consider where the content goes. I like to look for images with obvious content spaces. That means less for me to edit or design. A common one is the file folder. It looks business-y and it gives me a place to put content.

The images below have good empty areas that can hold the course content.

visual context e-learning course

Vary the Imagery

Since you’ll be working over a series of screens, try to find more than one image that meets the context requirements. You can use the different images to establish different types of content or sections. If you can’t find images that look like they came from the same place, you can add color filters or other effects to make them seem more cohesive and as if the belong together.

In the example below, the images were from different sources. But the visual context (fire department) and the color overlay tie them together.

visual context e-learning course

The tips above don’t replace solid graphic design. But it does help the person who has limited time or skills step away from the default layouts that may be a bit bland. And it helps make those screens visually rich and contextual.

Events

Free E-Learning Resources

Want to learn more? Check out these articles and free resources in the community.

Here’s a great job board for e-learning, instructional design, and training jobs

Participate in the weekly e-learning challenges to sharpen your skills

Get your free PowerPoint templates and free graphics & stock images.

Lots of cool e-learning examples to check out and find inspiration.

Getting Started? This e-learning 101 series and the free e-books will help.


subject matter expert e-learning course

You’re building an e-learning course and your subject matter expert needs to review and make edits to the course. But they don’t have access to your e-learning software.

So how do you get them to make those edits? Here are some time-saving tips.

What Should Happen

Before you start building the e-learning course, you should have a signed and approved script. And then you work from that. Obviously, there will be a final review and there’s always some editing to be done. But there shouldn’t be a ton, or not enough that requires someone else make significant edits.

Of course, that’s not how it always works.

I’ve been on projects where it seems things are done and then marketing steps in and throws a wrench in the process. So you end up making a bunch of edits to fit the organization’s brand.

Another common issue is when training that involves the legal team. I have nothing against lawyers, but I swear, they can really create a lot of extra work, especially with compliance training where every word means something.

To combat this issue, you should bring all those teams to the table when you develop the content and prior to sign-off before you start assembling the course.

That’s how it should work in an ideal world: the project and content is reviewed and you get final sign-off.  But that’s just not how it ends up working for a lot of people.

How to Get the Subject Matter Expert to Make the Edits

Storyline has a feature to export the course text for translation. It gets exported to a Word doc. From there, someone can review and make text edits. When done, the Word doc is saved and imported back into Storyline. Why not use that feature for your subject matter experts?

Here’s what I’d do:

  • Publish the course to Review 360. They can see the course in action. Of course, they can add comments, but you don’t need them since they’ll be making edits in the doc.

subject matter expert reviews edits course

  • Export the course for translation.
  • Forward the Word doc to the subject matter expert with instructions on what to do.
  • The subject matter expert reviews the course and makes text edits in the Word doc.
  • The subject matter expert forwards the Word doc.
  • Import the edited doc into Storyline.


Watch the tutorial on YouTube.

That’s a pretty easy process. It allows your subject matter expert to review a published course. And where they want to make changes, they do so in the Word doc. Super easy and it doesn’t require that they have access to your e-learning application.

Events

Free E-Learning Resources

Want to learn more? Check out these articles and free resources in the community.

Here’s a great job board for e-learning, instructional design, and training jobs

Participate in the weekly e-learning challenges to sharpen your skills

Get your free PowerPoint templates and free graphics & stock images.

Lots of cool e-learning examples to check out and find inspiration.

Getting Started? This e-learning 101 series and the free e-books will help.


e-learning hero

Did you know that every two seconds, someone needs blood? And one donation can save up to three lives?

2020 has been a challenging year. And on top of it, the news media seems to focus on all the discord and hardship. Where’s the good news? What can we do to make a difference in our little part of the universe?

How to be an E-Learning Hero

Every week we feature various e-learning challenges. The goal is to use the e-learning tools in different ways. Move past the compliance projects we do at work and do something different.

This helps us gain mastery over the e-learning tools, play around with various interactive prototypes, and get inspiration from seeing what others can do.

If you don’t participate, you should. At a minimum, you should check out the round up that David does every Thursday. There’s always some creative ideas that may inspire something for your next project.

Recently, we did a challenge to promote blood donations. Here’s a link to the round up with a bunch of nice examples.

Here are a few key thoughts:

  • There’s more than one way to do things. What I love most about the challenge entries is that it shows there’s a lot of creative ways to do the same thing.
  • Keep your design clean and focused. We tend to be info-centric and push a lot of content out. Try to minimize content on the screen and control when and how it’s exposed.
  • Where’s the personality? Many of the challenges feature facts and various levels of interactivity. The ones that stood out to me are the ones wrapped around stories and people. What’s the story in your e-learning courses?
  • There are a lot of nice examples, my favorite is this one by Przemyslaw Hubisz. I like the simple and clean design; and that the activity is contextually meaningful. It makes me consider the point of the information being presented to me.

e-learning example blood donation

Click here to view the e-learning example.

If you want to grow your skills using the e-learning software and building interactions, the challenges are a great way to do that. If you’re a beginner or more advanced, doesn’t matter. The challenges work for where you’re at and it’s not a competition. It’s all about you.

How to be a REAL Hero

Blood and platelets cannot be manufactured. They can only come from volunteer donors. And not everyone can donate, so everyone who can plays an important role.

Can you donate?

e-learning hero blood donation

I’ll have to admit, it’s not always on my radar. But I was reading an article recently that reminded me how important it is. And while I can’t control a lot of what’s going on in the world today, I can control what I do and how I share what I have. Because of that, I’ve made a commitment to donate blood regularly.

Hopefully it’s something you can to do, too. Find out where you can donate blood today.

Join us in the e-learning challenges to grow your skills. Join us in donating blood to be a hero to someone who needs it.

Events

Free E-Learning Resources

Want to learn more? Check out these articles and free resources in the community.

Here’s a great job board for e-learning, instructional design, and training jobs

Participate in the weekly e-learning challenges to sharpen your skills

Get your free PowerPoint templates and free graphics & stock images.

Lots of cool e-learning examples to check out and find inspiration.

Getting Started? This e-learning 101 series and the free e-books will help.


manage multimedia

When I’ve completed PowerPoint presentations or e-learning courses, I like to save all of the media assets I used in the presentations and courses and put them in a single location. During production I have multiple versions of the files, which is fine. But when it’s all over, I like a single place for all the media assets. It makes it easy to locate and not have to dig through all of the versions and duplicate files.

In today’s post, I’m going to show you a few simple tips to manage the media assetsin your PowerPoint presentations and e-learning courses.

It does require a couple of free tools which you can download here:

Use Storyline’s Media Library to Locate and Export Media Assets

If you’re using Storyline 360, the easiest way to locate your assets is via the Media Library. From there, you can select the ones you want and export them. Media Library filters by images, characters, audio, and video.

manage media assets e-learning media library Storyline

Steps to export the media:

  • Open the Media Library under the View tab.
  • Filter media by type.
  • Select the media files.
  • Select export and the media files will be saved to a folder of your choosing.

Here’s a quick tutorial on exporting the media files from your Storyline projects using the Media Library.

Click here to watch the tutorial on YouTube.

Use 7-ZIP to Extract the Media Files from PowerPoint & Storyline

7-Zip is a free application to compress and extract files. Both PowerPoint (.pptx) and Storyline (.story) use compressed file formats. Use 7-Zip to extract the file, locate the media in it, and then copy the media to a temporary folder.

manage media assets e-learning PowerPoint 7-zip

Steps to extract the media from PowerPoint or Storyline files:

  • Locate your file.
  • Right-click and select extract.
  • This creates a new folder with the file name.
  • Locate the media folder inside the extracted file folder. In PowerPoint it’s in the “ppt” folder and in Storyline it is in the “story” folder).
  • Copy and paste the folder to your archive location.

Here’s a quick tutorial that shows how to use 7-Zip to locate the media files in both PowerPoint presentations and Storyline files.

Click here it view the tutorial on YouTube.

Use Microsoft PowerToys to Rename All of Your Files to a Single Project Name

Recently, I shared how to use PowerToys to preview SVG files. Today, we’ll review how to quickly rename all of those media files you just dug out of PowerPoint or Storyline.

The steps are pretty simple:

  • Locate the folder with the assets.
  • Select the files you want to rename.
  • Right-click and select “PowerRename” and rename the files.

manage media assets e-learning PowerPoint Microsoft PowerToys Rename

If the titles are something like image1 and you want to rename all instances of “image” to Safety101, that’s going to be real easy. However, the PowerToys renaming is pretty powerful and with a few simple variables, you can do all sorts of things.

Check out the tutorial below where I go through the basics of renaming and how to change the name when all of the text is a bunch of gibberish or not easily found and replaced (which is probably more common).

Click here to watch the tutorial on YouTube.

I’ll admit, I am not always consistent with how I manage my media assets. Sometimes I keep them in a big media folder and sometimes I keep them in project-specific folder. Ultimately it doesn’t matter. When everything is done, I can follow the tips above and quickly have all of my media assets in one folder that I can share or archive.


Events

Free E-Learning Resources

Want to learn more? Check out these articles and free resources in the community.

Here’s a great job board for e-learning, instructional design, and training jobs

Participate in the weekly e-learning challenges to sharpen your skills

Get your free PowerPoint templates and free graphics & stock images.

Lots of cool e-learning examples to check out and find inspiration.

Getting Started? This e-learning 101 series and the free e-books will help.


animated gifs

Recently I shared some free animated gif resources: animated icons and backgrounds. If you’re using Rise or Rise.com it’s as simple as inserting an image. They’re great for novel attention-getters or simple instructional procedures.

free animated gif interaction

If you’re using Storyline 360, with triggers and state changes you can do a bit more to control how the animated gifs work in your course.

Animated gifs are great, but they do loop. Thus, when you insert them in the slide they just continue without end.

To make it more interactive, I like to insert a static image and then interact with the image to activate the animated gif.

animated gif

Click to view the example.

The demo above shows a few ideas:

  • Selected state is like an on/off toggle. Press on the image to toggle between the static version and animated gif.
  • Hover state allows you to mouse over the static image to reveal the animated gif and mouse away when you want to leave.
  • Down state is like the mouseover, but works by pressing down on the image to activate the gif, and releasing the mouse, stops it. I like this option the best.

Bonus idea: do the opposite and start with the looping animation and create an interaction where the animation stops when clicked.

  • Visited state indicates when an object has been clicked. Use the animated icons as markers and then insert the static image in the visited state. This provides a nice visual indication of what’s already been viewed.

View the tutorial on YouTube.

What’s cool about all of the choices above is that they’re super easy to build and don’t require any triggers. Sometimes the looping can be a bit distracting to start, so having an interactive option is nice. I like them because instead of a looping animation it allows the image to become interactive where the user can click to view it and activate the animation.

Events

Free E-Learning Resources

Want to learn more? Check out these articles and free resources in the community.

Here’s a great job board for e-learning, instructional design, and training jobs

Participate in the weekly e-learning challenges to sharpen your skills

Get your free PowerPoint templates and free graphics & stock images.

Lots of cool e-learning examples to check out and find inspiration.

Getting Started? This e-learning 101 series and the free e-books will help.


preview SVG files

SVG is an image format that is becoming more common. The challenge is that it’s not always easy to preview the SVG images you have on your computer.

What is an SVG?

SVG stands for scalable vector graphics, which means that it doesn’t have a defined resolution. Instead it’s made up of data in an XML file. So it can be sized up or down without image degradation which keeps the images are crisp.

On the other hand, most images used in e-learning courses are bitmaps. They’re essentially a grid of pixels. For example, an image that is 500×500 is 500 pixels wide and 500 pixels high. When the images is scaled up the pixels increase in size which degrades the image as you see the pixel blocks. With an SVG image you won’t have that type of degradation which is why they’re popular.

How to Preview an SVG File

SVG example

The problem is that you can’t easily preview an SVG (as noted in the image above).

For example, when I download an SVG icon to my desktop, it looks like a web link. I can’t preview image without opening it in the browser. That doesn’t help if I have to click onto every link to preview the SVG files when I look for something specific.

Welcome Microsoft PowerToys! Install it and you’ll get an SVG previewer in the newly empowered File Explorer.

  • Download Microsoft PowerToys.
  • Open File Explorer and go to the View tab to enable the preview pane.
  • Select an SVG file and you’ll see a preview of the image.

preview SVG file

Now you can preview SVG files to your heart’s content.

Events

Free E-Learning Resources

Want to learn more? Check out these articles and free resources in the community.

Here’s a great job board for e-learning, instructional design, and training jobs

Participate in the weekly e-learning challenges to sharpen your skills

Get your free PowerPoint templates and free graphics & stock images.

Lots of cool e-learning examples to check out and find inspiration.

Getting Started? This e-learning 101 series and the free e-books will help.


spell checker e-learning Microsoft Editor

Many of you probably do lots of writing using online applications. This is especially true as many of us are spending a lot more time working remotely. If you do a lot of writing, odds are you can use one of those handy browser extensions to help with spelling and grammar.

I’ve used Grammarly, in the past. It’s a really good extension and works well. In fact, I used it for a quite some time. However, I’m always open to new browser apps and extensions, especially if they’re not too intrusive to what I’m working on. Personally, I had to quit using Grammarly because it slowed down my work and often the feature interfered with what I was doing, so I found myself turning it off more than on.

Microsoft recently introduced their grammar/spelling browser extension, Microsoft Editor. The app is available to anyone, but with a Microsoft account, you have access to more features and multiple languages. I’ve been using it for about a week now. I find it to be light and responsive.

microsoft editor for e-learning

If you do your course editing in your e-learning authoring tool like Rise 360, then Microsoft Editor is a tool that comes in handy.

Below is a quick overview of the Microsoft Editor app and how I use it in Rise 360 when building online training programs.

There are a few good grammar and spell checker tools out there. This is one I like.

What are your thoughts?

Events

Free E-Learning Resources

Want to learn more? Check out these articles and free resources in the community.

Here’s a great job board for e-learning, instructional design, and training jobs

Participate in the weekly e-learning challenges to sharpen your skills

Get your free PowerPoint templates and free graphics & stock images.

Lots of cool e-learning examples to check out and find inspiration.

Getting Started? This e-learning 101 series and the free e-books will help.


production tips e-learning

Many e-learning developers are usually on a small team. But most I know, are a team of one. This means lots of projects, many hats to wear in the process, no budget, and almost no time.

Here are three production tips and shortcuts from previous posts to help save time (and sanity) when building e-learning courses and online training.

A Simple Way to Build E-learning Templates

e-learning templates made easy

First, if you’re using Storyline 360, then you have a ton of templates and slides to use for your e-learning courses. And they’re easy enough to modify to meet your needs.

However, if you want to create some simple templates and e-learning screens, then here are 3 Super Easy Ways to Build E-Learning Templates.

Save Time Managing Your Project Emails

Generally when building online training courses, we send emails back and forth, which can be a pain to manage and cause a lot of extra work and confusion trying to clarify what’s being communicated.

With Review 360, most of that is resolved because you can manage the course review process in one place, eliminating all of those back and forth emails.

However, we still send emails. Here are some good production tips on managing the process so that when emailing others, the message is clear, and all action items are identified.

save time with this project management tip

Build Courses Around Real Learning Objectives to Save Time & Money

how to create learning objectives

There are many reasons why we build e-learning courses. Generally, they fall into one of two buckets: information or performance. An effective course is focused on performance-centered (and tangible) objectives.

If you don’t build courses around real learning objectives, you’ll waste time; and odds are no one will be happy with the course. Check out this blog post to get production tip on setting learning objectives for your e-learning courses.

Hopefully, these quick tips help you build the courses you need. Feel free to add some of your own in the comments.

Events

Free E-Learning Resources

Want to learn more? Check out these articles and free resources in the community.

Here’s a great job board for e-learning, instructional design, and training jobs

Participate in the weekly e-learning challenges to sharpen your skills

Get your free PowerPoint templates and free graphics & stock images.

Lots of cool e-learning examples to check out and find inspiration.

Getting Started? This e-learning 101 series and the free e-books will help.


Articulate Rapid E-Learning Blog - create interactive stories with simple pictures and comic-book like panels

The other day I was doing a search for business meeting images and ran into this collage image. It kind of looks like a comic book layout. I played around with some ways to use this image in an elearning course.

Articulate Rapid E-Learning Blog - create an interactive story with this collage image

Here’s a quick demo of the image converted into an interactive slide. I just added some place holder content since the images are not contextual. But in your case, you’d create a collage where the images work together to tell a story.

Articulate Rapid E-Learning Blog - example of an interactive story to replace bullet points

Click here to view the interactive story demo.

Tips & Tricks for Creating an Interactive Story

Here are a few ideas on how you could approach this type of interaction:

  • Create a story. Many courses tend to be heavy on the information and light on relevant context. Rework your content and frame it like a mini story or scenario. In this case, it’s not about a long branched interaction. It’s more like a quick scenario where the course content is framed in a relevant context. People love stories so why not build a story around your information? Plus, the comic-book style layout is kind of popular.
  • Get rid of bullet points. A lot of elearning is linear and the screens are loaded with bullet points. Get rid of those bullet points! Why not use a panel for each bullet point? I’d use the large panel to represent the essential point of the slide. And the smaller panels would represent the bullet points or supporting information.
  • Feel free to take your own photos. You don’t need to be a pro to create your own stock photos. Besides many of the smart phones have those cool filters that convert your images and give them a pro feel. So outline a story and then storyboard the photos you’d need to support that story.
  • Create a few panel layouts so that you can rotate through your screens and make them visually a bit different. This post on comic book layouts will help come up with some ideas.

This is a simple technique but and an easy way to convert bullet point slides into something a bit more visually engaging. And with a little effort you can frame the information into something more story-like and interactive. It’s a step away from a content dump and a step into meaningful content.

What do you think? Would this work with any of your elearning courses?

Events

Free E-Learning Resources

Want to learn more? Check out these articles and free resources in the community.

Here’s a great job board for e-learning, instructional design, and training jobs

Participate in the weekly e-learning challenges to sharpen your skills

Get your free PowerPoint templates and free graphics & stock images.

Lots of cool e-learning examples to check out and find inspiration.

Getting Started? This e-learning 101 series and the free e-books will help.