Another way of getting at the image (or audio) files – even with older versions of PowerPoint – is saving the presentation as an html page. PowerPoint will then create an extra folder including (among other file types) the images.
Unleash Your E-Learning Graphics from PowerPoint 2007
August 18th, 2009This is a trick I kind of stumbled upon a few months ago. I was attempting to zip up a PowerPoint 2007 file and accidentally unzipped it to reveal a media folder that held all of the images I was using in my course. Now, keep in mind that this only works for PowerPoint 2007, but it’s still a cool trick, nonetheless.
Here’s a quick screencast I did to show you how easy this is and how you can use it to manage your course images.
Click here to view the 7-Zip demo.
Download 7-Zip. It’s Free!
The first step is to download 7-Zip. It’s a free application that you can use to compress or extract files that are compressed. For example, if you get a presentation.zip file, you can right click on the file and choose to extract it.
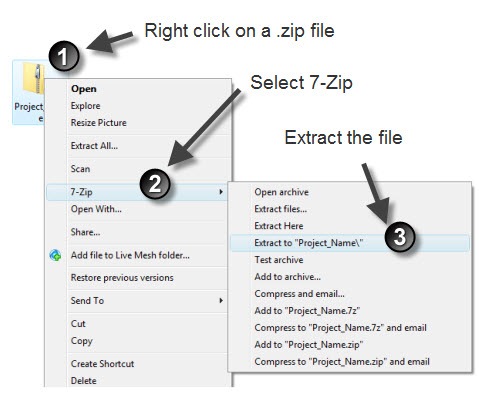
Extract the PowerPoint 2007 File
Once you have 7-Zip installed, you can extract the contents of your PowerPoint 2007 file. What happens when you extract the .pptx file is you’ll get a folder with a matching name. Inside that folder, there’s a media folder than contains the images that you used in your elearning course.
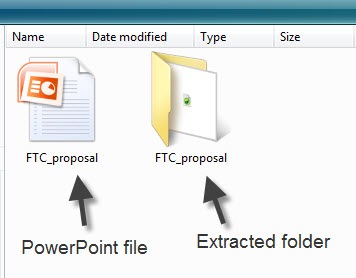
Locate the Media Folder
Let’s see this in action. I created the FTC demo course below. It was built with PowerPoint 2007. If you notice, I have quite a few images on the various slides.
After I extracted the .pptx file, I locate the media folder which has all of the course’s images in one location. The media folder is one level down inside the ppt folder.
If you look at the image below, you’ll see the contents of the media folder. What you’ll notice is that all of the images I added to the course are in that one folder. This really comes in handy.
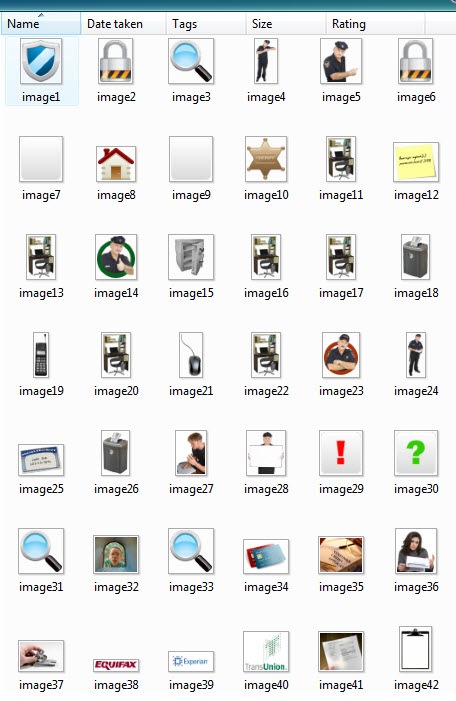
Tips on Using the Media Folder
Here are a couple of ways that you can use the media folder to save time.
-
Keep all of your images in one location. Many people aren’t very organized when it comes to managing their course’s assets. When you’re done with your course, just use 7-Zip to extract the media folder. Move the media folder to a place where you save your images. Rename it to match the course and all of your images are now in one place. You can quickly scan the folder with an application like Picasa or Windows Photo Gallery.
-
Quickly save clip art images to your slides and then save the .pptx file. It’s easy to just drag and drop images to a PowerPoint 2007 slide. Normally, you have to right click on the image and then save as a picture to have it outside of the slide. Not with this technique. Add images to your slides and then extract the file to have quick access to all of the images.
Here’s a link to IrFanView. This is a free application that you can use to quickly view your .WMF files. It has a lot of other useful features, but you can learn about that on their web site.
What are some other ways that you can use this approach to your advantage? Feel free to share your thoughts by clicking on the comments link.
If you liked this post, you might find these interesting:
- 9 Free Tools That Help Me Build Better E-Learning
- The Secret to Creating Your Own PowerPoint Templates for E-Learning
- How to Be More Productive When Using PowerPoint to Create E-Learning Courses
Events
- Everyday. Check out the weekly training webinars to learn more about Rise, Storyline, and instructional design.
Free E-Learning Resources
 |
 |
 |
|
Want to learn more? Check out these articles and free resources in the community. |
Here’s a great job board for e-learning, instructional design, and training jobs |
Participate in the weekly e-learning challenges to sharpen your skills |
 |
 |
 |
|
Get your free PowerPoint templates and free graphics & stock images. |
Lots of cool e-learning examples to check out and find inspiration. |
Getting Started? This e-learning 101 series and the free e-books will help. |
33 responses to “Unleash Your E-Learning Graphics from PowerPoint 2007”
Great tips! I’m definitely going to use this technique.
I’m curious what you used to capture the live screen motion demo?
Thanks.
I thought this was really cool and very handy…however, when I drag and try to drop from the Web into the PPT, my images aren’t transferring like yours. Any ideas?
Even more reasons to use PowerPoint 2007!
I’d like to know how you did the screen caps as well. Might you do a blog on this sometime? Tools to use, screen setting/size would be great!
Thanks!
Excellent post; thank you.
I don’t have 7-Zip so I tried using WinZip instead and it worked beautifully. You’ll need an extra step though: first manually change the .pptx extension to .zip and then extract the media folder from it.
The link to “How To Build Your Own Template” links to the “How to Be More Productive When Using PowerPoint to Create E-Learning Courses.” Can you send me the link for How to Build YOur Own Templates.
Thanks!
Judy
Note from Tom: Sorry about that. I fixed the link in the blog post.
Very usefull! If you don’t want to install any extra 3rd party tools like winzip or 7-zip, you can just use Windows Vista’s built in compression-tool (just rename to .zip and right-click and choose Extract).
Just learned about Screenr from your comment, made my first recording in less than 10 minutes, and sent the tweet automatically. Very cool! Now that’s some fast turnaround. 🙂
Just a comment on your your use of Irfan View. Maybe a little extension of your workflow.
Why not use Irfan View Thumbnail to show all the wmf files? When you’ve opened one file in Irfan View you just press T and get all the wmf-files shown. I think that’s a very easy way to get a good overview. If the size of the image is not what you like, just change it to almost any size via Options.
You then have lots of options within Irfan View. One is to show all images in all subfiles… that can come in handy when your working in projects.
First of all I would like to say that I !!!! LOVE !!!! the weekly blog. I have learned an incredible amount and had fun doing so. I am fairly new to the whole elearning concept.
Basically we were just doing an information dump with the pretty pictures that I inserted. And sometimes that’s what they still want. You have taught me many cool effects to spice up my courses and make them more interactive. It makes it more interesting and enjoyable for me. Thank you.
Out of curiosity I tried this on Word 2007 documents and it also works there. Very handy tip – thanks!
Great post! I can’t see the images that were extracted. My computer does not know how to read the files…..Any ideas?
Nice tip – didn’t I just see this in the Articulate Forums yesterday? 😉
You are an international treasure!
I regularly use 7Zip for the usual zip and unzip. And I down load matching clips by tediously trolling through the media files and selecting those I think are by the same artist. Your method is so helpful.
I shall be trying to see if Stuffit works too after reading that WinZip works. One of the things I like about your blog is that it sets the brain going and often I can extend or modify your ideas to suit my particular needs.
Thankyou.
Finally… Screenr is public! Interesting how you just slipped that in there in your comment, Tom. 🙂
I was out of the office for a bit, but came back, read your blog, and maximized TweetDeck.
Wow! In my “Articulate” group/column y’all have tweeted a ton about Screenr.
Lots of quick tips and tricks on Twitter. Thanks!
I can’t wait to try Screenr!
Another awesome post, Tom. Thank you for helping us to improve every week!
When I click on a clip art picture in the Microsoft Office site I can’t find the style code…?? Am I looking into the wrong site? Do I need special access to get this information???
As Kerstin posted, you can achieve the same result by saving the presentation as “Web Page” which I have done successfully with older versions of PowerPoint (e.g., 2000, 2003).
F to the YI, you can also save Microsoft Word documents as “Web Page” to create the media resource folder.
This is helpful if you are working with source material published in Word and you need the embedded images (logos, screen shots, photos) for your courseware. I have found that Word and PowerPoint optimize the image when inserted even if you have already optimize it in a photo editing application…which is fine for the finalized product, but sometimes problematic if you need to scale or manipulate the image in your courseware.
By saving the file as Tom suggests, or as “Web Page” you can usually access the “less optimized” file to make any modifications necessary.
Cheers,
~Xanthé
Thanks Tom, always love getting your tips.
Belen – If you click on the image, a new window will open with the picture plus other info. STYLE is just under file size. Possibly, you have your settings so you can’t get pop-up windows???
File name j0438245.wmf
Media type Clip Art
Dimensions Resizable
File size 25 KB
STYLE 1582
Keywords anime, balloons, birthday cakes, birthday parties, birthdays, bows, cakes, candles, celebrations, faces, flames, food, gifts, Manga, Manga style, packages, parties, presents, special occasions
[…] Unleash Your E-Learning Graphics from PowerPoint 2007, August 18, 2009 […]
Debby: I’ve experienced the same thing as Belen with some image styles but not all. I get the popup window with the image info except the style number. Anybody know why?
Debby, I have the same issue as Belen on some clip art,using IE or Firefox. The popups come up but the style info is sometimes there but not always. Anyone know why?
Tom,
I have the dragging problem as well. I added the add on but the link you provided to install active x was not valid. A search for active x only brings up office 203 products. What am I doing wrong?
Hi Tom, where do you get your images from? I am STRUGGLING to find anything worth using!!!
thanks
[…] Unleash Your E-Learning Graphics from PowerPoint 2007 […]
[…] to the post and view the quick tutorial. There’s also a link to a free image viewer and a program that lets you unzip your […]
I had a problem trying to use 7-zip.
I downloaded the 7-zip program. I right-clicked on my 2010 ppt file and chose the “Extract to”. I got my one folder with files in it, but there isn’t any folders within the main folder with my images.
The files I got were:
-Current User
-Pictures
-Powerpoint Document
-DocumentSummaryInformation
-SummaryInformation
Not sure what I did wrong.
Thanks.
[…] Unleash Your E-Learning Graphics from PowerPoint 2007 […]



0
comments